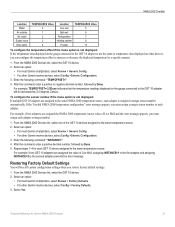
Technical Reference for Garmin NMEA 2000 Products
Page 30
...From the NMEA 2000 Devices list, select the GRA 10 device. 3. To test the gauge-type setting: 1. Select an option: • For most Garmin chartplotters, select Review > Gauge Type. • For other Garmin marine devices, select Config >Generic Configuration. 4. Perform the..., select 2 Coil. 4. Select an option: • For most Garmin chartplotters, select Review > Rudder Angle Calibration. • For other Garmin marine devices, select Config > Rudder Angle Calibration. 4. Configuring the GRA 10 Adapter if the Rudder Angle Calibration and Gauge Type Selections Are Not Displayed...
Technical Reference for Garmin NMEA 2000 Products
Page 31
... NMEA 2000-Certified Sensor Configuration Information 6. Center the rudder. 8. From the NMEA 2000 Devices list, select the GRA 10 device. 2. Select an option: • For most Garmin chartplotters, select Review > Generic Config. • For other Garmin marine devices, select Config >Generic Configuration. 3. After the command, enter one -coil gauge, enter 1, followed by Done. To access...
Technical Reference for Garmin NMEA 2000 Products
Page 32
... boat ignition key to the full-down position. Select an option: • For most Garmin chartplotters, select Review > Gauge Type. • For other Garmin marine devices, select Config >Generic Configuration. 4. Troubleshooting the Gauge Type When connected to a gauge, the GET 10 adapter gauge type is set to Auto Detect by default, and the adapter automatically...
Technical Reference for Garmin NMEA 2000 Products
Page 33
... 2000 Devices list, select the GET 10 device. 2. Enter the following command: "INSTANCE=" 4. Select an option: • For most Garmin chartplotters, select Review > Generic Config. • For other Garmin marine devices, select Config > Factory Defaults. 3. Select an option: • For most Garmin chartplotters, select Review > N2K Fluid Type. • For other Garmin marine devices, select Config >Generic Configuration. 3. Select...
Technical Reference for Garmin NMEA 2000 Products
Page 34
... on the total tank capacity. 9. Select an option: • For most Garmin chartplotters, select Review > Level Calibration > Add Calibration Point. • For other Garmin marine devices, select Config > N2K Tank Capacity. 3. Select OK. Select OK. From the NMEA 2000 Devices list, select the GFL 10 device. 2. Troubleshooting the Gauge Type When connected to a gauge, the...
Technical Reference for Garmin NMEA 2000 Products
Page 35
... Type. 3. Select an option: • For most Garmin chartplotters, select Review > Gauge Type. • For other Garmin marine devices, select Config > Level Calibration. 3. From the NMEA 2000 Devices list, select the GFL 10 device. 2. Select an option: • For most Garmin chartplotters, select Review > Generic Config. • For other Garmin marine devices, select Config >Generic Configuration. 3. Enter the following...
Technical Reference for Garmin NMEA 2000 Products
Page 36
... that the adapter is associated with. Select an option: • For most Garmin chartplotters, select Review > Trim Tab Calibration. • For other Garmin marine devices, select Config > Factory Defaults. 3. GBT 10 (Garmin Bennett Trim Tab Adapter) NOTE: This section provides specific configuration information for Garmin NMEA 2000 Products Calibrating the Trim Tab Position To use the GBT...
Technical Reference for Garmin NMEA 2000 Products
Page 37
... percentage of the temperature sensor. From the NMEA 2000 Devices list, select the GBT 10 device. 2. Select an option: • For most Garmin chartplotters, select Review > Factory Defaults. • For other Garmin marine devices, select Config > Factory Defaults. 3. Follow the on other Garmin marine devices, select Config > Temperature Offset. 3. Enter the following command: �"�TRIMTABPOS=" 9. From...
Technical Reference for Garmin NMEA 2000 Products
Page 38
... an option: • For most Garmin chartplotters, select Review > Generic Config. • For other Garmin marine devices, select Config >Generic Configuration. 3. To calibrate the water speed if the menu option is not displayed: To use the GST 10 adapter, you must calibrate the water speed...menu option is not displayed: To use the GST 10 adapter, you must select the source for Garmin NMEA 2000 Products Select an option: • For most Garmin chartplotters, select Review > Generic Config. • For other Garmin marine devices, select Config > Sensor Number. 3. For...
Technical Reference for Garmin NMEA 2000 Products
Page 39
...assigning INSTANCE=2 to each adapter is not the same as temperature data displayed on the gauge connected to the GST 10 adapter will lose all custom configuration settings when you can configure the temperature offset to increase or decrease the displayed ..., select Review > Generic Config. • For other Garmin marine devices, select Config >Generic Configuration. 3. NMEA 2000 Checklist Location Water Air outside Air inside Engine room Main cabin TEMPSOURCE Value 0 1 2 3 4 Location Live well Bait well Refrigeration Heating system Freezer TEMPSOURCE Value 5 6 7 8 13 To configure...
Installation Instructions
Page 35
...select Select to re-enter the value. If any of the steps in conditions appropriate for the helm displacement value. GHP 10 Marine Autopilot System Installation Instructions 35 The first time you power the GHP 10 on, you adjust the Pulses Per Rev with the tachometer (or tachometers) on the dashboard of your boat for ... arrow, the motor should turn the boat to the right, and when you wired the tachometer sensor from the CCU. When you are finished reviewing the values, select Done. Lock to Lock: Count the number of your boat. Adjust the Pulses Per Rev with little or no wind. ...