Owners Manual
Page 3
... years of reliable service. Use this Owner's Manual and learn how to operate your Fishfinder 250/250C is lost, stolen, or in a safe place or attach a photocopy to these instructions. Many services provided by completing our... online registration today! Basic Operation provides detailed references to the features and operations of the Fishfinder 250/250C and a basic overview of how sonar works and provides information on the back of service. Product Registration Help us to better support you get the most from Garmin...
... years of reliable service. Use this Owner's Manual and learn how to operate your Fishfinder 250/250C is lost, stolen, or in a safe place or attach a photocopy to these instructions. Many services provided by completing our... online registration today! Basic Operation provides detailed references to the features and operations of the Fishfinder 250/250C and a basic overview of how sonar works and provides information on the back of service. Product Registration Help us to better support you get the most from Garmin...

Owners Manual
Page 4
... CONTENTS Introduction iii Product Support iii Product Registration iii Getting Started 1 Packing List 1 Transducers 2 Optional Transducers 2 Installation 3 Selecting a Proper Location 3 Installing the Swivel Mount 3 Flush Mounting the Fishfinder 250/250C Unit 6 Connecting the Power/Data Cable 7 Interfacing 8 Installing the Transducer 10 Transom Mount Installation 10 Shoot-Thru-Hull Installation 11 Testing the Installation 12 Basic Operation 13 Using the Keypad 13 Using the Sonar Page 14 Using the Adjustment Menu...
... CONTENTS Introduction iii Product Support iii Product Registration iii Getting Started 1 Packing List 1 Transducers 2 Optional Transducers 2 Installation 3 Selecting a Proper Location 3 Installing the Swivel Mount 3 Flush Mounting the Fishfinder 250/250C Unit 6 Connecting the Power/Data Cable 7 Interfacing 8 Installing the Transducer 10 Transom Mount Installation 10 Shoot-Thru-Hull Installation 11 Testing the Installation 12 Basic Operation 13 Using the Keypad 13 Using the Sonar Page 14 Using the Adjustment Menu...
Owners Manual
Page 5
..., 14°) Plastic Transom Mount Transducer with Depth and Temp Fishfinder 250/250C Owner's Manual GETTING STARTED > PACKING LIST Fishfinder 250C Standard Package (010-00341-00 w/o transducer): • Fishfinder 250C Unit • Swivel-Mount Bracket and Knobs • Power/Data Cable • Owner's Manual • Self-Adhesive Quick Reference Guide • Protective Cover • Flush Mount Hardware Kit Fishfinder 250C Optional Package (010-00341...
..., 14°) Plastic Transom Mount Transducer with Depth and Temp Fishfinder 250/250C Owner's Manual GETTING STARTED > PACKING LIST Fishfinder 250C Standard Package (010-00341-00 w/o transducer): • Fishfinder 250C Unit • Swivel-Mount Bracket and Knobs • Power/Data Cable • Owner's Manual • Self-Adhesive Quick Reference Guide • Protective Cover • Flush Mount Hardware Kit Fishfinder 250C Optional Package (010-00341...

Owners Manual
Page 6
...-hull mount, depth • 200kHz, 14°, plastic, trolling motor mount, depth, temp Fishfinder 250/250C Owner's Manual In addition, a variety of optional transducers are on. A wide cone angle transducer works ...transducer selection and installation are important to deep water installations, providing a smaller coverage or viewing area than a wide cone transducer, but at a decreased bottom resolution. A narrow cone angle transducer is better suited to the operation of your unit. GETTING STARTED > TRANSDUCERS Transducers The transducer acts as the eyes and ears of your sonar...
...-hull mount, depth • 200kHz, 14°, plastic, trolling motor mount, depth, temp Fishfinder 250/250C Owner's Manual In addition, a variety of optional transducers are on. A wide cone angle transducer works ...transducer selection and installation are important to deep water installations, providing a smaller coverage or viewing area than a wide cone transducer, but at a decreased bottom resolution. A narrow cone angle transducer is better suited to the operation of your unit. GETTING STARTED > TRANSDUCERS Transducers The transducer acts as the eyes and ears of your sonar...
Owners Manual
Page 7
... the unit, consider the following instructions to the unit's keypad. Extended exposure to support the unit and protect it from excessive vibration and shock. To complete the installation, you experience difficulty installing the unit, contact Garmin Product Support or seek the assistance of the transducer and power/data cables. • The mounting surface should be sturdy enough to...
... the unit, consider the following instructions to the unit's keypad. Extended exposure to support the unit and protect it from excessive vibration and shock. To complete the installation, you experience difficulty installing the unit, contact Garmin Product Support or seek the assistance of the transducer and power/data cables. • The mounting surface should be sturdy enough to...

Owners Manual
Page 8
...3. DO NOT OVERTIGHTEN. 4. GETTING STARTED > INSTALLATION To install the swivel-mount bracket: Tools (not included)-Drill, screwdriver (Phillips or standard), and either of the mount over the swivel base and secure with the short knob. Drill the mounting holes. • If securing the base with...you risk damaging the mounting bracket. Place the rest of the following: • Three #8 (4mm) pan head machine bolts with three bolts or screws. Secure the base and attach the mount. 4 Fishfinder 250/250C Owner's Manual Starter holes should generally be secured using a pan head screw...
...3. DO NOT OVERTIGHTEN. 4. GETTING STARTED > INSTALLATION To install the swivel-mount bracket: Tools (not included)-Drill, screwdriver (Phillips or standard), and either of the mount over the swivel base and secure with the short knob. Drill the mounting holes. • If securing the base with...you risk damaging the mounting bracket. Place the rest of the following: • Three #8 (4mm) pan head machine bolts with three bolts or screws. Secure the base and attach the mount. 4 Fishfinder 250/250C Owner's Manual Starter holes should generally be secured using a pan head screw...

Owners Manual
Page 10
...ush mounted on all four mounting studs to obtain the best fit. 6. It may damage the mounting stud. Tighten all cables reach the unit mounting location before beginning installation. Always wear safety goggles and a dust mask when drilling, cutting, or sanding. Trim the Flush Mount Template ...inside the cutout area of the mounting surface. 8. To flush mount the Fishfinder 250/250C: Included mounting hardware-Four 3mm studs, four flat panel. Using a center punch, indent the center of the unit. Install the four mounting studs into the unit by screwing...
...ush mounted on all four mounting studs to obtain the best fit. 6. It may damage the mounting stud. Tighten all cables reach the unit mounting location before beginning installation. Always wear safety goggles and a dust mask when drilling, cutting, or sanding. Trim the Flush Mount Template ...inside the cutout area of the mounting surface. 8. To flush mount the Fishfinder 250/250C: Included mounting hardware-Four 3mm studs, four flat panel. Using a center punch, indent the center of the unit. Install the four mounting studs into the unit by screwing...

Owners Manual
Page 11
... cable. To connect the power/data cable to the negative voltage terminal. 4. Connect the Black (- Fishfinder 250/250C Owner's Manual 2A Black wire Red wire GETTING STARTED > INSTALLATION To 10-35 Volt boat supply + 2-Amp fuse - Connecting the Power/Data Cable The power/data cable connects the Fishfinder 250/250C to extend the power/data wires, use a 2-Amp ACG/3AG replacement fuse. If needed, use a wire of the voltage source using the boat's fuse...
... cable. To connect the power/data cable to the negative voltage terminal. 4. Connect the Black (- Fishfinder 250/250C Owner's Manual 2A Black wire Red wire GETTING STARTED > INSTALLATION To 10-35 Volt boat supply + 2-Amp fuse - Connecting the Power/Data Cable The power/data cable connects the Fishfinder 250/250C to extend the power/data wires, use a 2-Amp ACG/3AG replacement fuse. If needed, use a wire of the voltage source using the boat's fuse...
Owners Manual
Page 12
... wire identification. 2. GETTING STARTED > INSTALLATION The Fishfinder 250/250C can be connected to another device and can send depth, temperature, and speed information to On (page 27). If equipped with a capable transducer, the Fishfinder 250/250C can accept GPS navigational data (page 23), such as a Garmin GPS (Global Positioning System). To connect the power/data cable to a GPS...
... wire identification. 2. GETTING STARTED > INSTALLATION The Fishfinder 250/250C can be connected to another device and can send depth, temperature, and speed information to On (page 27). If equipped with a capable transducer, the Fishfinder 250/250C can accept GPS navigational data (page 23), such as a Garmin GPS (Global Positioning System). To connect the power/data cable to a GPS...
Owners Manual
Page 13
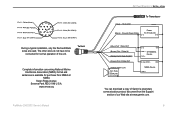
... at www.garmin.com. 9 Ground (Power/Data) Power 10-35 Volts DC (Blue) Port 1 Data OUT (Brown) Port 1 Data IN (White) Port 2 Data IN (N/C) (Green) Port 2 Data OUT (Yellow) Alarm Low Alarm Relay 100ma max coil current RXD + GPS/NMEA Device TXD + and RXD - www.nmea.org Fishfinder 250/250C Owner's Manual GETTING STARTED > INSTALLATION To Transducer (Red...
... at www.garmin.com. 9 Ground (Power/Data) Power 10-35 Volts DC (Blue) Port 1 Data OUT (Brown) Port 1 Data IN (White) Port 2 Data IN (N/C) (Green) Port 2 Data OUT (Yellow) Alarm Low Alarm Relay 100ma max coil current RXD + GPS/NMEA Device TXD + and RXD - www.nmea.org Fishfinder 250/250C Owner's Manual GETTING STARTED > INSTALLATION To Transducer (Red...
Owners Manual
Page 14
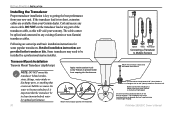
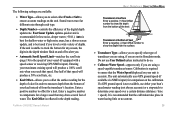
... NOT cut the transducer lead or any part of the transducer cable, as this will void your warranty. Some transducers may need to Multiple Sensors Fishfinder 250/250C Owner's Manual Transom Mount Installation Transom Mount Transducer (depth/temp) NOTE: DO NOT mount the transducer behind strakes, struts, fittings, water intake or discharge ports, or anything that the transducer be installed by a professional marine installer. Following are some...
... NOT cut the transducer lead or any part of the transducer cable, as this will void your warranty. Some transducers may need to Multiple Sensors Fishfinder 250/250C Owner's Manual Transom Mount Installation Transom Mount Transducer (depth/temp) NOTE: DO NOT mount the transducer behind strakes, struts, fittings, water intake or discharge ports, or anything that the transducer be installed by a professional marine installer. Following are some...

Owners Manual
Page 15
... standard plastic transom mount transducer can , as shown below. 2. Fishfinder 250/250C Owner's Manual GETTING STARTED > INSTALLATION NOTE: Many modern hulls have a prelocated pocket for optimum performance. Set the unit for shoot-thru-hull transducer installation. To test the location: 1. This type of clean water at the bottom. Temporarily seal the test device to use a higher gain setting. Weight it in...
... standard plastic transom mount transducer can , as shown below. 2. Fishfinder 250/250C Owner's Manual GETTING STARTED > INSTALLATION NOTE: Many modern hulls have a prelocated pocket for optimum performance. Set the unit for shoot-thru-hull transducer installation. To test the location: 1. This type of clean water at the bottom. Temporarily seal the test device to use a higher gain setting. Weight it in...
Owners Manual
Page 16
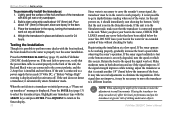
...Battery Voltage High" warning is displayed. Build a dam using strip caulk about 1/8" (3mm) of the water. Testing the Installation Though it should be in the epoxy, turning the transducer to the correct polarity, and the 2-Amp fuse is seated properly in the back of the transducer, make the adjustments in the Simulator mode. Press ADJ/MENU to return to the Sonar... enters Simulator mode. Fishfinder 250/250C Owner's Manual Return the boat to select the transducer type. If the unit is in the Simulator mode, make sure that the power/data cable is installed and not...
...Battery Voltage High" warning is displayed. Build a dam using strip caulk about 1/8" (3mm) of the water. Testing the Installation Though it should be in the epoxy, turning the transducer to the correct polarity, and the 2-Amp fuse is seated properly in the back of the transducer, make the adjustments in the Simulator mode. Press ADJ/MENU to return to the Sonar... enters Simulator mode. Fishfinder 250/250C Owner's Manual Return the boat to select the transducer type. If the unit is in the Simulator mode, make sure that the power/data cable is installed and not...
Owners Manual
Page 18
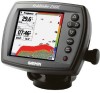
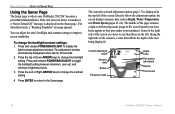
... backlight setting between maximum, user-set, and minimum brightness levels. 3. The currently selected adjustment option (page 17) is displayed in Simulator mode, a "Running Simulator" message appears. Along the right side of the screen is a scale that reflects the depth of the screen. Press and release POWER/BACKLIGHT to improve screen readability. BASIC OPERATION > USING THE SONAR PAGE Using the Sonar Page The Sonar page...
... backlight setting between maximum, user-set, and minimum brightness levels. 3. The currently selected adjustment option (page 17) is displayed in Simulator mode, a "Running Simulator" message appears. Along the right side of the screen is a scale that reflects the depth of the screen. Press and release POWER/BACKLIGHT to improve screen readability. BASIC OPERATION > USING THE SONAR PAGE Using the Sonar Page The Sonar page...
Owners Manual
Page 19
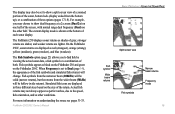
...18). Fishfinder 250/250C Owner's Manual BASIC OPERATION > USING THE SONAR PAGE Split screen view Fish symbol Wide beam returns Fish symbols Narrow beam returns Frequency mode 15 Fish symbols appear as shades of each sonar display. For more information on the Fishfinder 250C. The display may also be set to...you to find fish by viewing the actual sonar data, a fish symbol or a combination of the fish symbols (and simulated fish returns) will be hollow (wide returns). Simulated fish icons are lighter. Actual fish returns...
...18). Fishfinder 250/250C Owner's Manual BASIC OPERATION > USING THE SONAR PAGE Split screen view Fish symbol Wide beam returns Fish symbols Narrow beam returns Frequency mode 15 Fish symbols appear as shades of each sonar display. For more information on the Fishfinder 250C. The display may also be set to...you to find fish by viewing the actual sonar data, a fish symbol or a combination of the fish symbols (and simulated fish returns) will be hollow (wide returns). Simulated fish icons are lighter. Actual fish returns...
Owners Manual
Page 33
... or a stopwatch to compensate for low-noise, deeper water (>50 ft.). Fishfinder 250/250C Owner's Manual BASIC OPERATION > USING THE MAIN MENU Transducer at different rates through each type. • Depth Number-controls the efficiency of your speed over a certain distance ...Simulator mode. The Keel Offset is accurate. If the unit is best used if you are not in the depth reading. Enter a positive number to ensure that speed. Auto is best for shallow water or high noise areas, has a slower screen update, and is unable to measure depth from the transducer...
... or a stopwatch to compensate for low-noise, deeper water (>50 ft.). Fishfinder 250/250C Owner's Manual BASIC OPERATION > USING THE MAIN MENU Transducer at different rates through each type. • Depth Number-controls the efficiency of your speed over a certain distance ...Simulator mode. The Keel Offset is accurate. If the unit is best used if you are not in the depth reading. Enter a positive number to ensure that speed. Auto is best for shallow water or high noise areas, has a slower screen update, and is unable to measure depth from the transducer...
Owners Manual
Page 34
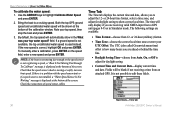
...cables. Fields will only display if you are receiving valid NMEA input from an attached GPS. Use the ARROW keys to a cruising speed. If the new speed is how many hours you to show in Simulator mode. NOTE: If the boat is used instead. The following settings...If there is a problem with the speed sensor/unit or if a speed senor is not installed, a "Water Speed...USING THE MAIN MENU To calibrate the water speed: 1. Both the top GPS ground speed and uncalibrated water speed will automatically show correct local time. Main Menu-Time tab 30 Fishfinder 250/250C Owner's Manual...
...cables. Fields will only display if you are receiving valid NMEA input from an attached GPS. Use the ARROW keys to a cruising speed. If the new speed is how many hours you to show in Simulator mode. NOTE: If the boat is used instead. The following settings...If there is a problem with the speed sensor/unit or if a speed senor is not installed, a "Water Speed...USING THE MAIN MENU To calibrate the water speed: 1. Both the top GPS ground speed and uncalibrated water speed will automatically show correct local time. Main Menu-Time tab 30 Fishfinder 250/250C Owner's Manual...
Owners Manual
Page 41
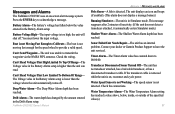
... dealer or Garmin Product Support to transmit the waypoint via the NMEA WPL sentence. Battery Voltage High-The input voltage is detected. Water Temperature Alarm-The Water Temperature Alarm setting has reached a value above, below the value entered in the Battery Alarm setup is higher than the voltage where the unit automatically turns off . If the transducer cable is...
... dealer or Garmin Product Support to transmit the waypoint via the NMEA WPL sentence. Battery Voltage High-The input voltage is detected. Water Temperature Alarm-The Water Temperature Alarm setting has reached a value above, below the value entered in the Battery Alarm setup is higher than the voltage where the unit automatically turns off . If the transducer cable is...

Owners Manual
Page 42
... customer for one year from defects in Garmin. To obtain warranty service, contact your local Garmin authorized dealer or call Garmin Product Support for any country in source code form remains a valuable trade secret of the purchase price at its sole discretion. Such repairs or replacement will at its sole option repair or replace any derivative works based on the Software...
... customer for one year from defects in Garmin. To obtain warranty service, contact your local Garmin authorized dealer or call Garmin Product Support for any country in source code form remains a valuable trade secret of the purchase price at its sole discretion. Such repairs or replacement will at its sole option repair or replace any derivative works based on the Software...
Owners Manual
Page 43
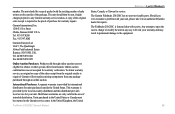
...replace missing components from Garmin. Any attempt to open the case to the equipment. 39 The unit should be securely packed with your unit, please take it to the Garmin service center in -country distributor and this distributor provides local service for repairs. Garmin International, Inc. 1200 E 151st Street Olathe, Kansas 66062 U.S.A. Garmin will void your unit. The Fish...warranty verification. The Garmin Fishfinder 250/250C has no user-serviceable parts. Should you ever encounter a problem with the tracking number clearly written on the outside the...
...replace missing components from Garmin. Any attempt to open the case to the equipment. 39 The unit should be securely packed with your unit, please take it to the Garmin service center in -country distributor and this distributor provides local service for repairs. Garmin International, Inc. 1200 E 151st Street Olathe, Kansas 66062 U.S.A. Garmin will void your unit. The Fish...warranty verification. The Garmin Fishfinder 250/250C has no user-serviceable parts. Should you ever encounter a problem with the tracking number clearly written on the outside the...


