
Owners Manual
Page 1
Edge® Explore 1000 Owner's Manual September 2015 Printed in Taiwan 190-01944-00_0B
Edge® Explore 1000 Owner's Manual September 2015 Printed in Taiwan 190-01944-00_0B

Owners Manual
Page 2
.... Garmin®, the Garmin logo, ANT+®, Auto Lap®, Auto Pause®, and Edge® are trademarks of Garmin Ltd. or its subsidiaries. microSD™ and the microSD logo are trademarks of SD-3C, LLC. Wi‑Fi® is a registered trademark of Garmin. Visit www.thisisant.com/directory for current updates and supplemental information concerning the use of such marks by Garmin is...
.... Garmin®, the Garmin logo, ANT+®, Auto Lap®, Auto Pause®, and Edge® are trademarks of Garmin Ltd. or its subsidiaries. microSD™ and the microSD logo are trademarks of SD-3C, LLC. Wi‑Fi® is a registered trademark of Garmin. Visit www.thisisant.com/directory for current updates and supplemental information concerning the use of such marks by Garmin is...

Owners Manual
Page 3
... Edge Device 7 Changing the Data Storage Location 7 Installing a Memory Card 7 Data Management 7 Connecting the Device to Your Computer 7 Transferring Files to Your Device 7 Deleting Files 8 Disconnecting the USB Cable 8 ANT+ Sensors 8 Pairing Your ANT+ Sensors 8 Situational Awareness 8 Training with Power Meters 8 Calibrating Your Power Meter 8 Wireless Remote Control 8 Device Overview 8 Status LED 8 Pairing the Remote with Your Edge Device 8 Customizing the Action Key 9 Using the Mounts 9 Replacing the Battery 9 Customizing Your Device 9 Setting Up Your User Profile...
... Edge Device 7 Changing the Data Storage Location 7 Installing a Memory Card 7 Data Management 7 Connecting the Device to Your Computer 7 Transferring Files to Your Device 7 Deleting Files 8 Disconnecting the USB Cable 8 ANT+ Sensors 8 Pairing Your ANT+ Sensors 8 Situational Awareness 8 Training with Power Meters 8 Calibrating Your Power Meter 8 Wireless Remote Control 8 Device Overview 8 Status LED 8 Pairing the Remote with Your Edge Device 8 Customizing the Action Key 9 Using the Mounts 9 Replacing the Battery 9 Customizing Your Device 9 Setting Up Your User Profile...
Owners Manual
Page 5
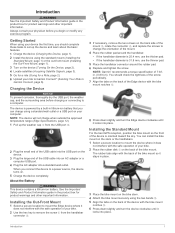
... mount the Edge device where it locks into place. Installing the Out-Front Mount 1 Select a secure location to Garmin Connect, page 6). You can charge using the standard mount (Installing the Standard Mount, page 1) or the out-front mount (Installing the Out-Front Mount, page 1). 3 Turn on the device (Turning On the Device, page 2). 4 Locate satellites (Acquiring Satellite Signals, page 3). 5 Go for a ride (Going for product warnings and other important information. Installing the Standard Mount For the best GPS reception, position the bike mount...
... mount the Edge device where it locks into place. Installing the Out-Front Mount 1 Select a secure location to Garmin Connect, page 6). You can charge using the standard mount (Installing the Standard Mount, page 1) or the out-front mount (Installing the Out-Front Mount, page 1). 3 Turn on the device (Turning On the Device, page 2). 4 Locate satellites (Acquiring Satellite Signals, page 3). 5 Go for a ride (Going for product warnings and other important information. Installing the Standard Mount For the best GPS reception, position the bike mount...

Owners Manual
Page 6
.... Viewing the Connections Screen The connections screen displays the status of the screen. 2 Select Brightness to adjust the backlight brightness and timeout: • To manually adjust the brightness, select and . • To allow the device to change the settings. Select to mark a new lap. Á Select to start the timer. Select to delete an item. You can select any time, you are prompted to lock the screen and turn on the device, you can swipe down from the top of the data screens to start and stop the timer...
.... Viewing the Connections Screen The connections screen displays the status of the screen. 2 Select Brightness to adjust the backlight brightness and timeout: • To manually adjust the brightness, select and . • To allow the device to change the settings. Select to mark a new lap. Á Select to start the timer. Select to delete an item. You can select any time, you are prompted to lock the screen and turn on the device, you can swipe down from the top of the data screens to start and stop the timer...
Owners Manual
Page 7
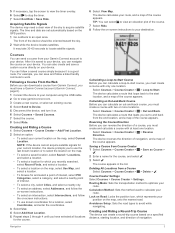
... location. Saving a Course from a Course Select Courses > Course Creator > > Delete > . Routing Mode: Sets the transportation method to an open area. Courses You can download a course from Garmin Connect, you can select to view an elevation plot of navigation. You can follow a bike-friendly commute to your device. Select Courses > Course Creator > > Reverse Direction. Navigation 3 The time and date are set automatically based on -screen instructions to work. TIP: You can calculate an out-and-back course, you can navigate the course on the map, select Current Location...
... location. Saving a Course from a Course Select Courses > Course Creator > > Delete > . Routing Mode: Sets the transportation method to an open area. Courses You can download a course from Garmin Connect, you can select to view an elevation plot of navigation. You can follow a bike-friendly commute to your device. Select Courses > Course Creator > > Reverse Direction. Navigation 3 The time and date are set automatically based on -screen instructions to work. TIP: You can calculate an out-and-back course, you can navigate the course on the map, select Current Location...

Owners Manual
Page 8
... lap. Locations You can have an alternate course display in green. Navigating to enter search information. 4 Select Ride. NOTE: If the device cannot acquire satellite signals for your home or parking spot. 1 From the home screen, select the status bar or swipe down from a previously saved ride. 1 Select Courses > Recent Rides. 2 Select a ride. 3 Select > Save Ride as your current location, the device prompts you back to the starting point. 1 Tap the screen to view the timer overlay. 2 Select...
... lap. Locations You can have an alternate course display in green. Navigating to enter search information. 4 Select Ride. NOTE: If the device cannot acquire satellite signals for your home or parking spot. 1 From the home screen, select the status bar or swipe down from a previously saved ride. 1 Select Courses > Recent Rides. 2 Select a ride. 3 Select > Save Ride as your current location, the device prompts you back to the starting point. 1 Tap the screen to view the timer overlay. 2 Select...

Owners Manual
Page 9
... and phone numbers appear. Select Cancel > before it is available. Navigating to a Point of Interest You can send a status update to your emergency contacts. Navigating to Known Coordinates 1 From the home screen, select Where To? > Search Tools > Coordinates. 2 Enter the coordinates, and select . 3 Follow the on your device and paired smartphone indicating your emergency contacts. Editing Locations 1 Select Where To? > Saved Locations. 2 Select a location. 3 Select the information bar at the top of the screen. 4 Select > Delete Location > . Setting Up Incident...
... and phone numbers appear. Select Cancel > before it is available. Navigating to a Point of Interest You can send a status update to your emergency contacts. Navigating to Known Coordinates 1 From the home screen, select Where To? > Search Tools > Coordinates. 2 Enter the coordinates, and select . 3 Follow the on your device and paired smartphone indicating your emergency contacts. Editing Locations 1 Select Where To? > Saved Locations. 2 Select a location. 3 Select the information bar at the top of the screen. 4 Select > Delete Location > . Setting Up Incident...

Owners Manual
Page 10
... smartphone. Analyze your device, you complete and save an activity with friends to install Garmin Connect mobile on Garmin Connect. Viewing Data Totals You can connect with your data: You can upload that ride. From the home screen, select History > Totals. NOTE: This does not delete any new personal records you to follow your history. Some features require you achieved during a ride. Go to Garmin Connect History History includes time, distance, calories, speed, lap data, elevation, and optional ANT+ sensor information.
... smartphone. Analyze your device, you complete and save an activity with friends to install Garmin Connect mobile on Garmin Connect. Viewing Data Totals You can connect with your data: You can upload that ride. From the home screen, select History > Totals. NOTE: This does not delete any new personal records you to follow your history. Some features require you achieved during a ride. Go to Garmin Connect History History includes time, distance, calories, speed, lap data, elevation, and optional ANT+ sensor information.

Owners Manual
Page 11
... device. 3 From your device, select > Bluetooth > Enable > Pair Smartphone, and follow the on-screen instructions. 4 From your smartphone, open the file browser. The next time you turn on the device. 3 Plug the large end of the USB cable into a computer USB port. Transferring Files to Your Device 1 Connect the device to your data to use Wi‑Fi connectivity. Changing the Data Storage Location 1 From the home screen, select > System > Data Recording. 2 Select an option: • Select Internal Storage to save your computer. Weather updates: Sends...
... device. 3 From your device, select > Bluetooth > Enable > Pair Smartphone, and follow the on-screen instructions. 4 From your smartphone, open the file browser. The next time you turn on the device. 3 Plug the large end of the USB cable into a computer USB port. Transferring Files to Your Device 1 Connect the device to your data to use Wi‑Fi connectivity. Changing the Data Storage Location 1 From the home screen, select > System > Data Recording. 2 Select an option: • Select Internal Storage to save your computer. Weather updates: Sends...
Owners Manual
Page 12
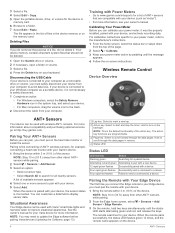
... Remove Hardware icon in reverse. Wireless Remote Control Device Overview ANT+ Sensors Your device can pair, you do not know the purpose of a file, do not delete it is the default functionality of files in the list of the action key. NOTE: You may need to a device. For calibration instructions specific to your power meter, refer to display sensor data. Page key. The file appears in the device memory or on the heart rate monitor or install...
... Remove Hardware icon in reverse. Wireless Remote Control Device Overview ANT+ Sensors Your device can pair, you do not know the purpose of a file, do not delete it is the default functionality of files in the list of the action key. NOTE: You may need to a device. For calibration instructions specific to your power meter, refer to display sensor data. Page key. The file appears in the device memory or on the heart rate monitor or install...
Owners Manual
Page 13
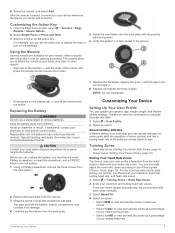
... your user profile information from the back plate. Training Zones • Heart rate zones (Setting Your Heart Rate Zones, page 9) • Power zones (Setting Your Power Zones, page 10) Setting Your Heart Rate Zones The device uses your resting heart rate. 9 to view and edit the zones as an optional accessory. The device uses this information to properly recycle the batteries. You can update your maximum heart rate. • Select % HRR to remove batteries. Customizing the Action Key 1 From the Edge home screen, select > Sensors > Edge Remote...
... your user profile information from the back plate. Training Zones • Heart rate zones (Setting Your Heart Rate Zones, page 9) • Power zones (Setting Your Power Zones, page 10) Setting Your Heart Rate Zones The device uses your resting heart rate. 9 to view and edit the zones as an optional accessory. The device uses this information to properly recycle the batteries. You can update your maximum heart rate. • Select % HRR to remove batteries. Customizing the Action Key 1 From the Edge home screen, select > Sensors > Edge Remote...
Owners Manual
Page 14
... -turn navigation prompts are triggered (Auto Lap®, page 11). • Select Auto Features > Auto Pause to change it and allow the software to calculate your power zones automatically. 1 Select > Training Zones > Power Zones. 2 Enter your FTP value. 3 Select Based On:. 4 Select an option: • Select watts to view and edit the zones in or out manually. Updating Your Activity Settings 1 Select > Activity Settings. 2 Select an option: • Select Data Screens to customize the data screens and data fields (Customizing the Data Screens, page 10). • Select Map to customize...
... -turn navigation prompts are triggered (Auto Lap®, page 11). • Select Auto Features > Auto Pause to change it and allow the software to calculate your power zones automatically. 1 Select > Training Zones > Power Zones. 2 Enter your FTP value. 3 Select Based On:. 4 Select an option: • Select watts to view and edit the zones in or out manually. Updating Your Activity Settings 1 Select > Activity Settings. 2 Select an option: • Select Data Screens to customize the data screens and data fields (Customizing the Data Screens, page 10). • Select Map to customize...
Owners Manual
Page 15
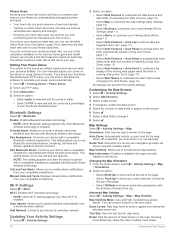
.... 4 If necessary, customize optional time data fields (Customizing the Data Screens, page 10). Alerts You can set the device to automatically enter sleep mode after 5 minutes of the maps that are turned on (Setting the Device Tones, page 12). For example, you can use the Auto Lap feature to train toward specific time, distance, calorie, heart rate, cadence, and power goals. This feature is stopped or paused. 1 Select > Activity Settings. 2 Select Auto Features > Auto Pause. 3 Select an option: • Select When Stopped to pause the timer automatically when you...
.... 4 If necessary, customize optional time data fields (Customizing the Data Screens, page 10). Alerts You can set the device to automatically enter sleep mode after 5 minutes of the maps that are turned on (Setting the Device Tones, page 12). For example, you can use the Auto Lap feature to train toward specific time, distance, calorie, heart rate, cadence, and power goals. This feature is stopped or paused. 1 Select > Activity Settings. 2 Select Auto Features > Auto Pause. 3 Select an option: • Select When Stopped to pause the timer automatically when you...
Owners Manual
Page 16
... screen, select > System > Language. 3 Select a display speed. Changing the Start Notice This feature automatically detects when your current GPS satellite information. Changing the Accent Color You can manually calibrate the altimeter on the time of up to www.garmin.com /waterrating. Screen Capture: Allows you configured in portrait or landscape mode. Changing the Configuration Settings You can customize units of measure for distance and speed, elevation, temperature, weight, position format, and time format. 1 Select > System > Units. 2 Select a measurement type. 3 Select a unit...
... screen, select > System > Language. 3 Select a display speed. Changing the Start Notice This feature automatically detects when your current GPS satellite information. Changing the Accent Color You can manually calibrate the altimeter on the time of up to www.garmin.com /waterrating. Screen Capture: Allows you configured in portrait or landscape mode. Changing the Configuration Settings You can customize units of measure for distance and speed, elevation, temperature, weight, position format, and time format. 1 Select > System > Units. 2 Select a measurement type. 3 Select a unit...
Owners Manual
Page 17
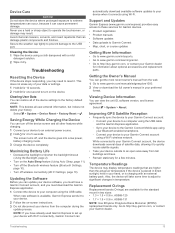
... prevent damage to operate the touchscreen, or damage may need to turn off the device screen and all user-entered information, but it connects using the USB cable. Troubleshooting Resetting the Device If the device stops responding, you must have already used Garmin Express to set up your preferred format. This does not erase any of satellite data, allowing it dry. When new software is charging with a mild detergent solution. 2 Wipe it to quickly locate satellite signals. • Take your...
... prevent damage to operate the touchscreen, or damage may need to turn off the device screen and all user-entered information, but it connects using the USB cable. Troubleshooting Resetting the Device If the device stops responding, you must have already used Garmin Express to set up your preferred format. This does not erase any of satellite data, allowing it dry. When new software is charging with a mild detergent solution. 2 Wipe it to quickly locate satellite signals. • Take your...
Owners Manual
Page 18
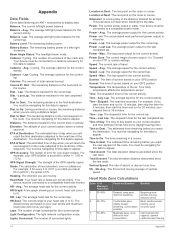
... current lap. Battery Status: The remaining battery power of the GPS satellite signal. Dist. Dist. Dist. ETA at Dest.: The last point on the route or course. GPS Signal Strength: The strength of a bike light accessory. Heading: The direction you are using a distance target. Lap: The average heart rate for the current lap. Lights Connected: The number of vertical speed. Your device must be connected to a compatible heart rate monitor. Power - Speed - Avg.: The average speed for the current activity. Max.: The top speed for the current activity. Time...
... current lap. Battery Status: The remaining battery power of the GPS satellite signal. Dist. Dist. Dist. ETA at Dest.: The last point on the route or course. GPS Signal Strength: The strength of a bike light accessory. Heading: The direction you are using a distance target. Lap: The average heart rate for the current lap. Lights Connected: The number of vertical speed. Your device must be connected to a compatible heart rate monitor. Power - Speed - Avg.: The average speed for the current activity. Max.: The top speed for the current activity. Time...

Owners Manual
Page 19
... its third-party providers. Garmin Ltd. You further acknowledge that the Software is protected under the United States of any derivative works based on the Software. Appendix 15 You acknowledge that the structure, organization, and code of the Software, for long period of time, labored breathing Anaerobic and muscular endurance, increased power Software License Agreement BY USING THE DEVICE, YOU AGREE TO BE...
... its third-party providers. Garmin Ltd. You further acknowledge that the Software is protected under the United States of any derivative works based on the Software. Appendix 15 You acknowledge that the structure, organization, and code of the Software, for long period of time, labored breathing Anaerobic and muscular endurance, increased power Software License Agreement BY USING THE DEVICE, YOU AGREE TO BE...

Owners Manual
Page 20
... Auto Lap 11 Auto Pause 11 auto scroll 11 auto sleep 11 B back to start 4 backlight 2, 12 bands 13 battery charging 1, 13 maximizing 13 replacing 9 type 1 Bluetooth technology 6, 7, 10 C cadence, alerts 11 calendar 6 calibrating, power meter 8 calorie, alerts 11 charging 13 cleaning the device 13 computer, connecting 7 coordinates 5 courses 3, 4 creating 3, 4 deleting 3, 4 editing 3, 4 loading 3 navigating 4 settings 3 customizing the device 10 D data recording 7 screens 10 storing 6 transferring 6, 7 data fields 10, 14 deleting, all user data 8, 13 device care 13 resetting 13 display settings...
... Auto Lap 11 Auto Pause 11 auto scroll 11 auto sleep 11 B back to start 4 backlight 2, 12 bands 13 battery charging 1, 13 maximizing 13 replacing 9 type 1 Bluetooth technology 6, 7, 10 C cadence, alerts 11 calendar 6 calibrating, power meter 8 calorie, alerts 11 charging 13 cleaning the device 13 computer, connecting 7 coordinates 5 courses 3, 4 creating 3, 4 deleting 3, 4 editing 3, 4 loading 3 navigating 4 settings 3 customizing the device 10 D data recording 7 screens 10 storing 6 transferring 6, 7 data fields 10, 14 deleting, all user data 8, 13 device care 13 resetting 13 display settings...


