
Owner's Manual
Page 8
GETTING STARTED Buttons 1 6 2 ���� 3 ��� 4 1 power • Press and hold to turn unit on/off. • Press to turn backlight on/off. 2 mode • Press to switch modes. 5 • Press to return to the previous page. • Press and hold to switch bike profiles. 3 reset/lap • Press and hold to reset the timer. • Press to create a new lap. 4 start/stop Press to start/stop the timer. 8 Edge™ 205/305 Owner's Manual
GETTING STARTED Buttons 1 6 2 ���� 3 ��� 4 1 power • Press and hold to turn unit on/off. • Press to turn backlight on/off. 2 mode • Press to switch modes. 5 • Press to return to the previous page. • Press and hold to switch bike profiles. 3 reset/lap • Press and hold to reset the timer. • Press to create a new lap. 4 start/stop Press to start/stop the timer. 8 Edge™ 205/305 Owner's Manual
Owner's Manual
Page 9
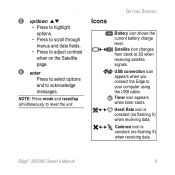
... (no flashing X) when receiving data. Satellite icon changes from blank to reset the unit. USB connection icon appears when you connect the Edge to acknowledge messages. Cadence icon is constant (no flashing X) when receiving data. Edge™ 205/305 Owner's Manual 9 Icons GETTING STARTED Battery icon shows the current battery charge level...
... (no flashing X) when receiving data. Satellite icon changes from blank to reset the unit. USB connection icon appears when you connect the Edge to acknowledge messages. Cadence icon is constant (no flashing X) when receiving data. Edge™ 205/305 Owner's Manual 9 Icons GETTING STARTED Battery icon shows the current battery charge level...
Owner's Manual
Page 16
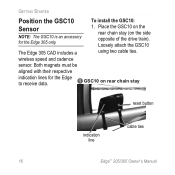
wireless speed and cadence sensor. Both magnets must be aligned with their respective indication lines for the Edge 305 only. GETTING STARTED Position the GSC10 Sensor NOTE: The GSC10 is an accessory for the Edge to receive data. 1 GSC10 on the side opposite of the drive train). Loosely attach the GSC10 The Edge 305 CAD includes a using two cable ties. To install the GSC10: 1. Place the GSC10 on the rear chain stay (on rear chain stay reset button indication line cable ties 16 Edge™ 205/305 Owner's Manual
wireless speed and cadence sensor. Both magnets must be aligned with their respective indication lines for the Edge 305 only. GETTING STARTED Position the GSC10 Sensor NOTE: The GSC10 is an accessory for the Edge to receive data. 1 GSC10 on the side opposite of the drive train). Loosely attach the GSC10 The Edge 305 CAD includes a using two cable ties. To install the GSC10: 1. Place the GSC10 on the rear chain stay (on rear chain stay reset button indication line cable ties 16 Edge™ 205/305 Owner's Manual

Owner's Manual
Page 18
... ties, sensor arm, and spoke magnet. 3 Spoke magnet on the GSC10. Press the Reset button on wheel spoke magnet pedal magnet 18 sensor arm indication line Edge™ 205/305 Owner's Manual The LED light turns red, then green. Press Reset again if you require additional passes. 6. Pedal to test the sensor alignment. NOTE...
... ties, sensor arm, and spoke magnet. 3 Spoke magnet on the GSC10. Press the Reset button on wheel spoke magnet pedal magnet 18 sensor arm indication line Edge™ 205/305 Owner's Manual The LED light turns red, then green. Press Reset again if you require additional passes. 6. Pedal to test the sensor alignment. NOTE...

Owner's Manual
Page 30
To end an interval or advanced workout step early: Press the lap/reset button. It is easy to set up one of the following quick workouts with your time, distance, or pace goals, and the Edge displays the Virtual Partner to help you achieve them. Quick Workouts For quick ...workout, press mode to access the Main Menu. 2. Select Training > Stop Workout. When you enter your Edge: • Distance and time • Time and speed • Distance and speed 30 Edge™ 205/305 Owner's Manual message appears. To end a workout early: 1. Press mode to see the Workout data page....
To end an interval or advanced workout step early: Press the lap/reset button. It is easy to set up one of the following quick workouts with your time, distance, or pace goals, and the Edge displays the Virtual Partner to help you achieve them. Quick Workouts For quick ...workout, press mode to access the Main Menu. 2. Select Training > Stop Workout. When you enter your Edge: • Distance and time • Time and speed • Distance and speed 30 Edge™ 205/305 Owner's Manual message appears. To end a workout early: 1. Press mode to see the Workout data page....

Owner's Manual
Page 93
R register your product 84 reset button 8 reset Edge 9 rest time 22 routes 50 creating 50 deleting 52 finding 51 S satellite icon 9 Satellite page 52 satellite signals acquiring 13 serial number 84 setup ... 19 tire size 20, 77 tones 56 training features 22 U unit ID 56 up and down buttons 9 USB 6, 80 user profile setting 19 Edge™ 205/305 Owner's Manual INDEX V viewing history 43 Virtual Partner 28, 30 W warranty 87 waterproof 81 workouts 30 93
R register your product 84 reset button 8 reset Edge 9 rest time 22 routes 50 creating 50 deleting 52 finding 51 S satellite icon 9 Satellite page 52 satellite signals acquiring 13 serial number 84 setup ... 19 tire size 20, 77 tones 56 training features 22 U unit ID 56 up and down buttons 9 USB 6, 80 user profile setting 19 Edge™ 205/305 Owner's Manual INDEX V viewing history 43 Virtual Partner 28, 30 W warranty 87 waterproof 81 workouts 30 93

Quick Start Guide
Page 1
.... Follow the on the wedge. For troubleshooting information, refer to prevent corrosion. 2. Press and hold to reset the timer. • Press to create a new lap. 2 ���� 6 5 ... pad under weather cap ➋ Mount the Edge You can run for the best GPS reception. When the battery is on the Edge. The stem installation (shown here) provides a...Edge 305 only. To configure your ride. ���� To install the Edge on the unit. 3. Align the Edge with step 2. For bars with step 2. ➌ Configure the Edge...
.... Follow the on the wedge. For troubleshooting information, refer to prevent corrosion. 2. Press and hold to reset the timer. • Press to create a new lap. 2 ���� 6 5 ... pad under weather cap ➋ Mount the Edge You can run for the best GPS reception. When the battery is on the Edge. The stem installation (shown here) provides a...Edge 305 only. To configure your ride. ���� To install the Edge on the unit. 3. Align the Edge with step 2. For bars with step 2. ➌ Configure the Edge...

Quick Start Guide
Page 2
...; 205/305 GPS-enabled computer for the Edge to activate your ride. 5. The heart rate icon changes from the installation disk in place during your heart rate monitor or restart scan. Install Garmin Training Center from flashing to test the sensor alignment. Make sure the indication line... Settings > User Profile. 3. For more information about the GSC10, see the owner's manual. 1 GSC10 on rear chain stay indication line reset button 2 Pedal magnet on crank arm cable tie indication line cable ties 3 Spoke magnet on the GSC10. Select Settings > Bike Profile....
...; 205/305 GPS-enabled computer for the Edge to activate your ride. 5. The heart rate icon changes from the installation disk in place during your heart rate monitor or restart scan. Install Garmin Training Center from flashing to test the sensor alignment. Make sure the indication line... Settings > User Profile. 3. For more information about the GSC10, see the owner's manual. 1 GSC10 on rear chain stay indication line reset button 2 Pedal magnet on crank arm cable tie indication line cable ties 3 Spoke magnet on the GSC10. Select Settings > Bike Profile....


