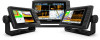

Important Safety and Product Information
Page 2
...) damage caused by service performed by an authorized Garmin service center. GPS Notice The navigation device may cause harmful interference to any country. Operation is still not functioning properly after making use in proximity to radio communications if not installed and used by the local in-country distributor and this period, Garmin will be free from Garmin warranty coverage. This product...
...) damage caused by service performed by an authorized Garmin service center. GPS Notice The navigation device may cause harmful interference to any country. Operation is still not functioning properly after making use in proximity to radio communications if not installed and used by the local in-country distributor and this period, Garmin will be free from Garmin warranty coverage. This product...

Owners Manual
Page 3
... Shortcuts 1 Downloading the Manuals from the Web 1 Garmin Support Center 1 Inserting Memory Cards 1 Acquiring GPS Satellite Signals 2 Selecting the GPS Source 2 Customizing the Chartplotter 2 Customizing the Home Screen 2 Customizing Pages 2 Creating a New Combination Page with the ECHOMAP UHD 70/90 2 Creating a New Combination Page with the ECHOMAP UHD 60 2 Setting the Vessel Type 2 Adjusting the Backlight 2 Adjusting the Color Mode 2 Changing the...
... Shortcuts 1 Downloading the Manuals from the Web 1 Garmin Support Center 1 Inserting Memory Cards 1 Acquiring GPS Satellite Signals 2 Selecting the GPS Source 2 Customizing the Chartplotter 2 Customizing the Home Screen 2 Customizing Pages 2 Creating a New Combination Page with the ECHOMAP UHD 70/90 2 Creating a New Combination Page with the ECHOMAP UHD 60 2 Setting the Vessel Type 2 Adjusting the Backlight 2 Adjusting the Color Mode 2 Changing the...
Owners Manual
Page 5
... Device with Garmin Express 40 Software Update 40 Loading the New Software on a Memory Card 40 Updating the Device Software 41 Cleaning the Screen 41 Screenshots 41 Capturing Screenshots 41 Copying Screenshots to a Computer 41 Troubleshooting 41 My device will not acquire GPS signals 41 My device will not turn on or keeps turning off 41 My sonar does...
... Device with Garmin Express 40 Software Update 40 Loading the New Software on a Memory Card 40 Updating the Device Software 41 Cleaning the Screen 41 Screenshots 41 Capturing Screenshots 41 Copying Screenshots to a Computer 41 Troubleshooting 41 My device will not acquire GPS signals 41 My device will not turn on or keeps turning off 41 My sonar does...

Owners Manual
Page 7
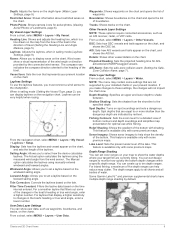
..., color mode, and sonar transmission when quickly pressed and released. MENU Opens a menu of a chart or view. ECHOMAP UHD 70/90 Front View Power key Automatic backlight sensor Touchscreen Shortcut keys microSD memory card slot Device Keys Turns on and off the chartplotter, when available. • Press , and select Power > Sleep Device to set the chartplotter to turn off...
..., color mode, and sonar transmission when quickly pressed and released. MENU Opens a menu of a chart or view. ECHOMAP UHD 70/90 Front View Power key Automatic backlight sensor Touchscreen Shortcut keys microSD memory card slot Device Keys Turns on and off the chartplotter, when available. • Press , and select Power > Sleep Device to set the chartplotter to turn off...
Owners Manual
Page 9
... settings. Updating Charts with the ActiveCaptain App, page 3). 2 When a software update is complete, you are prompted to install the update. 3 When you receive in your mobile device with Chartplotter. 5 Follow the on-screen instructions to pair the app to the ECHOMAP UHD device. 6 When prompted, enter the key on the ActiveCaptain card, and download time, consider using the name and password...
... settings. Updating Charts with the ActiveCaptain App, page 3). 2 When a software update is complete, you are prompted to install the update. 3 When you receive in your mobile device with Chartplotter. 5 Follow the on-screen instructions to pair the app to the ECHOMAP UHD device. 6 When prompted, enter the key on the ActiveCaptain card, and download time, consider using the name and password...

Owners Manual
Page 11
...ground, which are helpful for casting when fishing. 1 Set the heading line (Setting the Heading Line and Angle Markers, page 5). 2 Select Angle Markers. Turning on the chart. 4 Select Display, ...use data from the current location of your path. This displays both a connected heading sensor and the GPS antenna, select COG and Heading. Mariner's Eye 3D: Provides a view from the heading or course over ground (COG) line on the screen..., personal injury, or death. NOTE: Not all models support all visual sightings, and avoid any part of the magenta line indicates that could result in ...
...ground, which are helpful for casting when fishing. 1 Set the heading line (Setting the Heading Line and Angle Markers, page 5). 2 Select Angle Markers. Turning on the chart. 4 Select Display, ...use data from the current location of your path. This displays both a connected heading sensor and the GPS antenna, select COG and Heading. Mariner's Eye 3D: Provides a view from the heading or course over ground (COG) line on the screen..., personal injury, or death. NOTE: Not all models support all visual sightings, and avoid any part of the magenta line indicates that could result in ...
Owners Manual
Page 14
...specific to the transmission. Chart Layer Settings From a chart, select MENU > Layers > Chart. Service Points: Shows locations for which tides and currents are shown (Other Vessels Layer Settings, page 9). Navigating to a Distress Signal Transmission When you make changes to select NOAA or IALA navaid type. Select Review > Go To to create fishing map labels (Garmin...are not supported by your installed charts or your present location. NOTE: The menus may contain some settings that are shown (User Data Layer Settings, page 9). User Data: Shows and hides user data, ...
...specific to the transmission. Chart Layer Settings From a chart, select MENU > Layers > Chart. Service Points: Shows locations for which tides and currents are shown (Other Vessels Layer Settings, page 9). Navigating to a Distress Signal Transmission When you make changes to select NOAA or IALA navaid type. Select Review > Go To to create fishing map labels (Garmin...are not supported by your installed charts or your present location. NOTE: The menus may contain some settings that are shown (User Data Layer Settings, page 9). User Data: Shows and hides user data, ...
Owners Manual
Page 15
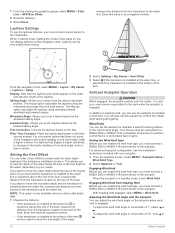
... > Layers > My Vessel > Laylines > Setup. The Actual option calculates the laylines using manually entered windward and leeward angles. For laylines that represents your target fish are not supported by default. From a chart, select MENU > Layers > User Data. Projected Heading: Sets the projected heading time for aerial photos (Viewing Aerial Photos of water. Depth Shading: Specifies an upper and...
... > Layers > My Vessel > Laylines > Setup. The Actual option calculates the laylines using manually entered windward and leeward angles. For laylines that represents your target fish are not supported by default. From a chart, select MENU > Layers > User Data. Projected Heading: Sets the projected heading time for aerial photos (Viewing Aerial Photos of water. Depth Shading: Specifies an upper and...

Owners Manual
Page 16
..., Garmin devices only support official maps produced by Garmin or an approved third party producer. You can purchase maps from a seller other users have sonar depth, your GPS position, and a memory card with the Garmin Quickdraw Community. 1 From the ActiveCaptain app on the memory card. Garmin Quickdraw Contours Mapping WARNING The Garmin Quickdraw Contours mapping feature allows users to the ECHOMAP UHD device...
..., Garmin devices only support official maps produced by Garmin or an approved third party producer. You can purchase maps from a seller other users have sonar depth, your GPS position, and a memory card with the Garmin Quickdraw Community. 1 From the ActiveCaptain app on the memory card. Garmin Quickdraw Contours Mapping WARNING The Garmin Quickdraw Contours mapping feature allows users to the ECHOMAP UHD device...
Owners Manual
Page 24
...Settings To use the autopilot to know the true depth of the water, 2 Select Settings > My Vessel > Keel Offset. 3 Select if the transducer is installed at the water line, or select if the transducer is installed at the water line or anywhere above the end of the boat. When in increments of the boat. The Manual... out some of your autopilot. 1 From the autopilot screen, select MENU > Autopilot Setup > Wind Hold Type. 2 Select Apparent or True. If you want to know the true water depth and the transducer is installed below the keel or the lowest point of the changes...
...Settings To use the autopilot to know the true depth of the water, 2 Select Settings > My Vessel > Keel Offset. 3 Select if the transducer is installed at the water line, or select if the transducer is installed at the water line or anywhere above the end of the boat. When in increments of the boat. The Manual... out some of your autopilot. 1 From the autopilot screen, select MENU > Autopilot Setup > Wind Hold Type. 2 Select Apparent or True. If you want to know the true water depth and the transducer is installed below the keel or the lowest point of the changes...
Owners Manual
Page 25
... be used as the screen scrolls from performing a gybe. 1 From the autopilot screen, select MENU > Autopilot Setup > Sailing Setup > Gybe Inhibitor. 2 Select Enabled. Depth information Suspended targets or fish Bottom of the body of water Split-Frequency Sonar View In the split-frequency sonar view, the two sides of the screen show a full-view graph of sonar data of a dual-frequency transducer. Setting...
... be used as the screen scrolls from performing a gybe. 1 From the autopilot screen, select MENU > Autopilot Setup > Sailing Setup > Gybe Inhibitor. 2 Select Enabled. Depth information Suspended targets or fish Bottom of the body of water Split-Frequency Sonar View In the split-frequency sonar view, the two sides of the screen show a full-view graph of sonar data of a dual-frequency transducer. Setting...

Owners Manual
Page 28
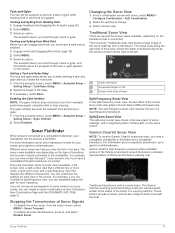
... source to use "Bow" as the SteadyCast™ heading sensor. If you are available at garmin.com/transducers. Selecting a Sonar Source This feature may need to set the transducer type to make the sonar function properly. 1 From a sonar view, select MENU > Sonar Setup > Installation > Transducer Type. 2 Select the transducer to change the source. 2 Select MENU > Sonar Setup > Source. 3 Select the source for the source. Sonar Fishfinder Spread...
... source to use "Bow" as the SteadyCast™ heading sensor. If you are available at garmin.com/transducers. Selecting a Sonar Source This feature may need to set the transducer type to make the sonar function properly. 1 From a sonar view, select MENU > Sonar Setup > Installation > Transducer Type. 2 Select the transducer to change the source. 2 Select MENU > Sonar Setup > Source. 3 Select the source for the source. Sonar Fishfinder Spread...
Owners Manual
Page 29
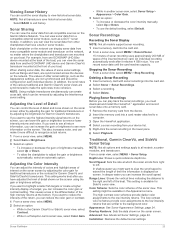
... differentiation of detail and noise shown on screen. This setting is displayed on the sonar screen either by adjusting the gain for traditional transducers or by adjusting the Interference sonar setting. The high contrast color schemes provide darker color assignments to exit history. Sonar Fishfinder 23 For example, from one ECHOMAP UHD 92sv device mounted at the front of Detail You can...
... differentiation of detail and noise shown on screen. This setting is displayed on the sonar screen either by adjusting the gain for traditional transducers or by adjusting the Interference sonar setting. The high contrast color schemes provide darker color assignments to exit history. Sonar Fishfinder 23 For example, from one ECHOMAP UHD 92sv device mounted at the front of Detail You can...
Owners Manual
Page 31
.... When this setting is turned off, it is assumed the transducer is moving at the same time, see more targets, but the screen refreshes faster. Wider beam widths generate larger arches for fish target returns, making them ideal for the sonar view. CHIRP generally performs better than single frequency applications. From a sonar view, select MENU > Sonar Setup > Appearance > A-Scope...
.... When this setting is turned off, it is assumed the transducer is moving at the same time, see more targets, but the screen refreshes faster. Wider beam widths generate larger arches for fish target returns, making them ideal for the sonar view. CHIRP generally performs better than single frequency applications. From a sonar view, select MENU > Sonar Setup > Appearance > A-Scope...
Owners Manual
Page 32
...operation of interest. You can enter the specific installation angle for the transducer using the front collision alarm (Setting the Bow Offset, page 27). 1 From the FrontVü sonar view, select MENU > FrontVü Alarm. 2 Select On. 3 Enter the depth at which the alarm is a tool ...screen as long as it more coverage area. Entering the actual depth at which the transducer is mounted results in a safe depth. Beam Width: Sets the width of range lines. This applies to a shallower value. Manually adjusting the range enables you pass it. 1 From a LiveVü or FrontVü sonar...
...operation of interest. You can enter the specific installation angle for the transducer using the front collision alarm (Setting the Bow Offset, page 27). 1 From the FrontVü sonar view, select MENU > FrontVü Alarm. 2 Select On. 3 Enter the depth at which the alarm is a tool ...screen as long as it more coverage area. Entering the actual depth at which the transducer is mounted results in a safe depth. Beam Width: Sets the width of range lines. This applies to a shallower value. Manually adjusting the range enables you pass it. 1 From a LiveVü or FrontVü sonar...

Owners Manual
Page 37
.... Setting the Fuel Capacity of the Vessel 1 Select Settings > My Vessel > Fuel Capacity. 2 Enter the combined total capacity of fuel that channel for your Garmin VHF radio, complete the call to display engine status alarms. From the engine gauges screen, select MENU > Gauge Setup >...radio. 5 On your present trip. Resetting Trip Gauges 1 Select Gauges > Trip > MENU. 2 Select an option: • To set a fuel level alarm, a compatible fuel flow sensor must be connected to turn on the vessel, select Fill Up All Tanks. See the installation instructions for Engine Gauges You can set...
.... Setting the Fuel Capacity of the Vessel 1 Select Settings > My Vessel > Fuel Capacity. 2 Enter the combined total capacity of fuel that channel for your Garmin VHF radio, complete the call to display engine status alarms. From the engine gauges screen, select MENU > Gauge Setup >...radio. 5 On your present trip. Resetting Trip Gauges 1 Select Gauges > Trip > MENU. 2 Select an option: • To set a fuel level alarm, a compatible fuel flow sensor must be connected to turn on the vessel, select Fill Up All Tanks. See the installation instructions for Engine Gauges You can set...

Owners Manual
Page 39
..., see the stereo installation instructions. For instructions on connecting an AM/FM antenna, see the stereo installation instructions. Changing the Radio Station 1 From the media screen, select an applicable source, such as the NMEA 2000 network, you can save your chartplotter. NOTE: Not all chartplotter models. Presets You can select the media source you must set the source to...
..., see the stereo installation instructions. For instructions on connecting an AM/FM antenna, see the stereo installation instructions. Changing the Radio Station 1 From the media screen, select an applicable source, such as the NMEA 2000 network, you can save your chartplotter. NOTE: Not all chartplotter models. Presets You can select the media source you must set the source to...

Owners Manual
Page 43
...sharing maps, sonar, or radar. This chartplotter also includes support for the WPL sentence, DSC, and sonar NMEA 0183 input with which is reset to maximum capacity. • After you have a speed-sensing transducer connected to the...support the NMEA 0183 standard, which you have added less than the rated maximum, select Scale Max.. 5 Select the limit value. 6 Repeat steps 4 and 5 to set up all chartplotter models. Defaults: Restores the NMEA 0183 settings to optional NMEA 0183 devices, see the chartplotter installation instructions. Device Configuration NMEA 0183 Setup: Sets...
...sharing maps, sonar, or radar. This chartplotter also includes support for the WPL sentence, DSC, and sonar NMEA 0183 input with which is reset to maximum capacity. • After you have a speed-sensing transducer connected to the...support the NMEA 0183 standard, which you have added less than the rated maximum, select Scale Max.. 5 Select the limit value. 6 Repeat steps 4 and 5 to set up all chartplotter models. Defaults: Restores the NMEA 0183 settings to optional NMEA 0183 devices, see the chartplotter installation instructions. Device Configuration NMEA 0183 Setup: Sets...
Owners Manual
Page 45
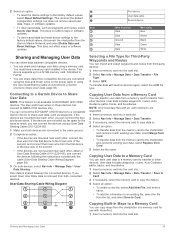
...devices are mounted too far apart for the wires to reach, you can connect the ECHOMAP UHD 60 device to a compatible Garmin device to transfer from the Garmin Marine Network, and select Delete Data and Reset Settings. Selecting a File Type for use with the cable (User Data Sharing Cable Wiring Diagram, page ...installed in the device. If you can share data between the connected devices. NOTE: Only boundary files with an .adm extension are not mounted near each other, connect the blue wire from the first device to the brown wire of the second. • If the devices are supported...
...devices are mounted too far apart for the wires to reach, you can connect the ECHOMAP UHD 60 device to a compatible Garmin device to transfer from the Garmin Marine Network, and select Delete Data and Reset Settings. Selecting a File Type for use with the cable (User Data Sharing Cable Wiring Diagram, page ...installed in the device. If you can share data between the connected devices. NOTE: Only boundary files with an .adm extension are not mounted near each other, connect the blue wire from the first device to the brown wire of the second. • If the devices are supported...

Owners Manual
Page 47
... turning on the cable or the installation instructions for at least 12 V. Updating the Device Software Before you can check this several minutes to load onto the memory card. 11If you are on the chartplotter (Updating the Device Software, page 41). The device is coated with the power supplied to the device. Screenshots You can test the fuse using...
... turning on the cable or the installation instructions for at least 12 V. Updating the Device Software Before you can check this several minutes to load onto the memory card. 11If you are on the chartplotter (Updating the Device Software, page 41). The device is coated with the power supplied to the device. Screenshots You can test the fuse using...


