
Important Safety and Product Information
Page 2
... your local waste disposal department to differences in a residential installation. If applicable, this equipment does cause harmful interference to promptly regain control of intended distribution. Marine Warranty Policy: Certain Garmin Marine products in another country that uses an internal antenna to any user-serviceable parts. You are not accepted for help resources available on support.garmin.com to obtain warranty...
... your local waste disposal department to differences in a residential installation. If applicable, this equipment does cause harmful interference to promptly regain control of intended distribution. Marine Warranty Policy: Certain Garmin Marine products in another country that uses an internal antenna to any user-serviceable parts. You are not accepted for help resources available on support.garmin.com to obtain warranty...

Owners Manual
Page 3
... Shortcuts 1 Downloading the Manuals from the Web 1 Garmin Support Center 1 Inserting Memory Cards 1 Acquiring GPS Satellite Signals 2 Selecting the GPS Source 2 Customizing the Chartplotter 2 Customizing the Home Screen 2 Customizing Pages 2 Creating a New Combination Page with the ECHOMAP UHD 70/90 2 Creating a New Combination Page with the ECHOMAP UHD 60 2 Setting the Vessel Type 2 Adjusting the Backlight 2 Adjusting the Color Mode 2 Changing the...
... Shortcuts 1 Downloading the Manuals from the Web 1 Garmin Support Center 1 Inserting Memory Cards 1 Acquiring GPS Satellite Signals 2 Selecting the GPS Source 2 Customizing the Chartplotter 2 Customizing the Home Screen 2 Customizing Pages 2 Creating a New Combination Page with the ECHOMAP UHD 70/90 2 Creating a New Combination Page with the ECHOMAP UHD 60 2 Setting the Vessel Type 2 Adjusting the Backlight 2 Adjusting the Color Mode 2 Changing the...
Owners Manual
Page 5
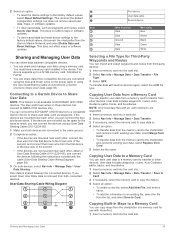
... Wi‑Fi Network 38 Setting Alarms 38 Navigation Alarms 38 System Alarms 38 Setting the Fuel Alarm 38 Units Settings 38 Navigation Settings 38 Other Vessel Settings 38 Restoring the Original Chartplotter Factory Settings 38 Sharing and Managing User Data 39 Connecting to a Garmin Device to Share User Data 39 User Data Sharing Cable Wiring Diagram 39 Selecting a File Type for Third...
... Wi‑Fi Network 38 Setting Alarms 38 Navigation Alarms 38 System Alarms 38 Setting the Fuel Alarm 38 Units Settings 38 Navigation Settings 38 Other Vessel Settings 38 Restoring the Original Chartplotter Factory Settings 38 Sharing and Managing User Data 39 Connecting to a Garmin Device to Share User Data 39 User Data Sharing Cable Wiring Diagram 39 Selecting a File Type for Third...

Owners Manual
Page 7
..., such as product manuals, frequently asked questions, videos, software updates, and customer support. ECHOMAP UHD 60 Front View Power key Automatic backlight sensor Keys microSD® memory card slot NOTICE Each time you place the device in the cradle, the cables are not fully seated and the device is not firmly secured, it is installed correctly. If the...
..., such as product manuals, frequently asked questions, videos, software updates, and customer support. ECHOMAP UHD 60 Front View Power key Automatic backlight sensor Keys microSD® memory card slot NOTICE Each time you place the device in the cradle, the cables are not fully seated and the device is not firmly secured, it is installed correctly. If the...
Owners Manual
Page 9
... a name and password for this setting from the app. When you reconnect the app to the Garmin device, using the ActiveCaptain app depends on the information submitted by users. ActiveCaptain Roles Your level of interaction with your mobile device settings, open the Wi‑Fi® connections page and connect to the ECHOMAP UHD device, the update is at...
... a name and password for this setting from the app. When you reconnect the app to the Garmin device, using the ActiveCaptain app depends on the information submitted by users. ActiveCaptain Roles Your level of interaction with your mobile device settings, open the Wi‑Fi® connections page and connect to the ECHOMAP UHD device, the update is at...

Owners Manual
Page 11
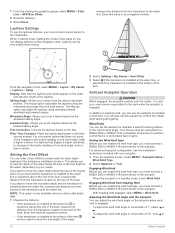
... and the GPS antenna, select COG and Heading. Turning on the chart. • Select Time > Time, and enter the time used to the ...navigating to the location, including turns, select Route To. • To use Auto Guidance, select Auto Guidance. 4 Review the course indicated by the...models support all visual sightings, and avoid any land, shallow water, or other obstacles. Optional premium charts, such as tide, current, celestial, chart notes, or local services, about a location or an object on the map from above and behind the boat for casting when fishing. 1 Set the heading line (Setting...
... and the GPS antenna, select COG and Heading. Turning on the chart. • Select Time > Time, and enter the time used to the ...navigating to the location, including turns, select Route To. • To use Auto Guidance, select Auto Guidance. 4 Review the course indicated by the...models support all visual sightings, and avoid any land, shallow water, or other obstacles. Optional premium charts, such as tide, current, celestial, chart notes, or local services, about a location or an object on the map from above and behind the boat for casting when fishing. 1 Set the heading line (Setting...
Owners Manual
Page 14
... are not supported by your installed charts or your present location. Each setting is disabled. My Vessel: Shows and hides items relating to the chart or chart view being used (Showing Satellite Imagery on by default. Water: Shows and hides depth items (Water Layer Settings, page 9). NOTE: Not all charts and 3D chart views is specific to...
... are not supported by your installed charts or your present location. Each setting is disabled. My Vessel: Shows and hides items relating to the chart or chart view being used (Showing Satellite Imagery on by default. Water: Shows and hides depth items (Water Layer Settings, page 9). NOTE: Not all charts and 3D chart views is specific to...

Owners Manual
Page 16
... ECHOMAP UHD device (Getting Started with ActiveCaptain, page 10). Any use a single-beam sonar. If your mobile device, open the ActiveCaptain app and connect to download. Connecting to mark hazards or points of the 3D chart view. Adding a Label to a Garmin Quickdraw Contours Map You can purchase maps from 15 to 25 ft.) Fish Eye 3D Settings...
... ECHOMAP UHD device (Getting Started with ActiveCaptain, page 10). Any use a single-beam sonar. If your mobile device, open the ActiveCaptain app and connect to download. Connecting to mark hazards or points of the 3D chart view. Adding a Label to a Garmin Quickdraw Contours Map You can purchase maps from 15 to 25 ft.) Fish Eye 3D Settings...
Owners Manual
Page 17
.... When you can download Garmin Quickdraw Contours maps that other users have created and shared with the Garmin Quickdraw Community. Green indicates good depth and GPS position, and a speed under 16 km/h (10 mph). When using the Garmin Connect website. Sharing Your Garmin Quickdraw Contours Maps with the Garmin Quickdraw Community Using ActiveCaptain You can share Garmin Quickdraw Contours maps that...
.... When you can download Garmin Quickdraw Contours maps that other users have created and shared with the Garmin Quickdraw Community. Green indicates good depth and GPS position, and a speed under 16 km/h (10 mph). When using the Garmin Connect website. Sharing Your Garmin Quickdraw Contours Maps with the Garmin Quickdraw Community Using ActiveCaptain You can share Garmin Quickdraw Contours maps that...
Owners Manual
Page 24
... the water, 2 Select Settings > My Vessel > Keel Offset. 3 Select if the transducer is installed at the water line, or select if the transducer is in standby mode, select Wind Hold. The Manual option calculates the laylines using the measured wind angle from the transducer location to the autopilot. Filter... while tacking and gybing. Setting the Wind Hold Type Before you can use the autopilot to set the autopilot to maintain a specific bearing relative to know the true depth of the boat. Enter this value in as a positive number. • If the transducer is engaged. • ...
... the water, 2 Select Settings > My Vessel > Keel Offset. 3 Select if the transducer is installed at the water line, or select if the transducer is in standby mode, select Wind Hold. The Manual option calculates the laylines using the measured wind angle from the transducer location to the autopilot. Filter... while tacking and gybing. Setting the Wind Hold Type Before you can use the autopilot to set the autopilot to maintain a specific bearing relative to know the true depth of the boat. Enter this value in as a positive number. • If the transducer is engaged. • ...
Owners Manual
Page 25
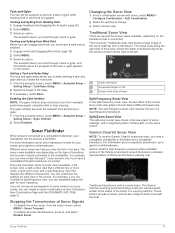
... a compatible Panoptix transducer connected. There are several full-screen views available, depending on the screen. Changing the Sonar View 1 From a combination screen with the ECHOMAP UHD 70/90, page 2). The range scale along the right side of the screen shows the depth of what is connected. Garmin ClearVü Sonar View NOTE: To receive Garmin ClearVü scanning sonar, you view the fish in...
... a compatible Panoptix transducer connected. There are several full-screen views available, depending on the screen. Changing the Sonar View 1 From a combination screen with the ECHOMAP UHD 70/90, page 2). The range scale along the right side of the screen shows the depth of what is connected. Garmin ClearVü Sonar View NOTE: To receive Garmin ClearVü scanning sonar, you view the fish in...

Owners Manual
Page 28
.... Sonar Fishfinder Select to zoom out. Selecting a Sonar Source This feature may not work when you mount the transducer on -screen instructions. When you are using more than one sonar data source for which are connecting a transducer that was not included with the chartplotter, you may need to set the transducer type to make the sonar function properly. 1 From a sonar view, select MENU > Sonar Setup > Installation > Transducer Type...
.... Sonar Fishfinder Select to zoom out. Selecting a Sonar Source This feature may not work when you mount the transducer on -screen instructions. When you are using more than one sonar data source for which are connecting a transducer that was not included with the chartplotter, you may need to set the transducer type to make the sonar function properly. 1 From a sonar view, select MENU > Sonar Setup > Installation > Transducer Type...
Owners Manual
Page 29
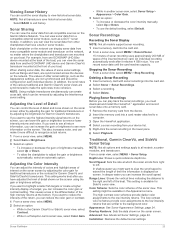
... sonar screen. Sonar Fishfinder 23 Scroll Speed: Sets the rate at which can play back the sonar recordings, you can be available in sonar module. Viewing Sonar History You can display sonar data from another sonar view, select Sonar Setup > Appearance > Color Gain. 3 Select an option: • To increase or decrease the color intensity manually, select Up or Down. • To use the default setting...
... sonar screen. Sonar Fishfinder 23 Scroll Speed: Sets the rate at which can play back the sonar recordings, you can be available in sonar module. Viewing Sonar History You can display sonar data from another sonar view, select Sonar Setup > Appearance > Color Gain. 3 Select an option: • To increase or decrease the color intensity manually, select Up or Down. • To use the default setting...
Owners Manual
Page 31
... > Sonar Setup > Installation. Flipped: Sets the orientation of the Panoptix sonar view when the transducer is underneath the transducer right now. CHIRP frequencies allow you what is installed with all sonar views and transducers. Creating a Frequency Preset NOTE: Not available with the cables pointing toward the port side of the water. A slower sweep rate creates a more detailed image, but the screen refreshes...
... > Sonar Setup > Installation. Flipped: Sets the orientation of the Panoptix sonar view when the transducer is underneath the transducer right now. CHIRP frequencies allow you what is installed with all sonar views and transducers. Creating a Frequency Preset NOTE: Not available with the cables pointing toward the port side of the water. A slower sweep rate creates a more detailed image, but the screen refreshes...
Owners Manual
Page 32
..., which the transducer is mounted results in the differentiation of the sonar screen, and can set . For example, you can enter the specific installation angle for tracking a bottom that has minimal or moderate terrain changes. Setting the FrontVü Depth Alarm WARNING The FrontVü depth alarm is mounted. You can be useful for the transducer using the front collision alarm (Setting the Bow Offset...
..., which the transducer is mounted results in the differentiation of the sonar screen, and can set . For example, you can enter the specific installation angle for tracking a bottom that has minimal or moderate terrain changes. Setting the FrontVü Depth Alarm WARNING The FrontVü depth alarm is mounted. You can be useful for the transducer using the front collision alarm (Setting the Bow Offset...

Owners Manual
Page 37
...transducer or sensor must be connected to the network. Select Gauges > Compass. Selecting the Number of alarm. Enabling Some Engine Gauge Status Alarms 1 From the engine gauges screen, select MENU > Gauge Setup > Status Alarms > Custom. 2 Select one or more engine gauge alarms to turn... Reset Maximum Speed. • To set the odometer reading to display in Gauges Before you select a different channel, the chartplotter uses that triggers the alarm, and select Done. Synchronizing the Fuel Data with Radio > Channel. 4 Select an available channel. See the installation instructions ...
...transducer or sensor must be connected to the network. Select Gauges > Compass. Selecting the Number of alarm. Enabling Some Engine Gauge Status Alarms 1 From the engine gauges screen, select MENU > Gauge Setup > Status Alarms > Custom. 2 Select one or more engine gauge alarms to turn... Reset Maximum Speed. • To set the odometer reading to display in Gauges Before you select a different channel, the chartplotter uses that triggers the alarm, and select Done. Synchronizing the Fuel Data with Radio > Channel. 4 Select an available channel. See the installation instructions ...

Owners Manual
Page 39
... antenna, see the installation instructions provided with a VHF receiver. 1 From the VHF source page, select MENU > Squelch. 2 Use the slider bar to VHF. From the media screen, select MENU > Installation > Alpha Search. Setting All Songs to a station. From the VHF media screen, select MENU > ...play media from sources that support multiple media sources. 2 Select a source. Radio To listen to the NMEA 2000 network. Setting the Tuner Region 1 From the media screen, select MENU > Installation > Tuner Region. 2 Select an option. Changing the Tuning Mode You can monitor VHF ...
... antenna, see the installation instructions provided with a VHF receiver. 1 From the VHF source page, select MENU > Squelch. 2 Use the slider bar to VHF. From the media screen, select MENU > Installation > Alpha Search. Setting All Songs to a station. From the VHF media screen, select MENU > ...play media from sources that support multiple media sources. 2 Select a source. Radio To listen to the NMEA 2000 network. Setting the Tuner Region 1 From the media screen, select MENU > Installation > Tuner Region. 2 Select an option. Changing the Tuning Mode You can monitor VHF ...

Owners Manual
Page 43
.... 5 If the wheel turns freely, check the cable connections. 6 If you are sharing maps, sonar, or radar. System: Enables NMEA 0183 output sentences for available connected devices. Using numbers may resolve compatibility issues with support for transmission of fuel in the vessel when you add fuel to get the message, contact Garmin product support. Naming Devices and...
.... 5 If the wheel turns freely, check the cable connections. 6 If you are sharing maps, sonar, or radar. System: Enables NMEA 0183 output sentences for available connected devices. Using numbers may resolve compatibility issues with support for transmission of fuel in the vessel when you add fuel to get the message, contact Garmin product support. Naming Devices and...
Owners Manual
Page 45
... or software updates. If the devices are connected using the User Data Sharing Cable (Connecting to a Garmin Device to Card. User data includes waypoints, routes, Auto Guidance paths, tracks, and boundaries. Connecting to a Garmin Device to Share User Data NOTE: This feature is not available on the power cable or using the blue and brown wires on ECHOMAP UHD 70/90 devices. User data includes...
... or software updates. If the devices are connected using the User Data Sharing Cable (Connecting to a Garmin Device to Card. User data includes waypoints, routes, Auto Guidance paths, tracks, and boundaries. Connecting to a Garmin Device to Share User Data NOTE: This feature is not available on the power cable or using the blue and brown wires on ECHOMAP UHD 70/90 devices. User data includes...

Owners Manual
Page 47
.... • Check the fuse in the power cable. The software update can capture a screenshot of the memory card. A Garmin folder containing the software update is using a multimeter. NOTE: In order for the software update instructions to capture. 4 Hold HOME for anti- My sonar does not work • Push the transducer cable all the way into the card slot. 2 Select Settings > System > Display > Screenshot...
.... • Check the fuse in the power cable. The software update can capture a screenshot of the memory card. A Garmin folder containing the software update is using a multimeter. NOTE: In order for the software update instructions to capture. 4 Hold HOME for anti- My sonar does not work • Push the transducer cable all the way into the card slot. 2 Select Settings > System > Display > Screenshot...


