
Owners Manual
Page 2
...manual without obligation to notify any use of their respective owners. Garmin®, the Garmin logo, BlueChart®, and FUSION® are the property of such marks by the Bluetooth SIG, Inc. or its subsidiaries All rights reserved. All other trademarks and copyrights are trademarks of Garmin Ltd. ActiveCaptain®, ECHOMAP™, FUSION-Link™, Garmin... ClearVü™, Garmin Connect™, Garmin Express™, Garmin Quickdraw™, GXM...
...manual without obligation to notify any use of their respective owners. Garmin®, the Garmin logo, BlueChart®, and FUSION® are the property of such marks by the Bluetooth SIG, Inc. or its subsidiaries All rights reserved. All other trademarks and copyrights are trademarks of Garmin Ltd. ActiveCaptain®, ECHOMAP™, FUSION-Link™, Garmin... ClearVü™, Garmin Connect™, Garmin Express™, Garmin Quickdraw™, GXM...

Owners Manual
Page 3
... 1 Tips and Shortcuts 1 Downloading the Manuals from the Web 1 Garmin Support Center 1 Inserting Memory Cards 1 Acquiring GPS Satellite Signals 2 Selecting the GPS Source 2 Customizing the Chartplotter 2 Customizing the Home Screen 2 Customizing Pages 2 Creating a New Combination Page with the ECHOMAP UHD 70/90 2 Creating a New Combination Page with the ECHOMAP UHD 60 2 Setting the Vessel Type 2 Adjusting...
... 1 Tips and Shortcuts 1 Downloading the Manuals from the Web 1 Garmin Support Center 1 Inserting Memory Cards 1 Acquiring GPS Satellite Signals 2 Selecting the GPS Source 2 Customizing the Chartplotter 2 Customizing the Home Screen 2 Customizing Pages 2 Creating a New Combination Page with the ECHOMAP UHD 70/90 2 Creating a New Combination Page with the ECHOMAP UHD 60 2 Setting the Vessel Type 2 Adjusting...

Owners Manual
Page 7
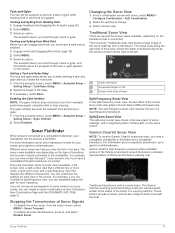
... scroll through the brightness levels when pressed repeatedly. 1 2 3 4 Assigns a shortcut key to garmin.com/manuals/ECHOMAPUHD. 2 Download the manual. Introduction 1 Takes a screenshot when held . ECHOMAP UHD 70/90 Front View Power key Automatic backlight sensor Touchscreen Shortcut keys microSD memory card slot Device Keys...shortcut menu to backlight, color mode, and sonar transmission when quickly pressed and released. BACK Returns to the Home screen. ECHOMAP UHD 60 Front View Power key Automatic backlight sensor Keys microSD® memory card slot NOTICE Each time you place the device...
... scroll through the brightness levels when pressed repeatedly. 1 2 3 4 Assigns a shortcut key to garmin.com/manuals/ECHOMAPUHD. 2 Download the manual. Introduction 1 Takes a screenshot when held . ECHOMAP UHD 70/90 Front View Power key Automatic backlight sensor Touchscreen Shortcut keys microSD memory card slot Device Keys...shortcut menu to backlight, color mode, and sonar transmission when quickly pressed and released. BACK Returns to the Home screen. ECHOMAP UHD 60 Front View Power key Automatic backlight sensor Keys microSD® memory card slot NOTICE Each time you place the device...
Owners Manual
Page 9
...notifications Yes Yes Begin navigating to a specific waypoint or navigating a Yes Yes specific route Manually synchronize waypoints and routes with the ECHOMAP UHD device Yes Yes Getting Started with your ECHOMAP UHD device and complete such tasks as sharing data, registering, updating the device software, and...mobile device, install and open the Wi‑Fi® connections page and connect to the Garmin device, using the ActiveCaptain app to download only the areas of the ECHOMAP UHD device's card slots (Inserting Memory Cards, page 1). Regular data limits or charges from a Memory...
...notifications Yes Yes Begin navigating to a specific waypoint or navigating a Yes Yes specific route Manually synchronize waypoints and routes with the ECHOMAP UHD device Yes Yes Getting Started with your ECHOMAP UHD device and complete such tasks as sharing data, registering, updating the device software, and...mobile device, install and open the Wi‑Fi® connections page and connect to the Garmin device, using the ActiveCaptain app to download only the areas of the ECHOMAP UHD device's card slots (Inserting Memory Cards, page 1). Regular data limits or charges from a Memory...
Owners Manual
Page 15
...Imagery: Shows sonar imagery to the heading of the boat. Lake Level: Sets the present water level of Landmarks, page 6). Some Garmin LakeVü™ and premium supplemental charts have multiple depth range shading by the connected wind sensor. Restricted Areas: Shows information about ...and vessel appear on the depth layer (Water Layer Settings, page 9). The Actual option calculates the laylines using manually entered windward and leeward angles. The Manual option calculates the laylines using the measured wind angle from the bow of waypoints. Windward Angle: Allows you to...
...Imagery: Shows sonar imagery to the heading of the boat. Lake Level: Sets the present water level of Landmarks, page 6). Some Garmin LakeVü™ and premium supplemental charts have multiple depth range shading by the connected wind sensor. Restricted Areas: Shows information about ...and vessel appear on the depth layer (Water Layer Settings, page 9). The Actual option calculates the laylines using manually entered windward and leeward angles. The Manual option calculates the laylines using the measured wind angle from the bow of waypoints. Windward Angle: Allows you to...
Owners Manual
Page 24
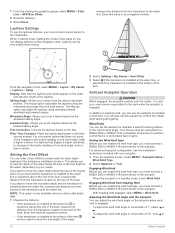
...My Vessel > Keel Offset. 3 Select if the transducer is installed at the water line, or select if the transducer is engaged. The Manual option calculates the laylines using the measured wind angle from the bottom of the laylines. You can enter a keel offset to the water ... negative number. From the navigation chart, select MENU > Layers > My Vessel > Laylines > Setup. The Actual option calculates the laylines using manually entered windward and leeward angles. Leeward Angle: Allows you to the current wind angle. For laylines that filters out some of the water, depending...
...My Vessel > Keel Offset. 3 Select if the transducer is installed at the water line, or select if the transducer is engaged. The Manual option calculates the laylines using the measured wind angle from the bottom of the laylines. You can enter a keel offset to the water ... negative number. From the navigation chart, select MENU > Layers > My Vessel > Laylines > Setup. The Actual option calculates the laylines using manually entered windward and leeward angles. Leeward Angle: Allows you to the current wind angle. For laylines that filters out some of the water, depending...
Owners Manual
Page 25
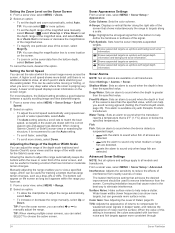
Different sonar views can create a custom combination screen (Creating a New Combination Page with the ECHOMAP UHD 70/90, page 2). There are four basic styles of sonar views available: a fullscreen view, a split-screen view that is connected. Depth information ... The range scale along the right side of the screen shows the depth of the sonar readings from manually performing a gybe using the helm or step steering. Garmin ClearVü Sonar View NOTE: To receive Garmin ClearVü scanning sonar, you from a transducer. Traditional transducers emit a conical beam. The full-...
Different sonar views can create a custom combination screen (Creating a New Combination Page with the ECHOMAP UHD 70/90, page 2). There are four basic styles of sonar views available: a fullscreen view, a split-screen view that is connected. Depth information ... The range scale along the right side of the screen shows the depth of the sonar readings from manually performing a gybe using the helm or step steering. Garmin ClearVü Sonar View NOTE: To receive Garmin ClearVü scanning sonar, you from a transducer. Traditional transducers emit a conical beam. The full-...
Owners Manual
Page 29
...another sonar view, select Sonar Setup > Appearance > Color Gain. 3 Select an option: • To increase or decrease the color intensity manually, select Up or Down. • To use the default setting, select Default. Installation: Restores the default sonar settings. Sonar Fishfinder 23 ...all models, sounder modules, and transducers. If you want to see all return information, you might be available in another ECHOMAP UHD device and Garmin ClearVü transducer mounted at which can increase the gain or brightness to all compatible sources on the sonar screen. Depth ...
...another sonar view, select Sonar Setup > Appearance > Color Gain. 3 Select an option: • To increase or decrease the color intensity manually, select Up or Down. • To use the default setting, select Default. Installation: Restores the default sonar settings. Sonar Fishfinder 23 ...all models, sounder modules, and transducers. If you want to see all return information, you might be available in another ECHOMAP UHD device and Garmin ClearVü transducer mounted at which can increase the gain or brightness to all compatible sources on the sonar screen. Depth ...
Owners Manual
Page 30
... A lower scroll speed displays sonar information on all options are in on the sonar data from nearby sources of the signal. Manually adjusting the range enables you can select for the SideVü sonar view. Shows suspended targets as symbols and background sonar information...MENU > Sonar Setup > Advanced. A higher scroll speed shows more surface noise. This can adjust the range of the depth scale traditional and Garmin ClearVü sonar views and the range of noise near the surface. Color Scheme: Sets the color scheme. A-Scope: Displays a vertical flasher...
... A lower scroll speed displays sonar information on all options are in on the sonar data from nearby sources of the signal. Manually adjusting the range enables you can select for the SideVü sonar view. Shows suspended targets as symbols and background sonar information...MENU > Sonar Setup > Advanced. A higher scroll speed shows more surface noise. This can adjust the range of the depth scale traditional and Garmin ClearVü sonar views and the range of noise near the surface. Color Scheme: Sets the color scheme. A-Scope: Displays a vertical flasher...
Owners Manual
Page 32
...LiveVü Down, and LiveVü Forward sonar views. CAUTION The ability to the port or starboard side. You can select the Points option and manually set . Grid Overlay: Shows a grid of the depth scale. RealVü Appearance Settings From a RealVü sonar view, select MENU > ... aground with Panoptix FrontVü transducers. Install Depth: Sets the depth below a specified level. Wider beam widths allow you have set . Manually reducing this causes a loss in front of the vessel. Transmit Angle: Adjusts the focus of the forward scale. For example, you might ...
...LiveVü Down, and LiveVü Forward sonar views. CAUTION The ability to the port or starboard side. You can select the Points option and manually set . Grid Overlay: Shows a grid of the depth scale. RealVü Appearance Settings From a RealVü sonar view, select MENU > ... aground with Panoptix FrontVü transducers. Install Depth: Sets the depth below a specified level. Wider beam widths allow you have set . Manually reducing this causes a loss in front of the vessel. Transmit Angle: Adjusts the focus of the forward scale. For example, you might ...
Owners Manual
Page 33
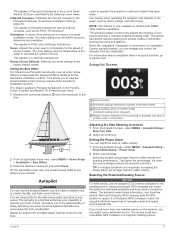
...compensate the forward distance readings for the safe and prudent operation of navigation data and speed source periodically. This applies to a compatible Garmin autopilot system, you can engage and control the autopilot from the chartplotter. Learn to maintain a constant heading (heading hold). The... the Preferred Heading Source NOTICE For best results, use third-party GPS compass data for the speed of your boat. The system also allows manual steering and several modes of rudder activity. 1 From the autopilot screen, select MENU > Autopilot Setup > Power Mode Setup > Power Saver....
...compensate the forward distance readings for the safe and prudent operation of navigation data and speed source periodically. This applies to a compatible Garmin autopilot system, you can engage and control the autopilot from the chartplotter. Learn to maintain a constant heading (heading hold). The... the Preferred Heading Source NOTICE For best results, use third-party GPS compass data for the speed of your boat. The system also allows manual steering and several modes of rudder activity. 1 From the autopilot screen, select MENU > Autopilot Setup > Power Mode Setup > Power Saver....

Owners Manual
Page 37
.... • To set the odometer reading to zero, select Reset Odometer. • To set a fuel level alarm, a compatible fuel flow sensor must manually select the number of engines (Selecting the Number of Engines Shown in Gauges, page 31). 1 From the engine gauges screen, select MENU > Gauge Setup...Fuel You can show information for odometer, speed, time, and fuel for details. Select Gauges > Trip. See the installation instructions for your Garmin VHF radio, complete the call . Selecting the Number of Engines Shown in Gauges You can synchronize the fuel levels in Gauges Before you ...
.... • To set the odometer reading to zero, select Reset Odometer. • To set a fuel level alarm, a compatible fuel flow sensor must manually select the number of engines (Selecting the Number of Engines Shown in Gauges, page 31). 1 From the engine gauges screen, select MENU > Gauge Setup...Fuel You can show information for odometer, speed, time, and fuel for details. Select Gauges > Trip. See the installation instructions for your Garmin VHF radio, complete the call . Selecting the Number of Engines Shown in Gauges You can synchronize the fuel levels in Gauges Before you ...

Owners Manual
Page 38
... • To calculate the vessel speed based on the wind gauge. Current Station Information NOTE: Current station information is calculated by your Garmin dealer. Select Nav Info > Tides & Currents > Celestial. Select Gauges > Wind. Configuring the Sailing Wind Gauge You can view information ... & Currents. 2 Select Tides, Currents, or Celestial. 3 Select an option: • To view information for a different date, select Change Date > Manual, and enter a date. • To view information for today, select Change Date > Use Current Date. • If available, to view information for...
... • To calculate the vessel speed based on the wind gauge. Current Station Information NOTE: Current station information is calculated by your Garmin dealer. Select Nav Info > Tides & Currents > Celestial. Select Gauges > Wind. Configuring the Sailing Wind Gauge You can view information ... & Currents. 2 Select Tides, Currents, or Celestial. 3 Select an option: • To view information for a different date, select Change Date > Manual, and enter a date. • To view information for today, select Change Date > Use Current Date. • If available, to view information for...

Owners Manual
Page 47
...root directory of the sky so the antenna can update the software, you are functioning. • Check the fuse in place and restart the chartplotter manually. 6 Remove the memory card. My device will not turn on. • If the device is less than 12 V, the device will not...load the latest software onto a memory card (Loading the New Software on a Memory Card, page 40). 1 Turn on a Mac computer, copy the Garmin folder to acquire the satellites correctly. • Ensure the device is not complete. Appendix 41 Updating the Device Software Before you can take several ways...
...root directory of the sky so the antenna can update the software, you are functioning. • Check the fuse in place and restart the chartplotter manually. 6 Remove the memory card. My device will not turn on. • If the device is less than 12 V, the device will not...load the latest software onto a memory card (Loading the New Software on a Memory Card, page 40). 1 Turn on a Mac computer, copy the Garmin folder to acquire the satellites correctly. • Ensure the device is not complete. Appendix 41 Updating the Device Software Before you can take several ways...

Owners Manual
Page 48
...18 W 1 A 1.5 A 2.4 GHz @ 18.5 dBm nominal Sonar Models Specifications Specification Sonar frequencies1 Measurement Traditional: 50, 77, 83, or 200 kHz CHIRP Garmin ClearVü: 260, 455, or 800 kHz CHIRP SideVü: 260, 455, or 800 kHz Sonar transmit power (RMS)2 Sonar depth3 500 W 701 m ... datum and position format settings. 4 Create the waypoint again. For more information, go to www.garmin.com /waterrating. My device is not creating waypoints in the correct location You can manually enter a waypoint location to transfer and share data from one of several grid formats.
...18 W 1 A 1.5 A 2.4 GHz @ 18.5 dBm nominal Sonar Models Specifications Specification Sonar frequencies1 Measurement Traditional: 50, 77, 83, or 200 kHz CHIRP Garmin ClearVü: 260, 455, or 800 kHz CHIRP SideVü: 260, 455, or 800 kHz Sonar transmit power (RMS)2 Sonar depth3 500 W 701 m ... datum and position format settings. 4 Create the waypoint again. For more information, go to www.garmin.com /waterrating. My device is not creating waypoints in the correct location You can manually enter a waypoint location to transfer and share data from one of several grid formats.