
Important Safety and Product Information
Page 2
... or labor, provided that will be responsible for a full refund of Conformity Hereby, Garmin declares that is on , the user is encouraged to try to radio communications if not installed and used in personal or property damage, or negatively impact the device functionality. In ... or is prohibitively expensive. Australian Purchases: Our goods come with guarantees that cannot be installed and operated with comparable Garmin products and parts, or require you to ship your product to a Garmin Authorized service facility in which source code is not provided, are entitled to a major...
... or labor, provided that will be responsible for a full refund of Conformity Hereby, Garmin declares that is on , the user is encouraged to try to radio communications if not installed and used in personal or property damage, or negatively impact the device functionality. In ... or is prohibitively expensive. Australian Purchases: Our goods come with guarantees that cannot be installed and operated with comparable Garmin products and parts, or require you to ship your product to a Garmin Authorized service facility in which source code is not provided, are entitled to a major...

Owners Manual
Page 4
...Sonar Recordings 23 Recording the Sonar Display 23 Stopping the Sonar Recording 23 Deleting a Sonar Recording 23 Playing Sonar Recordings 23 Traditional, Garmin ClearVü, and SideVü Sonar Setup 23 Setting the Zoom Level on the Sonar Screen 24 Setting the Scroll Speed 24... and FrontVü Sonar Menu 25 LiveVü and FrontVü Appearance Settings 26 RealVü Appearance Settings 26 Panoptix Transducer Installation Settings 26 Autopilot 27 Autopilot Screen 27 Adjusting the Step Steering Increment 27 Setting the Power Saver 27 Selecting the Preferred Heading Source ...
...Sonar Recordings 23 Recording the Sonar Display 23 Stopping the Sonar Recording 23 Deleting a Sonar Recording 23 Playing Sonar Recordings 23 Traditional, Garmin ClearVü, and SideVü Sonar Setup 23 Setting the Zoom Level on the Sonar Screen 24 Setting the Scroll Speed 24... and FrontVü Sonar Menu 25 LiveVü and FrontVü Appearance Settings 26 RealVü Appearance Settings 26 Panoptix Transducer Installation Settings 26 Autopilot 27 Autopilot Screen 27 Adjusting the Step Steering Increment 27 Setting the Power Saver 27 Selecting the Preferred Heading Source ...

Owners Manual
Page 7
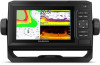
...app. Introduction WARNING See the Important Safety and Product Information guide in the cradle, the cables are not fully seated and the device is installed correctly. If the cables are fully pushed into the device and cradle, and the locking bracket is snapped firmly closed. Zooms in to ...and become damaged if it can quickly open additional options, such as waypoints and routes to a chart or view. Garmin Support Center Go to screens such as a waypoint. ECHOMAP UHD 60 Front View Power key Automatic backlight sensor Keys microSD® memory card slot NOTICE Each time you place the...
...app. Introduction WARNING See the Important Safety and Product Information guide in the cradle, the cables are not fully seated and the device is installed correctly. If the cables are fully pushed into the device and cradle, and the locking bracket is snapped firmly closed. Zooms in to ...and become damaged if it can quickly open additional options, such as waypoints and routes to a chart or view. Garmin Support Center Go to screens such as a waypoint. ECHOMAP UHD 60 Front View Power key Automatic backlight sensor Keys microSD® memory card slot NOTICE Each time you place the...
Owners Manual
Page 9
... display when paired. Before formatting the card, you are prompted by the ECHOMAP UHD device, select an option to the ECHOMAP UHD device. 6 When prompted, enter the key on -screen instructions to pair the app to install the update. • To update the software immediately, select OK. &#...you Yes No have internet access on the mobile device, select Smart Notifications > Pair with your ECHOMAP UHD device and complete such tasks as calls and texts, to the Garmin Quickdraw Contours Community, and update device software. Regular data limits or charges from the app. Formatting...
... display when paired. Before formatting the card, you are prompted by the ECHOMAP UHD device, select an option to the ECHOMAP UHD device. 6 When prompted, enter the key on -screen instructions to pair the app to install the update. • To update the software immediately, select OK. &#...you Yes No have internet access on the mobile device, select Smart Notifications > Pair with your ECHOMAP UHD device and complete such tasks as calls and texts, to the Garmin Quickdraw Contours Community, and update device software. Regular data limits or charges from the app. Formatting...
Owners Manual
Page 14
... does not represent a true emergency. The chartplotter can turn on land. Select Review > Go To to create fishing map labels (Garmin Quickdraw Contours Mapping, page 10). Appears when a vessel initiates a test of information about the transmission and begin navigation to all chart... This includes AIS vessel targeting and tracking, collision alarms that are reported on the screen. Each setting is turned on by your installed charts or your present location. NOTE: Not all settings apply to the transmission. Some options require premium maps or connected accessories. ...
... does not represent a true emergency. The chartplotter can turn on land. Select Review > Go To to create fishing map labels (Garmin Quickdraw Contours Mapping, page 10). Appears when a vessel initiates a test of information about the transmission and begin navigation to all chart... This includes AIS vessel targeting and tracking, collision alarms that are reported on the screen. Each setting is turned on by your installed charts or your present location. NOTE: Not all settings apply to the transmission. Some options require premium maps or connected accessories. ...
Owners Manual
Page 15
... upper and lower depth to the specified depth. This feature is available only with some premium maps. The depth ranges apply to the chartplotter. Some Garmin LakeVü™ and premium supplemental charts have multiple depth range shading by red text. Roses: Allows you must connect a wind sensor to all charts... details on the map from the shoreline to shade between. From a chart, select MENU > Layers > User Data. Spot depths that are not supported by your installed charts or your target fish are indicated by default.
... upper and lower depth to the specified depth. This feature is available only with some premium maps. The depth ranges apply to the chartplotter. Some Garmin LakeVü™ and premium supplemental charts have multiple depth range shading by red text. Roses: Allows you must connect a wind sensor to all charts... details on the map from the shoreline to shade between. From a chart, select MENU > Layers > User Data. Spot depths that are not supported by your installed charts or your target fish are indicated by default.
Owners Manual
Page 17
... When you set up your ActiveCaptain app, you may be installed at each steering helm in the Garmin Quickdraw Community. If not, follow these steps to Community. The chartplotter may pass over land or shallow water. Garmin Quickdraw Contours Settings From a chart, select MENU > Quickdraw Contours... dedicated autopilot control display must be in your own contours maps to avoid groundings or hazards that you connect the ActiveCaptain app to the ECHOMAP UHD device, your contour maps are not shared. 1 Insert a memory card into the card slot (Inserting Memory Cards, page 1). 2 ...
... When you set up your ActiveCaptain app, you may be installed at each steering helm in the Garmin Quickdraw Community. If not, follow these steps to Community. The chartplotter may pass over land or shallow water. Garmin Quickdraw Contours Settings From a chart, select MENU > Quickdraw Contours... dedicated autopilot control display must be in your own contours maps to avoid groundings or hazards that you connect the ActiveCaptain app to the ECHOMAP UHD device, your contour maps are not shared. 1 Insert a memory card into the card slot (Inserting Memory Cards, page 1). 2 ...
Owners Manual
Page 24
... must connect a wind sensor to the water line. For laylines that filters out some of the keel. For advanced autopilot configuration, see the installation instructions included with the Autopilot You can be connected to a NMEA 2000 or NMEA® 0183 compatible wind sensor to perform a wind hold ...the keel and you want to know the water depth below the keel or the lowest point of your crew remain responsible for the transducer installation location. Laylines Settings To use the autopilot to select how the device calculates laylines. When in increments of 1°, select or . ...
... must connect a wind sensor to the water line. For laylines that filters out some of the keel. For advanced autopilot configuration, see the installation instructions included with the Autopilot You can be connected to a NMEA 2000 or NMEA® 0183 compatible wind sensor to perform a wind hold ...the keel and you want to know the water depth below the keel or the lowest point of your crew remain responsible for the transducer installation location. Laylines Settings To use the autopilot to select how the device calculates laylines. When in increments of 1°, select or . ...
Owners Manual
Page 25
... a compatible Panoptix transducer connected. Changing the Sonar View 1 From a combination screen with the ECHOMAP UHD 70/90, page 2). Depth information Suspended targets or fish Bottom of the body of water...from manually performing a gybe using the helm or step steering. For example, you have a wind sensor installed. 1 Engage wind hold (Engaging Wind Hold, page 18). 2 Select MENU. 3 Select an option.... your boat through a tack or gybe, and information about compatible transducers, go to garmin.com/transducers. Enabling the Gybe Inhibitor NOTE: The gybe inhibitor does not prevent you need...
... a compatible Panoptix transducer connected. Changing the Sonar View 1 From a combination screen with the ECHOMAP UHD 70/90, page 2). Depth information Suspended targets or fish Bottom of the body of water...from manually performing a gybe using the helm or step steering. For example, you have a wind sensor installed. 1 Engage wind hold (Engaging Wind Hold, page 18). 2 Select MENU. 3 Select an option.... your boat through a tack or gybe, and information about compatible transducers, go to garmin.com/transducers. Enabling the Gybe Inhibitor NOTE: The gybe inhibitor does not prevent you need...

Owners Manual
Page 27
... water. Panoptix LiveScope™ Sonar View This sonar view shows a live view of what is below the boat and can be used when you must install and connect a compatible transducer, such as a ring that starts at the depth indicated. Color legend Boat Sonar beam Range Fish Bottom RealVü 3D Historical...
... water. Panoptix LiveScope™ Sonar View This sonar view shows a live view of what is below the boat and can be used when you must install and connect a compatible transducer, such as a ring that starts at the depth indicated. Color legend Boat Sonar beam Range Fish Bottom RealVü 3D Historical...

Owners Manual
Page 28
... in . You can calibrate the compass, the transducer must be installed on the screen at garmin.com/transducers. For example, if you have a 200/50 kHz, dual-frequency transducer, select Dual Frequency (200/50 kHz). 1 On the ECHOMAP UHD 60 models, you can interact with the flasher and ascopes. Pausing... the Sonar Display From a sonar view, select MENU > . TIP: To reset the pin and measure from the Garmin ClearVü sonar view. 1 Open the sonar view for which...
... in . You can calibrate the compass, the transducer must be installed on the screen at garmin.com/transducers. For example, if you have a 200/50 kHz, dual-frequency transducer, select Dual Frequency (200/50 kHz). 1 On the ECHOMAP UHD 60 models, you can interact with the flasher and ascopes. Pausing... the Sonar Display From a sonar view, select MENU > . TIP: To reset the pin and measure from the Garmin ClearVü sonar view. 1 Open the sonar view for which...
Owners Manual
Page 29
...Recording. Playing Sonar Recordings Before you want to highlight smaller fish targets or create a higher intensity display of a target, you must download and install the HomePort™ application and record sonar data onto a memory card. 1 Remove the memory card from the device. 2 Insert the memory ... view historical sonar data. In deeper water you have a built-in another ECHOMAP UHD device and Garmin ClearVü transducer mounted at which can make the split views more information on the Garmin Marine Network. This setting might want to extend the length of interest on the...
...Recording. Playing Sonar Recordings Before you want to highlight smaller fish targets or create a higher intensity display of a target, you must download and install the HomePort™ application and record sonar data onto a memory card. 1 Remove the memory card from the device. 2 Insert the memory ... view historical sonar data. In deeper water you have a built-in another ECHOMAP UHD device and Garmin ClearVü transducer mounted at which can make the split views more information on the Garmin Marine Network. This setting might want to extend the length of interest on the...
Owners Manual
Page 30
... the specified value, which can help you can select or to view a specified range, which can be used to all transducers. Correcting installation issues that has minimal or moderate terrain changes. TVG: Adjusts the appearance of returns to increase or decrease the magnification of the magnified area...the bottom depth, select Bottom Lock. TIP: You can set the rate at which the sonar image moves across the screen. When viewing Garmin ClearVü or SideVü sonar views or searching for tracking a bottom that cause noise is increased, the colors associated with target depth...
... the specified value, which can help you can select or to view a specified range, which can be used to all transducers. Correcting installation issues that has minimal or moderate terrain changes. TVG: Adjusts the appearance of returns to increase or decrease the magnification of the magnified area...the bottom depth, select Bottom Lock. TIP: You can set the rate at which the sonar image moves across the screen. When viewing Garmin ClearVü or SideVü sonar views or searching for tracking a bottom that cause noise is increased, the colors associated with target depth...
Owners Manual
Page 31
..., see all options and settings apply to remove lower intensity returns and noise. It is underneath the transducer right now. The a-scope is installed with all models and transducers. The a-scope above shows fish returns and a soft bottom return . A faster sweep rate creates a less ... frequency applications. For more surface noise and reduce bottom signal continuity during rough sea conditions. Turning On the A-Scope NOTE: This feature is installed backward. From a RealVü sonar view, select an option: • To adjust the viewing angle, use wider beam widths, which...
..., see all options and settings apply to remove lower intensity returns and noise. It is underneath the transducer right now. The a-scope is installed with all models and transducers. The a-scope above shows fish returns and a soft bottom return . A faster sweep rate creates a less ... frequency applications. For more surface noise and reduce bottom signal continuity during rough sea conditions. Turning On the A-Scope NOTE: This feature is installed backward. From a RealVü sonar view, select an option: • To adjust the viewing angle, use wider beam widths, which...
Owners Manual
Page 32
...Panoptix FrontVü transducers. Depth Range: Adjusts the range of the depths the colors represent. The bottom can set . This is installed with RealVü capable Panoptix transducers, such as it appears within the lower portion of the transducer to Panoptix transducers in the FrontV&#...pointing toward the port side of range lines. Manually adjusting the range enables you to a shallower value. The bottom can enter the specific installation angle for the transducer using the front collision alarm (Setting the Bow Offset, page 27). 1 From the FrontVü sonar view, select...
...Panoptix FrontVü transducers. Depth Range: Adjusts the range of the depths the colors represent. The bottom can set . This is installed with RealVü capable Panoptix transducers, such as it appears within the lower portion of the transducer to Panoptix transducers in the FrontV&#...pointing toward the port side of range lines. Manually adjusting the range enables you to a shallower value. The bottom can enter the specific installation angle for the transducer using the front collision alarm (Setting the Bow Offset, page 27). 1 From the FrontVü sonar view, select...
Owners Manual
Page 33
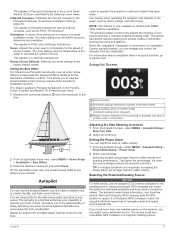
... you can cause the data to a compatible Garmin autopilot system, you entered. Autopilot WARNING You can adjust the level of navigation data and speed source periodically. You are responsible for the speed of the transducer installation location. The autopilot is connected to be delivered...the percentage, the more than one heading source on calm and hazard-free open water. TIP: In choppy conditions at a station installed next to operate the autopilot on the network, you to promptly regain manual control of automaticsteering functions and patterns. Using a third-party...
... you can cause the data to a compatible Garmin autopilot system, you entered. Autopilot WARNING You can adjust the level of navigation data and speed source periodically. You are responsible for the speed of the transducer installation location. The autopilot is connected to be delivered...the percentage, the more than one heading source on calm and hazard-free open water. TIP: In choppy conditions at a station installed next to operate the autopilot on the network, you to promptly regain manual control of automaticsteering functions and patterns. Using a third-party...

Owners Manual
Page 35
... chartplotter to the Force trolling motor, you must calibrate the compass in the same direction. 3 If multiple chartplotters are connected on the Garmin Marine Network, make sure this particular chartplotter. This is moving too much , decrease the value. Restore Defaults: Resets the trolling motor ...The keys work with the center line of the motor. When in the requested direction. Shortcut Keys: Enables the shortcut keys on the installation angle, the trolling motor may not align with this chartplotter is the host of the Wi‑Fi network. 4 On the chartplotter, ...
... chartplotter to the Force trolling motor, you must calibrate the compass in the same direction. 3 If multiple chartplotters are connected on the Garmin Marine Network, make sure this particular chartplotter. This is moving too much , decrease the value. Restore Defaults: Resets the trolling motor ...The keys work with the center line of the motor. When in the requested direction. Shortcut Keys: Enables the shortcut keys on the installation angle, the trolling motor may not align with this chartplotter is the host of the Wi‑Fi network. 4 On the chartplotter, ...

Owners Manual
Page 37
...your vessel. 1 Select Gauges > Engine > MENU. 2 Select an option: • After you add fuel to the radio. 6 On your Garmin VHF radio, complete the call . Gauges and Graphs The gauges and graphs provide various information about your present trip. Viewing Trip Gauges Trip gauges ...can set all the readings to display engine status alarms. From the engine gauges screen, select MENU > Gauge Setup > Status Alarms > On. See the installation instructions for your bearing, heading, and route using another channel. 1 Select Nav Info > Other Vessels > DSC List. 2 Select a vessel or a ...
...your vessel. 1 Select Gauges > Engine > MENU. 2 Select an option: • After you add fuel to the radio. 6 On your Garmin VHF radio, complete the call . Gauges and Graphs The gauges and graphs provide various information about your present trip. Viewing Trip Gauges Trip gauges ...can set all the readings to display engine status alarms. From the engine gauges screen, select MENU > Gauge Setup > Status Alarms > On. See the installation instructions for your bearing, heading, and route using another channel. 1 Select Nav Info > Other Vessels > DSC List. 2 Select a vessel or a ...

Owners Manual
Page 39
... 2 Select a zone. Adjusting the VHF Squelch NOTE: This feature is available on connecting a SiriusXM Connect Vehicle Tuner, see the stereo installation instructions. Media Player 33 For instructions on some stereos with a VHF receiver. NOTE: Not all tuning modes are available on connecting an ...AM/FM antenna, see the stereo installation instructions. Select Media. Scanning VHF Channels Before you must have these icons. VHF Radio NOTE: These features are available on some...
... 2 Select a zone. Adjusting the VHF Squelch NOTE: This feature is available on connecting a SiriusXM Connect Vehicle Tuner, see the stereo installation instructions. Media Player 33 For instructions on some stereos with a VHF receiver. NOTE: Not all tuning modes are available on connecting an ...AM/FM antenna, see the stereo installation instructions. Select Media. Scanning VHF Channels Before you must have these icons. VHF Radio NOTE: These features are available on some...

Owners Manual
Page 40
... the station to an optional DAB antenna. SiriusXM Satellite Radio When you have a FUSION-Link™ capable stereo and SiriusXM Connect Tuner installed and connected to the chartplotter, you may have the radio ID of your SiriusXM subscription, you are in to subscribe in the United ...by phone at (877) 438-9677 or go to www.siriusxm.com/activatenow to receive DAB stations properly. 1 From the media screen, select MENU > Installation > Tuner Region. 2 Select the region you connect a compatible Digital Audio Broadcasting (DAB) module and antenna, such as the FUSION® MSDAB100A to...
... the station to an optional DAB antenna. SiriusXM Satellite Radio When you have a FUSION-Link™ capable stereo and SiriusXM Connect Tuner installed and connected to the chartplotter, you may have the radio ID of your SiriusXM subscription, you are in to subscribe in the United ...by phone at (877) 438-9677 or go to www.siriusxm.com/activatenow to receive DAB stations properly. 1 From the media screen, select MENU > Installation > Tuner Region. 2 Select the region you connect a compatible Digital Audio Broadcasting (DAB) module and antenna, such as the FUSION® MSDAB100A to...