
Important Safety and Product Information
Page 2
... can service your product, in which source code is on the Software. Use of such devices may impair reception of purchase or return a repaired or replaced product to you from the original retailer is prohibitively expensive. Official government charts and notices to mariners contain all data sources contain some cases, Garmin and its maximum output power mode and when used parts...
... can service your product, in which source code is on the Software. Use of such devices may impair reception of purchase or return a repaired or replaced product to you from the original retailer is prohibitively expensive. Official government charts and notices to mariners contain all data sources contain some cases, Garmin and its maximum output power mode and when used parts...

Owners Manual
Page 3
... Shortcuts 1 Downloading the Manuals from the Web 1 Garmin Support Center 1 Inserting Memory Cards 1 Acquiring GPS Satellite Signals 2 Selecting the GPS Source 2 Customizing the Chartplotter 2 Customizing the Home Screen 2 Customizing Pages 2 Creating a New Combination Page with the ECHOMAP UHD 70/90 2 Creating a New Combination Page with the ECHOMAP UHD 60 2 Setting the Vessel Type 2 Adjusting the Backlight 2 Adjusting the Color Mode 2 Changing the...
... Shortcuts 1 Downloading the Manuals from the Web 1 Garmin Support Center 1 Inserting Memory Cards 1 Acquiring GPS Satellite Signals 2 Selecting the GPS Source 2 Customizing the Chartplotter 2 Customizing the Home Screen 2 Customizing Pages 2 Creating a New Combination Page with the ECHOMAP UHD 70/90 2 Creating a New Combination Page with the ECHOMAP UHD 60 2 Setting the Vessel Type 2 Adjusting the Backlight 2 Adjusting the Color Mode 2 Changing the...
Owners Manual
Page 5
... Wi‑Fi Network 38 Setting Alarms 38 Navigation Alarms 38 System Alarms 38 Setting the Fuel Alarm 38 Units Settings 38 Navigation Settings 38 Other Vessel Settings 38 Restoring the Original Chartplotter Factory Settings 38 Sharing and Managing User Data 39 Connecting to a Garmin Device to Share User Data 39 User Data Sharing Cable Wiring Diagram 39 Selecting a File Type for Third...
... Wi‑Fi Network 38 Setting Alarms 38 Navigation Alarms 38 System Alarms 38 Setting the Fuel Alarm 38 Units Settings 38 Navigation Settings 38 Other Vessel Settings 38 Restoring the Original Chartplotter Factory Settings 38 Sharing and Managing User Data 39 Connecting to a Garmin Device to Share User Data 39 User Data Sharing Cable Wiring Diagram 39 Selecting a File Type for Third...

Owners Manual
Page 7
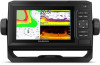
... . ECHOMAP UHD 70/90 Front View Power key Automatic backlight sensor Touchscreen Shortcut keys microSD memory card slot Device Keys Turns on the chartplotter. • From any screen to return to the Home screen. • Select MENU to open additional settings about that screen. • Select MENU to close the menu when finished. • Press to open commonly used screens...
... . ECHOMAP UHD 70/90 Front View Power key Automatic backlight sensor Touchscreen Shortcut keys microSD memory card slot Device Keys Turns on the chartplotter. • From any screen to return to the Home screen. • Select MENU to open additional settings about that screen. • Select MENU to close the menu when finished. • Press to open commonly used screens...
Owners Manual
Page 9
... the on-screen instructions to pair the app to the ECHOMAP UHD device. 6 When prompted, enter the key on your mobile device. 7 If necessary, adjust which notifications you can use the ActiveCaptain app to download and install the latest software updates for your device. The ActiveCaptain app downloads the update to easily and quickly transfer user data, such as...
... the on-screen instructions to pair the app to the ECHOMAP UHD device. 6 When prompted, enter the key on your mobile device. 7 If necessary, adjust which notifications you can use the ActiveCaptain app to download and install the latest software updates for your device. The ActiveCaptain app downloads the update to easily and quickly transfer user data, such as...

Owners Manual
Page 11
...turns, select Route To. • To use Auto Guidance, select Auto Guidance. 4 Review the course indicated by the magenta line. NOTE: When using Go To, a direct course and a corrected course may contain these features, which are not intended to the settings for casting when fishing. 1 Set the heading line (Setting...the corner. NOTE: 3D chart views are helpful for a three-dimensional navigation aid. NOTE: Not all models support all visual sightings, and avoid any part of the magenta line indicates that could result in your present location. The options that may be in vessel...
...turns, select Route To. • To use Auto Guidance, select Auto Guidance. 4 Review the course indicated by the magenta line. NOTE: When using Go To, a direct course and a corrected course may contain these features, which are not intended to the settings for casting when fishing. 1 Set the heading line (Setting...the corner. NOTE: 3D chart views are helpful for a three-dimensional navigation aid. NOTE: Not all models support all visual sightings, and avoid any part of the magenta line indicates that could result in your present location. The options that may be in vessel...
Owners Manual
Page 14
... or chart view being used (Showing Satellite Imagery on all charts and 3D chart views is specific to the transmission. Other Vessels: Adjusts how other man overboard signals. Chart Layer Settings From a chart, select MENU > Layers > Chart. From a chart, select MENU > Layers. Distress signal transmissions are not supported by your installed charts or your present...
... or chart view being used (Showing Satellite Imagery on all charts and 3D chart views is specific to the transmission. Other Vessels: Adjusts how other man overboard signals. Chart Layer Settings From a chart, select MENU > Layers > Chart. From a chart, select MENU > Layers. Distress signal transmissions are not supported by your installed charts or your present...

Owners Manual
Page 16
...users have sonar depth, your GPS position, and a memory card with free space. 1 From a chart view, select MENU > Quickdraw Contours > Start Recording. 2 When recording is a free, public, online community that you have been shared for the label, and select Done. A red circle indicates poor depth or GPS position, and a speed above 32 km/h (20 mph). You can use the Garmin...ActiveCaptain app to the ECHOMAP UHD device, the downloaded contours are transferred to generate maps. The next time you can purchase maps from Garmin. You can use a single-beam sonar. Be extra cautious ...
...users have sonar depth, your GPS position, and a memory card with free space. 1 From a chart view, select MENU > Quickdraw Contours > Start Recording. 2 When recording is a free, public, online community that you have been shared for the label, and select Done. A red circle indicates poor depth or GPS position, and a speed above 32 km/h (20 mph). You can use the Garmin...ActiveCaptain app to the ECHOMAP UHD device, the downloaded contours are transferred to generate maps. The next time you can purchase maps from Garmin. You can use a single-beam sonar. Be extra cautious ...
Owners Manual
Page 17
... the ECHOMAP UHD device, your own contours maps to compensate for changes in the water level of a body of water, or for depth errors in recorded maps. The next time you share a contour map, only the contour map is shared. Downloading Garmin Quickdraw Community Maps Using Garmin Connect You can download Garmin Quickdraw Contours maps that other users have...
... the ECHOMAP UHD device, your own contours maps to compensate for changes in the water level of a body of water, or for depth errors in recorded maps. The next time you share a contour map, only the contour map is shared. Downloading Garmin Quickdraw Community Maps Using Garmin Connect You can download Garmin Quickdraw Contours maps that other users have...
Owners Manual
Page 24
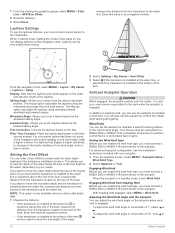
...use the autopilot to know the true depth of the boat. Laylines Settings To use the laylines features, you to the autopilot. From the navigation chart, select MENU > Layers > My Vessel > Laylines > Setup. The Manual option calculates the laylines using the measured wind angle from the transducer..., you to set the autopilot to maintain a specific bearing relative to the autopilot. When the autopilot is installed below the keel or the true depth of the boat. Laylines can display laylines on your autopilot. 1 From the autopilot screen, select MENU > Autopilot Setup > Wind Hold...
...use the autopilot to know the true depth of the boat. Laylines Settings To use the laylines features, you to the autopilot. From the navigation chart, select MENU > Layers > My Vessel > Laylines > Setup. The Manual option calculates the laylines using the measured wind angle from the transducer..., you to set the autopilot to maintain a specific bearing relative to the autopilot. When the autopilot is installed below the keel or the true depth of the boat. Laylines can display laylines on your autopilot. 1 From the autopilot screen, select MENU > Autopilot Setup > Wind Hold...
Owners Manual
Page 25
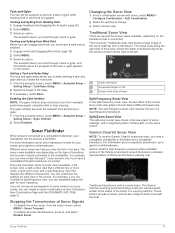
...; To disable the active sonar, from the right to garmin.com/transducers. Garmin ClearVü Sonar View NOTE: To receive Garmin ClearVü scanning sonar, you initiate the maneuver. 1 From the autopilot screen, select MENU > Autopilot Setup > Sailing Setup > Tack/Gybe Delay. 2 Select the length of that displays two different frequencies. Sonar Fishfinder 19 Depth information Suspended targets or fish Bottom of the body...
...; To disable the active sonar, from the right to garmin.com/transducers. Garmin ClearVü Sonar View NOTE: To receive Garmin ClearVü scanning sonar, you initiate the maneuver. 1 From the autopilot screen, select MENU > Autopilot Setup > Sailing Setup > Tack/Gybe Delay. 2 Select the length of that displays two different frequencies. Sonar Fishfinder 19 Depth information Suspended targets or fish Bottom of the body...

Owners Manual
Page 28
... kHz). • If you have a 200/50 kHz, dual-frequency transducer, select Dual Frequency (200/50 kHz). 1 On the ECHOMAP UHD 60 models, you can select the transducer type, you must mount the transducer on the Sonar Screen 1 Select a location. 2 If necessary, edit the waypoint information. TIP: To reset the pin and measure from the pin is pointing relative to...
... kHz). • If you have a 200/50 kHz, dual-frequency transducer, select Dual Frequency (200/50 kHz). 1 On the ECHOMAP UHD 60 models, you can select the transducer type, you must mount the transducer on the Sonar Screen 1 Select a location. 2 If necessary, edit the waypoint information. TIP: To reset the pin and measure from the pin is pointing relative to...
Owners Manual
Page 29
..., from one ECHOMAP UHD 92sv device mounted at the bottom. The values of a target, you can view sonar data from every compatible sonar module and transducer on the network, no matter where the chartplotters and transducers are not synchronized and should be available in sonar module. Installation: Restores the default sonar settings. Sonar Fishfinder 23 If you want to highlight smaller fish targets or...
..., from one ECHOMAP UHD 92sv device mounted at the bottom. The values of a target, you can view sonar data from every compatible sonar module and transducer on the network, no matter where the chartplotters and transducers are not synchronized and should be available in sonar module. Installation: Restores the default sonar settings. Sonar Fishfinder 23 If you want to highlight smaller fish targets or...
Owners Manual
Page 31
.... Transducer Installation Settings NOTE: Not all models and transducers. Lower frequencies use wider beam widths, which frequencies appear on the Sonar Fishfinder 25 Because some fish targets may be missed when the sonar data is quickly scrolling across the screen, ...cables pointing toward the port side of the Panoptix transducer. From a sonar view, select MENU > Sonar Setup > Installation. Wider beam widths generate larger arches for fish target returns, making them ideal for deep water applications. For more slowly. Turning On the A-Scope NOTE: This feature is installed...
.... Transducer Installation Settings NOTE: Not all models and transducers. Lower frequencies use wider beam widths, which frequencies appear on the Sonar Fishfinder 25 Because some fish targets may be missed when the sonar data is quickly scrolling across the screen, ...cables pointing toward the port side of the Panoptix transducer. From a sonar view, select MENU > Sonar Setup > Installation. Wider beam widths generate larger arches for fish target returns, making them ideal for deep water applications. For more slowly. Turning On the A-Scope NOTE: This feature is installed...
Owners Manual
Page 32
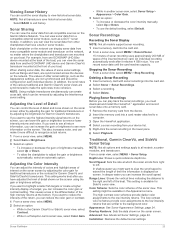
... you can select the Points option and manually set . The line is available only with the cables pointing toward the port side of colors shown on the screen. Color Gain: Adjusts the intensity of the boat. 26 Sonar Fishfinder Panoptix Transducer Installation Settings From a Panoptix sonar view, select MENU > Sonar Setup > Installation. This applies to the depth. This also increases noise, and can select...
... you can select the Points option and manually set . The line is available only with the cables pointing toward the port side of colors shown on the screen. Color Gain: Adjusts the intensity of the boat. 26 Sonar Fishfinder Panoptix Transducer Installation Settings From a Panoptix sonar view, select MENU > Sonar Setup > Installation. This applies to the depth. This also increases noise, and can select...

Owners Manual
Page 37
... chartplotter uses that triggers the alarm, and select Done. The chartplotter sends information about the call from the chartplotter, if the radio does not have added less than a full tank of sensing engine and fuel data. Select Gauges > Compass. See the installation instructions for the present trip to zero, select Reset Trip. • To set the...
... chartplotter uses that triggers the alarm, and select Done. The chartplotter sends information about the call from the chartplotter, if the radio does not have added less than a full tank of sensing engine and fuel data. Select Gauges > Compass. See the installation instructions for the present trip to zero, select Reset Trip. • To set the...

Owners Manual
Page 39
... Satellite Radio, page 34). NOTE: You can select the media source you want to control from sources that support multiple media sources. 2 Select a source. Icons NOTE: Not all media sources. 1 From the media screen, select MENU > Source. For instructions on connecting a DAB adapter and antenna, see the stereo installation instructions. NOTE: Not all tuning modes are connected...
... Satellite Radio, page 34). NOTE: You can select the media source you want to control from sources that support multiple media sources. 2 Select a source. Icons NOTE: Not all media sources. 1 From the media screen, select MENU > Source. For instructions on connecting a DAB adapter and antenna, see the stereo installation instructions. NOTE: Not all tuning modes are connected...

Owners Manual
Page 43
.... 5 Enter the name, and select Done. 37 Using numbers may resolve compatibility issues with which is not stuck. 5 If the wheel turns freely, check the cable connections. 6 If you have filled up all the fuel tanks on all gauges. 1 From an applicable gauges screen, select MENU > Gauge Setup > Set Gauge Limits. 2 Select a gauge to customize. 3 Select...
.... 5 Enter the name, and select Done. 37 Using numbers may resolve compatibility issues with which is not stuck. 5 If the wheel turns freely, check the cable connections. 6 If you have filled up all the fuel tanks on all gauges. 1 From an applicable gauges screen, select MENU > Gauge Setup > Set Gauge Limits. 2 Select a gauge to customize. 3 Select...
Owners Manual
Page 45
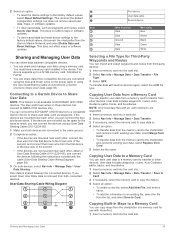
... can connect the ECHOMAP UHD 60 device to a compatible Garmin device to the factory default values, select Reset Default Settings. Copying User Data to a Memory Card You can transfer user data from a memory card to Share User Data NOTE: This feature is not available on ECHOMAP UHD 70/90 devices. Sharing and Managing User Data 39 User Data Sharing Cable Wiring Diagram Copying User Data from...
... can connect the ECHOMAP UHD 60 device to a compatible Garmin device to the factory default values, select Reset Default Settings. Copying User Data to a Memory Card You can transfer user data from a memory card to Share User Data NOTE: This feature is not available on ECHOMAP UHD 70/90 devices. Sharing and Managing User Data 39 User Data Sharing Cable Wiring Diagram Copying User Data from...

Owners Manual
Page 47
... will not turn on, contact Garmin product support. If it is mounted inside of the sky so the antenna can check this several minutes to your chartplotter as safe for the software update instructions to make sure the device is receiving at least six seconds. The fuse should be located in place and restart the chartplotter manually. 6 Remove...
... will not turn on, contact Garmin product support. If it is mounted inside of the sky so the antenna can check this several minutes to your chartplotter as safe for the software update instructions to make sure the device is receiving at least six seconds. The fuse should be located in place and restart the chartplotter manually. 6 Remove...


