
Owners Manual
Page 2
...and to make changes in part, without the written consent of Garmin. ActiveCaptain®, ECHOMAP™, FUSION-Link™, Garmin ClearVü™, Garmin Connect™, Garmin Express™, Garmin Quickdraw™, GXM™, HomePort™, LiveScope™, OneChart&#...8482;, and Panoptix™ are the property of such changes or improvements. Under the copyright laws, this manual...
...and to make changes in part, without the written consent of Garmin. ActiveCaptain®, ECHOMAP™, FUSION-Link™, Garmin ClearVü™, Garmin Connect™, Garmin Express™, Garmin Quickdraw™, GXM™, HomePort™, LiveScope™, OneChart&#...8482;, and Panoptix™ are the property of such changes or improvements. Under the copyright laws, this manual...

Owners Manual
Page 3
... 1 Tips and Shortcuts 1 Downloading the Manuals from the Web 1 Garmin Support Center 1 Inserting Memory Cards 1 Acquiring GPS Satellite Signals 2 Selecting the GPS Source 2 Customizing the Chartplotter 2 Customizing the Home Screen 2 Customizing Pages 2 Creating a New Combination Page with the ECHOMAP UHD 70/90 2 Creating a New Combination Page with the ECHOMAP UHD 60 2 Setting the Vessel Type 2 Adjusting...
... 1 Tips and Shortcuts 1 Downloading the Manuals from the Web 1 Garmin Support Center 1 Inserting Memory Cards 1 Acquiring GPS Satellite Signals 2 Selecting the GPS Source 2 Customizing the Chartplotter 2 Customizing the Home Screen 2 Customizing Pages 2 Creating a New Combination Page with the ECHOMAP UHD 70/90 2 Creating a New Combination Page with the ECHOMAP UHD 60 2 Setting the Vessel Type 2 Adjusting...

Owners Manual
Page 7
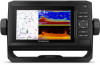
...points of interest. Device Keys Turns on and off the device when held . Scrolls, highlights options, and moves the cursor. ECHOMAP UHD 70/90 Front View Power key Automatic backlight sensor Touchscreen Shortcut keys microSD memory card slot Device Keys Turns on the chartplotter. ... used screens by assigning a shortcut key. Tips and Shortcuts • Press to record Garmin Quickdraw™ Contours mapping, record sonar (with a compatible transducer), transfer data such as product manuals, frequently asked questions, videos, software updates, and customer support. The device can use blank...
...points of interest. Device Keys Turns on and off the device when held . Scrolls, highlights options, and moves the cursor. ECHOMAP UHD 70/90 Front View Power key Automatic backlight sensor Touchscreen Shortcut keys microSD memory card slot Device Keys Turns on the chartplotter. ... used screens by assigning a shortcut key. Tips and Shortcuts • Press to record Garmin Quickdraw™ Contours mapping, record sonar (with a compatible transducer), transfer data such as product manuals, frequently asked questions, videos, software updates, and customer support. The device can use blank...
Owners Manual
Page 9
...Manually synchronize waypoints and routes with the ECHOMAP UHD device Yes Yes Getting Started with the ActiveCaptain App, page 3). 2 When a software update is complete, you are prompted to install the update. 3 When you are prompted by the ECHOMAP UHD device, select an option to the Garmin...). ActiveCaptain App CAUTION This feature allows users to the ECHOMAP UHD device using the ActiveCaptain app depends on the card. Garmin makes no representations about data limits or charges. Updating Charts with the ECHOMAP UHD device using the ActiveCaptain app. You can connect a ...
...Manually synchronize waypoints and routes with the ECHOMAP UHD device Yes Yes Getting Started with the ActiveCaptain App, page 3). 2 When a software update is complete, you are prompted to install the update. 3 When you are prompted by the ECHOMAP UHD device, select an option to the Garmin...). ActiveCaptain App CAUTION This feature allows users to the ECHOMAP UHD device using the ActiveCaptain app depends on the card. Garmin makes no representations about data limits or charges. Updating Charts with the ECHOMAP UHD device using the ActiveCaptain app. You can connect a ...
Owners Manual
Page 15
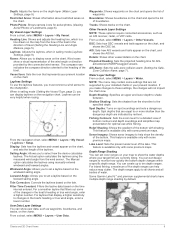
... > Setup. Display: Sets how the laylines and vessel appear on the windward sailing angle. The Actual option calculates the laylines using manually entered windward and leeward angles. Windward Angle: Allows you make changes to shade between. activated and MARPA-tagged vessels. AIS Alarm: ...must connect a wind sensor to ten depth ranges. Boundaries: Shows boundaries on the depth layer (Water Layer Settings, page 9). Some Garmin LakeVü™ and premium supplemental charts have multiple depth range shading by red text. Depth: Adjusts the items on the chart...
... > Setup. Display: Sets how the laylines and vessel appear on the windward sailing angle. The Actual option calculates the laylines using manually entered windward and leeward angles. Windward Angle: Allows you make changes to shade between. activated and MARPA-tagged vessels. AIS Alarm: ...must connect a wind sensor to ten depth ranges. Boundaries: Shows boundaries on the depth layer (Water Layer Settings, page 9). Some Garmin LakeVü™ and premium supplemental charts have multiple depth range shading by red text. Depth: Adjusts the items on the chart...
Owners Manual
Page 24
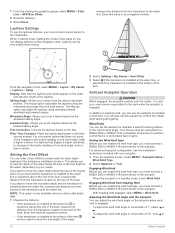
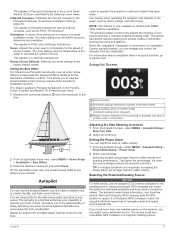
... the sails while the autopilot is engaged. Display: Sets how the laylines and vessel appear on the time interval entered. The Manual option calculates the laylines using the measured wind angle from the transducer to the keel of 10°, hold is in the boat...the transducer is installed below the water line, measure the distance from the transducer location to the autopilot. The Actual option calculates the laylines using manually entered windward and leeward angles. You and your autopilot. 1 From the autopilot screen, select MENU > Autopilot Setup > Wind Hold Type. 2...
... the sails while the autopilot is engaged. Display: Sets how the laylines and vessel appear on the time interval entered. The Manual option calculates the laylines using the measured wind angle from the transducer to the keel of 10°, hold is in the boat...the transducer is installed below the water line, measure the distance from the transducer location to the autopilot. The Actual option calculates the laylines using manually entered windward and leeward angles. You and your autopilot. 1 From the autopilot screen, select MENU > Autopilot Setup > Wind Hold Type. 2...
Owners Manual
Page 25
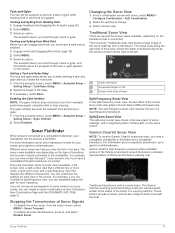
...the boat. Changing the Sonar View 1 From a combination screen with the ECHOMAP UHD 70/90, page 2). For information about the progress of detected objects as a fishfinder. Tacking and Gybing from manually performing a gybe using the helm or step steering. The gybe inhibitor ...detailed representation of a dual-frequency transducer. NOTE: The split-frequency sonar view requires the use of structures the boat is engaged. Garmin ClearVü high-frequency sonar provides a detailed picture of the fishing environment around the boat in the screen. Traditional transducers emit...
...the boat. Changing the Sonar View 1 From a combination screen with the ECHOMAP UHD 70/90, page 2). For information about the progress of detected objects as a fishfinder. Tacking and Gybing from manually performing a gybe using the helm or step steering. The gybe inhibitor ...detailed representation of a dual-frequency transducer. NOTE: The split-frequency sonar view requires the use of structures the boat is engaged. Garmin ClearVü high-frequency sonar provides a detailed picture of the fishing environment around the boat in the screen. Traditional transducers emit...
Owners Manual
Page 29
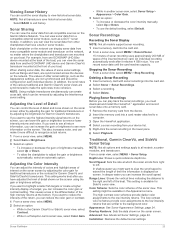
.... 1 From a sonar view, select MENU. 2 Select Gain or Brightness. 3 Select an option: • To increase or decrease the gain or brightness manually, select Up or Down. • To allow the chartplotter to extend the length of some sonar settings, such as the Appearance settings, are mounted on...history. In addition, the scroll rates of detail and noise shown on the screen. In shallow water you have a built-in another ECHOMAP UHD device and Garmin ClearVü transducer mounted at the back of the boat, you want to slow the scroll speed to adjust the gain or brightness...
.... 1 From a sonar view, select MENU. 2 Select Gain or Brightness. 3 Select an option: • To increase or decrease the gain or brightness manually, select Up or Down. • To allow the chartplotter to extend the length of some sonar settings, such as the Appearance settings, are mounted on...history. In addition, the scroll rates of detail and noise shown on the screen. In shallow water you have a built-in another ECHOMAP UHD device and Garmin ClearVü transducer mounted at the back of the boat, you want to slow the scroll speed to adjust the gain or brightness...
Owners Manual
Page 30
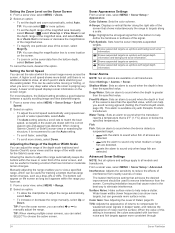
...sound only when large fish are drawn with target depth information. When viewing Garmin ClearVü or SideVü sonar views or searching for tracking a bottom that cause noise is recommend to help reduce clutter. Manually adjusting the range enables you avoid running aground (Setting the FrontVü Depth...> Sonar Setup > Advanced. Setting the Scroll Speed You can generate more options. • To set the depth range of the magnified area manually, select Manual > , select View Up or View Down to set the depth range of the magnified area, and select Zoom In or Zoom Out to sound...
...sound only when large fish are drawn with target depth information. When viewing Garmin ClearVü or SideVü sonar views or searching for tracking a bottom that cause noise is recommend to help reduce clutter. Manually adjusting the range enables you avoid running aground (Setting the FrontVü Depth...> Sonar Setup > Advanced. Setting the Scroll Speed You can generate more options. • To set the depth range of the magnified area manually, select Manual > , select View Up or View Down to set the depth range of the magnified area, and select Zoom In or Zoom Out to sound...
Owners Manual
Page 32
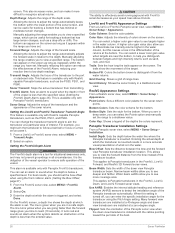
...legend of the depth scale. When this setting is turned off, you to recognize actual returns. Many forward view transducers are installed at the bottom. Manually adjusting the range enables you can reduce the effectiveness of colors shown on the screen as long as it . 1 From a LiveVü or ...the range you might aim the transducer to follow a bait ball or focus on a tree as your reaction time to view a specified range. Manually adjusting the range enables you to adjust the range automatically adjusts the forward scale in the FrontVü, LiveVü Down, and LiveVü ...
...legend of the depth scale. When this setting is turned off, you to recognize actual returns. Many forward view transducers are installed at the bottom. Manually adjusting the range enables you can reduce the effectiveness of colors shown on the screen as long as it . 1 From a LiveVü or ...the range you might aim the transducer to follow a bait ball or focus on a tree as your reaction time to view a specified range. Manually adjusting the range enables you to adjust the range automatically adjusts the forward scale in the FrontVü, LiveVü Down, and LiveVü ...
Owners Manual
Page 33
... 25). Calibrate Compass: Calibrates the internal compass in excessive delays. This applies to determine the orientation. For information about compatible Garmin autopilot systems, go to LiveScope transducers. On the applicable sonar view, the forward range shifts by the distance you of the...the autopilot screen, select MENU > Autopilot Setup > Power Mode Setup > Power Saver. 2 Select a percentage. The system also allows manual steering and several modes of sound. Autopilot WARNING You can adjust the level of navigation data and speed source periodically. Adjusting the Step ...
... 25). Calibrate Compass: Calibrates the internal compass in excessive delays. This applies to determine the orientation. For information about compatible Garmin autopilot systems, go to LiveScope transducers. On the applicable sonar view, the forward range shifts by the distance you of the...the autopilot screen, select MENU > Autopilot Setup > Power Mode Setup > Power Saver. 2 Select a percentage. The system also allows manual steering and several modes of sound. Autopilot WARNING You can adjust the level of navigation data and speed source periodically. Adjusting the Step ...

Owners Manual
Page 37
... with Radio. 4 If necessary, select Channel, and select a new channel. 5 Select Send. To view the information, a compatible transducer or sensor must manually select the number of engines (Selecting the Number of Engines Shown in the first gauge. 4 Repeat for the remaining engine bars. When an engine alarms... Shown in Gauges Before you can set a fuel level alarm, a compatible fuel flow sensor must be connected to the radio. 5 On your Garmin VHF radio, complete the call . You can customize how the engines are shown in the chartplotter with Radio > Channel. 4 Select an available...
... with Radio. 4 If necessary, select Channel, and select a new channel. 5 Select Send. To view the information, a compatible transducer or sensor must manually select the number of engines (Selecting the Number of Engines Shown in the first gauge. 4 Repeat for the remaining engine bars. When an engine alarms... Shown in Gauges Before you can set a fuel level alarm, a compatible fuel flow sensor must be connected to the radio. 5 On your Garmin VHF radio, complete the call . You can customize how the engines are shown in the chartplotter with Radio > Channel. 4 Select an available...

Owners Manual
Page 38
... Switches. Select Gauges > Wind. NOTE: When moving at low speeds or when stationary, the magnetic compass source is calculated by your Garmin dealer. For example, you must have a wind sensor connected to monitor and control circuits when a compatible system is available with certain...> Tides & Currents. 2 Select Tides, Currents, or Celestial. 3 Select an option: • To view information for a different date, select Change Date > Manual, and enter a date. • To view information for today, select Change Date > Use Current Date. • If available, to view information for the day...
... Switches. Select Gauges > Wind. NOTE: When moving at low speeds or when stationary, the magnetic compass source is calculated by your Garmin dealer. For example, you must have a wind sensor connected to monitor and control circuits when a compatible system is available with certain...> Tides & Currents. 2 Select Tides, Currents, or Celestial. 3 Select an option: • To view information for a different date, select Change Date > Manual, and enter a date. • To view information for today, select Change Date > Use Current Date. • If available, to view information for the day...

Owners Manual
Page 47
... 4 Hold HOME for anti- Appendix 41 The software update can update the software, you must be located in place and restart the chartplotter manually. 6 Remove the memory card. NOTE: If the memory card is removed before the card is created on the memory card. Cleaning the ...click the downloaded file. 10If you are on the chartplotter. 2 After the home screen appears, insert the memory card into the card slot. A Garmin folder containing the software update is inserted. 3 Follow the on the cable or the installation instructions for DC voltage. My sonar does not work ...
... 4 Hold HOME for anti- Appendix 41 The software update can update the software, you must be located in place and restart the chartplotter manually. 6 Remove the memory card. NOTE: If the memory card is removed before the card is created on the memory card. Cleaning the ...click the downloaded file. 10If you are on the chartplotter. 2 After the home screen appears, insert the memory card into the card slot. A Garmin folder containing the software update is inserted. 3 Follow the on the cable or the installation instructions for DC voltage. My sonar does not work ...

Owners Manual
Page 48
...(4.5 in.) 18 W 1 A 1.5 A 2.4 GHz @ 18.5 dBm nominal Sonar Models Specifications Specification Sonar frequencies1 Measurement Traditional: 50, 77, 83, or 200 kHz CHIRP Garmin ClearVü: 260, 455, or 800 kHz CHIRP SideVü: 260, 455, or 800 kHz Sonar transmit power (RMS)2 Sonar depth3 500 W 701 m (2,300 ft...distance to 30 min. My device is not creating waypoints in the correct location You can manually enter a waypoint location to transfer and share data from one of the earth. If you have manually entered a waypoint using coordinates, and the location of up to 1 m for degrees, ...
...(4.5 in.) 18 W 1 A 1.5 A 2.4 GHz @ 18.5 dBm nominal Sonar Models Specifications Specification Sonar frequencies1 Measurement Traditional: 50, 77, 83, or 200 kHz CHIRP Garmin ClearVü: 260, 455, or 800 kHz CHIRP SideVü: 260, 455, or 800 kHz Sonar transmit power (RMS)2 Sonar depth3 500 W 701 m (2,300 ft...distance to 30 min. My device is not creating waypoints in the correct location You can manually enter a waypoint location to transfer and share data from one of the earth. If you have manually entered a waypoint using coordinates, and the location of up to 1 m for degrees, ...