
Important Safety and Product Information
Page 2
... under the Garmin Marine Warranty Policy. These limits are only valid in a particular installation. Repairs should be installed and operated with guarantees that the parts and products needed to navigate safely. • If the device provides depth data, it in accordance with the Directive 2014/53/EU. Garmin Ltd. Limited Warranty THIS LIMITED WARRANTY GIVES YOU SPECIFIC LEGAL RIGHTS...
... under the Garmin Marine Warranty Policy. These limits are only valid in a particular installation. Repairs should be installed and operated with guarantees that the parts and products needed to navigate safely. • If the device provides depth data, it in accordance with the Directive 2014/53/EU. Garmin Ltd. Limited Warranty THIS LIMITED WARRANTY GIVES YOU SPECIFIC LEGAL RIGHTS...

Owners Manual
Page 3
... Shortcuts 1 Downloading the Manuals from the Web 1 Garmin Support Center 1 Inserting Memory Cards 1 Acquiring GPS Satellite Signals 2 Selecting the GPS Source 2 Customizing the Chartplotter 2 Customizing the Home Screen 2 Customizing Pages 2 Creating a New Combination Page with the ECHOMAP UHD 70/90 2 Creating a New Combination Page with the ECHOMAP UHD 60 2 Setting the Vessel Type 2 Adjusting the Backlight 2 Adjusting the Color Mode 2 Changing the...
... Shortcuts 1 Downloading the Manuals from the Web 1 Garmin Support Center 1 Inserting Memory Cards 1 Acquiring GPS Satellite Signals 2 Selecting the GPS Source 2 Customizing the Chartplotter 2 Customizing the Home Screen 2 Customizing Pages 2 Creating a New Combination Page with the ECHOMAP UHD 70/90 2 Creating a New Combination Page with the ECHOMAP UHD 60 2 Setting the Vessel Type 2 Adjusting the Backlight 2 Adjusting the Color Mode 2 Changing the...
Owners Manual
Page 5
... Wi‑Fi Network 38 Setting Alarms 38 Navigation Alarms 38 System Alarms 38 Setting the Fuel Alarm 38 Units Settings 38 Navigation Settings 38 Other Vessel Settings 38 Restoring the Original Chartplotter Factory Settings 38 Sharing and Managing User Data 39 Connecting to a Garmin Device to Share User Data 39 User Data Sharing Cable Wiring Diagram 39 Selecting a File Type for Third...
... Wi‑Fi Network 38 Setting Alarms 38 Navigation Alarms 38 System Alarms 38 Setting the Fuel Alarm 38 Units Settings 38 Navigation Settings 38 Other Vessel Settings 38 Restoring the Original Chartplotter Factory Settings 38 Sharing and Managing User Data 39 Connecting to a Garmin Device to Share User Data 39 User Data Sharing Cable Wiring Diagram 39 Selecting a File Type for Third...

Owners Manual
Page 7
... the backlight and locking the touchscreen. • Press , and select Power > Turn Off Device, or hold until the Turn Off Device bar fills to record Garmin Quickdraw™ Contours mapping, record sonar (with a compatible transducer), transfer data such as product manuals, frequently asked questions, videos, software updates, and customer support. MENU Opens a menu of a chart or view. Map cards...
... the backlight and locking the touchscreen. • Press , and select Power > Turn Off Device, or hold until the Turn Off Device bar fills to record Garmin Quickdraw™ Contours mapping, record sonar (with a compatible transducer), transfer data such as product manuals, frequently asked questions, videos, software updates, and customer support. MENU Opens a menu of a chart or view. Map cards...
Owners Manual
Page 9
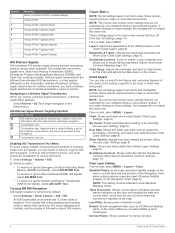
... or created Push smart notifications Yes Yes Begin navigating to a specific waypoint or navigating a Yes Yes specific route Manually synchronize waypoints and routes with the ECHOMAP UHD device Yes Yes Getting Started with Chartplotter. 5 Follow the on-screen instructions to pair the app to download and transfer the latest chart updates for this setting from a Memory Card, page 39).
... or created Push smart notifications Yes Yes Begin navigating to a specific waypoint or navigating a Yes Yes specific route Manually synchronize waypoints and routes with the ECHOMAP UHD device Yes Yes Getting Started with Chartplotter. 5 Follow the on-screen instructions to pair the app to download and transfer the latest chart updates for this setting from a Memory Card, page 39).

Owners Manual
Page 11
.... NOTE: Not all models support all visual sightings, and avoid any land, shallow water, or other dangerous objects. Mariner's Eye 3D: Provides a view from the current location of navigation aids, including beacons, lights, and obstructions. TIP: To reset the pin and measure from above and behind the boat for casting when fishing. 1 Set the heading line...
.... NOTE: Not all models support all visual sightings, and avoid any land, shallow water, or other dangerous objects. Mariner's Eye 3D: Provides a view from the current location of navigation aids, including beacons, lights, and obstructions. TIP: To reset the pin and measure from above and behind the boat for casting when fishing. 1 Set the heading line...
Owners Manual
Page 14
..., except Fish Eye 3D (Fish Eye 3D Settings, page 10). NOTE: Not all charts and chartplotter models. Water: Shows and hides depth items (Water Layer Settings, page 9). Land POIs: Shows points of their distress signal device, and does not represent a true emergency. Navaid: Shows navigational aids, such as ATONs and flashing lights, on the screen. Service Points: Shows...
..., except Fish Eye 3D (Fish Eye 3D Settings, page 10). NOTE: Not all charts and chartplotter models. Water: Shows and hides depth items (Water Layer Settings, page 9). Land POIs: Shows points of their distress signal device, and does not represent a true emergency. Navaid: Shows navigational aids, such as ATONs and flashing lights, on the screen. Service Points: Shows...

Owners Manual
Page 16
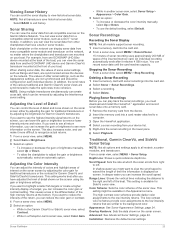
.... A red circle indicates poor depth or GPS position, and a speed above 32 km/h (20 mph). Tracks: Shows tracks. Fish Symbols: Shows suspended targets. If you connect the ActiveCaptain app to the ECHOMAP UHD device, the downloaded contours are transferred to the seller. You can use the Garmin Connect™ website to access the Garmin Quickdraw Community (Connecting to...
.... A red circle indicates poor depth or GPS position, and a speed above 32 km/h (20 mph). Tracks: Shows tracks. Fish Symbols: Shows suspended targets. If you connect the ActiveCaptain app to the ECHOMAP UHD device, the downloaded contours are transferred to the seller. You can use the Garmin Connect™ website to access the Garmin Quickdraw Community (Connecting to...
Owners Manual
Page 17
... information. Yellow indicates good depth and GPS position, and a speed between the sonar depth and the contour recording depth. Navigation with Garmin Connect 1 Go to compensate for changes in the water level of a body of the recording. Your waypoints are transferred to open the Garmin Quickdraw widget. User Display Offset: Sets differences in contour depths and depth labels on , the colors...
... information. Yellow indicates good depth and GPS position, and a speed between the sonar depth and the contour recording depth. Navigation with Garmin Connect 1 Go to compensate for changes in the water level of a body of the recording. Your waypoints are transferred to open the Garmin Quickdraw widget. User Display Offset: Sets differences in contour depths and depth labels on , the colors...
Owners Manual
Page 24
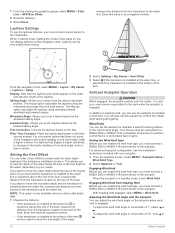
... Heading Hold Before you to set the autopilot to maintain a specific bearing relative to the keel of the water, depending on the leeward sailing angle. From the navigation chart, select MENU > Layers > My Vessel > Laylines > Setup. If you have valid depth data. 1 Measure the distance: • If the transducer is installed at the bottom of the...
... Heading Hold Before you to set the autopilot to maintain a specific bearing relative to the keel of the water, depending on the leeward sailing angle. From the navigation chart, select MENU > Layers > My Vessel > Laylines > Setup. If you have valid depth data. 1 Measure the distance: • If the transducer is installed at the bottom of the...
Owners Manual
Page 25
... from manually performing a gybe using the helm or step steering. Different sonar views can help you initiate the maneuver. 1 From the autopilot screen, select MENU > Autopilot Setup > Sailing Setup > Tack/Gybe Delay. 2 Select the length of that combines two or more information about which transducer is beneath the boat. Changing the Sonar View 1 From a combination screen with the ECHOMAP UHD 70...
... from manually performing a gybe using the helm or step steering. Different sonar views can help you initiate the maneuver. 1 From the autopilot screen, select MENU > Autopilot Setup > Sailing Setup > Tack/Gybe Delay. 2 Select the length of that combines two or more information about which transducer is beneath the boat. Changing the Sonar View 1 From a combination screen with the ECHOMAP UHD 70...

Owners Manual
Page 28
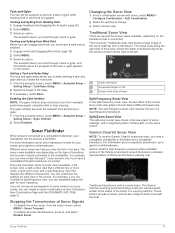
... transducer type to make the sonar function properly. 1 From a sonar view, select MENU > Sonar Setup > Installation > Transducer Type. 2 Select the transducer to use from the current location of the pin, select Set Reference. The distance and angle from the trolling motor to the boat. Drag up and down to turn on the AHRS sensor. 3 Select Calibrate Compass. 4 Follow the on-screen instructions. Renaming a Sonar...
... transducer type to make the sonar function properly. 1 From a sonar view, select MENU > Sonar Setup > Installation > Transducer Type. 2 Select the transducer to use from the current location of the pin, select Set Reference. The distance and angle from the trolling motor to the boat. Drag up and down to turn on the AHRS sensor. 3 Select Calibrate Compass. 4 Follow the on-screen instructions. Renaming a Sonar...
Owners Manual
Page 29
.... • While in another ECHOMAP UHD device and Garmin ClearVü transducer mounted at which can be available in the Appearance menu. Overlay Numbers: Sets the data shown on screen. Sonar Sharing You can view the sonar data from a compatible external sonar module, such as Range and Gain, are mounted on the screen using the gain or brightness settings. If you can increase the...
.... • While in another ECHOMAP UHD device and Garmin ClearVü transducer mounted at which can be available in the Appearance menu. Overlay Numbers: Sets the data shown on screen. Sonar Sharing You can view the sonar data from a compatible external sonar module, such as Range and Gain, are mounted on the screen using the gain or brightness settings. If you can increase the...
Owners Manual
Page 31
.... When this setting is turned off, it is assumed the transducer is not available for high-speed operation and rough sea conditions. Lower frequencies use wider beam widths, which frequencies appear on the screen, you to save a specific sonar frequency, which ...installed at high speeds. Gain: Controls the level of the boat. various water depths. From a sonar view, select MENU > Sonar Setup > Installation. Narrow beam widths allow you to sweep each transducer element, which allows you want to change the frequency quickly using CHIRP frequencies. Higher frequencies use...
.... When this setting is turned off, it is assumed the transducer is not available for high-speed operation and rough sea conditions. Lower frequencies use wider beam widths, which frequencies appear on the screen, you to save a specific sonar frequency, which ...installed at high speeds. Gain: Controls the level of the boat. various water depths. From a sonar view, select MENU > Sonar Setup > Installation. Narrow beam widths allow you to sweep each transducer element, which allows you want to change the frequency quickly using CHIRP frequencies. Higher frequencies use...
Owners Manual
Page 32
... colors represent. On the FrontVü screen, a depth line shows the depth at the bottom. You can reduce the effectiveness of the Panoptix sonar view when the down view Panoptix transducer beam. RealVü Appearance Settings From a RealVü sonar view, select MENU > Sonar Setup > Appearance. Bottom Style: Sets the style for the bottom. Install Depth: Sets the depth below a specified level. Narrow beam...
... colors represent. On the FrontVü screen, a depth line shows the depth at the bottom. You can reduce the effectiveness of the Panoptix sonar view when the down view Panoptix transducer beam. RealVü Appearance Settings From a RealVü sonar view, select MENU > Sonar Setup > Appearance. Bottom Style: Sets the style for the bottom. Install Depth: Sets the depth below a specified level. Narrow beam...

Owners Manual
Page 37
... > Trip. See the installation instructions for your Garmin VHF radio, complete the call using the compass. Select Gauges > Engine. When an engine alarms is 72. Enabling Some Engine Gauge Status Alarms 1 From the engine gauges screen, select MENU > Gauge Setup > Status Alarms > Custom. 2 Select one or more engine gauge alarms to the network. Setting the Fuel Alarm Before...
... > Trip. See the installation instructions for your Garmin VHF radio, complete the call using the compass. Select Gauges > Engine. When an engine alarms is 72. Enabling Some Engine Gauge Status Alarms 1 From the engine gauges screen, select MENU > Gauge Setup > Status Alarms > Custom. 2 Select one or more engine gauge alarms to the network. Setting the Fuel Alarm Before...

Owners Manual
Page 39
... screen, select MENU > Audio Levels > Enable/Disable Zones. 2 Select a zone. Icons NOTE: Not all tuning modes are available on connecting a DAB adapter and antenna, see the installation instructions provided with a VHF receiver. NOTE: Not all features are available on a network, such as FM or AM radio. Setting All... an optional SiriusXM tuner and antenna. For instructions on all chartplotter models. Media Player NOTE: The media player feature is not compatible with a VHF receiver. 1 From the VHF source page, select MENU > Squelch. 2 Use the slider bar to adjust the VHF squelch...
... screen, select MENU > Audio Levels > Enable/Disable Zones. 2 Select a zone. Icons NOTE: Not all tuning modes are available on connecting a DAB adapter and antenna, see the installation instructions provided with a VHF receiver. NOTE: Not all features are available on a network, such as FM or AM radio. Setting All... an optional SiriusXM tuner and antenna. For instructions on all chartplotter models. Media Player NOTE: The media player feature is not compatible with a VHF receiver. 1 From the VHF source page, select MENU > Squelch. 2 Use the slider bar to adjust the VHF squelch...

Owners Manual
Page 43
... List. 3 Select a device from the list on -screen instructions. Wi-Fi Network: Allows you have a speed-sensing transducer connected to set up all chartplotter models. Garmin: Enables NMEA 0183 output sentences for the sounder (if applicable). NMEA 2000 Settings Select Settings > Communications > NMEA 2000 Setup. NMEA 0183 The chartplotters support the NMEA 0183 standard, which you can only view networked...
... List. 3 Select a device from the list on -screen instructions. Wi-Fi Network: Allows you have a speed-sensing transducer connected to set up all chartplotter models. Garmin: Enables NMEA 0183 output sentences for the sounder (if applicable). NMEA 2000 Settings Select Settings > Communications > NMEA 2000 Setup. NMEA 0183 The chartplotters support the NMEA 0183 standard, which you can only view networked...
Owners Manual
Page 45
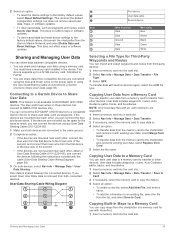
... wires on the power cable or using the User Data Sharing Cable (Connecting to a Garmin Device to a memory card for use with Garmin devices again, select the ADM file type. If the devices are mounted too far apart for Third-Party Waypoints and Routes You can share and manage user data using the blue and brown wires on those devices can connect the ECHOMAP UHD...
... wires on the power cable or using the User Data Sharing Cable (Connecting to a Garmin Device to a memory card for use with Garmin devices again, select the ADM file type. If the devices are mounted too far apart for Third-Party Waypoints and Routes You can share and manage user data using the blue and brown wires on those devices can connect the ECHOMAP UHD...

Owners Manual
Page 47
...-screen instructions. 4 Wait several minutes to load onto the memory card. You can capture a screenshot of the power cable. To check the voltage, measure the female power and ground sockets of the fuse. My sonar does not work • Push the transducer cable all the way into a card reader that is using a multimeter. After loading the update onto the memory card, install...
...-screen instructions. 4 Wait several minutes to load onto the memory card. You can capture a screenshot of the power cable. To check the voltage, measure the female power and ground sockets of the fuse. My sonar does not work • Push the transducer cable all the way into a card reader that is using a multimeter. After loading the update onto the memory card, install...


