
Important Safety and Product Information
Page 2
... viewing the device screen while driving. • Do not input destinations, change settings, or access any functions requiring prolonged use any radio that has a damaged antenna, because if it obstructs the driver's view of the road or interferes with correct replacement batteries. Warning: Do not use of the device controls while driving. You should not carry the radio in bodily injury or even death. Radio Frequency Radiation Exposure This device is turned...
... viewing the device screen while driving. • Do not input destinations, change settings, or access any functions requiring prolonged use any radio that has a damaged antenna, because if it obstructs the driver's view of the road or interferes with correct replacement batteries. Warning: Do not use of the device controls while driving. You should not carry the radio in bodily injury or even death. Radio Frequency Radiation Exposure This device is turned...

Important Safety and Product Information
Page 3
...Garmin may, in its option: (i) repair the device using new parts or previously used parts that satisfy Garmin's quality standards, (ii) replace the device with a new device or a refurbished device that meets Garmin's quality standards, or (iii) exchange the device for rebates or other associated taxes and charges. Distributor warranties are only valid in which case you can service... that country due to the end of purchase or follow the instructions on support.garmin.com to the products. THIS LIMITED WARRANTY GIVES YOU SPECIFIC LEGAL RIGHTS, AND YOU MAY HAVE OTHER LEGAL RIGHTS, WHICH ...
...Garmin may, in its option: (i) repair the device using new parts or previously used parts that satisfy Garmin's quality standards, (ii) replace the device with a new device or a refurbished device that meets Garmin's quality standards, or (iii) exchange the device for rebates or other associated taxes and charges. Distributor warranties are only valid in which case you can service... that country due to the end of purchase or follow the instructions on support.garmin.com to the products. THIS LIMITED WARRANTY GIVES YOU SPECIFIC LEGAL RIGHTS, AND YOU MAY HAVE OTHER LEGAL RIGHTS, WHICH ...
Owners Manual
Page 1
TT™ 25 DOG COLLAR DEVICE Owner's Manual
TT™ 25 DOG COLLAR DEVICE Owner's Manual

Owners Manual
Page 2
... of this manual without obligation to www.garmin.com for current updates and supplemental information concerning the use of Garmin Ltd. © 2023 Garmin Ltd. or its products and to make changes in the United States or other countries. Garmin Express™ and TT™ are those of Garmin. These trademarks may not be used without the written consent of their respective owners. TORX...
... of this manual without obligation to www.garmin.com for current updates and supplemental information concerning the use of Garmin Ltd. © 2023 Garmin Ltd. or its products and to make changes in the United States or other countries. Garmin Express™ and TT™ are those of Garmin. These trademarks may not be used without the written consent of their respective owners. TORX...

Owners Manual
Page 3
... the Dog Collar Device 2 Acquiring Satellite Signals 2 Adding a Dog to the Alpha® Navigator Using Wireless Pairing 2 Selecting and Installing the Contact Points 3 Removing the Contact Points 3 Fitting the Collar on Your Dog 3 Dog Tracking and Training 4 Dog Tracking 4 Dog Training 4 Collar Training 5 Training Methods 5 Communication with the Dog Collar Device 6 Using a Dynamic Update Rate 6 Using Sleep Mode 6 Device Information 6 Getting the Owner's Manual 6 Product Updates 7 Setting Up Wi‑Fi® for the Dog Collar Device 7 Setting Up Garmin Express 7 Connecting...
... the Dog Collar Device 2 Acquiring Satellite Signals 2 Adding a Dog to the Alpha® Navigator Using Wireless Pairing 2 Selecting and Installing the Contact Points 3 Removing the Contact Points 3 Fitting the Collar on Your Dog 3 Dog Tracking and Training 4 Dog Tracking 4 Dog Training 4 Collar Training 5 Training Methods 5 Communication with the Dog Collar Device 6 Using a Dynamic Update Rate 6 Using Sleep Mode 6 Device Information 6 Getting the Owner's Manual 6 Product Updates 7 Setting Up Wi‑Fi® for the Dog Collar Device 7 Setting Up Garmin Express 7 Connecting...
Owners Manual
Page 5
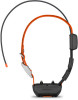
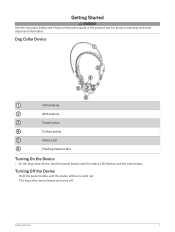
Turning Off the Device Hold the power button until the status LED flashes and the collar beeps. The dog collar device beeps and turns off. Dog Collar Device VHF antenna GPS antenna Power button Contact points Status LED Flashing beacon LEDs Turning On the Device • On the dog collar device, hold the power button until the status LED turns solid red. Getting Started 1 Getting Started WARNING See the Important Safety and Product Information guide in the product box for product warnings and other important information.
Turning Off the Device Hold the power button until the status LED flashes and the collar beeps. The dog collar device beeps and turns off. Dog Collar Device VHF antenna GPS antenna Power button Contact points Status LED Flashing beacon LEDs Turning On the Device • On the dog collar device, hold the power button until the status LED turns solid red. Getting Started 1 Getting Started WARNING See the Important Safety and Product Information guide in the product box for product warnings and other important information.
Owners Manual
Page 6
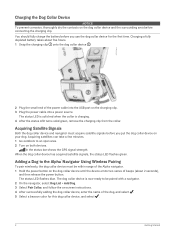
... series of beeps (about five hours. 1 Snap the charging clip onto the dog collar device . 2 Plug the small end of the power cable into a power source. When the dog collar device has acquired satellite signals, the status LED flashes green. Adding a Dog to be within range of the Alpha navigator. 1 Hold the power button on your dog. The status LED flashes blue. The dog collar device is charging. 4 After the status LED turns solid green, remove the charging...
... series of beeps (about five hours. 1 Snap the charging clip onto the dog collar device . 2 Plug the small end of the power cable into a power source. When the dog collar device has acquired satellite signals, the status LED flashes green. Adding a Dog to be within range of the Alpha navigator. 1 Hold the power button on your dog. The status LED flashes blue. The dog collar device is charging. 4 After the status LED turns solid green, remove the charging...
Owners Manual
Page 7
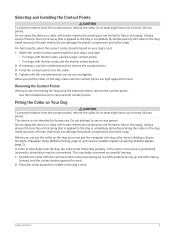
... Alpha® Navigator Using Wireless Pairing, page 2), and acquire satellite signals (Acquiring Satellite Signals, page 2). Small amounts of every 24-hour period. If the collar is not intended for at least eight hours out of harsh chemicals can damage the plastic components and collar strap. This device is too loose or positioned incorrectly, stimulation may be inconsistent. Always ensure that is applied to remove...
... Alpha® Navigator Using Wireless Pairing, page 2), and acquire satellite signals (Acquiring Satellite Signals, page 2). Small amounts of every 24-hour period. If the collar is not intended for at least eight hours out of harsh chemicals can damage the plastic components and collar strap. This device is too loose or positioned incorrectly, stimulation may be inconsistent. Always ensure that is applied to remove...
Owners Manual
Page 8
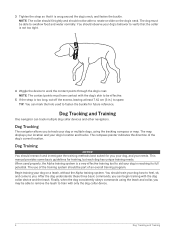
... the dog collar device and the leash. TIP: You can mark the hole used properly, the Alpha training system is a very effective training tool to aid your dog in .) to spare. Dog Tracking and Training One navigator can begin training with only the dog collar device. 4 Dog Tracking and Training After the dog understands these three basic commands, you can track multiple dog collar devices and other navigators. The map displays your location...
... the dog collar device and the leash. TIP: You can mark the hole used properly, the Alpha training system is a very effective training tool to aid your dog in .) to spare. Dog Tracking and Training One navigator can begin training with only the dog collar device. 4 Dog Tracking and Training After the dog understands these three basic commands, you can track multiple dog collar devices and other navigators. The map displays your location...
Owners Manual
Page 9
...training button, regardless of how long the button is your dog's baseline level for a maximum of dog leashes. Be fair and consistent, and use repetition and praise when using the Alpha training system. After the dog begins to respond consistently to the command during collar training... dog the entire time you press the training button. The effectiveness of collar training. Choosing the Correct Intensity Level 1 Set the intensity to the lowest level. 2 Observe the dog for your environment and your dog's temperament. You do not need to change in expression. Dog Tracking and...
...training button, regardless of how long the button is your dog's baseline level for a maximum of dog leashes. Be fair and consistent, and use repetition and praise when using the Alpha training system. After the dog begins to respond consistently to the command during collar training... dog the entire time you press the training button. The effectiveness of collar training. Choosing the Correct Intensity Level 1 Set the intensity to the lowest level. 2 Observe the dog for your environment and your dog's temperament. You do not need to change in expression. Dog Tracking and...
Owners Manual
Page 10
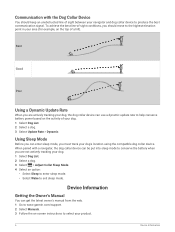
... not actively tracking your dog. 1 Select Dog List. 2 Select a dog. 3 Select > Adjust Collar Sleep Mode. 4 Select an option: • Select Sleep to enter sleep mode. • Select Wake to exit sleep mode. Communication with a navigator, the dog collar device can be put into sleep mode to conserve the battery when you are actively tracking your dog, the dog collar device can use a dynamic update rate to help conserve battery power based on -screen instructions to select your product. 6 Device Information To...
... not actively tracking your dog. 1 Select Dog List. 2 Select a dog. 3 Select > Adjust Collar Sleep Mode. 4 Select an option: • Select Sleep to enter sleep mode. • Select Wake to exit sleep mode. Communication with a navigator, the dog collar device can be put into sleep mode to conserve the battery when you are actively tracking your dog, the dog collar device can use a dynamic update rate to help conserve battery power based on -screen instructions to select your product. 6 Device Information To...
Owners Manual
Page 11
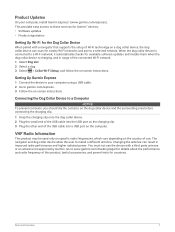
Connecting the Dog Collar Device to garmin.com/express. 3 Follow the on-screen instructions. Changing the antenna can scan for countries. VHF Radio Information This product may be used only on specific radio frequencies, which vary depending on the country of use the device with a navigator that supports the setup of Wi‑Fi technology on a dog collar device, the dog collar device can result in range of this product, lawful accessories, and power limits for nearby Wi...
Connecting the Dog Collar Device to garmin.com/express. 3 Follow the on-screen instructions. Changing the antenna can scan for countries. VHF Radio Information This product may be used only on specific radio frequencies, which vary depending on the country of use the device with a navigator that supports the setup of Wi‑Fi technology on a dog collar device, the dog collar device can result in range of this product, lawful accessories, and power limits for nearby Wi...
Owners Manual
Page 12
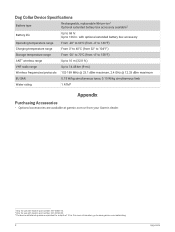
Dog Collar Device Specifications Battery type Rechargeable, replaceable lithium-ion1 Optional extended battery box accessory available2 Battery life Up to 136 hr. Up to 68 hr. For more information, go to a depth of 10 m. with optional extended battery box accessory Operating temperature range From -20° to 60°C (from -4° to 140°F) Charging temperature range From 0° to 40°C (from...
Dog Collar Device Specifications Battery type Rechargeable, replaceable lithium-ion1 Optional extended battery box accessory available2 Battery life Up to 136 hr. Up to 68 hr. For more information, go to a depth of 10 m. with optional extended battery box accessory Operating temperature range From -20° to 60°C (from -4° to 140°F) Charging temperature range From 0° to 40°C (from...
Owners Manual
Page 13
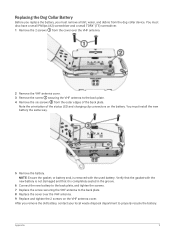
... from the dog collar device. Appendix 9 Replacing the Dog Collar Battery Before you replace the battery, you remove the old battery, contact your local waste disposal department to properly recycle the battery. You must remove all dirt, water, and debris from the outer edges of the status LED and charging clip connectors on the VHF antenna cover. After you must install the new battery the same way. 5 Remove the battery.
... from the dog collar device. Appendix 9 Replacing the Dog Collar Battery Before you replace the battery, you remove the old battery, contact your local waste disposal department to properly recycle the battery. You must remove all dirt, water, and debris from the outer edges of the status LED and charging clip connectors on the VHF antenna cover. After you must install the new battery the same way. 5 Remove the battery.
Owners Manual
Page 14
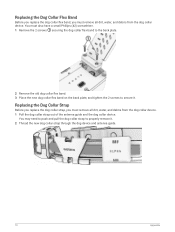
Replacing the Dog Collar Strap Before you replace the dog collar strap, you must remove all dirt, water, and debris from the dog collar device. You may need to push and pull the dog collar strap to secure it . 2 Thread the new dog collar strap through the dog device and antenna guide. 10 Appendix You must also have a small Phillips (#2) screwdriver. 1 Remove the 2 screws securing the dog collar flex band to the back...
Replacing the Dog Collar Strap Before you replace the dog collar strap, you must remove all dirt, water, and debris from the dog collar device. You may need to push and pull the dog collar strap to secure it . 2 Thread the new dog collar strap through the dog device and antenna guide. 10 Appendix You must also have a small Phillips (#2) screwdriver. 1 Remove the 2 screws securing the dog collar flex band to the back...
Owners Manual
Page 15
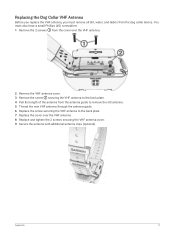
... must remove all dirt, water, and debris from the antenna guide to remove the old antenna. 5 Thread the new VHF antenna through the antenna guide. 6 Replace the screw securing the VHF antenna to the back plate. 7 Replace the cover over the VHF antenna. 2 Remove the VHF antenna cover. 3 Remove the screw securing the VHF antenna to the back plate. 4 Pull the length of the antenna from the dog collar device.
... must remove all dirt, water, and debris from the antenna guide to remove the old antenna. 5 Thread the new VHF antenna through the antenna guide. 6 Replace the screw securing the VHF antenna to the back plate. 7 Replace the cover over the VHF antenna. 2 Remove the VHF antenna cover. 3 Remove the screw securing the VHF antenna to the back plate. 4 Pull the length of the antenna from the dog collar device.

Owners Manual
Page 16
support.garmin.com May 2023 GUID-992E9C90-AE40-4ED4-B3C4-9D812BD4DF89 v1
support.garmin.com May 2023 GUID-992E9C90-AE40-4ED4-B3C4-9D812BD4DF89 v1


