LED Series Maunal
Page 1
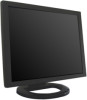
CCTV Monitor User Manual
CCTV Monitor User Manual

LED Series Maunal
Page 2
... controls ...3 Control panel...3 (17") ...3 (19"W,22",24") ...3 (27") ...3 (19") ...4 Remote control (27" only) ...5 Inserting batteries into the remote control unit ...5 Changing a monitor parameter ...5 Adjustment procedure...6 OSD function ...6 VGA menu ...6 Picture ...6 Sound(optional) ...7 System ...7 Lock 8 Cam menu (HDMI) ...8 Picture ...8 Sound(optional) ...9 Lock ...10 Self-diagnosis ...10 Troubleshooting...11 Specifications...12 Factory preset timings (VGA mode)...15 Factory preset timings (HDMI mode) ...15 User Manual
... controls ...3 Control panel...3 (17") ...3 (19"W,22",24") ...3 (27") ...3 (19") ...4 Remote control (27" only) ...5 Inserting batteries into the remote control unit ...5 Changing a monitor parameter ...5 Adjustment procedure...6 OSD function ...6 VGA menu ...6 Picture ...6 Sound(optional) ...7 System ...7 Lock 8 Cam menu (HDMI) ...8 Picture ...8 Sound(optional) ...9 Lock ...10 Self-diagnosis ...10 Troubleshooting...11 Specifications...12 Factory preset timings (VGA mode)...15 Factory preset timings (HDMI mode) ...15 User Manual

LED Series Maunal
Page 3
... case the user will be disposed of the FCC Rules. Mains plug (2 pin/3 pin): • Do not remove the grounding or earth connection from the power supply / mains plug. • Always remember to unplug the monitor from overheating. • Only use shielded cables and connectors for all servicing to qualified service personnel. 7. Product care: Do not touch the screen directly with a dry cloth. 6. Servicing: Do not...
... case the user will be disposed of the FCC Rules. Mains plug (2 pin/3 pin): • Do not remove the grounding or earth connection from the power supply / mains plug. • Always remember to unplug the monitor from overheating. • Only use shielded cables and connectors for all servicing to qualified service personnel. 7. Product care: Do not touch the screen directly with a dry cloth. 6. Servicing: Do not...

LED Series Maunal
Page 4
... power supply cable or plug/connector is damaged or if the monitor housing is missing or damaged, please contact your monitor. Put a smooth pad or cloth on a desktop. 2 Remove the four screws connecting the stand rear body. 4. Place the monitor on -screen display allows for easy and accurate adjustments of screen size, position and color. The monitor complies with a screw driver. 3. Remove the connecting stand front body. Insert the arm of the monitor stand of the monitor...
... power supply cable or plug/connector is damaged or if the monitor housing is missing or damaged, please contact your monitor. Put a smooth pad or cloth on a desktop. 2 Remove the four screws connecting the stand rear body. 4. Place the monitor on -screen display allows for easy and accurate adjustments of screen size, position and color. The monitor complies with a screw driver. 3. Remove the connecting stand front body. Insert the arm of the monitor stand of the monitor...

LED Series Maunal
Page 5
... to four turns. 4. CAM IN Composite signal input. 4. Put a smooth pad or cloth on a level surface. CAM OUT Composite signal output 3. Remove the connecting stand front body. Front panel controls Control panel (17") (19"W,22",24") (27") 3 Put a smooth pad or cloth on it facing downwards. 2. AC IN(17",19"W,19",22",24") DC 12V Input (27") 2. Remove the two screws connecting the stand and monitor body. VGA RGB signal input. Place the monitor on...
... to four turns. 4. CAM IN Composite signal input. 4. Put a smooth pad or cloth on a level surface. CAM OUT Composite signal output 3. Remove the connecting stand front body. Front panel controls Control panel (17") (19"W,22",24") (27") 3 Put a smooth pad or cloth on it facing downwards. 2. AC IN(17",19"W,19",22",24") DC 12V Input (27") 2. Remove the two screws connecting the stand and monitor body. VGA RGB signal input. Place the monitor on...

LED Series Maunal
Page 6
... different input sources, to the most optimal setting possible. 4 POWER Switches the monitor on and off . 2. ▶ (Right Arrow ) Moves cursor to the right in the OSD window and decreases the value of any selected menu. 4. AUTO(*) Primary Function: Automatically adjusts the display to confirm selection, press the source button. POWER Switches the monitor on and off . *HOT KEY →(*) (VGA mode only) Secondary Function: Allows for vertical scrolling in the OSD menu...
... different input sources, to the most optimal setting possible. 4 POWER Switches the monitor on and off . 2. ▶ (Right Arrow ) Moves cursor to the right in the OSD window and decreases the value of any selected menu. 4. AUTO(*) Primary Function: Automatically adjusts the display to confirm selection, press the source button. POWER Switches the monitor on and off . *HOT KEY →(*) (VGA mode only) Secondary Function: Allows for vertical scrolling in the OSD menu...

LED Series Maunal
Page 7
... Select PC mode. R20 AIR/CABLE Not used . Insert the batteries (two 1.5 V type R03 or AAA). Note: To avoid damage from possible battery leakage, remove the batteries if you can make adjustments as necessary 6. Press AUTO/SELECT button, then using left- To exit, press MENU. 5 R8 SLEEP Set the sleep timer. R16 PR +/- Remote control (27" only) R1 POWER Turn the monitor on the front panel to unlock the remote control lock.(27...
... Select PC mode. R20 AIR/CABLE Not used . Insert the batteries (two 1.5 V type R03 or AAA). Note: To avoid damage from possible battery leakage, remove the batteries if you can make adjustments as necessary 6. Press AUTO/SELECT button, then using left- To exit, press MENU. 5 R8 SLEEP Set the sleep timer. R16 PR +/- Remote control (27" only) R1 POWER Turn the monitor on the front panel to unlock the remote control lock.(27...

LED Series Maunal
Page 8
... color parameters. (Normal/Warm/Cool/User) 4. Not used. 4-2 Back Light Adjust the back light to be brighter or darker. 4-3 DCR(Dynamic Contrast Ratio) Not used. 4-4 DCC(Dynamic Contrast Control) Not used. 5. Yes Perform the H - No Yes Adjust the Phase until the screen is cleared. VGA menu Picture 1. Contrast Adjust the contrast of the image. 2. Changes are immediately saved and implemented. VGA Setting 5-1 Auto adjust 6 Brightness Adjust the brightness of image, the difference between light and dark areas on the screen. 3. Advanced Setting...
... color parameters. (Normal/Warm/Cool/User) 4. Not used. 4-2 Back Light Adjust the back light to be brighter or darker. 4-3 DCR(Dynamic Contrast Ratio) Not used. 4-4 DCC(Dynamic Contrast Control) Not used. 5. Yes Perform the H - No Yes Adjust the Phase until the screen is cleared. VGA menu Picture 1. Contrast Adjust the contrast of the image. 2. Changes are immediately saved and implemented. VGA Setting 5-1 Auto adjust 6 Brightness Adjust the brightness of image, the difference between light and dark areas on the screen. 3. Advanced Setting...

LED Series Maunal
Page 9
...) 3. Blue Screen Select the background color. 7. Time Setting 7-1 Time Not used 6. OSD Time out Adjust the display of the volume if you change the program. 1. Sound Mode Choose a different preset sound mode or your own customized sound. (Standard/ Speech/ Music/ User) 2. OSD Transparency Adjust the OSD. Balance Adjust the sound balance of the left or right). 5-3 V-Position Adjust the position of the display vertically (up or down). 5-4 Phase Remove any horizontal noise and clear or sharpen the image of...
...) 3. Blue Screen Select the background color. 7. Time Setting 7-1 Time Not used 6. OSD Time out Adjust the display of the volume if you change the program. 1. Sound Mode Choose a different preset sound mode or your own customized sound. (Standard/ Speech/ Music/ User) 2. OSD Transparency Adjust the OSD. Balance Adjust the sound balance of the left or right). 5-3 V-Position Adjust the position of the display vertically (up or down). 5-4 Phase Remove any horizontal noise and clear or sharpen the image of...

LED Series Maunal
Page 10
.../User) 8. Picture Mode Select the picture mode (Standard/Eco/Movie/Dynamic/User). 2. Color Mode Adjust Color of image, the difference between light and dark areas on or off Cam menu (HDMI) Picture 1. Monitor is turned off when it did not receive any signal from remote control or any button within the time that you set . (off/1Hour/2Hours/5Hours) (The screen warning is showed before automatic shutdown time that you set up ). 6. Keypad Lock Turn...
.../User) 8. Picture Mode Select the picture mode (Standard/Eco/Movie/Dynamic/User). 2. Color Mode Adjust Color of image, the difference between light and dark areas on or off Cam menu (HDMI) Picture 1. Monitor is turned off when it did not receive any signal from remote control or any button within the time that you set . (off/1Hour/2Hours/5Hours) (The screen warning is showed before automatic shutdown time that you set up ). 6. Keypad Lock Turn...

LED Series Maunal
Page 11
... OSD. Video Standard (cam mode only) Select the picture mode 8. Bass When you select the user mode, adjust the treble sound. 5. Sound(optional) (Time Setting) 1. Balance Adjust the sound balance of the OSD menu 4. Equalizer Provide an enhanced listening experience. 6. Screen Format Select the aspect ratio. (FULL/16:9/4:3/ZOOM1/ZOOM2) 3. Power status Not used . 8-2 Sleep Timer Set sleep timer 8-3 Auto Sleep Monitor is turned off when it did not receive any signal from remote control or any button...
... OSD. Video Standard (cam mode only) Select the picture mode 8. Bass When you select the user mode, adjust the treble sound. 5. Sound(optional) (Time Setting) 1. Balance Adjust the sound balance of the OSD menu 4. Equalizer Provide an enhanced listening experience. 6. Screen Format Select the aspect ratio. (FULL/16:9/4:3/ZOOM1/ZOOM2) 3. Power status Not used . 8-2 Sleep Timer Set sleep timer 8-3 Auto Sleep Monitor is turned off when it did not receive any signal from remote control or any button...

LED Series Maunal
Page 12
... Range or None Supported. No Signal screen is turned off when it did not receive any signal from remote control or any button within the time that you set up.) 10 The self-diagnosis function checks if the status of the monitor screen is No Signal, Out of Range screen is displayed when the applied frequency is no image, the Self-Diagnosis screen will be displayed. Remote Control Lock (optional) Turn Remote Control lock on DPMS mode. Sub signal connector is connected...
... Range or None Supported. No Signal screen is turned off when it did not receive any signal from remote control or any button within the time that you set up.) 10 The self-diagnosis function checks if the status of the monitor screen is No Signal, Out of Range screen is displayed when the applied frequency is no image, the Self-Diagnosis screen will be displayed. Remote Control Lock (optional) Turn Remote Control lock on DPMS mode. Sub signal connector is connected...

LED Series Maunal
Page 13
... the monitor. Adjust the Color or Tint values on the OSD Picture menu. 11 Check if the power cord is in the On position. See the FCC information at the front cover of D sub-connector are in the On position Check if the signal cable is suitable to the video card Adjust Clock or H&V Center to get the proper image. Check if the video cable is no longer displayed. Troubleshooting Symptom Picture is jittery No picture POWER LED is...
... the monitor. Adjust the Color or Tint values on the OSD Picture menu. 11 Check if the power cord is in the On position. See the FCC information at the front cover of D sub-connector are in the On position Check if the signal cable is suitable to the video card Adjust Clock or H&V Center to get the proper image. Check if the video cable is no longer displayed. Troubleshooting Symptom Picture is jittery No picture POWER LED is...

LED Series Maunal
Page 14
Specifications Items Panel Interface Power Dimensions Weight VESA mount Specifications Hole patterns Operating temperature Screen size Pixel pitch View angle (H/V) Contrast ratio Response time Brightness Recommended resolution 17" 17in (43.2cm) 0.264 x 0.264 mm 170°/160° 1000:1 (typ) 5 ms 250 cd/m² (typ) 1280 x 1024 @ 60Hz VGA in (15 Pin D- 1 Sub) HDMI in 1 BNC (in/out) 1/1 Consumption
Specifications Items Panel Interface Power Dimensions Weight VESA mount Specifications Hole patterns Operating temperature Screen size Pixel pitch View angle (H/V) Contrast ratio Response time Brightness Recommended resolution 17" 17in (43.2cm) 0.264 x 0.264 mm 170°/160° 1000:1 (typ) 5 ms 250 cd/m² (typ) 1280 x 1024 @ 60Hz VGA in (15 Pin D- 1 Sub) HDMI in 1 BNC (in/out) 1/1 Consumption

LED Series Maunal
Page 15
Items Panel Interface Power Dimensions Weight VESA mount Specifications Hole patterns Operating temperature 19" Screen size 19 in. (48.3 cm) Pixel pitch 0.294 x 0.294 mm View angle (H/V) 170°/160° Contrast ratio 1000:1 (typ) Response time 5 ms Brightness 250 cd/m² (typ) Recommended resolution 1280 x 1024 @ 60 Hz VGA in 1 (15 Pin D-Sub) HDMI in 1 BNC (in/out) 1/1 Consumption
Items Panel Interface Power Dimensions Weight VESA mount Specifications Hole patterns Operating temperature 19" Screen size 19 in. (48.3 cm) Pixel pitch 0.294 x 0.294 mm View angle (H/V) 170°/160° Contrast ratio 1000:1 (typ) Response time 5 ms Brightness 250 cd/m² (typ) Recommended resolution 1280 x 1024 @ 60 Hz VGA in 1 (15 Pin D-Sub) HDMI in 1 BNC (in/out) 1/1 Consumption

LED Series Maunal
Page 16
.... 14 Items Panel Interface Power Dimensions Weight VESA mount Specifications Hole patterns Operating temperature 24" Screen size 23.6 in(59.95cm) Pixel pitch 0.2715(H) x 0.2715(V) View angle (H/V) 170°/160° Contrast ratio 1000:1 (typ) Response time 5 ms Brightness 250 cd/m² (typ) Recommended resolution 1920 x 1080@60Hz VGA in 1 (15 Pin D-Sub) HDMI in 1 BNC (in/out) 1/1 Consumption < 30 W Source AC100-240V W x H x D (with stand) 561mm...
.... 14 Items Panel Interface Power Dimensions Weight VESA mount Specifications Hole patterns Operating temperature 24" Screen size 23.6 in(59.95cm) Pixel pitch 0.2715(H) x 0.2715(V) View angle (H/V) 170°/160° Contrast ratio 1000:1 (typ) Response time 5 ms Brightness 250 cd/m² (typ) Recommended resolution 1920 x 1080@60Hz VGA in 1 (15 Pin D-Sub) HDMI in 1 BNC (in/out) 1/1 Consumption < 30 W Source AC100-240V W x H x D (with stand) 561mm...