
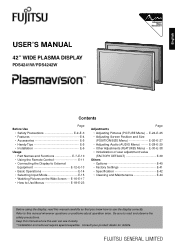
User Manual
Page 1
...; Installation E-6 Usage • Part Names and Functions E-7-E-10 • Using the Remote Control E-11 • Connecting the Display to External Equipment E-12-E-13 • Basic Operations E-14 • Selecting Input Mode E-15 • Watching Pictures on the Wide Screen ··· E-16-E-17 • How to Use Menus E-18-E-23 Page Adjustments • Adjusting Pictures (PICTURE Menu) ··· E-24-E-25 • Adjusting Screen Position and Size (POSITION/SIZE Menu E-26-E-27 • Adjusting Audio (AUDIO Menu...
...; Installation E-6 Usage • Part Names and Functions E-7-E-10 • Using the Remote Control E-11 • Connecting the Display to External Equipment E-12-E-13 • Basic Operations E-14 • Selecting Input Mode E-15 • Watching Pictures on the Wide Screen ··· E-16-E-17 • How to Use Menus E-18-E-23 Page Adjustments • Adjusting Pictures (PICTURE Menu) ··· E-24-E-25 • Adjusting Screen Position and Size (POSITION/SIZE Menu E-26-E-27 • Adjusting Audio (AUDIO Menu...

User Manual
Page 5
.... For added protection for this indicates a need for service. - Unauthorized substitutions may touch dangerous voltage points or short out parts that produce heat. - Use the standard power plug and cord set of the grounded plug. - Power cord Power supply voltage: AC 100-125 V (Included) AC 200-240 V (Not included) AC 240 V (SAA TYPE) (Not included) E-3 English - Adjust only those controls that they exit from overheating. If you...
.... For added protection for this indicates a need for service. - Unauthorized substitutions may touch dangerous voltage points or short out parts that produce heat. - Use the standard power plug and cord set of the grounded plug. - Power cord Power supply voltage: AC 100-125 V (Included) AC 200-240 V (Not included) AC 240 V (SAA TYPE) (Not included) E-3 English - Adjust only those controls that they exit from overheating. If you...
User Manual
Page 6
... displaying of normal-size (4:3 aspect ratio) pictures. • The display has an Auto mode to receive signals, including VGA, SVGA, XGA,SXGA and UXGA*1. 5 screen sizes (Video input mode) and 3 screen sizes (RGB input mode) • This display offers a total of software. • Three different screen sizes in video input mode: Wide1, Wide2, Zoom1, and Zoom2. Others • Troublesome adjustment of DVI standard to display a high definition picture quality in . • 2 audio input terminals and 9W + 9W external speaker output terminal are supported...
... displaying of normal-size (4:3 aspect ratio) pictures. • The display has an Auto mode to receive signals, including VGA, SVGA, XGA,SXGA and UXGA*1. 5 screen sizes (Video input mode) and 3 screen sizes (RGB input mode) • This display offers a total of software. • Three different screen sizes in video input mode: Wide1, Wide2, Zoom1, and Zoom2. Others • Troublesome adjustment of DVI standard to display a high definition picture quality in . • 2 audio input terminals and 9W + 9W external speaker output terminal are supported...
User Manual
Page 7
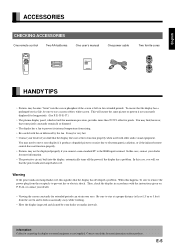
... not supplied. Warning If the power indicator lamp flashes red, this happens, be very hot. • Contact your eyes. English ACCESSORIES CHECKING ACCESSORIES One remote control Two AA batteries One user's manual One power cable Two ferrite cores Manual HANDY TIPS • Pictures may become "burnt" into the display, automatically turns off the power if the display has a problem. This will see that the display has developed a problem. Then, check the display in...
... not supplied. Warning If the power indicator lamp flashes red, this happens, be very hot. • Contact your eyes. English ACCESSORIES CHECKING ACCESSORIES One remote control Two AA batteries One user's manual One power cable Two ferrite cores Manual HANDY TIPS • Pictures may become "burnt" into the display, automatically turns off the power if the display has a problem. This will see that the display has developed a problem. Then, check the display in...
User Manual
Page 9
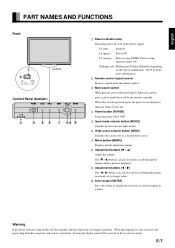
... wide screen. 7 Menu button [MENU] Displays picture adjustment menus. 8 Adjustment buttons [ / ] Adjust the volume. When this switch is pressed again, the power is displayed. 9 Adjustment buttons [ / ] The [ / ] buttons can be turned on the type of the power supply. When this happens, be sure to remove the power plug from the remote control. 3 Main power switch When pressed, power indicator lamp 1 lights red, and the power can also be used to scroll through the options when a menu is cut and power indicator lamp 1 goes off by Lit (green): Power...
... wide screen. 7 Menu button [MENU] Displays picture adjustment menus. 8 Adjustment buttons [ / ] Adjust the volume. When this switch is pressed again, the power is displayed. 9 Adjustment buttons [ / ] The [ / ] buttons can be turned on the type of the power supply. When this happens, be sure to remove the power plug from the remote control. 3 Main power switch When pressed, power indicator lamp 1 lights red, and the power can also be used to scroll through the options when a menu is cut and power indicator lamp 1 goes off by Lit (green): Power...

User Manual
Page 10
... the power cable supplied with 75 Ω . E-12.) 7 RGB 1 input terminal (RGB 1 INPUT/DVI-D) Connect this terminal to the cable. (See P. When connecting a cable, attach a ferrite core to the PC's display (digital RGB) output terminal. *The connection cable No.88741-8000 made by molex Inc. PART NAMES AND FUNCTIONS (Continued) Bottom 1 External speaker output terminal (EXT SP) Connect this terminal to the optionally available speaker. (Use a speaker with 4 to 16 Ω.) *See the speaker instruction manual...
... the power cable supplied with 75 Ω . E-12.) 7 RGB 1 input terminal (RGB 1 INPUT/DVI-D) Connect this terminal to the cable. (See P. When connecting a cable, attach a ferrite core to the PC's display (digital RGB) output terminal. *The connection cable No.88741-8000 made by molex Inc. PART NAMES AND FUNCTIONS (Continued) Bottom 1 External speaker output terminal (EXT SP) Connect this terminal to the optionally available speaker. (Use a speaker with 4 to 16 Ω.) *See the speaker instruction manual...

User Manual
Page 12
... in a menu and change values. 9 Enter button [ENTER] ➝ (See P. E-14.) 2 Turns the power ON. 5 2 Power OFF button [POWER OFF] 4 Turns the power OFF. ➝ (See P. Make sure that apply in your country/area. CAUTION: Be sure to use these buttons to display a desired menu for adjusting the picture. 7 Volume adjustment buttons [VOL +/-] ➝ (See P. PART NAMES AND FUNCTIONS (Continued) Remote Control 1 3 8 1 Power ON button [POWER ON] ➝ (See P. E-14.) 6 3 RGB input mode selector button [RGB] Switches between video input modes. 5 Wide screen...
... in a menu and change values. 9 Enter button [ENTER] ➝ (See P. E-14.) 2 Turns the power ON. 5 2 Power OFF button [POWER OFF] 4 Turns the power OFF. ➝ (See P. Make sure that apply in your country/area. CAUTION: Be sure to use these buttons to display a desired menu for adjusting the picture. 7 Volume adjustment buttons [VOL +/-] ➝ (See P. PART NAMES AND FUNCTIONS (Continued) Remote Control 1 3 8 1 Power ON button [POWER ON] ➝ (See P. E-14.) 6 3 RGB input mode selector button [RGB] Switches between video input modes. 5 Wide screen...

User Manual
Page 14
... will need to the display and external equipment before making any connections. Loose connectors can result in picture or color problems. Make sure that the power cable's grounding wire is connected to attenuate undesired signals. CONNECTING THE DISPLAY TO EXTERNAL EQUIPMENT Be sure to turn OFF the power to have only a 2-hole receptacle, you have it replaced. RECEPTACLE Make sure that all connectors are used varies depending on the PC model. Contact...
... will need to the display and external equipment before making any connections. Loose connectors can result in picture or color problems. Make sure that the power cable's grounding wire is connected to attenuate undesired signals. CONNECTING THE DISPLAY TO EXTERNAL EQUIPMENT Be sure to turn OFF the power to have only a 2-hole receptacle, you have it replaced. RECEPTACLE Make sure that all connectors are used varies depending on the PC model. Contact...

User Manual
Page 16
... switches on the remote When you turn OFF the power. * As Audio Input is set at the bottom of the display. When the volume adjustment button is ON. on the display's control panel to reduce the volume. BASIC OPERATIONS TURNING ON THE POWER 1 Press the main power switch at "No Audio" in the factory settings, the sound volume cannot be selected. * "No Audio" appears if you press or after you do so, the power indicator lamp turns green...
... switches on the remote When you turn OFF the power. * As Audio Input is set at the bottom of the display. When the volume adjustment button is ON. on the display's control panel to reduce the volume. BASIC OPERATIONS TURNING ON THE POWER 1 Press the main power switch at "No Audio" in the factory settings, the sound volume cannot be selected. * "No Audio" appears if you press or after you do so, the power indicator lamp turns green...
User Manual
Page 20
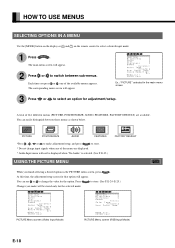
....) USING THE PICTURE MENU FACTORY DEFAULT When you press or , one of five different menus (PICTURE, POSITION/SIZE, AUDIO, FEATURES, FACTORY DEFAULT) are displayed. * Audio Input menu will not be stored only for the selected mode. A total of the available menus appears. PICTURE Menu screen (Video Input Mode) E-18 PICTURE Menu screen (RGB Input Mode) Press to select an option for adjustment/setup. HOW TO USE MENUS SELECTING OPTIONS IN A MENU Use the [MODE] button on the display or and on the remote control to store. * Do not change...
....) USING THE PICTURE MENU FACTORY DEFAULT When you press or , one of five different menus (PICTURE, POSITION/SIZE, AUDIO, FEATURES, FACTORY DEFAULT) are displayed. * Audio Input menu will not be stored only for the selected mode. A total of the available menus appears. PICTURE Menu screen (Video Input Mode) E-18 PICTURE Menu screen (RGB Input Mode) Press to select an option for adjustment/setup. HOW TO USE MENUS SELECTING OPTIONS IN A MENU Use the [MODE] button on the display or and on the remote control to store. * Do not change...

User Manual
Page 21
.... Use or for Video, S-video, Comp.video) (5) Sharpness Adjusts color darkness. Can set up when User is selected in Color Temp. (9) Noise Reduction Sets up . : Moves screen down. USING THE POSITION/SIZE MENU When you do so, the adjustment screen for each of Red, Green and Blue Off/Min./Std./Max. Adjusts width. When you finish selecting a desired option in RGB1 (DVI-D) mode. Adjusts screen size. Adjusts height. : Increases width. : Reduces width. : Increases height. : Reduces height. Adjusts color temperature. Adjusts picture sharpness. Use or for switching...
.... Use or for Video, S-video, Comp.video) (5) Sharpness Adjusts color darkness. Can set up when User is selected in Color Temp. (9) Noise Reduction Sets up . : Moves screen down. USING THE POSITION/SIZE MENU When you do so, the adjustment screen for each of Red, Green and Blue Off/Min./Std./Max. Adjusts width. When you finish selecting a desired option in RGB1 (DVI-D) mode. Adjusts screen size. Adjusts height. : Increases width. : Reduces width. : Increases height. : Reduces height. Adjusts color temperature. Adjusts picture sharpness. Use or for switching...
User Manual
Page 25
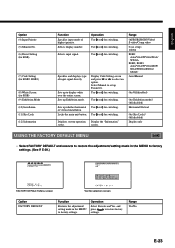
... installation. Use or for switching. Range Off/RGB2/RGB3/Video/ S-video/Comp.video 0 (no setup) 1/2/3/4 RGB1: Auto/VGA/WVGA/XGA/ WXGA RGB2, RGB3: Auto/VGA/WVGA/480P/ XGA/WXGA/SXGA/ SXGA+ Auto/Manual On /Off(disabled) On (Exhibition mode)/ Off(disabled) Horizontal/Vertical On (Key Lock)/ Off(disabled) Display only USING THE FACTORY DEFAULT MENU • Select FACTORY DEFAULT and execute to restore the adjustment/setting made in the MENU to factory settings. Selects display number. Selects input signal. Operation Use or for switching. Use or for switching. Display Code Setting screen...
... installation. Use or for switching. Range Off/RGB2/RGB3/Video/ S-video/Comp.video 0 (no setup) 1/2/3/4 RGB1: Auto/VGA/WVGA/XGA/ WXGA RGB2, RGB3: Auto/VGA/WVGA/480P/ XGA/WXGA/SXGA/ SXGA+ Auto/Manual On /Off(disabled) On (Exhibition mode)/ Off(disabled) Horizontal/Vertical On (Key Lock)/ Off(disabled) Display only USING THE FACTORY DEFAULT MENU • Select FACTORY DEFAULT and execute to restore the adjustment/setting made in the MENU to factory settings. Selects display number. Selects input signal. Operation Use or for switching. Use or for switching. Display Code Setting screen...

User Manual
Page 26
... change tint values. : More greenish colors : More purplish colors 6 Press to select "PICTURE". The main menu screen will appear. "PICTURE" selected in which you do not take any changes. 1 Press . Therefore, you press or , one of the available menus appears in the following abbreviations used in this document represent input modes in the main menu screen FEATURES FACTORY DEFAULT * You can also use the switches on the display's control panel...
... change tint values. : More greenish colors : More purplish colors 6 Press to select "PICTURE". The main menu screen will appear. "PICTURE" selected in which you do not take any changes. 1 Press . Therefore, you press or , one of the available menus appears in the following abbreviations used in this document represent input modes in the main menu screen FEATURES FACTORY DEFAULT * You can also use the switches on the display's control panel...

User Manual
Page 27
... pictures. Press or to select Red, Green or Blue and press or to make adjustment in the following sequence: Warm: More reddish colors Standard:Standard color temperature Cool: More bluish colors User: User Color Temp. E-25 setup • Setting User Color Temp. (User Color Temp.) Can set up when User is adjusted individually at the factory. English • Adjusting Contrast (Contrast) Any value between -30 and +30 can be selected. : Higher contrast : Lower contrast Press to store. • Adjusting Screen Brightness (Brightness...
... pictures. Press or to select Red, Green or Blue and press or to make adjustment in the following sequence: Warm: More reddish colors Standard:Standard color temperature Cool: More bluish colors User: User Color Temp. E-25 setup • Setting User Color Temp. (User Color Temp.) Can set up when User is adjusted individually at the factory. English • Adjusting Contrast (Contrast) Any value between -30 and +30 can be selected. : Higher contrast : Lower contrast Press to store. • Adjusting Screen Brightness (Brightness...

User Manual
Page 30
...: PICTURE POSITION/SIZE AUDIO The AUDIO Menu screen will appear. 2 Press or to store. Therefore, you wish to make changes to other options. * Audio Input menu will be displayed when "No Audio" is selected. (See P. Each time you make changes to all sound adjustment options in the AUDIO Menu screen 6 Press Press to select "AUDIO". to select * You can make will not be stored for the selected input mode. E-35.) E-28 ADJUSTING AUDIO (AUDIO MENU) BASIC OPERATION [EX.: ADJUSTING VOLUME BALANCE...
...: PICTURE POSITION/SIZE AUDIO The AUDIO Menu screen will appear. 2 Press or to store. Therefore, you wish to make changes to other options. * Audio Input menu will be displayed when "No Audio" is selected. (See P. Each time you make changes to all sound adjustment options in the AUDIO Menu screen 6 Press Press to select "AUDIO". to select * You can make will not be stored for the selected input mode. E-35.) E-28 ADJUSTING AUDIO (AUDIO MENU) BASIC OPERATION [EX.: ADJUSTING VOLUME BALANCE...
User Manual
Page 33
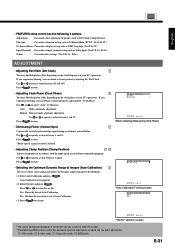
... frequency of your PC's processor. Manual: Does not make other settings. (See P. Press to the optimum. (1) Select Auto Calibration and press . Press or to eliminate vertical flicker. Adjustment : Can make an input terminal setting such as OSD, Language. (See P. E-33 - No: Disables the execution result of images to store. *Some type of pictures such as 24 Frame Mode, 3D Y/C. (See P. E-32.) Input Terminal : Can make a fine adjustment of signal can obtain a clearer picture...
... frequency of your PC's processor. Manual: Does not make other settings. (See P. Press to the optimum. (1) Select Auto Calibration and press . Press or to eliminate vertical flicker. Adjustment : Can make an input terminal setting such as OSD, Language. (See P. E-33 - No: Disables the execution result of images to store. *Some type of pictures such as 24 Frame Mode, 3D Y/C. (See P. E-32.) Input Terminal : Can make a fine adjustment of signal can obtain a clearer picture...

User Manual
Page 39
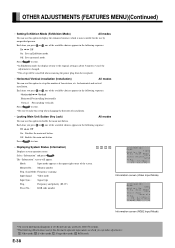
...RGB input signal by code number. On: Displays a white screen immediately. Switch to the fixed display when the image is not displayed properly. • Specifying RGB Input Signal (Code Setting) You can use this option to display white over entire screen (White Screen) All modes You can use this document represent input modes in the following sequence: For RGB1 mode: For RGB2.3 mode: Auto: The optimum display is fixed for input signals. Press to store. * In Auto mode, the optimum resolution may not be automatically distinguished. English • Setting RGB Input...
...RGB input signal by code number. On: Displays a white screen immediately. Switch to the fixed display when the image is not displayed properly. • Specifying RGB Input Signal (Code Setting) You can use this option to display white over entire screen (White Screen) All modes You can use this document represent input modes in the following sequence: For RGB1 mode: For RGB2.3 mode: Auto: The optimum display is fixed for input signals. Press to store. * In Auto mode, the optimum resolution may not be automatically distinguished. English • Setting RGB Input...
User Manual
Page 40
... button. Each time you press or , one of fan rotation, etc. Press to store. • Displaying System Status (Information) Displays system operation status. Each time you do not take any action for about 5 minutes even if the adjustment is most suitable for horizontal and vertical installation. Scan Mode: Frequency scanning Input Signal: Video mode Input Sync.: Signal type Freq.: Frequency and polarity (fH, fV) Preset No.: RGB code number Information screen (Video Input Mode...
... button. Each time you press or , one of fan rotation, etc. Press to store. • Displaying System Status (Information) Displays system operation status. Each time you do not take any action for about 5 minutes even if the adjustment is most suitable for horizontal and vertical installation. Scan Mode: Frequency scanning Input Signal: Video mode Input Sync.: Signal type Freq.: Frequency and polarity (fH, fV) Preset No.: RGB code number Information screen (Video Input Mode...

User Manual
Page 43
... the instructions in accordance with the settings you finish, the settings will replace the adjustment value of the first input signal. FACTORY SETTINGS English This display can check input signals through "Information" on the FEATURES Menu screen. (See P. The fifth input signal will be displayed in "Adjusting Screen Position and Size" on P. E-41 In the Comp.video and Video/S-video modes, the display has been factory-set as follows for different input signals: Main corresponding signals (Comp.video mode) Main corresponding signals (Video, S-video mode) Horizontal frequency...
... the instructions in accordance with the settings you finish, the settings will replace the adjustment value of the first input signal. FACTORY SETTINGS English This display can check input signals through "Information" on the FEATURES Menu screen. (See P. The fifth input signal will be displayed in "Adjusting Screen Position and Size" on P. E-41 In the Comp.video and Video/S-video modes, the display has been factory-set as follows for different input signals: Main corresponding signals (Comp.video mode) Main corresponding signals (Video, S-video mode) Horizontal frequency...
User Manual
Page 46
... "No Audio" for a repairs. • The picture may have cooled sufficiently.) If the message appears again when you have been properly adjusted. (See "Adjusting Screen Position and Size" on , remove the power plug from the receptacle, and contact your AV equipment is ON. • Check for connection to wrong terminals or for cleaning. Cleaning the Cabinet and Remote Control Use a soft cloth for wrong input mode. • Check whether the input mode display is...
... "No Audio" for a repairs. • The picture may have cooled sufficiently.) If the message appears again when you have been properly adjusted. (See "Adjusting Screen Position and Size" on , remove the power plug from the receptacle, and contact your AV equipment is ON. • Check for connection to wrong terminals or for cleaning. Cleaning the Cabinet and Remote Control Use a soft cloth for wrong input mode. • Check whether the input mode display is...


