Datasheet
Page 1
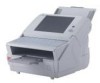
imaging The easiest way to enter data and view images Built-in the front office. fi-6000NS Color Duplex Network Scanner Turn-key network scanning solution with a small footprint and high performance Automatic image quality adjustment, automatic color detection, image deskew, automatic paper size detection and ...blank page detection and removal Small footprint makes it easy to install in a variety of locations Large touch screen display makes it easy to share documents in US 101 keyboard Robust 50-page Automatic Document Feeder (ADF) for hard and embossed card scanning as well as long...
imaging The easiest way to enter data and view images Built-in the front office. fi-6000NS Color Duplex Network Scanner Turn-key network scanning solution with a small footprint and high performance Automatic image quality adjustment, automatic color detection, image deskew, automatic paper size detection and ...blank page detection and removal Small footprint makes it easy to install in a variety of locations Large touch screen display makes it easy to share documents in US 101 keyboard Robust 50-page Automatic Document Feeder (ADF) for hard and embossed card scanning as well as long...
Datasheet
Page 2
..., scan to email, scan to PDF and scan to a PDF and send it can maximize your documents, log into even the most crowded environments, including front office and back office locations. The Fujitsu fi-6000NS Network Scanner is a subsidiary of Fujitsu Limited, a leading provider of America, Inc. Featuring a large touch-screen display and a built-in . Just...
..., scan to email, scan to PDF and scan to a PDF and send it can maximize your documents, log into even the most crowded environments, including front office and back office locations. The Fujitsu fi-6000NS Network Scanner is a subsidiary of Fujitsu Limited, a leading provider of America, Inc. Featuring a large touch-screen display and a built-in . Just...

Operator's Guide
Page 5
...Network Settings Menus 69 3.6.1 3.6.2 3.6.3 3.6.4 3.6.5 3.6.6 3.6.7 3.6.8 3.6.9 3.6.10 3.6.11 3.6.12 Giving the Scanner an IP Address 69 Setting the DNS Server 72 Setting the WINS Server 73 Setting the NTP Server 74 Setting...Scanner's System Software 161 Setting the Information Output Level 164 Obtaining Technical Support 165 Chapter 4 Regular User Operations 169 4.1 Loading Documents 170 4.2 Using Touch Panel Screens: Regular User 173 4.2.1 4.2.2 4.2.3 Common Buttons and Indicators 173 Main Menu Screen 174 Input Fields and Entering Characters 176 Network Scanner fi-6000NS ...
...Network Settings Menus 69 3.6.1 3.6.2 3.6.3 3.6.4 3.6.5 3.6.6 3.6.7 3.6.8 3.6.9 3.6.10 3.6.11 3.6.12 Giving the Scanner an IP Address 69 Setting the DNS Server 72 Setting the WINS Server 73 Setting the NTP Server 74 Setting...Scanner's System Software 161 Setting the Information Output Level 164 Obtaining Technical Support 165 Chapter 4 Regular User Operations 169 4.1 Loading Documents 170 4.2 Using Touch Panel Screens: Regular User 173 4.2.1 4.2.2 4.2.3 Common Buttons and Indicators 173 Main Menu Screen 174 Input Fields and Entering Characters 176 Network Scanner fi-6000NS ...
Operator's Guide
Page 7
...255 Rotating a Scanned Page 256 Adding a Scanned Page 257 Deleting a Scanned Page 258 4.11 Checking the User Log 259 4.12 Maintenance 261 Chapter 5 Scanner Care 263 5.1 Cleaning 264 5.1.1 5.1.2 Cleaning Materials 264 Which Parts and When 265 5.2 Cleaning the ADF 266 5.2.1 Cleaning the ADF 266 5.3 Cleaning the... 273 5.5.1 5.5.2 Replacing the Pad Assembly 275 Replacing the Pick Roller 276 5.6 Performing a Scan Test 280 Chapter 6 Troubleshooting 283 6.1 Removing Jammed Documents 284 6.2 Dealing with Detached Keycaps 288 Network Scanner fi-6000NS Operator's Guide vii
...255 Rotating a Scanned Page 256 Adding a Scanned Page 257 Deleting a Scanned Page 258 4.11 Checking the User Log 259 4.12 Maintenance 261 Chapter 5 Scanner Care 263 5.1 Cleaning 264 5.1.1 5.1.2 Cleaning Materials 264 Which Parts and When 265 5.2 Cleaning the ADF 266 5.2.1 Cleaning the ADF 266 5.3 Cleaning the... 273 5.5.1 5.5.2 Replacing the Pad Assembly 275 Replacing the Pick Roller 276 5.6 Performing a Scan Test 280 Chapter 6 Troubleshooting 283 6.1 Removing Jammed Documents 284 6.2 Dealing with Detached Keycaps 288 Network Scanner fi-6000NS Operator's Guide vii
Operator's Guide
Page 11
...(INCLUDING NEGLIGENCE OR OTHERWISE) ARISING IN ANY WAY OUT OF THE USE OF THIS SOFTWARE, EVEN IF ADVISED OF THE POSSIBILITY OF SUCH DAMAGE. Network Scanner fi-6000NS Operator's Guide xi Neither the name of the Politecnico di Torino, CACE Technologies nor the names of conditions and the following conditions are met: 1. ... following disclaimer in source and binary forms, with the distribution. 3. LEADTOOLS for .NET Copyright© 2005 LEAD Technologies, Inc. Redistribution and use in the documentation and/or other materials provided with or without specific prior written permission.
...(INCLUDING NEGLIGENCE OR OTHERWISE) ARISING IN ANY WAY OUT OF THE USE OF THIS SOFTWARE, EVEN IF ADVISED OF THE POSSIBILITY OF SUCH DAMAGE. Network Scanner fi-6000NS Operator's Guide xi Neither the name of the Politecnico di Torino, CACE Technologies nor the names of conditions and the following conditions are met: 1. ... following disclaimer in source and binary forms, with the distribution. 3. LEADTOOLS for .NET Copyright© 2005 LEAD Technologies, Inc. Redistribution and use in the documentation and/or other materials provided with or without specific prior written permission.
Operator's Guide
Page 13
..., this software without specific prior written permission. IN NO EVENT SHALL THE AUTHOR BE LIABLE FOR ANY DIRECT, INDIRECT, Network Scanner fi-6000NS Operator's Guide xiii Portions Copyright© 1995, 1996, 1997 Kungliga Tekniska Hogskolan (Royal Institute of conditions and the following disclaimer...2. Redistributions of source code must retain the above copyright notice, this list of conditions and the following disclaimer in the documentation and/or other materials provided with or without modification, are permitted provided that the following conditions are met: 1. THIS ...
..., this software without specific prior written permission. IN NO EVENT SHALL THE AUTHOR BE LIABLE FOR ANY DIRECT, INDIRECT, Network Scanner fi-6000NS Operator's Guide xiii Portions Copyright© 1995, 1996, 1997 Kungliga Tekniska Hogskolan (Royal Institute of conditions and the following disclaimer...2. Redistributions of source code must retain the above copyright notice, this list of conditions and the following disclaimer in the documentation and/or other materials provided with or without modification, are permitted provided that the following conditions are met: 1. THIS ...

Operator's Guide
Page 15
..., THE IMPLIED WARRANTIES OF MERCHANTABILITY AND FITNESS FOR A PARTICULAR PURPOSE. Network Scanner fi-6000NS Operator's Guide xv The name of the program without specific prior permission, and notice be given in the documentation and/or other materials provided with the distribution. LOSS OF USE, DATA... of conditions and the following disclaimer in supporting documentation that this copyright and permission notice appear on all copies and supporting documentation, the name of Carnegie Mellon not be used in the documentation or other materials provided with or without express or...
..., THE IMPLIED WARRANTIES OF MERCHANTABILITY AND FITNESS FOR A PARTICULAR PURPOSE. Network Scanner fi-6000NS Operator's Guide xv The name of the program without specific prior permission, and notice be given in the documentation and/or other materials provided with the distribution. LOSS OF USE, DATA... of conditions and the following disclaimer in supporting documentation that this copyright and permission notice appear on all copies and supporting documentation, the name of Carnegie Mellon not be used in the documentation or other materials provided with or without express or...
Operator's Guide
Page 25
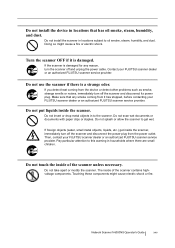
... you detect heat coming from it is damaged. Do not scan wet documents or documents with paper clips or staples. Network Scanner fi-6000NS Operator's Guide xxv Make sure that has oil smoke, steam, humidity, and dust. Then, contact your FUJITSU scanner dealer or an authorized FUJITSU scanner service provider. Doing so might cause electric shock or fire. Turn...
... you detect heat coming from it is damaged. Do not scan wet documents or documents with paper clips or staples. Network Scanner fi-6000NS Operator's Guide xxv Make sure that has oil smoke, steam, humidity, and dust. Then, contact your FUJITSU scanner dealer or an authorized FUJITSU scanner service provider. Doing so might cause electric shock or fire. Turn...

Operator's Guide
Page 33
Network Scanner fi-6000NS Operator's Guide 5 Pick roller 3. Glass scanner windows No. Part name Function 1 Pad assembly 2 Pick roller Help to guide documents from the ADF paper chute, past the ument Feeder) glass scanner windows, to the glass scanner windows. 3 Sheet guide 4 Glass scanner windows Place where the documents are scanned. 5 ADF (Automatic Doc- Pad assembly 1.2 Part Names and Functions...
Network Scanner fi-6000NS Operator's Guide 5 Pick roller 3. Glass scanner windows No. Part name Function 1 Pad assembly 2 Pick roller Help to guide documents from the ADF paper chute, past the ument Feeder) glass scanner windows, to the glass scanner windows. 3 Sheet guide 4 Glass scanner windows Place where the documents are scanned. 5 ADF (Automatic Doc- Pad assembly 1.2 Part Names and Functions...
Operator's Guide
Page 37
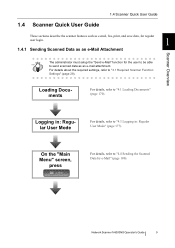
..., press For details, refer to "3.1 Required Scanner Function Settings" (page 28). Network Scanner fi-6000NS Operator's Guide 9 For details about the required settings, refer to "4.4 Sending the Scanned Data by e-Mail" (page 180). Logging in: Regular User Mode For details, refer to "4.1 Loading Documents" (page 170). Scanner Overview Loading Documents For details, refer to "4.3 Logging in: Regular...
..., press For details, refer to "3.1 Required Scanner Function Settings" (page 28). Network Scanner fi-6000NS Operator's Guide 9 For details about the required settings, refer to "4.4 Sending the Scanned Data by e-Mail" (page 180). Logging in: Regular User Mode For details, refer to "4.1 Loading Documents" (page 170). Scanner Overview Loading Documents For details, refer to "4.3 Logging in: Regular...
Operator's Guide
Page 39
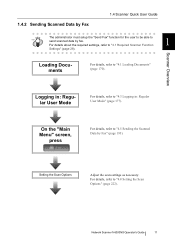
... Loading Documents" (page 170). Loading Documents For details, refer to "3.1 Required Scanner Function 1 Settings" (page 28). Network Scanner fi-6000NS Operator's Guide 11 On the "Main Menu" screen, press For details, refer to "4.5 Sending the Scanned Data by fax. 1.4.2 Sending Scanned Data by Fax 1.4 Scanner Quick User...be able to HINT send scanned data by Fax" (page 193). Setting the Scan Options Adjust the scan settings as necessary. Scanner Overview Logging in: Regular User Mode For details, refer to "4.8 Setting the Scan Options" (page 222). For details, refer...
... Loading Documents" (page 170). Loading Documents For details, refer to "3.1 Required Scanner Function 1 Settings" (page 28). Network Scanner fi-6000NS Operator's Guide 11 On the "Main Menu" screen, press For details, refer to "4.5 Sending the Scanned Data by fax. 1.4.2 Sending Scanned Data by Fax 1.4 Scanner Quick User...be able to HINT send scanned data by Fax" (page 193). Setting the Scan Options Adjust the scan settings as necessary. Scanner Overview Logging in: Regular User Mode For details, refer to "4.8 Setting the Scan Options" (page 222). For details, refer...
Operator's Guide
Page 41
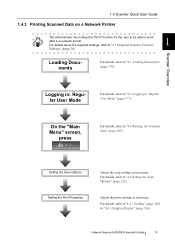
For details, refer to "4.1 Loading Documents" (page 170). Loading Documents For details, refer to "4.8 Setting the Scan Options" (page 222). Scanner Overview Logging in : Regular User Mode" (page 177). Setting the Scan Options Setting the Print Properties Adjust the ...) to "4.3 Logging in : Regular User Mode For details, refer to "4.6.3 Simplex/Duplex" (page 216). Adjust the print settings as necessary. Network Scanner fi-6000NS Operator's Guide 13 For details about the required settings, refer to "4.6 Printing the Scanned Data" (page 203). On the "Main Menu" screen, ...
For details, refer to "4.1 Loading Documents" (page 170). Loading Documents For details, refer to "4.8 Setting the Scan Options" (page 222). Scanner Overview Logging in : Regular User Mode" (page 177). Setting the Scan Options Setting the Print Properties Adjust the ...) to "4.3 Logging in : Regular User Mode For details, refer to "4.6.3 Simplex/Duplex" (page 216). Adjust the print settings as necessary. Network Scanner fi-6000NS Operator's Guide 13 For details about the required settings, refer to "4.6 Printing the Scanned Data" (page 203). On the "Main Menu" screen, ...

Operator's Guide
Page 43
... in: Regular User Mode For details, refer to "4.1 Loading Documents" (page 170). Loading Documents For details, refer to "4.3 Logging in: Regular User Mode" (page 177). For details, refer to save HINT data in a network folder. Network Scanner fi-6000NS Operator's Guide 15 1.4 Scanner Quick User Guide 1.4.4 Saving Scanned Data in a Network Folder The administrator must setup...
... in: Regular User Mode For details, refer to "4.1 Loading Documents" (page 170). Loading Documents For details, refer to "4.3 Logging in: Regular User Mode" (page 177). For details, refer to save HINT data in a network folder. Network Scanner fi-6000NS Operator's Guide 15 1.4 Scanner Quick User Guide 1.4.4 Saving Scanned Data in a Network Folder The administrator must setup...
Operator's Guide
Page 85
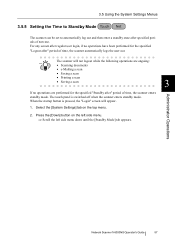
... Mode] tab appears. Press the [Down] button on the top menu. 2. Administrator Operations Network Scanner fi-6000NS Operator's Guide 57 For any screen after regular user login, if no operations are ongoing: HINT • Scanning documents • e-Mailing a scan • Faxing a scan • Printing a scan • ...are performed for the specified "Logout after" period of time, the scanner automatically logs the user out. 3.5 Using the System Settings Menus 3.5.5 Setting the Time to Standby Mode The scanner can be set to automatically log out and then enter a standby state...
... Mode] tab appears. Press the [Down] button on the top menu. 2. Administrator Operations Network Scanner fi-6000NS Operator's Guide 57 For any screen after regular user login, if no operations are ongoing: HINT • Scanning documents • e-Mailing a scan • Faxing a scan • Printing a scan • ...are performed for the specified "Logout after" period of time, the scanner automatically logs the user out. 3.5 Using the System Settings Menus 3.5.5 Setting the Time to Standby Mode The scanner can be set to automatically log out and then enter a standby state...
Operator's Guide
Page 91
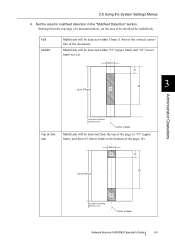
... "#1" (upper limit) and "#2" (lower limit) set the area to 510mm (b) Outside of multifeed detection area Center of paper Network Scanner fi-6000NS Operator's Guide 63 Multifeeds will be detected within 35mm (1.4in) of the vertical centerline of the page. (b) 35mm (b) #1 #2 Up... to be checked for multifeed detection in the "Multifeed Detection" section. Starting from the top edge of a document sheet, set . (a) 35mm #1 Up to 510mm (a) #2 3 Administrator Operations Top & Bottom Outside of multifeed detection area Center of paper Multifeeds...
... "#1" (upper limit) and "#2" (lower limit) set the area to 510mm (b) Outside of multifeed detection area Center of paper Network Scanner fi-6000NS Operator's Guide 63 Multifeeds will be detected within 35mm (1.4in) of the vertical centerline of the page. (b) 35mm (b) #1 #2 Up... to be checked for multifeed detection in the "Multifeed Detection" section. Starting from the top edge of a document sheet, set . (a) 35mm #1 Up to 510mm (a) #2 3 Administrator Operations Top & Bottom Outside of multifeed detection area Center of paper Multifeeds...

Operator's Guide
Page 93
... of 510mm. If the paper size setting is set. Press the [OK] button. ⇒ The document area to be monitored for "#2". • "#2" can be detected. 3.5 Using the System Settings Menus 5. feed will not be entered. Network Scanner fi-6000NS Operator's Guide 65 In Step 4, if [Middle] or [Top & Bottom] is longer than 510mm, multifeed...
... of 510mm. If the paper size setting is set. Press the [OK] button. ⇒ The document area to be monitored for "#2". • "#2" can be detected. 3.5 Using the System Settings Menus 5. feed will not be entered. Network Scanner fi-6000NS Operator's Guide 65 In Step 4, if [Middle] or [Top & Bottom] is longer than 510mm, multifeed...

Operator's Guide
Page 95
On the "Scanner Adjustment" screen, under [Front Side Offsets]/[Reverse Side Off- Administrator Operations Network Scanner fi-6000NS Operator's Guide 67 sets], enter values for the "Horizontal Offset" and "Vertical Offset" input fields. Offset lengths are set to the actual documents being scanned, the scan offsets can be displaced relative to between -4 and +4. 3 2. Press the [OK] button. ⇒ The offset settings are measured in units of 0.5mm and may be set . 3.5 Using the System Settings Menus ■ Offset Settings If the scanned output is found to be adjusted. 1.
On the "Scanner Adjustment" screen, under [Front Side Offsets]/[Reverse Side Off- Administrator Operations Network Scanner fi-6000NS Operator's Guide 67 sets], enter values for the "Horizontal Offset" and "Vertical Offset" input fields. Offset lengths are set to the actual documents being scanned, the scan offsets can be displaced relative to between -4 and +4. 3 2. Press the [OK] button. ⇒ The offset settings are measured in units of 0.5mm and may be set . 3.5 Using the System Settings Menus ■ Offset Settings If the scanned output is found to be adjusted. 1.

Operator's Guide
Page 155
Select the [Usage Status] tab on the top menu. 2. Select the [Device Status] tab on the left side menu. ⇒ The "Usage Status" screen appears. 3 Administrator Operations Network Scanner fi-6000NS Operator's Guide 127 For details on consumable replacement, refer to "5.5 Replacing Parts" (page 273). ■ Viewing the Status of the scanner's consumable parts (pad assembly or pick roller) can be viewed. 3.7 Using the Device Status Menus 3.7.2 Viewing the Usage Status Information about the number of documents that have been scanned and the status of Consumable Parts 1.
Select the [Usage Status] tab on the top menu. 2. Select the [Device Status] tab on the left side menu. ⇒ The "Usage Status" screen appears. 3 Administrator Operations Network Scanner fi-6000NS Operator's Guide 127 For details on consumable replacement, refer to "5.5 Replacing Parts" (page 273). ■ Viewing the Status of the scanner's consumable parts (pad assembly or pick roller) can be viewed. 3.7 Using the Device Status Menus 3.7.2 Viewing the Usage Status Information about the number of documents that have been scanned and the status of Consumable Parts 1.

Operator's Guide
Page 197
...on a network printer, or saved to a network folder. Chapter 4 Regular User Operations This scanner is used to scan documents which then can be setup by the administrator. For details of scanner setup, refer to a Network Folder 217 4.8 Setting the Scan Options 222 4.9 Enabling/Disabling ... scanner must first be sent by Fax 193 4.6 Printing the Scanned Data 203 4.7 Saving the Scanned Data to "Chapter3 Administrator Operations" (page27). To perform the operations described in the Scan Viewer 255 4.11 Checking the User Log 259 4.12 Maintenance ...261 Network Scanner fi-6000NS ...
...on a network printer, or saved to a network folder. Chapter 4 Regular User Operations This scanner is used to scan documents which then can be setup by the administrator. For details of scanner setup, refer to a Network Folder 217 4.8 Setting the Scan Options 222 4.9 Enabling/Disabling ... scanner must first be sent by Fax 193 4.6 Printing the Scanned Data 203 4.7 Saving the Scanned Data to "Chapter3 Administrator Operations" (page27). To perform the operations described in the Scan Viewer 255 4.11 Checking the User Log 259 4.12 Maintenance ...261 Network Scanner fi-6000NS ...

Operator's Guide
Page 199
If there is to the width of the documents. Reverse Side 4.1 Loading Documents 2. Move the side guides so that they touch both sides of documents, the scanned data may be scanned, it should face down . If only one side is any space between the side guides and the edges of the documents. Load the documents face down in the ADF paper chute. 3. Adjust the side guides to be skewed. 4 Regular User Operations Network Scanner fi-6000NS Operator's Guide 171
If there is to the width of the documents. Reverse Side 4.1 Loading Documents 2. Move the side guides so that they touch both sides of documents, the scanned data may be scanned, it should face down . If only one side is any space between the side guides and the edges of the documents. Load the documents face down in the ADF paper chute. 3. Adjust the side guides to be skewed. 4 Regular User Operations Network Scanner fi-6000NS Operator's Guide 171


