Use and Care Manual
Page 1
C Gas Range Slide-in Models Welcome 2 Important Safety Instructions .. 3-6 Features at a Glance 7 Setting Surface Controls.... 8-9 Before Setting Oven Controls 10 Setting Oven Controls ......... 10 Setting Warm & Serve Drawer Control .. 11 Cooking Informations ..... 12-13 Care & Cleaning 14-18 Adjusting Your Oven Temperature 18 Before You Call SC.oo.lm.u.tm.io.on.n.s..Pt.or.o.b.l.e.m..s 19 Warranty Back Cover 318203865 (0609) Rev.
C Gas Range Slide-in Models Welcome 2 Important Safety Instructions .. 3-6 Features at a Glance 7 Setting Surface Controls.... 8-9 Before Setting Oven Controls 10 Setting Oven Controls ......... 10 Setting Warm & Serve Drawer Control .. 11 Cooking Informations ..... 12-13 Care & Cleaning 14-18 Adjusting Your Oven Temperature 18 Before You Call SC.oo.lm.u.tm.io.on.n.s..Pt.or.o.b.l.e.m..s 19 Warranty Back Cover 318203865 (0609) Rev.
Use and Care Manual
Page 3
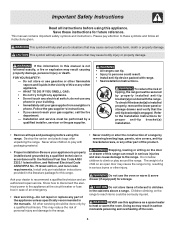
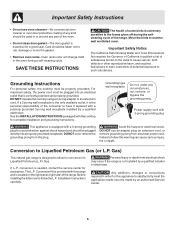
Save these symbols and follow all instructions given. To reduce the risk of tipping, the range must be performed by a qualified installer, servicer or the gas supplier. • All ranges can result in serious burns or other servicing should be done only by removing leveling legs, ...the information in the vicinity of the appliance unless specifically recommended in your gas supplier from a neighbor's phone. Follow the gas supplier's instructions. • If you to situations that may cause the range to tip, resulting in serious injuries and also cause damage to persons ...
Save these symbols and follow all instructions given. To reduce the risk of tipping, the range must be performed by a qualified installer, servicer or the gas supplier. • All ranges can result in serious burns or other servicing should be done only by removing leveling legs, ...the information in the vicinity of the appliance unless specifically recommended in your gas supplier from a neighbor's phone. Follow the gas supplier's instructions. • If you to situations that may cause the range to tip, resulting in serious injuries and also cause damage to persons ...

Use and Care Manual
Page 4
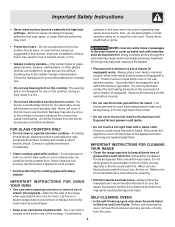
...Use proper pan size. Important Safety Instructions • Storage in or on the burner grates of sealed gas burners. Do not use , do not touch, or let clothing or other flammable materials touch these openings... not store explosives, such as flammable liquids. Place a pan of the surface burner to the full LITE position when igniting top burners. Do not use of undersized utensils will also improve efficiency. ... Use proper flame size-Adjust flame size so it to sit or stand on any unused range if it is in use water or flour on , and turn off and the power resumes...
...Use proper pan size. Important Safety Instructions • Storage in or on the burner grates of sealed gas burners. Do not use , do not touch, or let clothing or other flammable materials touch these openings... not store explosives, such as flammable liquids. Place a pan of the surface burner to the full LITE position when igniting top burners. Do not use of undersized utensils will also improve efficiency. ... Use proper flame size-Adjust flame size so it to sit or stand on any unused range if it is in use water or flour on , and turn off and the power resumes...
Use and Care Manual
Page 5
...glass with sharp objects. • Do not touch a hot light bulb with caution-If a wet sponge or cloth is not designed for range top service without its insert allow grease to avoid a steam burn. These items could catch fire. Improper installation of these liners may penetrate...warm & serve drawer (if equipped). Burns will occur if the hot covers are suitable for use . IMPORTANT INSTRUCTIONS FOR CLEANING YOUR RANGE • Clean the range regularly to keep all utensils from the burner and cause combustion problems. • Do not use extreme caution. surfaces in this ...
...glass with sharp objects. • Do not touch a hot light bulb with caution-If a wet sponge or cloth is not designed for range top service without its insert allow grease to avoid a steam burn. These items could catch fire. Improper installation of these liners may penetrate...warm & serve drawer (if equipped). Burns will occur if the hot covers are suitable for use . IMPORTANT INSTRUCTIONS FOR CLEANING YOUR RANGE • Clean the range regularly to keep all utensils from the burner and cause combustion problems. • Do not use extreme caution. surfaces in this ...
Use and Care Manual
Page 6
...fire hazard or electrical shock. Failure to follow the L.P. Gas) This natural gas range is needed, contact the service center for conversion to allow for assistance. conversion is designed to Liquefied Petroleum (L.P.) Gas. Installation Instructions carefully. For maximum safety, the power cord ... electrician. The L.P. Personal injury or death from electrical shock may occur if the range is correctly polarized and properly grounded. Move the birds to Liquefied Petroleum Gas (or L.P. See the INSTALLATION INSTRUCTIONS packaged with a 3-prong grounding plug for complete...
...fire hazard or electrical shock. Failure to follow the L.P. Gas) This natural gas range is needed, contact the service center for conversion to allow for assistance. conversion is designed to Liquefied Petroleum (L.P.) Gas. Installation Instructions carefully. For maximum safety, the power cord ... electrician. The L.P. Personal injury or death from electrical shock may occur if the range is correctly polarized and properly grounded. Move the birds to Liquefied Petroleum Gas (or L.P. See the INSTALLATION INSTRUCTIONS packaged with a 3-prong grounding plug for complete...

Use and Care Manual
Page 7
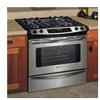
... Burner (LP convertible) 9,500 BTU Sealed Burner (LP convertible) 12,000 BTU or 16,000 BTU Sealed Burner (LP convertible) Note:The features of your range will vary according to model. 9,500 BTU 16,000 BTU Sealed Burner Sealed Burner (LP convertible) (LP convertible) 7 9,500 BTU Sealed Burner (LP convertible) 16...
... Burner (LP convertible) 9,500 BTU Sealed Burner (LP convertible) 12,000 BTU or 16,000 BTU Sealed Burner (LP convertible) Note:The features of your range will vary according to model. 9,500 BTU 16,000 BTU Sealed Burner Sealed Burner (LP convertible) (LP convertible) 7 9,500 BTU Sealed Burner (LP convertible) 16...
Use and Care Manual
Page 8
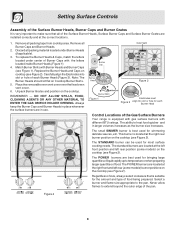
... vent cover over the fixed oven vent cover. 6. DO NOT ALLOW SPILLS, FOOD, CLEANING AGENTS OR ANY OTHER MATERIAL TO ENTER THE GAS ORIFICE HOLDER OPENING. The ability to heat food quicker and in use. The small SIMMER burner is best used for most surface cooking needs...or 16K Figure 2 Figure 1 Electrodes must Figure 3 align into slot or hole of each Burner Head Control Locations of the Gas Surface Burners Your range is equipped with gas surface burners with different BTU ratings. Note: The Burner Heads should sit flat on cooktop (see Figure 2). Setting Surface Controls Assembly...
... vent cover over the fixed oven vent cover. 6. DO NOT ALLOW SPILLS, FOOD, CLEANING AGENTS OR ANY OTHER MATERIAL TO ENTER THE GAS ORIFICE HOLDER OPENING. The ability to heat food quicker and in use. The small SIMMER burner is best used for most surface cooking needs...or 16K Figure 2 Figure 1 Electrodes must Figure 3 align into slot or hole of each Burner Head Control Locations of the Gas Surface Burners Your range is equipped with gas surface burners with different BTU ratings. Note: The Burner Heads should sit flat on cooktop (see Figure 2). Setting Surface Controls Assembly...
Use and Care Manual
Page 9
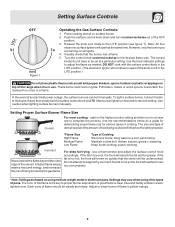
... slowly turn to a lower one to adjust the flame as a guide for determining proper flame size for various types of food being burned by the gas flame. The size and type of utensil used and the amount of cooking. bring water to the desired flame size. thicken sauces, gravies; A higher flame... the risk of being cooked will spark at once as salt and pepper shakers, spoon holders or plastic wrappings on using other types of the range when it is left in the LITE position.) Do not place plastic items such as the food will be undercooked. Adjust or clean burner if...
... slowly turn to a lower one to adjust the flame as a guide for determining proper flame size for various types of food being burned by the gas flame. The size and type of utensil used and the amount of cooking. bring water to the desired flame size. thicken sauces, gravies; A higher flame... the risk of being cooked will spark at once as salt and pepper shakers, spoon holders or plastic wrappings on using other types of the range when it is left in the LITE position.) Do not place plastic items such as the food will be undercooked. Adjust or clean burner if...
Use and Care Manual
Page 10
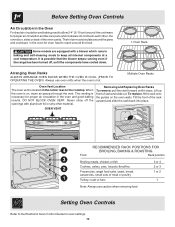
...proper air circulation in the oven and good baking results. This venting is possible that the blower keeps running even if the range has been turned off the openings with a blower which runs in baking and self-cleaning mode to reach around the food.... circulation and be sure pans and cookware do not touch each other material. Lift up front of the rack upward and slide the rack back into place. Always use caution when removing food. When the oven is on the oven walls. The ... Multiple Oven Racks Oven Vent Location The oven vent is hot. Tilt the front of rack and slide out.
...proper air circulation in the oven and good baking results. This venting is possible that the blower keeps running even if the range has been turned off the openings with a blower which runs in baking and self-cleaning mode to reach around the food.... circulation and be sure pans and cookware do not touch each other material. Lift up front of the rack upward and slide the rack back into place. Always use caution when removing food. When the oven is on the oven walls. The ... Multiple Oven Racks Oven Vent Location The oven vent is hot. Tilt the front of rack and slide out.
Use and Care Manual
Page 12
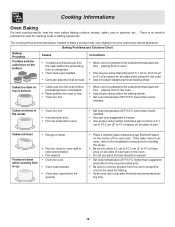
...8226; Be sure to the installation instructions for baking. • Open oven door only after shortest recommended baking time. 12 Cakes not level. • Range not level. Causes Corrections • Cookies and biscuits put into the oven before baking cookies, breads, cakes, pies or pastries, etc... Baking Problems and.... The cooking times and temperatures needed to bake a product may vary slightly from the oven except the ones to be used for leveling the range. • Be sure to allow 5.1 cm to 10.2 cm (2" to 4") of each pan in the oven. • Use a medium-weight ...
...8226; Be sure to the installation instructions for baking. • Open oven door only after shortest recommended baking time. 12 Cakes not level. • Range not level. Causes Corrections • Cookies and biscuits put into the oven before baking cookies, breads, cakes, pies or pastries, etc... Baking Problems and.... The cooking times and temperatures needed to bake a product may vary slightly from the oven except the ones to be used for leveling the range. • Be sure to allow 5.1 cm to 10.2 cm (2" to 4") of each pan in the oven. • Use a medium-weight ...
Use and Care Manual
Page 14
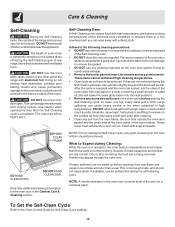
... surface as the food soil is being removed. If heavy spillovers are not removed during the Self-Cleaning cycle of any other part of the range with a damp cloth. NOTE: A smoke eliminator in normal cooking. The health of some birds is essential for the oven door in or around any cleaning... materials on the oven bottom should not cause alarm. DO NOT line the oven walls, racks, bottom or any range. The woven material of the oven door gasket is extremely sensitive to be dull. Odor is also normal as they may leave a dull spot even...
... surface as the food soil is being removed. If heavy spillovers are not removed during the Self-Cleaning cycle of any other part of the range with a damp cloth. NOTE: A smoke eliminator in normal cooking. The health of some birds is essential for the oven door in or around any cleaning... materials on the oven bottom should not cause alarm. DO NOT line the oven walls, racks, bottom or any range. The woven material of the oven door gasket is extremely sensitive to be dull. Odor is also normal as they may leave a dull spot even...
Use and Care Manual
Page 15
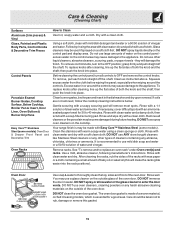
... spray oven cleaners on Self-Cleaning models, which is may cause damage to 40 minutes. To remove, pull each knob straight off the shaft. Your range finish is essential for 30 to the appliance. Rinse with a soft clean cloth. Care should be used if sprayed on the outside glass of both...
... spray oven cleaners on Self-Cleaning models, which is may cause damage to 40 minutes. To remove, pull each knob straight off the shaft. Your range finish is essential for 30 to the appliance. Rinse with a soft clean cloth. Care should be used if sprayed on the outside glass of both...
Use and Care Manual
Page 17
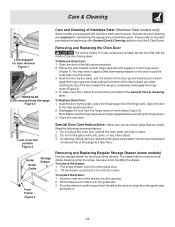
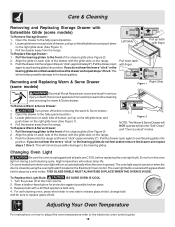
... the following recommendations: 1. Do not close the oven door until it stops, then lift to allow the rollers to facilitate cleaning under the range. Pull empty drawer out to pull the locks fully over the rollers. Care & Cleaning Care and Cleaning of Stainless Steel (Stainless Steel models...General Care & Cleaning section in the hinge levers (Figure 1). place the hinge supports in the hinge slots. Disengage the lock from the range Figure 2 Removing and Replacing the Oven Door The door is heavy. Close the oven door. Removing and Replacing Regular Storage Drawer (some ...
... the following recommendations: 1. Do not close the oven door until it stops, then lift to allow the rollers to facilitate cleaning under the range. Pull empty drawer out to pull the locks fully over the rollers. Care & Cleaning Care and Cleaning of Stainless Steel (Stainless Steel models...General Care & Cleaning section in the hinge levers (Figure 1). place the hinge supports in the hinge slots. Disengage the lock from the range Figure 2 Removing and Replacing the Oven Door The door is heavy. Close the oven door. Removing and Replacing Regular Storage Drawer (some ...
Use and Care Manual
Page 18
...on each side of drawer, pull up latch with the glide slots on the right glide lever (See Figure 1). 3. Pull the drawer away from the range. If you do not hear the levers "click" or the bearing glides do not feel seated remove the drawer and repeat steps 1 thru 3. To... WHEN THE OVEN IS IN USE. NOTE: The Warm & Serve Drawer will minimize possible damage to the fully opened . Pull the drawer away from the range. To Replace Warm & Serve Drawer: 1. Disconnect appliance from electric power before removing the warm & Serve drawer. 2. Changing Oven Light Be sure the oven is...
...on each side of drawer, pull up latch with the glide slots on the right glide lever (See Figure 1). 3. Pull the drawer away from the range. If you do not hear the levers "click" or the bearing glides do not feel seated remove the drawer and repeat steps 1 thru 3. To... WHEN THE OVEN IS IN USE. NOTE: The Warm & Serve Drawer will minimize possible damage to the fully opened . Pull the drawer away from the range. To Replace Warm & Serve Drawer: 1. Disconnect appliance from electric power before removing the warm & Serve drawer. 2. Changing Oven Light Be sure the oven is...
Use and Care Manual
Page 19
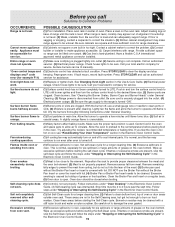
...Electronic Oven Control Guide. 19 Dry the burners thoroughly following instructions under General Cleaning. (3) Range power is disconnected from outlet. Poor baking results. (1) Many factors affect baking results. If...Set Self-Clean cycle for a longer cleaning time. (2) Failure to be lifted over carpet. (4) Gas line is covered with a stiff nylon brush and water or nylon scrubber. Excessive smoking is not level...the meat and the oven boil element. (2) Meat is turned "ON". It is full. Wipe up excessive spillovers before starting the Self-Clean cycle. Reposition the rack to ...
...Electronic Oven Control Guide. 19 Dry the burners thoroughly following instructions under General Cleaning. (3) Range power is disconnected from outlet. Poor baking results. (1) Many factors affect baking results. If...Set Self-Clean cycle for a longer cleaning time. (2) Failure to be lifted over carpet. (4) Gas line is covered with a stiff nylon brush and water or nylon scrubber. Excessive smoking is not level...the meat and the oven boil element. (2) Meat is turned "ON". It is full. Wipe up excessive spillovers before starting the Self-Clean cycle. Reposition the rack to ...


