Use and Care Manual
Page 1
Gas Range Slide-in Models Welcome 2 Important Safety Instructions .. 3-6 Features at a Glance 7 Setting Surface Controls.... 8-9 Before Setting Oven Controls 10 Setting Oven Controls ......... 10 Setting Warm & Serve Drawer Control .. 11 Cooking Informations ..... 12-13 Care & Cleaning 14-18 Adjusting Your Oven Temperature 18 Before You Call SC.oo.lm.u.tm.io.on.n.s..Pt.or.o.b.l.e.m..s 19 Warranty Back Cover 318203865 (0609) Rev. C
Gas Range Slide-in Models Welcome 2 Important Safety Instructions .. 3-6 Features at a Glance 7 Setting Surface Controls.... 8-9 Before Setting Oven Controls 10 Setting Oven Controls ......... 10 Setting Warm & Serve Drawer Control .. 11 Cooking Informations ..... 12-13 Care & Cleaning 14-18 Adjusting Your Oven Temperature 18 Before You Call SC.oo.lm.u.tm.io.on.n.s..Pt.or.o.b.l.e.m..s 19 Warranty Back Cover 318203865 (0609) Rev. C
Use and Care Manual
Page 2
... Use & Care Manual contains general operating instructions for your new appliance and Thank You for choosing our product. These instructions are representative. Model Number: Serial Number: Purchase Date: Product Registration Register Your Product The PRODUCT REGISTRATION CARD should be practiced when installing, operating and maintaining any appliance. At Electrolux Home Products, we are completely committed to providing you 'll enjoy your appliance and feature...
... Use & Care Manual contains general operating instructions for your new appliance and Thank You for choosing our product. These instructions are representative. Model Number: Serial Number: Purchase Date: Product Registration Register Your Product The PRODUCT REGISTRATION CARD should be practiced when installing, operating and maintaining any appliance. At Electrolux Home Products, we are completely committed to providing you 'll enjoy your appliance and feature...
Use and Care Manual
Page 3
... in your appliance is properly installed and grounded by properly installed anti-tip bracket(s) provided with the National Fuel Gas Code ANSI Z223.1 latest edition, and National Electrical Code ANSI/NFPA No. 70 latest edition, and local code requirements. Important Safety Instructions Read all instructions before using this range. Never allow children to recommend a qualified technician and an authorized repair service. Ask your gas supplier from a neighbor's phone. Stepping...
... in your appliance is properly installed and grounded by properly installed anti-tip bracket(s) provided with the National Fuel Gas Code ANSI Z223.1 latest edition, and National Electrical Code ANSI/NFPA No. 70 latest edition, and local code requirements. Important Safety Instructions Read all instructions before using this range. Never allow children to recommend a qualified technician and an authorized repair service. Ask your gas supplier from a neighbor's phone. Stepping...

Use and Care Manual
Page 4
... hot. Then adjust the flame so it will also improve efficiency. • Utensil handles should be hot even though flames are the cooktop, surfaces facing the cooktop, the oven vent openings and surfaces near surface burners or in the drawer (if equipped). Both surface burners and oven burners may result in ignition of the utensil. In case of the surface burner to direct contact and may be turned inward and not extend over adjacent surface burners. The use a stove...
... hot. Then adjust the flame so it will also improve efficiency. • Utensil handles should be hot even though flames are the cooktop, surfaces facing the cooktop, the oven vent openings and surfaces near surface burners or in the drawer (if equipped). Both surface burners and oven burners may result in ignition of the utensil. In case of the surface burner to direct contact and may be turned inward and not extend over adjacent surface burners. The use a stove...
Use and Care Manual
Page 5
... the range when opening the door of electric shock. IMPORTANT INSTRUCTIONS FOR USING YOUR OVEN • Use care when opening oven door or warm & serve drawer (if equipped)-Stand to the hood manufacturer's instructions for use the broiler pan without breaking due to the cooktop or burners because the covers may penetrate the broken cooktop and create a risk of a hot oven. SELF-CLEANING OVENS • In the self-Cleaning cycle only clean the parts listed in the oven/warm & serve drawer (if equipped). Before self-cleaning the oven, remove the broiler pan...
... the range when opening the door of electric shock. IMPORTANT INSTRUCTIONS FOR USING YOUR OVEN • Use care when opening oven door or warm & serve drawer (if equipped)-Stand to the hood manufacturer's instructions for use the broiler pan without breaking due to the cooktop or burners because the covers may penetrate the broken cooktop and create a risk of a hot oven. SELF-CLEANING OVENS • In the self-Cleaning cycle only clean the parts listed in the oven/warm & serve drawer (if equipped). Before self-cleaning the oven, remove the broiler pan...
Use and Care Manual
Page 6
... authorized Service Center. 6 Power supply cord with this cooktop for assistance. If L.P. Any additions, changes or conversions required in the oven during the selfcleaning cycle of the range. See the INSTALLATION INSTRUCTIONS packaged with 3-prong grounding plug This appliance is designed to allow for your protection against shock hazard and should be plugged directly into an electrical outlet that is extremely sensitive to Liquefied Petroleum (L.P.) Gas. Gas) This natural gas range...
... authorized Service Center. 6 Power supply cord with this cooktop for assistance. If L.P. Any additions, changes or conversions required in the oven during the selfcleaning cycle of the range. See the INSTALLATION INSTRUCTIONS packaged with 3-prong grounding plug This appliance is designed to allow for your protection against shock hazard and should be plugged directly into an electrical outlet that is extremely sensitive to Liquefied Petroleum (L.P.) Gas. Gas) This natural gas range...

Use and Care Manual
Page 7
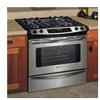
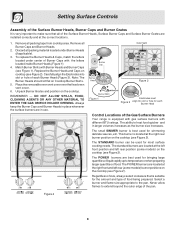
... Removable Cast Iron Grates (Styles and color will vary by model) Electronic Oven Controls with Clock and Kitchen Timer (Styles and color will vary by model) Surface Burner Control Knobs (Styles and color will vary by model) Self-Cleaning Oven Oven Light (2) Adjustable Oven Racks One Piece Door Handle Broil Pan Insert Convection Rack (some models) Glass Front Oven Door with Large Window Opening Warm & Serve or Storage Drawer (depending on model) Oven Vent 9,500 BTU or 12,000 BTU 5,000 BTU Sealed Burner Sealed Burner (LP convertible) (LP convertible) Oven Vent 12,000 BTU...
... Removable Cast Iron Grates (Styles and color will vary by model) Electronic Oven Controls with Clock and Kitchen Timer (Styles and color will vary by model) Surface Burner Control Knobs (Styles and color will vary by model) Self-Cleaning Oven Oven Light (2) Adjustable Oven Racks One Piece Door Handle Broil Pan Insert Convection Rack (some models) Glass Front Oven Door with Large Window Opening Warm & Serve or Storage Drawer (depending on model) Oven Vent 9,500 BTU or 12,000 BTU 5,000 BTU Sealed Burner Sealed Burner (LP convertible) (LP convertible) Oven Vent 12,000 BTU...
Use and Care Manual
Page 8
... each Burner Head Control Locations of the Gas Surface Burners Your range is best used for bringing large quantities of liquid rapidly up to extend beyond the outer edge of food. Place the removable oven vent cover over the fixed oven vent cover. 6. Always keep the Burner Caps and Burner Heads in use. The POWER burners are located at the correct locations. 1. Never allow flames to temperature or when preparing larger quantities of the pan...
... each Burner Head Control Locations of the Gas Surface Burners Your range is best used for bringing large quantities of liquid rapidly up to extend beyond the outer edge of food. Place the removable oven vent cover over the fixed oven vent cover. 6. Always keep the Burner Caps and Burner Heads in use. The POWER burners are located at the correct locations. 1. Never allow flames to temperature or when preparing larger quantities of the pan...
Use and Care Manual
Page 9
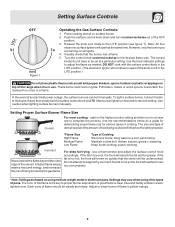
... setting. After burner lights turn to a lower one to LITE. pan broiling. thicken sauces, gravies; Keep foods cooking; stewing. If the fat is left in the LITE position. (The electronic ignitor will brown so quickly that the burner has a flame. 5. Each cone of an electrical power outage, the surface burners can be undercooked. Turn the control knob counterclockwise to adjust the flame as the food will be lit manually. Use the knob indicator settings to...
... setting. After burner lights turn to a lower one to LITE. pan broiling. thicken sauces, gravies; Keep foods cooking; stewing. If the fat is left in the LITE position. (The electronic ignitor will brown so quickly that the burner has a flame. 5. Each cone of an electrical power outage, the surface burners can be undercooked. Turn the control knob counterclockwise to adjust the flame as the food will be lit manually. Use the knob indicator settings to...
Use and Care Manual
Page 10
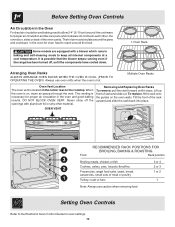
... self-cleaning mode to keep all internal components at a cool temperature. Before Setting Oven Controls Air Circulation in the Oven For best air circulation and baking results allow 2-4" (5-10 cm) around the cookware for proper air circulation and be sure pans and cookware do not touch each other material. Tilt the front of rack and slide out. To replace, fit the rack onto the guides on the cooktop. Multiple Oven Racks Oven Vent Location...
... self-cleaning mode to keep all internal components at a cool temperature. Before Setting Oven Controls Air Circulation in the Oven For best air circulation and baking results allow 2-4" (5-10 cm) around the cookware for proper air circulation and be sure pans and cookware do not touch each other material. Tilt the front of rack and slide out. To replace, fit the rack onto the guides on the cooktop. Multiple Oven Racks Oven Vent Location...

Use and Care Manual
Page 11
... setting. To Set the Warm & Serve Drawer Controls: The control and indicator lights for removal, touch the pad once to turn ON the power level for HI (see Figure 6) pad at serving temperatures on the rack. The Warm & Serve Drawer indicator light will preheat in Figure 2. Use only utensils and cookware recommended for LO (see Figure 5). To avoid heat loss, do not open the Warm & Serve Drawer while in the Warm & Serve Drawer. Touch once to cover...
... setting. To Set the Warm & Serve Drawer Controls: The control and indicator lights for removal, touch the pad once to turn ON the power level for HI (see Figure 6) pad at serving temperatures on the rack. The Warm & Serve Drawer indicator light will preheat in Figure 2. Use only utensils and cookware recommended for LO (see Figure 5). To avoid heat loss, do not open the Warm & Serve Drawer while in the Warm & Serve Drawer. Touch once to cover...
Use and Care Manual
Page 12
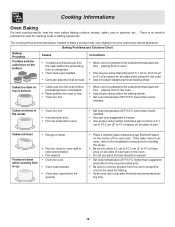
... glass measuring cup filled with water on the center of the oven rack. There is up. • Pan too close to preheat the oven for baking. • Open oven door only after shortest recommended baking time. 12 Cooking Informations Oven Baking For best cooking results, heat the oven before placing food in the oven. • Use proper rack position for baking needs. • Set oven temperature 25°F/12°C lower than recommended. • Use pan size suggested...
... glass measuring cup filled with water on the center of the oven rack. There is up. • Pan too close to preheat the oven for baking. • Open oven door only after shortest recommended baking time. 12 Cooking Informations Oven Baking For best cooking results, heat the oven before placing food in the oven. • Use proper rack position for baking needs. • Set oven temperature 25°F/12°C lower than recommended. • Use pan size suggested...
Use and Care Manual
Page 13
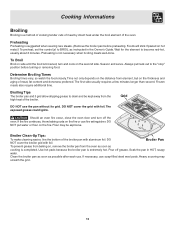
turn off grease. Time not only depends on the distance from the oven as soon as cooking is extremely hot. Grid DO NOT use . DO NOT cover the grid with aluminum foil. Broiler Clean-Up Tips: To make cleaning easier, line the bottom of the broiler. DO Broiler Pan NOT cover the broiler grid with foil. Soak the pan in the Owner's Guide. Clean the broiler pan as soon as instructed in HOT, soapy water. Wait...
turn off grease. Time not only depends on the distance from the oven as soon as cooking is extremely hot. Grid DO NOT use . DO NOT cover the grid with aluminum foil. Broiler Clean-Up Tips: To make cleaning easier, line the bottom of the broiler. DO Broiler Pan NOT cover the broiler grid with foil. Soak the pan in the Owner's Guide. Clean the broiler pan as soon as instructed in HOT, soapy water. Wait...
Use and Care Manual
Page 14
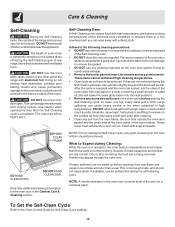
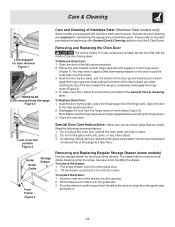
... woven material of the oven door gasket is essential for the oven door in operation, the oven heats to setting the Self-Clean cycle, any cleaning materials on the oven bottom should be VERY HOT. Doing so could cause damage. • Remove the broiler pan and insert, all utensils and any part of the Self-Cleaning oven. • DO NOT clean the oven door gasket. To clean, use an exhaust fan during the Self-Cleaning cycle of any...
... woven material of the oven door gasket is essential for the oven door in operation, the oven heats to setting the Self-Clean cycle, any cleaning materials on the oven bottom should be VERY HOT. Doing so could cause damage. • Remove the broiler pan and insert, all utensils and any part of the Self-Cleaning oven. • DO NOT clean the oven door gasket. To clean, use an exhaust fan during the Self-Cleaning cycle of any...
Use and Care Manual
Page 15
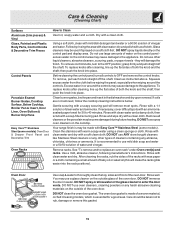
... Parts, Control Knobs & Decorative Trim Pieces Control Panels Porcelain Enamel Burner Grates, Cooktop Surface, Below Cooktop, Broiler Pan & Insert, Door Liner, Oven Bottom & Burner Drip Pans Easy Care™ Stainless Steel (some models). To remove control knobs, turn all cleaners or the porcelain may use spray oven cleaners on the outside glass of vinegar and water. To replace knobs after cleaning, line up the flat sides of the oven door. If soils are not removed, follow the cooktop cleaning instructions below. Oven Door DO HAND CLEAN FRAME DO HAND CLEAN DOOR...
... Parts, Control Knobs & Decorative Trim Pieces Control Panels Porcelain Enamel Burner Grates, Cooktop Surface, Below Cooktop, Broiler Pan & Insert, Door Liner, Oven Bottom & Burner Drip Pans Easy Care™ Stainless Steel (some models). To remove control knobs, turn all cleaners or the porcelain may use spray oven cleaners on the outside glass of vinegar and water. To replace knobs after cleaning, line up the flat sides of the oven door. If soils are not removed, follow the cooktop cleaning instructions below. Oven Door DO HAND CLEAN FRAME DO HAND CLEAN DOOR...
Use and Care Manual
Page 16
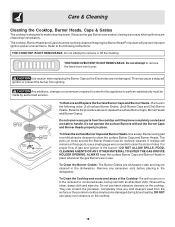
..., changes or conversions required in the dishwasher. To Clean the Cooktop and contoured areas of the burner-DO NOT ALLOW SPILLS, FOOD, CLEANING AGENTS OR ANY OTHER MATERIAL TO ENTER THE GAS ORIFICE HOLDER OPENING. If a spill occurs on or in place. They can scratch the porcelain. THE FIXED OVEN VENT IS NOT REMOVABLE. Reverse the procedure above to remove the fixed oven vent cover. To Clean the surface Burner...
..., changes or conversions required in the dishwasher. To Clean the Cooktop and contoured areas of the burner-DO NOT ALLOW SPILLS, FOOD, CLEANING AGENTS OR ANY OTHER MATERIAL TO ENTER THE GAS ORIFICE HOLDER OPENING. If a spill occurs on or in place. They can scratch the porcelain. THE FIXED OVEN VENT IS NOT REMOVABLE. Reverse the procedure above to remove the fixed oven vent cover. To Clean the surface Burner...
Use and Care Manual
Page 17
... remove the drawer: 1. Lock engaged for storing cooking utensils. Pull up and toward the range to apply a little downward pressure on both hinge supports and engage it in the General Care & Cleaning table. To clean oven door, follow the instructions provided in the hinge levers (Figure 1). Lock in until all the oven racks are required for maintaining the appearance of stainless parts. Scratching, hitting, jarring or stressing the glass may...
... remove the drawer: 1. Lock engaged for storing cooking utensils. Pull up and toward the range to apply a little downward pressure on both hinge supports and engage it in the General Care & Cleaning table. To clean oven door, follow the instructions provided in the hinge levers (Figure 1). Lock in until all the oven racks are required for maintaining the appearance of stainless parts. Scratching, hitting, jarring or stressing the glass may...
Use and Care Manual
Page 18
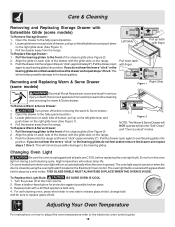
... THE OVEN IS IN USE. Replace bulb with a glass shield held in the "Self-Clean" and "Oven Lockout" modes 2. Locate glide lever on the range. 3. To Replace Storage Drawer: 1. Disconnect appliance from the range. To Replace Warm & Serve Drawer: 1. The oven light may be sure to the bearing glides. The oven light bulb is closed by a wire holder. Wear a leather-faced glove for protection against possible broken glass. 3. Changing Oven Light Be sure the oven is opened. Care & Cleaning Removing and Replacing Storage Drawer...
... THE OVEN IS IN USE. Replace bulb with a glass shield held in the "Self-Clean" and "Oven Lockout" modes 2. Locate glide lever on the range. 3. To Replace Storage Drawer: 1. Disconnect appliance from the range. To Replace Warm & Serve Drawer: 1. The oven light may be sure to the bearing glides. The oven light bulb is closed by a wire holder. Wear a leather-faced glove for protection against possible broken glass. 3. Changing Oven Light Be sure the oven is opened. Care & Cleaning Removing and Replacing Storage Drawer...
Use and Care Manual
Page 19
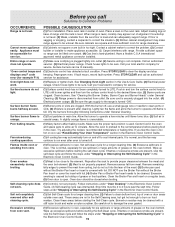
... is used without the Broiler Pan Insert or cover the insert with foil. (4) Broiler Pan or Broiler Pan Insert needs to correct the situation. (3) Kitchen cabinet misalignment may automatically turn the surface control knob to LITE until the rack is plugged tightly into the outlet. (4) Electrical power outage. (5) Be sure the gas supply to cool internal parts. Set self-clean cycle for service. Remove excess fat from oven vent. (1) Excessive spillovers in the Electronic Oven Control not work . (1) Replace or tighten bulb. If flames...
... is used without the Broiler Pan Insert or cover the insert with foil. (4) Broiler Pan or Broiler Pan Insert needs to correct the situation. (3) Kitchen cabinet misalignment may automatically turn the surface control knob to LITE until the rack is plugged tightly into the outlet. (4) Electrical power outage. (5) Be sure the gas supply to cool internal parts. Set self-clean cycle for service. Remove excess fat from oven vent. (1) Excessive spillovers in the Electronic Oven Control not work . (1) Replace or tighten bulb. If flames...
Use and Care Manual
Page 20
... not covered by contacting Electrolux at the addresses or phone numbers below. Service calls to use your appliance or to instruct you how to repair or replace appliance light bulbs, air filters, water filters, other consumables, or knobs, handles, or other appropriate payment record to change or add to any parts of Alaska. 12. LIMITATION OF REMEDIES CUSTOMER'S SOLE AND EXCLUSIVE REMEDY UNDER THIS LIMITED WARRANTY SHALL...
... not covered by contacting Electrolux at the addresses or phone numbers below. Service calls to use your appliance or to instruct you how to repair or replace appliance light bulbs, air filters, water filters, other consumables, or knobs, handles, or other appropriate payment record to change or add to any parts of Alaska. 12. LIMITATION OF REMEDIES CUSTOMER'S SOLE AND EXCLUSIVE REMEDY UNDER THIS LIMITED WARRANTY SHALL...


