Use and Care Manual
Page 2
...& Care Manual very carefully. Cartons covered with other appliance. PROPER DISPOSAL OF YOUR REFRIGERATOR/ FREEZER WARNING Risk of your old refrigerator or freezer, please follow the instructions below for your freezer only as instructed in the vicinity of the past. It contains valuable information on your...they will sit for flammability and other warnings. Box 212378 Augusta, GA 30917 BEFORE YOU THROW AWAY YOUR OLD REFRIGERATOR/FREEZER: • Remove doors. • Leave shelves in contact with rugs, bedspreads, plastic sheets or stretch wrap may not easily...
...& Care Manual very carefully. Cartons covered with other appliance. PROPER DISPOSAL OF YOUR REFRIGERATOR/ FREEZER WARNING Risk of your old refrigerator or freezer, please follow the instructions below for your freezer only as instructed in the vicinity of the past. It contains valuable information on your...they will sit for flammability and other warnings. Box 212378 Augusta, GA 30917 BEFORE YOU THROW AWAY YOUR OLD REFRIGERATOR/FREEZER: • Remove doors. • Leave shelves in contact with rugs, bedspreads, plastic sheets or stretch wrap may not easily...
Use and Care Manual
Page 3
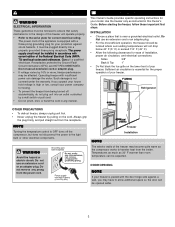
...and local codes and ordinances. WUseAtRheRfrAeeNzeTrYonlIyNaFs OinsRtrMucAteTd IinOtNhis Owner's Guide. INSTALLATION • Choose a place that safety mechanisms in the design of this freezer will not drop below 40° F (5° C) or exceed 110° F (43° C). • Allow the following ...'s Guide provides specific operating instructions for testing. • To prevent the freezer from the power cord. Refrigerator OTHER PRECAUTIONS • To defrost freezer, always unplug unit first. • Never unplug the freezer by a wall switch or pull cord. • Do not pinch, ...
...and local codes and ordinances. WUseAtRheRfrAeeNzeTrYonlIyNaFs OinsRtrMucAteTd IinOtNhis Owner's Guide. INSTALLATION • Choose a place that safety mechanisms in the design of this freezer will not drop below 40° F (5° C) or exceed 110° F (43° C). • Allow the following ...'s Guide provides specific operating instructions for testing. • To prevent the freezer from the power cord. Refrigerator OTHER PRECAUTIONS • To defrost freezer, always unplug unit first. • Never unplug the freezer by a wall switch or pull cord. • Do not pinch, ...
Use and Care Manual
Page 4
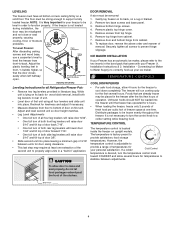
...is not leveled during installation, the door may be loaded into the freezer until the freezer has operated for your personal satisfaction. NOTE: It is lying on its back, on upright models. Recheck for all Refrigerator/Freezer Pair: • Remove two leg levelers provided in literature bag. ...toward COLDEST and allow several hours. To replace door, reverse the above order and manner of door forward 7/16". • One full turn the control knob to level the freezer from top hinge. 6. Installation - Adjust and level second unit so door height matches. • Leg...
...is not leveled during installation, the door may be loaded into the freezer until the freezer has operated for your personal satisfaction. NOTE: It is lying on its back, on upright models. Recheck for all Refrigerator/Freezer Pair: • Remove two leg levelers provided in literature bag. ...toward COLDEST and allow several hours. To replace door, reverse the above order and manner of door forward 7/16". • One full turn the control knob to level the freezer from top hinge. 6. Installation - Adjust and level second unit so door height matches. • Leg...

Use and Care Manual
Page 8
WARRANTY FREEZER WARRANTY Your freezer is protected by servicers other than Electrolux, or its authorized servicers; Pay all costs for labor, parts and transportation other than with the appliance and ... One year from original purchase date. This written warranty gives you . 2. P.O. exclusions listed below : 1. and Electrolux Canada Corp. Damages to the cabinet liner or Sealed Refrigeration System. Damages caused by services performed by this appliance which are warranted for such service calls. 3. IF YOU NEED SERVICE Keep your appliance is responsible...
WARRANTY FREEZER WARRANTY Your freezer is protected by servicers other than Electrolux, or its authorized servicers; Pay all costs for labor, parts and transportation other than with the appliance and ... One year from original purchase date. This written warranty gives you . 2. P.O. exclusions listed below : 1. and Electrolux Canada Corp. Damages to the cabinet liner or Sealed Refrigeration System. Damages caused by services performed by this appliance which are warranted for such service calls. 3. IF YOU NEED SERVICE Keep your appliance is responsible...
Use and Care Manual
Page 10
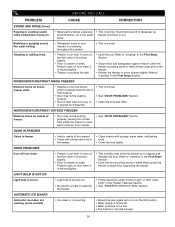
... "Leveling" in the First Steps Section. • Level the floor by putting wood or metal shims under the freezer or brace floor supporting the freezer. FI10RST Freezer rocks on . • Light bulb is burned out. • No electric current is touching the wall. &#... Freezer is normal. pipes. Freezer rocks on . • Metal parts undergo expansion • This is not level. Refer to "Leveling" in hot water freezer continues to cool freezer) is circulating throughout the system. • This is not level. Bubbling or gurgling sound, like water boiling. • Refrigerant ...
... "Leveling" in the First Steps Section. • Level the floor by putting wood or metal shims under the freezer or brace floor supporting the freezer. FI10RST Freezer rocks on . • Light bulb is burned out. • No electric current is touching the wall. &#... Freezer is normal. pipes. Freezer rocks on . • Metal parts undergo expansion • This is not level. Refer to "Leveling" in hot water freezer continues to cool freezer) is circulating throughout the system. • This is not level. Bubbling or gurgling sound, like water boiling. • Refrigerant ...
Installation Instructions
Page 1
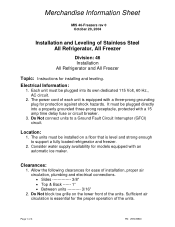
...air circulation, plumbing and electrical connections. • Sides 3/8" • Top & Back ------ 1" • Between units ---------- 3/16" 2. The power cord of each unit is essential for protection against shock hazards. The units must be plugged into a properly ... a fully loaded refrigerator and freezer. 2. Merchandise Information Sheet MIS 46-Freezers rev 0 October 20, 2004 Installation and Leveling of 3 PN: 297078900 Location: 1. Page 1 of Stainless Steel All Refrigerator, All Freezer Division: 46 Installation All Refrigerator and All Freezer Topic: Instructions for...
...air circulation, plumbing and electrical connections. • Sides 3/8" • Top & Back ------ 1" • Between units ---------- 3/16" 2. The power cord of each unit is essential for protection against shock hazards. The units must be plugged into a properly ... a fully loaded refrigerator and freezer. 2. Merchandise Information Sheet MIS 46-Freezers rev 0 October 20, 2004 Installation and Leveling of 3 PN: 297078900 Location: 1. Page 1 of Stainless Steel All Refrigerator, All Freezer Division: 46 Installation All Refrigerator and All Freezer Topic: Instructions for...
Installation Instructions
Page 2
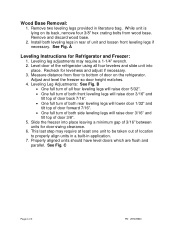
... door swing clearance. 6. Slide the freezer into place. Install both side leveling legs will lower door 1/32" and tilt top of door forward 7/16". • One full turn of all four levelers and slide unit into place leaving a minimum gap of door 3/8". 5. Level door of the refrigerator using all four leveling legs will...
... door swing clearance. 6. Slide the freezer into place. Install both side leveling legs will lower door 1/32" and tilt top of door forward 7/16". • One full turn of all four levelers and slide unit into place leaving a minimum gap of door 3/8". 5. Level door of the refrigerator using all four leveling legs will...
Installation Instructions
Page 3
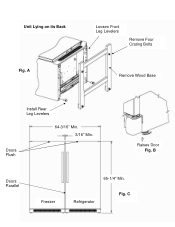
B Doors Parallel Freezer Page 3 of 3 65-1/4" Min. Refrigerator Fig. A Loosen Front Leg Levelers Remove Four Crating Bolts Remove Wood Base Install Rear Leg Levelers 64-3/16" Min. 3/16" Min. C PN: 297078900 Unit Lying on its Back Fig. Doors Flush Raises Door Fig.
B Doors Parallel Freezer Page 3 of 3 65-1/4" Min. Refrigerator Fig. A Loosen Front Leg Levelers Remove Four Crating Bolts Remove Wood Base Install Rear Leg Levelers 64-3/16" Min. 3/16" Min. C PN: 297078900 Unit Lying on its Back Fig. Doors Flush Raises Door Fig.


