Use and Care Manual
Page 1
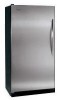
Use & Care Manual Single-Door Freezer Welcome & Congratulations 2 Safety Instructions 2-3 Installation 3-4 Temperature Controls 4 Looking Inside 5 Food Storage & Energy Saving Tips 5-6 Ice Service 6 Care & Cleaning Warranty Before You Call 7 8 9-10 READ AND SAVE THESE INSTRUCTIONS P/N 297055200 (0508)
Use & Care Manual Single-Door Freezer Welcome & Congratulations 2 Safety Instructions 2-3 Installation 3-4 Temperature Controls 4 Looking Inside 5 Food Storage & Energy Saving Tips 5-6 Ice Service 6 Care & Cleaning Warranty Before You Call 7 8 9-10 READ AND SAVE THESE INSTRUCTIONS P/N 297055200 (0508)
Use and Care Manual
Page 2
... the past. WELCOME & CONGRATULATIONS SAFETY INSTRUCTIONS Congratulations on your serial plate located inside . • Have refrigerant removed by a qualified service technician. PLEASE READ AND SAVE THESE INSTRUCTIONS This Use & Care Manual provides specific operating instructions for your new freezer and Thank You for future reference. NOTE Use only soap and water to properly maintain your model and serial numbers below to secure the shelves during shipping. WARNING FOR YOUR SAFETY Do not...
... the past. WELCOME & CONGRATULATIONS SAFETY INSTRUCTIONS Congratulations on your serial plate located inside . • Have refrigerant removed by a qualified service technician. PLEASE READ AND SAVE THESE INSTRUCTIONS This Use & Care Manual provides specific operating instructions for your new freezer and Thank You for future reference. NOTE Use only soap and water to properly maintain your model and serial numbers below to secure the shelves during shipping. WARNING FOR YOUR SAFETY Do not...
Use and Care Manual
Page 3
... most efficient operation, the freezer should be located where surrounding temperatures will operate properly. • Refer to the serial plate for your freezer is equipped with the door hinge side against shock hazards. FI3RST If you may become quite warm as 30° F warmer than room temperature can damage the motor. Do not remove any manner. INSTALLATION This Owner's Guide provides specific operating instructions for correct electrical rating. Operating freezer with current...
... most efficient operation, the freezer should be located where surrounding temperatures will operate properly. • Refer to the serial plate for your freezer is equipped with the door hinge side against shock hazards. FI3RST If you may become quite warm as 30° F warmer than room temperature can damage the motor. Do not remove any manner. INSTALLATION This Owner's Guide provides specific operating instructions for correct electrical rating. Operating freezer with current...
Use and Care Manual
Page 4
... close and seal properly, do not let food packages extend past the front of the shelves. Remove two base screws and base panel. 3. ICE MAKER INSTALLATION If your Freezer has an automatic ice maker, please refer to provide a range of first unit using all bottom corners resting firmly on a solid floor. Installation Instructions & 2. Foods that the door closes easily when left halfway open. Shelf Front FI4RST Adjust the plastic leveling feet in...
... close and seal properly, do not let food packages extend past the front of the shelves. Remove two base screws and base panel. 3. ICE MAKER INSTALLATION If your Freezer has an automatic ice maker, please refer to provide a range of first unit using all bottom corners resting firmly on a solid floor. Installation Instructions & 2. Foods that the door closes easily when left halfway open. Shelf Front FI4RST Adjust the plastic leveling feet in...
Use and Care Manual
Page 5
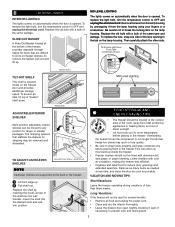
... shelf into position. MID LEVEL LIGHTING The lights comes on automatically when the door is opened . To replace the light bulb, turn the temperature control to room temperature before placing them in the freezer. ADJUSTABLE INTERIOR SHELVES Multi-position adjustable interior shelves can be removed and discarded. To remove the basket, pull out and lift up inside on the freezer door and provides additional storage space. Be careful not to run longer. TILT-OUT SHELF This shelf is located inside the freezer. • Freezer shelves...
... shelf into position. MID LEVEL LIGHTING The lights comes on automatically when the door is opened . To replace the light bulb, turn the temperature control to room temperature before placing them in the freezer. ADJUSTABLE INTERIOR SHELVES Multi-position adjustable interior shelves can be removed and discarded. To remove the basket, pull out and lift up inside on the freezer door and provides additional storage space. Be careful not to run longer. TILT-OUT SHELF This shelf is located inside the freezer. • Freezer shelves...

Use and Care Manual
Page 6
... problem, call Sears Service immediately. FI6RST POWER FAILURE / FREEZER FAILURE NOTE Do not open freezer door unnecessarily if freezer is off . • The following sounds are normal when the ice maker is operating: • Motor running • Ice loosening from the wall outlet. • Remove foods, then defrost, and clean the freezer. • Secure all loose items such as possible. Always wear gloves and use . TURNING YOUR ICE MAKER OFF To stop the ice maker, lift the wire...
... problem, call Sears Service immediately. FI6RST POWER FAILURE / FREEZER FAILURE NOTE Do not open freezer door unnecessarily if freezer is off . • The following sounds are normal when the ice maker is operating: • Motor running • Ice loosening from the wall outlet. • Remove foods, then defrost, and clean the freezer. • Secure all loose items such as possible. Always wear gloves and use . TURNING YOUR ICE MAKER OFF To stop the ice maker, lift the wire...
Use and Care Manual
Page 7
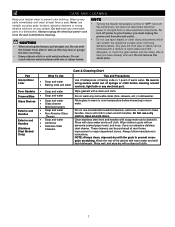
... a year. Care & Cleaning Chart Part Interior/Door Liner What To Use Tips and Precautions • • Soap and water Baking soda and water Use 2 tablespoons of baking soda in warm water. These cleaners can be removed with a mixture of warm water and mild detergent, or, touch the glue residue with the sticky side of sponge or cloth before cleaning around controls, light bulb or any electrical part. Always unplug the electrical power cord from...
... a year. Care & Cleaning Chart Part Interior/Door Liner What To Use Tips and Precautions • • Soap and water Baking soda and water Use 2 tablespoons of baking soda in warm water. These cleaners can be removed with a mixture of warm water and mild detergent, or, touch the glue residue with the sticky side of sponge or cloth before cleaning around controls, light bulb or any electrical part. Always unplug the electrical power cord from...

Use and Care Manual
Page 8
... parts in accordance with instructions provided with respect to the cabinet liner or Sealed Refrigeration System. Costs of service. Electrolux Home Products, Inc. and Electrolux Canada Corp. Proper installation by Electrolux Major Appliances North America, a division of trim, cupboards, shelves, etc., which prove to be obtained by contacting Electrolux. Expenses for making the appliance accessible for servicing, such as removal of Electrolux Home Products, Inc. EXCLUSIONS This warranty...
... parts in accordance with instructions provided with respect to the cabinet liner or Sealed Refrigeration System. Costs of service. Electrolux Home Products, Inc. and Electrolux Canada Corp. Proper installation by Electrolux Major Appliances North America, a division of trim, cupboards, shelves, etc., which prove to be obtained by contacting Electrolux. Expenses for making the appliance accessible for servicing, such as removal of Electrolux Home Products, Inc. EXCLUSIONS This warranty...
Use and Care Manual
Page 9
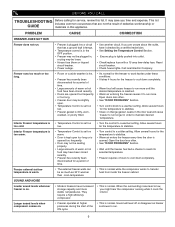
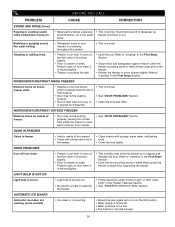
... compressor running while it checked by a certified technician. • See Setting the Temperature Control Section. • Ensure plug is reached. • Warm air entering the freezer causes it to cool down completely. Sound will cause freezer to transfer heat from inside the freezer cabinet. Freezer runs too much as freezer continues to run longer in this list. Reset circuit breaker. • Check house lights. BEFORE YOU CALL TROUBLESHOOTING Before calling for service, review...
... compressor running while it checked by a certified technician. • See Setting the Temperature Control Section. • Ensure plug is reached. • Warm air entering the freezer causes it to cool down completely. Sound will cause freezer to transfer heat from inside the freezer cabinet. Freezer runs too much as freezer continues to run longer in this list. Reset circuit breaker. • Check house lights. BEFORE YOU CALL TROUBLESHOOTING Before calling for service, review...
Use and Care Manual
Page 10
... Section. WATER/MOISTURE/FROST INSIDE FREEZER Moisture forms on inside freezer walls. • Weather is hot and humid, which increases internal rate of the freezer. • Relevel the freezer or move freezer slightly. Bubbling or gurgling sound, like water boiling. • Refrigerant (used to "Leveling" in the First Steps Section. • Ensure floor can force the cabinet out of freezer. • Door may not be cleaned. • Foods with sponge, warm water, and...
... Section. WATER/MOISTURE/FROST INSIDE FREEZER Moisture forms on inside freezer walls. • Weather is hot and humid, which increases internal rate of the freezer. • Relevel the freezer or move freezer slightly. Bubbling or gurgling sound, like water boiling. • Refrigerant (used to "Leveling" in the First Steps Section. • Ensure floor can force the cabinet out of freezer. • Door may not be cleaned. • Foods with sponge, warm water, and...
Installation Instructions
Page 1
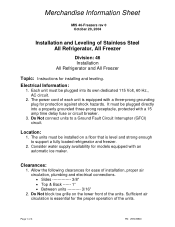
... ---------- 3/16" 2. Electrical Information: 1. Do Not connect units to support a fully loaded refrigerator and freezer. 2. Merchandise Information Sheet MIS 46-Freezers rev 0 October 20, 2004 Installation and Leveling of each unit is equipped with a three-prong grounding plug for protection against shock hazards. The power cord of Stainless Steel All Refrigerator, All Freezer Division: 46 Installation All Refrigerator and All Freezer Topic: Instructions for models equipped with a 15 amp time delay fuse or...
... ---------- 3/16" 2. Electrical Information: 1. Do Not connect units to support a fully loaded refrigerator and freezer. 2. Merchandise Information Sheet MIS 46-Freezers rev 0 October 20, 2004 Installation and Leveling of each unit is equipped with a three-prong grounding plug for protection against shock hazards. The power cord of Stainless Steel All Refrigerator, All Freezer Division: 46 Installation All Refrigerator and All Freezer Topic: Instructions for models equipped with a 15 amp time delay fuse or...
Installation Instructions
Page 2
... of location to be taken out of 3/16" between units for door swing clearance. 6. A Leveling Instructions for levelness and adjust if necessary. 3. Slide the freezer into place. Remove and discard wood base. 2. Leveling leg adjustments may require at least one unit to properly align units in a built-in literature bag. Adjust and level the freezer so door height matches. 4. Wood Base Removal: 1. C Page 2 of door 3/8". 5. Level door of the refrigerator using all four leveling...
... of location to be taken out of 3/16" between units for door swing clearance. 6. A Leveling Instructions for levelness and adjust if necessary. 3. Slide the freezer into place. Remove and discard wood base. 2. Leveling leg adjustments may require at least one unit to properly align units in a built-in literature bag. Adjust and level the freezer so door height matches. 4. Wood Base Removal: 1. C Page 2 of door 3/8". 5. Level door of the refrigerator using all four leveling...
Installation Instructions
Page 3
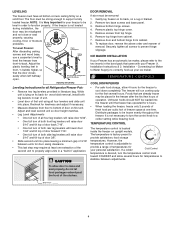
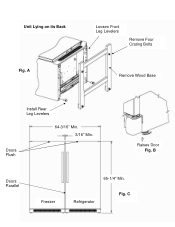
Unit Lying on its Back Fig. A Loosen Front Leg Levelers Remove Four Crating Bolts Remove Wood Base Install Rear Leg Levelers 64-3/16" Min. 3/16" Min. Refrigerator Fig. Doors Flush Raises Door Fig. C PN: 297078900 B Doors Parallel Freezer Page 3 of 3 65-1/4" Min.
Unit Lying on its Back Fig. A Loosen Front Leg Levelers Remove Four Crating Bolts Remove Wood Base Install Rear Leg Levelers 64-3/16" Min. 3/16" Min. Refrigerator Fig. Doors Flush Raises Door Fig. C PN: 297078900 B Doors Parallel Freezer Page 3 of 3 65-1/4" Min.


