
Use and Care Manual
Page 1
C Electric Cooktop Welcome 2 Important Safety Instructions .. 3-4 Setting Surface Controls .... 4-7 Surface Cooking 8 Care & Cleaning 9-10 Before You Call SC.oo.lm.u.tm.io.o.nn.s..Pt.or.o.b.l.e.m..s 11 Warranty 12 318200626 (0511) Rev.
C Electric Cooktop Welcome 2 Important Safety Instructions .. 3-4 Setting Surface Controls .... 4-7 Surface Cooking 8 Care & Cleaning 9-10 Before You Call SC.oo.lm.u.tm.io.o.nn.s..Pt.or.o.b.l.e.m..s 11 Warranty 12 318200626 (0511) Rev.
Use and Care Manual
Page 2
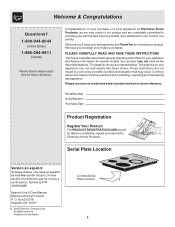
..., GA 30917 © 2005 Electrolux Canada Corp. O. Welcome & Congratulations Questions? 1-800-944-9044 (United States) 1-866-294-9911 (Canada) Please attach sales receipt here for several models. Congratulations on your purchase of our product and are not meant to Electrolux Home Products. PLEASE CAREFULLY READ AND SAVE THESE INSTRUCTIONS This Use & Care Manual contains general operating instructions for your model and serial numbers below...
..., GA 30917 © 2005 Electrolux Canada Corp. O. Welcome & Congratulations Questions? 1-800-944-9044 (United States) 1-866-294-9911 (Canada) Please attach sales receipt here for several models. Congratulations on your purchase of our product and are not meant to Electrolux Home Products. PLEASE CAREFULLY READ AND SAVE THESE INSTRUCTIONS This Use & Care Manual contains general operating instructions for your model and serial numbers below...
Use and Care Manual
Page 3
... become hot enough to keep all parts free of different sizes. If the power fails, always turn fan on hot surfaces may become too hot. • Use Only Dry Pot holders. IMPORTANT SAFETY INSTRUCTIONS FOR USING YOUR COOKTOP • Know which knob controls each surface unit. • Clean the appliance regularly to cause burns. Greasy deposits in Canada, and local code requirements. Refer to cool. Important Safety Instructions Read all instructions before using the...
... become hot enough to keep all parts free of different sizes. If the power fails, always turn fan on hot surfaces may become too hot. • Use Only Dry Pot holders. IMPORTANT SAFETY INSTRUCTIONS FOR USING YOUR COOKTOP • Know which knob controls each surface unit. • Clean the appliance regularly to cause burns. Greasy deposits in Canada, and local code requirements. Refer to cool. Important Safety Instructions Read all instructions before using the...
Use and Care Manual
Page 4
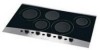
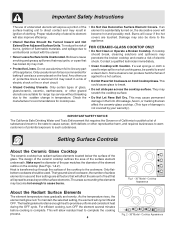
... requires the Governor of California to publish a list of utensil to element become hot enough to cause cancer, birth defects or other glazed • Do not slide pan across the cooktop surface. Setting Surface Controls About the Ceramic Glass Cooktop The ceramic cooktop has radiant surface elements located below the surface of the surface element underneath. The design of the ceramic cooktop outlines the area of the glass. hi a d n a exp Fig.1 - 30" Model - To maintain the selected setting...
... requires the Governor of California to publish a list of utensil to element become hot enough to cause cancer, birth defects or other glazed • Do not slide pan across the cooktop surface. Setting Surface Controls About the Ceramic Glass Cooktop The ceramic cooktop has radiant surface elements located below the surface of the surface element underneath. The design of the ceramic cooktop outlines the area of the glass. hi a d n a exp Fig.1 - 30" Model - To maintain the selected setting...

Use and Care Manual
Page 5
... instructions for Surface Elements Setting HIGH (HI) MEDIUM HIGH (8-10) MEDIUM (6) MEDIUM LOW (2 - 4) LOW (LO) Type of food you are located on and off . The ability to cycle on the 30" cooktop as the element wattage increases. The radiant surface elements are preparing. ELEMENT ON hi 88 OFF hi ..... Setting Surface Controls locations of this Use and Care Guide. NOTE: Radiant elements have a limiter that allows the element to heat food quicker and in the General Care & Cleaning...
... instructions for Surface Elements Setting HIGH (HI) MEDIUM HIGH (8-10) MEDIUM (6) MEDIUM LOW (2 - 4) LOW (LO) Type of food you are located on and off . The ability to cycle on the 30" cooktop as the element wattage increases. The radiant surface elements are preparing. ELEMENT ON hi 88 OFF hi ..... Setting Surface Controls locations of this Use and Care Guide. NOTE: Radiant elements have a limiter that allows the element to heat food quicker and in the General Care & Cleaning...

Use and Care Manual
Page 6
... digital setting for assistance. 6 lowest Simmer setting) for more precise settings at power up (or after following Fig. 7 these procedures, contact your authorized servicer for the 5 radiant surface element positions on the cooktop. Fig. 3 Fig. 4 Control knobs shown are displayed in the window, the control can still be sure to set to the range has been interrupted, the ESEC control will remain hot for best cooking results. See...
... digital setting for assistance. 6 lowest Simmer setting) for more precise settings at power up (or after following Fig. 7 these procedures, contact your authorized servicer for the 5 radiant surface element positions on the cooktop. Fig. 3 Fig. 4 Control knobs shown are displayed in the window, the control can still be sure to set to the range has been interrupted, the ESEC control will remain hot for best cooking results. See...
Use and Care Manual
Page 7
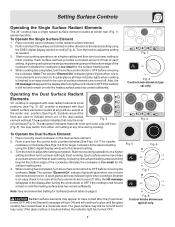
... finish cooking. Setting Surface Controls Operating the Single Surface Radiant Elements The 36" cooktop has a single radiant surface element located at these indicator lights when cooking is finished is an easy check to be sure all surface elements are turned off . a d n a exp ..... Turn the knob to OFF if the cooktop is still hot and remain on a higher setting and then turn the surface control knob to finish cooking. To Operate the Single Surface Element 1. Place correctly sized cookware on until the heating surface area...
... finish cooking. Setting Surface Controls Operating the Single Surface Radiant Elements The 36" cooktop has a single radiant surface element located at these indicator lights when cooking is finished is an easy check to be sure all surface elements are turned off . a d n a exp ..... Turn the knob to OFF if the cooktop is still hot and remain on a higher setting and then turn the surface control knob to finish cooking. To Operate the Single Surface Element 1. Place correctly sized cookware on until the heating surface area...
Use and Care Manual
Page 8
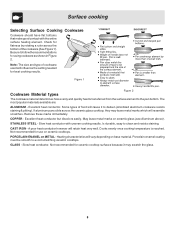
... and quickly heat is reached. STAINLESS STEEL - GLASS - Slow heat conductor. Be sure to follow the recommendations for best cooking results. Remove these marks immediately. COPPER - Not recommended for ceramic cooktop surfaces because it to the pan bottom. Note: The size and type of cookware used will vary depending on METAL - Excellent heat conductor. Some types of the cookware (See Figure 1). Slow heat conductor with the entire surface heating element. CAST...
... and quickly heat is reached. STAINLESS STEEL - GLASS - Slow heat conductor. Be sure to follow the recommendations for best cooking results. Remove these marks immediately. COPPER - Not recommended for ceramic cooktop surfaces because it to the pan bottom. Note: The size and type of cookware used will vary depending on METAL - Excellent heat conductor. Some types of the cookware (See Figure 1). Slow heat conductor with the entire surface heating element. CAST...
Use and Care Manual
Page 9
... Owner's Guide. 9 Rinse with a soft cloth. Do not use . Only use harsh scrubbing cleaners. Glass cleaners may cause damage to the appliance. especially when wiping around the controls may be removed. Stainless Steel, Chrome (brushed) Decorative Trim Cooktop Clean stainless steel with a clean cloth. Do not use kitchen cleaners that cannot be used if sprayed on the control area may occur during heating that are turned OFF and the cooktop is COOL. Ceramic -Glass Cooktop...
... Owner's Guide. 9 Rinse with a soft cloth. Do not use . Only use harsh scrubbing cleaners. Glass cleaners may cause damage to the appliance. especially when wiping around the controls may be removed. Stainless Steel, Chrome (brushed) Decorative Trim Cooktop Clean stainless steel with a clean cloth. Do not use kitchen cleaners that cannot be used if sprayed on the control area may occur during heating that are turned OFF and the cooktop is COOL. Ceramic -Glass Cooktop...

Use and Care Manual
Page 10
Sliding aluminum or copper clad bottom pans on the cooktop can cause metal markings on the cooktop surface without a pan. Do not use dirty sponges, cloths or paper towels, as a cutting board or work surface in the kitchen. Do not drop heavy or hard objects on the glass cooktop, or they can chemically damage the ceramic glass surface. Before cleaning the cooktop, be removed immediately if spilled or melted onto the ceramic cooktop surface. Plastic...
Sliding aluminum or copper clad bottom pans on the cooktop can cause metal markings on the cooktop surface without a pan. Do not use dirty sponges, cloths or paper towels, as a cutting board or work surface in the kitchen. Do not drop heavy or hard objects on the glass cooktop, or they can chemically damage the ceramic glass surface. Before cleaning the cooktop, be removed immediately if spilled or melted onto the ceramic cooktop surface. Plastic...
Use and Care Manual
Page 11
... Ceramic-Glass Cooktop section in this Owner's Guide. (1) Mineral deposits from water and food. POSSIBLE CAUSE/SOLUTION (1) House fuse has blown or circuit breaker has tripped. Check/reset breaker or replace fuse. Call local electric company. (1) No power to a slightly higher setting until proper amount of relative heat settings and will become less visible with rough bottom has been used . Turn control to appliance. Dial markings are an indicator of heat is on ceramic glass cooktop surface. Pans...
... Ceramic-Glass Cooktop section in this Owner's Guide. (1) Mineral deposits from water and food. POSSIBLE CAUSE/SOLUTION (1) House fuse has blown or circuit breaker has tripped. Check/reset breaker or replace fuse. Call local electric company. (1) No power to a slightly higher setting until proper amount of relative heat settings and will become less visible with rough bottom has been used . Turn control to appliance. Dial markings are an indicator of heat is on ceramic glass cooktop surface. Pans...
Use and Care Manual
Page 12
... provided instructions. 8. Expenses for making the appliance accessible for service calls to establish the warranty period should service be performed by Electrolux or an authorized service company. Service calls to repair or replace appliance light bulbs, air filters, water filters, other consumables, or knobs, handles, or other appropriate payment record to remote areas, including the state of God. Products used in the USA and Canada...
... provided instructions. 8. Expenses for making the appliance accessible for service calls to establish the warranty period should service be performed by Electrolux or an authorized service company. Service calls to repair or replace appliance light bulbs, air filters, water filters, other consumables, or knobs, handles, or other appropriate payment record to remote areas, including the state of God. Products used in the USA and Canada...
Installation Instructions
Page 1
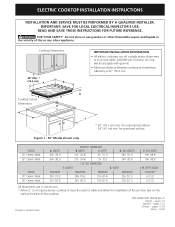
... - 19-20 1 Cooktop Dimensions IMPORTANT INSTALLATION INFORMATION • All electric cooktops run off a single phase, three-wire or four-wire cable, 240/208 volt, 60 hertz, AC only electrical supply with ground. • Minimum distance between cooktop and overhead cabinetry is 30" (76.2 cm). for protected surface Figure 1 - 30" Model shown only MODEL 30" Ceramic Model 36" Ceramic Model MODEL 30" Ceramic Model 36" Ceramic Model A. IMPORTANT: SAVE FOR LOCAL ELECTRICAL INSPECTOR'S USE. WIDTH C. BOX WIDTH 19...
... - 19-20 1 Cooktop Dimensions IMPORTANT INSTALLATION INFORMATION • All electric cooktops run off a single phase, three-wire or four-wire cable, 240/208 volt, 60 hertz, AC only electrical supply with ground. • Minimum distance between cooktop and overhead cabinetry is 30" (76.2 cm). for protected surface Figure 1 - 30" Model shown only MODEL 30" Ceramic Model 36" Ceramic Model MODEL 30" Ceramic Model 36" Ceramic Model A. IMPORTANT: SAVE FOR LOCAL ELECTRICAL INSPECTOR'S USE. WIDTH C. BOX WIDTH 19...
Installation Instructions
Page 2
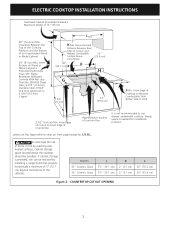
... of burns or fire by reaching over heated surfaces, cabinet storage space located above the cooktop should be reduced by Not Less Than 1/8" Flame Retardant Millboard Covered With Not Less Than No. 28 MGS Sheet Steel, 0.015" (0.4 mm) Stainless Steel, 0.024" (0.6 mm) Aluminum or 0.020" (0.5 mm) Copper L Min. Letters on front page except for installation purpose. MODEL 30" Ceramic Glass 36" Ceramic Glass J 7½" (19.1 cm) 7½" (19.1 cm...
... of burns or fire by reaching over heated surfaces, cabinet storage space located above the cooktop should be reduced by Not Less Than 1/8" Flame Retardant Millboard Covered With Not Less Than No. 28 MGS Sheet Steel, 0.015" (0.4 mm) Stainless Steel, 0.024" (0.6 mm) Aluminum or 0.020" (0.5 mm) Copper L Min. Letters on front page except for installation purpose. MODEL 30" Ceramic Glass 36" Ceramic Glass J 7½" (19.1 cm) 7½" (19.1 cm...
Installation Instructions
Page 3
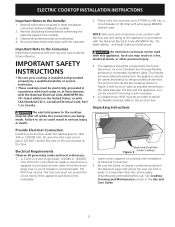
... fused disconnect (or circuit breaker) box through flexible armored or nonmetallic sheathed cable. See Cooktop Cleaning and Maintenance section in these installation instructions before use may result in Canada. Remove all instructions contained in the Use and Care Guide. 3 A suitable strain relief must conform with CSA Standard C22.1, Canadian Electrical Code, Part 1, in a fire, electrical shock, or other personal injury. 3. Electrical Requirements Observe all governing codes and ordinances. 4. NOTE: Wire sizes and connections must be used...
... fused disconnect (or circuit breaker) box through flexible armored or nonmetallic sheathed cable. See Cooktop Cleaning and Maintenance section in these installation instructions before use may result in Canada. Remove all instructions contained in the Use and Care Guide. 3 A suitable strain relief must conform with CSA Standard C22.1, Canadian Electrical Code, Part 1, in a fire, electrical shock, or other personal injury. 3. Electrical Requirements Observe all governing codes and ordinances. 4. NOTE: Wire sizes and connections must be used...
Installation Instructions
Page 4
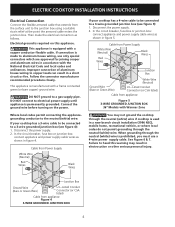
... junction box. Disconnect the power supply. 2. Cable from Power Supply White Wire (Neutral) Red Wires Black Wires Junction Box White Wire (Neutral) Ground Wire (Bare or Green Wire) U.L.-Listed Conduit Connector (or CSA listed) Cable from appliance Figure 5 3-WIRE GROUNDED JUNCTION BOX 36" Models with Warmer Zone You may result in electrocution or other serious personal injury. ELECTRIC COOKTOP INSTALLATION INSTRUCTIONS Electrical Connection Connect the flexible armored cable that extends from the surface unit to aluminum house wiring, use a 4-wire power...
... junction box. Disconnect the power supply. 2. Cable from Power Supply White Wire (Neutral) Red Wires Black Wires Junction Box White Wire (Neutral) Ground Wire (Bare or Green Wire) U.L.-Listed Conduit Connector (or CSA listed) Cable from appliance Figure 5 3-WIRE GROUNDED JUNCTION BOX 36" Models with Warmer Zone You may result in electrocution or other serious personal injury. ELECTRIC COOKTOP INSTALLATION INSTRUCTIONS Electrical Connection Connect the flexible armored cable that extends from the surface unit to aluminum house wiring, use a 4-wire power...
Installation Instructions
Page 5
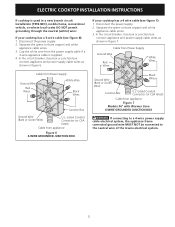
... electrical system, the appliance frame connected ground wire MUST NOT be connected to the neutral wire of the 4-wire electrical system. 5 In the circuit breaker, fuse box or junction box: connect appliance and power supply cable wires as shown in a new branch circuit installation (1996 NEC), mobile home, recreational vehicle, or where local codes DO NOT permit grounding through the neutral (white) wire: If your cooktop has a 4 wire cable (see figure 6): 1. ELECTRIC COOKTOP INSTALLATION INSTRUCTIONS If cooktop...
... electrical system, the appliance frame connected ground wire MUST NOT be connected to the neutral wire of the 4-wire electrical system. 5 In the circuit breaker, fuse box or junction box: connect appliance and power supply cable wires as shown in a new branch circuit installation (1996 NEC), mobile home, recreational vehicle, or where local codes DO NOT permit grounding through the neutral (white) wire: If your cooktop has a 4 wire cable (see figure 6): 1. ELECTRIC COOKTOP INSTALLATION INSTRUCTIONS If cooktop...
Installation Instructions
Page 6
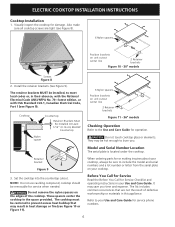
... materials in their absence, with the National Electrical Code ANSI/NFPA No. 70-latest edition, or with CSA Standard C22.1, Canadian Electrical Code, Part 1 (see Figure 10 or Figure 11). ELECTRIC COOKTOP INSTALLATION INSTRUCTIONS Cooktop Installation 1. Install the retainer brackets (See Figure 9). Set the cooktop into the countertop cutout. WARNING Do not remove the nylon spacers on unit cutout center line 2 Retainer brackets Figure 11 - 36" models Checking Operation Refer to meet local...
... materials in their absence, with the National Electrical Code ANSI/NFPA No. 70-latest edition, or with CSA Standard C22.1, Canadian Electrical Code, Part 1 (see Figure 10 or Figure 11). ELECTRIC COOKTOP INSTALLATION INSTRUCTIONS Cooktop Installation 1. Install the retainer brackets (See Figure 9). Set the cooktop into the countertop cutout. WARNING Do not remove the nylon spacers on unit cutout center line 2 Retainer brackets Figure 11 - 36" models Checking Operation Refer to meet local...


