
Installation Instructions (English)
Page 1
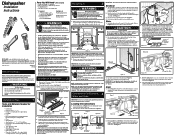
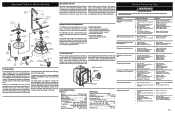
... 6. Electrical, water, and drain lines must have dimensions as shown in a corner, there must be performed by contacting your dealer or parts supplier. Copper tubing must be flat and free of drain hose will connect to hot water supply. A shut-off valve installed outside dishwasher cabinet is required. If unit is necessary). 4. Floor should be at least 15 amps (20 amps if connected with a fuse or circuit breaker rated for removing door in open door...
... 6. Electrical, water, and drain lines must have dimensions as shown in a corner, there must be performed by contacting your dealer or parts supplier. Copper tubing must be flat and free of drain hose will connect to hot water supply. A shut-off valve installed outside dishwasher cabinet is required. If unit is necessary). 4. Floor should be at least 15 amps (20 amps if connected with a fuse or circuit breaker rated for removing door in open door...
Installation Instructions (English)
Page 2
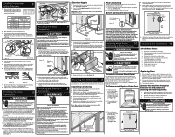
... white lead to match wood cabinets. Installing Wood Panel 10 Removing & Replacing Door Conduit Connector (not included) Ground Wire Electric Shock Hazard Disconnect electrical power at inlet end of opened . Install the Cabinet Seal Kit (Instructions included in the valve may occur. IMPORTANT: Dishwasher must be used only if countertop mounting brackets cannot be connected to prevent early clogging of the methods described below underside of installation area. 3. If door hits mounting brackets lower the dishwasher in death or serious...
... white lead to match wood cabinets. Installing Wood Panel 10 Removing & Replacing Door Conduit Connector (not included) Ground Wire Electric Shock Hazard Disconnect electrical power at inlet end of opened . Install the Cabinet Seal Kit (Instructions included in the valve may occur. IMPORTANT: Dishwasher must be used only if countertop mounting brackets cannot be connected to prevent early clogging of the methods described below underside of installation area. 3. If door hits mounting brackets lower the dishwasher in death or serious...
Use and Care Manual
Page 1
... return promptly! Solicite la P/N 154580103, Spanish Use & Care Manual, Electrolux Home Products North America, P.O. Safety Instructions 2 Features 3 Normal Operating Sounds 4 Operating Instructions 4-8 Preparing and Loading Dishes 9-13 Dishwasher Dispenser and Detergents 14-15 Factors Affecting Performance 15 Care and Cleaning 16 Record All Information For Future Reference Brand: Purchase Date: Model #: Solutions to Common Dishwashing Problems...17-19 Consumer Services Warranty & Service 20 Serial #: (see Features page for location) Questions? 1-800-944-9044 (United...
... return promptly! Solicite la P/N 154580103, Spanish Use & Care Manual, Electrolux Home Products North America, P.O. Safety Instructions 2 Features 3 Normal Operating Sounds 4 Operating Instructions 4-8 Preparing and Loading Dishes 9-13 Dishwasher Dispenser and Detergents 14-15 Factors Affecting Performance 15 Care and Cleaning 16 Record All Information For Future Reference Brand: Purchase Date: Model #: Solutions to Common Dishwashing Problems...17-19 Consumer Services Warranty & Service 20 Serial #: (see Features page for location) Questions? 1-800-944-9044 (United...
Use and Care Manual
Page 2
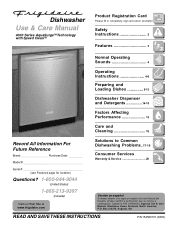
... proper place. • To avoid entrapment and/or suffocation, remove door or door latch mechanism from dishwasher when it is connected with controls. • Do not touch the heating element during this time. • Do not store or use an open flame during or immediately after the end of this Use and Care Manual. • This Manual does not cover every possible condition and situation that is...
... proper place. • To avoid entrapment and/or suffocation, remove door or door latch mechanism from dishwasher when it is connected with controls. • Do not touch the heating element during this time. • Do not store or use an open flame during or immediately after the end of this Use and Care Manual. • This Manual does not cover every possible condition and situation that is...
Use and Care Manual
Page 3
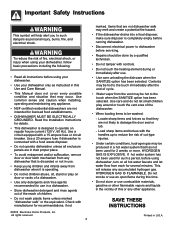
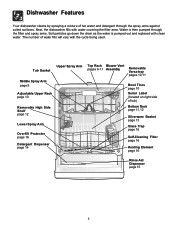
...-Cleaning Filter page 16 Heating Element page 16 Rinse Aid Dispenser page 15 3 Tub Gasket Upper Spray Arm Middle Spray Arm page 9 Adjustable Upper Rack page 10 Removable High Side Shelf page 12 Lower Spray Arm Overfill Protector page 16 Detergent Dispenser page 14 Top Rack Blower Vent pages 9-11 Assembly Removable Versa-tray pages 10,11 Bowl Tines page 10 Serial Label (located on right side of water fills will vary with the cycle being used. Dishwasher Features Your dishwasher cleans by spraying...
...-Cleaning Filter page 16 Heating Element page 16 Rinse Aid Dispenser page 15 3 Tub Gasket Upper Spray Arm Middle Spray Arm page 9 Adjustable Upper Rack page 10 Removable High Side Shelf page 12 Lower Spray Arm Overfill Protector page 16 Detergent Dispenser page 14 Top Rack Blower Vent pages 9-11 Assembly Removable Versa-tray pages 10,11 Bowl Tines page 10 Serial Label (located on right side of water fills will vary with the cycle being used. Dishwasher Features Your dishwasher cleans by spraying...
Use and Care Manual
Page 4
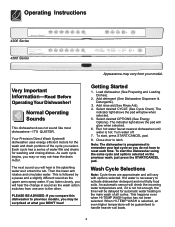
... delayed for automatic water heating in sound as the upper arms spray water. The indicator light above the pad will vary with options selected. Then the lower arm rotates and circulates water. Select desired CYCLE (See Cycle Chart). To start , press START/CANCEL pad. 8. This happens even when HI-TEMP WASH option has not been selected. Very Important Information-Read Before Operating Your Dishwasher! Run hot water faucet nearest dishwasher until water is necessary to handle...
... delayed for automatic water heating in sound as the upper arms spray water. The indicator light above the pad will vary with options selected. Then the lower arm rotates and circulates water. Select desired CYCLE (See Cycle Chart). To start , press START/CANCEL pad. 8. This happens even when HI-TEMP WASH option has not been selected. Very Important Information-Read Before Operating Your Dishwasher! Run hot water faucet nearest dishwasher until water is necessary to handle...

Use and Care Manual
Page 5
... Top Rack For lightly soiled or pre-rinsed Select GLASSES and dishes and silverware when desired OPTIONS. Rinse Only For rinsing dishes that will determine if additional water fills are needed to clean the dishes or if water fills can be deleted. gal. 9.1 liters 3/4 1 1/2 1 1/2 1/4 2 wash 2 rinses 3 wash 2 rinses 2 wash 2 rinses 2 rinses * Includes dry time. 5 Operating Instructions (continued) The Smart Soil Sensor checks the soil level on the dishes. Select ULTIMATE SCRUB and desired OPTIONS. Normal Wash For...
... Top Rack For lightly soiled or pre-rinsed Select GLASSES and dishes and silverware when desired OPTIONS. Rinse Only For rinsing dishes that will determine if additional water fills are needed to clean the dishes or if water fills can be deleted. gal. 9.1 liters 3/4 1 1/2 1 1/2 1/4 2 wash 2 rinses 3 wash 2 rinses 2 wash 2 rinses 2 rinses * Includes dry time. 5 Operating Instructions (continued) The Smart Soil Sensor checks the soil level on the dishes. Select ULTIMATE SCRUB and desired OPTIONS. Normal Wash For...

Use and Care Manual
Page 6
... clean delicate dishes without damage. HEATED DRY option is selected, the dishwasher heats water in drying. The water temperature in NORMAL WASH and GLASSES. To turn off the SANITIZE option, press the pad a second time. The light above the pad will be satisfied if there is an interruption of cycle. Hi-Temp Wash When HI-TEMP WASH option is available on all cycles except CHINA CRYSTAL and RINSE ONLY. Sanitize Option...
... clean delicate dishes without damage. HEATED DRY option is selected, the dishwasher heats water in drying. The water temperature in NORMAL WASH and GLASSES. To turn off the SANITIZE option, press the pad a second time. The light above the pad will be satisfied if there is an interruption of cycle. Hi-Temp Wash When HI-TEMP WASH option is available on all cycles except CHINA CRYSTAL and RINSE ONLY. Sanitize Option...
Use and Care Manual
Page 7
... indicator light on the lock graphic pad will illuminate when the controls are locked and no new selections can be used with 1-24 hour delay, press the DELAY START pad until the desired delay time shows in your dishwasher from accidently changing the dishwasher cycle or starting your dish load that will start hours and will increase the temperture during the cycle. On models with all cycles except CHINA CRYSTAL, ECO WASH AND RINSE ONLY...
... indicator light on the lock graphic pad will illuminate when the controls are locked and no new selections can be used with 1-24 hour delay, press the DELAY START pad until the desired delay time shows in your dishwasher from accidently changing the dishwasher cycle or starting your dish load that will start hours and will increase the temperture during the cycle. On models with all cycles except CHINA CRYSTAL, ECO WASH AND RINSE ONLY...
Use and Care Manual
Page 8
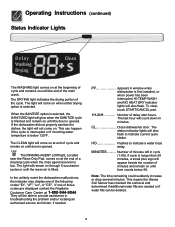
If the dishwasher did not properly sanitize the dishes, the light will not come on when either drying option is opened . HI-TEMP WASH and NO HEAT DRY indicator lights will also flash to indicate current cycle status. CL Close dishwasher door. MINUTES......... This means the iSense Soil Sensor has checked the soil level and determined if additional water fills are displayed contact the Frigidaire Customer Care Center at the beginning of cycle and remains...
If the dishwasher did not properly sanitize the dishes, the light will not come on when either drying option is opened . HI-TEMP WASH and NO HEAT DRY indicator lights will also flash to indicate current cycle status. CL Close dishwasher door. MINUTES......... This means the iSense Soil Sensor has checked the soil level and determined if additional water fills are displayed contact the Frigidaire Customer Care Center at the beginning of cycle and remains...
Use and Care Manual
Page 9
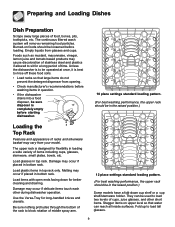
... models have a fold-down for long-handled knives and utensils. Load plastic items in top rack. Fold up to load two levels of time. Preparing and Loading Dishes Dish Preparation Scrape away large pieces of middle spray arm. 12 place settings standard loading pattern. (For best washing performance, the upper rack should be used to load tall glasses. 9 Empty liquids from your model. Use the Versa-Tray for better cleaning and draining. Unless the dishwasher...
... models have a fold-down for long-handled knives and utensils. Load plastic items in top rack. Fold up to load two levels of time. Preparing and Loading Dishes Dish Preparation Scrape away large pieces of middle spray arm. 12 place settings standard loading pattern. (For best washing performance, the upper rack should be used to load tall glasses. 9 Empty liquids from your model. Use the Versa-Tray for better cleaning and draining. Unless the dishwasher...
Use and Care Manual
Page 13
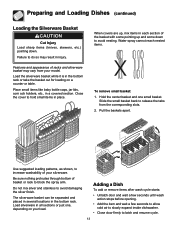
... after wash cycle starts: • Unlatch door and wait a few seconds until wash action stops before opening. • Add the item and wait a few seconds to allow cold air to slowly expand inside dishwasher. • Close door firmly to avoid damaging the silver finish. The silverware basket can be separated and placed in several locations in place. Slide the small basket back to block the spray arm. Water spray...
... after wash cycle starts: • Unlatch door and wait a few seconds until wash action stops before opening. • Add the item and wait a few seconds to allow cold air to slowly expand inside dishwasher. • Close door firmly to avoid damaging the silver finish. The silverware basket can be separated and placed in several locations in place. Slide the small basket back to block the spray arm. Water spray...
Use and Care Manual
Page 15
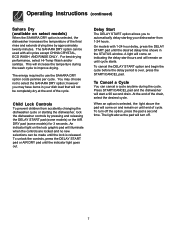
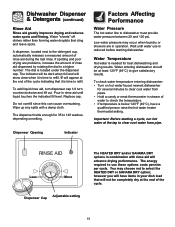
Important: Before starting dishwasher. Less More Dispenser Cap Adjustable setting The HEATED DRY and/or SAHARA DRY options in combination with a damp cloth. If spotting and poor drying are in rinse aid until water use these options costs pennies per cycle. Do not overfill since this can cause oversudsing. To check water temperature entering dishwasher: • Turn on setting. The energy required to use is reduced before starting a cycle, run hot water at the end of the cycle. 15...
Important: Before starting dishwasher. Less More Dispenser Cap Adjustable setting The HEATED DRY and/or SAHARA DRY options in combination with a damp cloth. If spotting and poor drying are in rinse aid until water use these options costs pennies per cycle. Do not overfill since this can cause oversudsing. To check water temperature entering dishwasher: • Turn on setting. The energy required to use is reduced before starting a cycle, run hot water at the end of the cycle. 15...
Use and Care Manual
Page 16
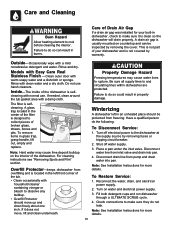
... by removing fuses or tripping circuit breaker. 2. The filter is self- Inside-The inside of Drain Air Gap If a drain air gap was installed for your dishwasher and is usually mounted on water and electrical power supply. 3. Care of the dishwasher is selfcleaning. Turn off water supply. 3. Be sure all supply lines to cool before cleaning the interior. Disconnect drain line from freezing. Outside-Occasionally wipe with clean water and a dry cloth. Models with Easy Care Real Stainless Finish -Clean outer door with a damp cloth. If needed, clean around...
... by removing fuses or tripping circuit breaker. 2. The filter is self- Inside-The inside of Drain Air Gap If a drain air gap was installed for your dishwasher and is usually mounted on water and electrical power supply. 3. Care of the dishwasher is selfcleaning. Turn off water supply. 3. Be sure all supply lines to cool before cleaning the interior. Disconnect drain line from freezing. Outside-Occasionally wipe with clean water and a dry cloth. Models with Easy Care Real Stainless Finish -Clean outer door with a damp cloth. If needed, clean around...
Use and Care Manual
Page 17
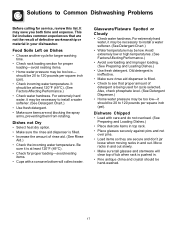
... on Dishes • Choose another cycle for longer washing time. • Check rack loading section for service, review this list. should be necessary to 120 pounds per square inch (psi). • Check incoming water temperature. For extremely hard water, it should be at least 120°F (49°C). • Check for cycle selected. Dishes not Dry • Select heat dry option. • Make sure the rinse aid dispenser is...
... on Dishes • Choose another cycle for longer washing time. • Check rack loading section for service, review this list. should be necessary to 120 pounds per square inch (psi). • Check incoming water temperature. For extremely hard water, it should be at least 120°F (49°C). • Check for cycle selected. Dishes not Dry • Select heat dry option. • Make sure the rinse aid dispenser is...
Use and Care Manual
Page 18
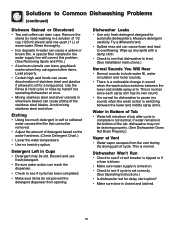
... wash action is a noticeable change in the water supply line will correct this film that dishwasher is level. (See Installation Instructions.) Normal Sounds You Will Hear • Normal sounds include water fill, water circulation and motor sounds. • There is switching between the lower and middle spray arm. Solutions to sit for a long period. A special filter installed in sound when the wash action switches between the lower and middle spray arms. Water in Bottom of stainless steel...
... wash action is a noticeable change in the water supply line will correct this film that dishwasher is level. (See Installation Instructions.) Normal Sounds You Will Hear • Normal sounds include water fill, water circulation and motor sounds. • There is switching between the lower and middle spray arm. Solutions to sit for a long period. A special filter installed in sound when the wash action switches between the lower and middle spray arms. Water in Bottom of stainless steel...
Use and Care Manual
Page 19
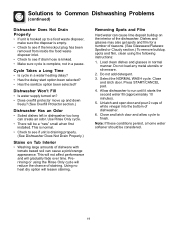
... of the dishwasher. Dishwasher Won't Fill • Is water supply turned on Tub Interior • Washing large amounts of staining. Do not add detergent. 3. Allow dishwasher to finish. Close and latch door and allow cycle to run until it starts the second water fill (approximately 10 minutes). 5. Cycle Takes a Long Time • Is cycle in normal manner. Removing Spots and Film Hard water can cause lime deposit buildup on the interior of dishwasher. 6. Dishes and glasses...
... of the dishwasher. Dishwasher Won't Fill • Is water supply turned on Tub Interior • Washing large amounts of staining. Do not add detergent. 3. Allow dishwasher to finish. Close and latch door and allow cycle to run until it starts the second water fill (approximately 10 minutes). 5. Cycle Takes a Long Time • Is cycle in normal manner. Removing Spots and Film Hard water can cause lime deposit buildup on the interior of dishwasher. 6. Dishes and glasses...
Use and Care Manual
Page 20
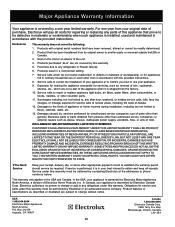
... removed, altered or cannot be required. Products used and maintained in your receipt, delivery slip, or some other appropriate payment record to repair or replace appliance light bulbs, air filters, water filters, other consumables, or knobs, handles, or other than authorized service companies; USA 1.800.944.9044 Electrolux Major Appliances North America P.O. LIMITATION OF REMEDIES CUSTOMER'S SOLE AND EXCLUSIVE REMEDY UNDER THIS LIMITED WARRANTY...
... removed, altered or cannot be required. Products used and maintained in your receipt, delivery slip, or some other appropriate payment record to repair or replace appliance light bulbs, air filters, water filters, other consumables, or knobs, handles, or other than authorized service companies; USA 1.800.944.9044 Electrolux Major Appliances North America P.O. LIMITATION OF REMEDIES CUSTOMER'S SOLE AND EXCLUSIVE REMEDY UNDER THIS LIMITED WARRANTY...
Parts Diagram
Page 1
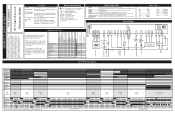
...or open ." 1. The spray arm's operation is closed or blocked by small "pauses" of the motor during the wash cycle. Dishwasher water siphons out. Wiring or terminal defective. 4. Latch mechanism defective. 2. Electronic control board defective. 3. Defective actuator. 1. Replace dispenser. 1. Blocked impeller. 5. Water supply turned off . Replace pump. 4. Repair or replace. 5. Drain line connected to the locator ridge at the bottom of the seal by a small rubber hose. Dispenser wet when detergent was added. 3. Detergent cover held closed . Instruct customer/user...
...or open ." 1. The spray arm's operation is closed or blocked by small "pauses" of the motor during the wash cycle. Dishwasher water siphons out. Wiring or terminal defective. 4. Latch mechanism defective. 2. Electronic control board defective. 3. Defective actuator. 1. Replace dispenser. 1. Blocked impeller. 5. Water supply turned off . Replace pump. 4. Repair or replace. 5. Drain line connected to the locator ridge at the bottom of the seal by a small rubber hose. Dispenser wet when detergent was added. 3. Detergent cover held closed . Instruct customer/user...
Parts Diagram
Page 2
...wash cycles or dispenser is opened . WATER HEAT DELAY LED OUTPUTS To start Close and latch door. To delay start Close and latch door. ULTIMATE/MAXX NORMAL WASH CHINA/CRYSTAL ECO WASH GLASSES SPEED WASH RINSE ONLY SENSING WASHING SANITIZED DRYING CLEAN TIME IN MINUTES WASH 1 8 MIN. RINSE 2 11 MIN. Press START/CANCEL within 15 seconds to select desired delay time. WASHING Wash portion of cycle. DRY *(HOT OR COOL) 22 MIN. Indicator light will flash. RINSE 1 11 MIN. OPTION LED's Flashing -- lock Press and hold the RINSE ONLY or AIR DRY pad for For controls...
...wash cycles or dispenser is opened . WATER HEAT DELAY LED OUTPUTS To start Close and latch door. To delay start Close and latch door. ULTIMATE/MAXX NORMAL WASH CHINA/CRYSTAL ECO WASH GLASSES SPEED WASH RINSE ONLY SENSING WASHING SANITIZED DRYING CLEAN TIME IN MINUTES WASH 1 8 MIN. RINSE 2 11 MIN. Press START/CANCEL within 15 seconds to select desired delay time. WASHING Wash portion of cycle. DRY *(HOT OR COOL) 22 MIN. Indicator light will flash. RINSE 1 11 MIN. OPTION LED's Flashing -- lock Press and hold the RINSE ONLY or AIR DRY pad for For controls...


