Complete Owner's Guide (English)
Page 1
... a reputable local service technician for you! √ Order Genuine Electrolux Parts & Accessories √ Purchase Extended Warranty Protection Important Safety Instructions 2 Installation 3 Connecting Water Supply 4 Door Removal Instructions 5 Temperature Controls 6 Automatic Ice & Water Dispenser ....... 8 Replacing Air Filter 13 Normal Operating Sounds & Sights ... 14 Care and Cleaning 15 Warranty 16 Before you Call 17 Features at a Glance 21 READ AND SAVE THESE INSTRUCTIONS PN: 241857500 (April 2007) Before Calling Your Local Repair Service - Need Parts or Service?
... a reputable local service technician for you! √ Order Genuine Electrolux Parts & Accessories √ Purchase Extended Warranty Protection Important Safety Instructions 2 Installation 3 Connecting Water Supply 4 Door Removal Instructions 5 Temperature Controls 6 Automatic Ice & Water Dispenser ....... 8 Replacing Air Filter 13 Normal Operating Sounds & Sights ... 14 Care and Cleaning 15 Warranty 16 Before you Call 17 Features at a Glance 21 READ AND SAVE THESE INSTRUCTIONS PN: 241857500 (April 2007) Before Calling Your Local Repair Service - Need Parts or Service?
Complete Owner's Guide (English)
Page 2
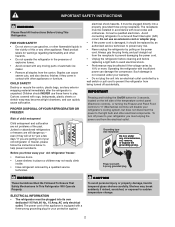
... Refrigerator Will Operate Properly. IMPORTANT Pressing and holding the On/Off button for warnings regarding flammability and other electrical components. Shelves may not easily climb inside. • Have refrigerant removed by 10% or more. If you are getting rid of the temperature control panel (Electronic controls), or turning the Freezer and Fresh Food controls to "0" (Mechanical controls) will sit for your refrigerator's cooling system, but does not disconnect the power...
... Refrigerator Will Operate Properly. IMPORTANT Pressing and holding the On/Off button for warnings regarding flammability and other electrical components. Shelves may not easily climb inside. • Have refrigerant removed by 10% or more. If you are getting rid of the temperature control panel (Electronic controls), or turning the Freezer and Fresh Food controls to "0" (Mechanical controls) will sit for your refrigerator's cooling system, but does not disconnect the power...
Complete Owner's Guide (English)
Page 3
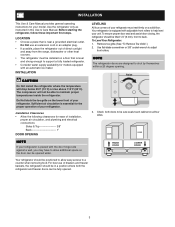
... adjustable front rollers to shut by themselves within a 20 degree opening. Installation Clearances • Allow the following clearances for ease of installation, proper air circulation, and plumbing and electrical connections: Sides & Top 3/8" Back 1" DOOR OPENING LEVELING All four corners of drawers and freezer baskets, the refrigerator should be fully opened wider. Use flat-blade screwdriver or 3/8" socket wrench to allow easy access to maintain proper temperatures inside the refrigerator...
... adjustable front rollers to shut by themselves within a 20 degree opening. Installation Clearances • Allow the following clearances for ease of installation, proper air circulation, and plumbing and electrical connections: Sides & Top 3/8" Back 1" DOOR OPENING LEVELING All four corners of drawers and freezer baskets, the refrigerator should be fully opened wider. Use flat-blade screwdriver or 3/8" socket wrench to allow easy access to maintain proper temperatures inside the refrigerator...

Complete Owner's Guide (English)
Page 4
... connect the water supply line to your water dispenser works properly, this system must be completely filled with a wrench; Before Installing The Water Supply Line, You Will Need: • Basic Tools: adjustable wrench, flat-blade screwdriver, and PhillipsTM screwdriver • Access to a household cold water line with all local plumbing codes. To Connect Water Supply Line To Ice Maker Inlet Valve 1. Tighten another half turn ice maker on, lower wire signal arm (side mounted) or set the ice maker's On/Off power switch...
... connect the water supply line to your water dispenser works properly, this system must be completely filled with a wrench; Before Installing The Water Supply Line, You Will Need: • Basic Tools: adjustable wrench, flat-blade screwdriver, and PhillipsTM screwdriver • Access to a household cold water line with all local plumbing codes. To Connect Water Supply Line To Ice Maker Inlet Valve 1. Tighten another half turn ice maker on, lower wire signal arm (side mounted) or set the ice maker's On/Off power switch...

Complete Owner's Guide (English)
Page 5
... makes reinstallation easier. 4 Detach the water tube from the top hinge and pull the multi-wire cable through narrow doorways, follow these steps to the Remove the three bottom hinge screws and hinge, if necessary. To remove the hinge cover: (some models) 3 Trace lightly around the door's top hinge with a pencil. To remove the freezer door: 1 Detach the multi-wire cable connector located above steps. 5 DOOR REMOVAL INSTRUCTIONS Top Hinge Screw Top Hinge Cover Screw Bottom Hinge...
... makes reinstallation easier. 4 Detach the water tube from the top hinge and pull the multi-wire cable through narrow doorways, follow these steps to the Remove the three bottom hinge screws and hinge, if necessary. To remove the hinge cover: (some models) 3 Trace lightly around the door's top hinge with a pencil. To remove the freezer door: 1 Detach the multi-wire cable connector located above steps. 5 DOOR REMOVAL INSTRUCTIONS Top Hinge Screw Top Hinge Cover Screw Bottom Hinge...
Complete Owner's Guide (English)
Page 6
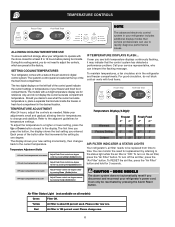
... (Cold) button. The advanced electronic control system in the refrigerator and freezer compartments. To turn off the air filter, press the "Air Filter" button. CAUTION - SOME MODELS The alarm system does not automatically reset if you entered. Yellow Air filter is 100 percent used . Red Air filter is about 80 percent used . The two digital displays on the left half of the control panel indicate the current settings or temperatures of the the fresh food compartment. Make your refrigerator's power...
... (Cold) button. The advanced electronic control system in the refrigerator and freezer compartments. To turn off the air filter, press the "Air Filter" button. CAUTION - SOME MODELS The alarm system does not automatically reset if you entered. Yellow Air filter is 100 percent used . Red Air filter is about 80 percent used . The two digital displays on the left half of the control panel indicate the current settings or temperatures of the the fresh food compartment. Make your refrigerator's power...

Complete Owner's Guide (English)
Page 7
... refrigerator compartments cool toward your refrigerator/freezer for assistance, warm (7.2° C using the phone settings. The On indicator light remains off alarm and press again to affect stored food temperatures. 7 Door Ajar Steady Green Flashing Green High Flashing Temp Amber Alarm system is off power to your refrigerator you must unplug the power cord from normal operating conditions are communicated by pressing the On/Off button located on the left ajar, and power failures. Care Guide. Power Flashing...
... refrigerator compartments cool toward your refrigerator/freezer for assistance, warm (7.2° C using the phone settings. The On indicator light remains off alarm and press again to affect stored food temperatures. 7 Door Ajar Steady Green Flashing Green High Flashing Temp Amber Alarm system is off power to your refrigerator you must unplug the power cord from normal operating conditions are communicated by pressing the On/Off button located on the left ajar, and power failures. Care Guide. Power Flashing...
Complete Owner's Guide (English)
Page 8
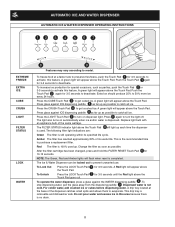
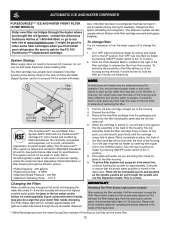
... possible. Press 5 again to get cubed ice. The following filter light indications are: Green The filter is dispensed. Red The filter is removable and dishwasher safe. Extra Ice should produce 25% to model. Press the CRUSH Touch Pad 4 to turn on automatically when ice and/or water is still operating within its useful life. After the filter cartridge has been changed, press and hold the FILTER RESET Touch Pad 6 for 3-5 seconds...
... possible. Press 5 again to get cubed ice. The following filter light indications are: Green The filter is dispensed. Red The filter is removable and dishwasher safe. Extra Ice should produce 25% to model. Press the CRUSH Touch Pad 4 to turn on automatically when ice and/or water is still operating within its useful life. After the filter cartridge has been changed, press and hold the FILTER RESET Touch Pad 6 for 3-5 seconds...
Complete Owner's Guide (English)
Page 9
... WATER DISPENSER AUTOMATIC ICE & WATER DISPENSER OPERATING INSTRUCTIONS 12 34 5 6 Features may vary according to the household water supply line and whenever you replace the water filter. Light Off Press the Light Off Touch Pad 4 to catch all ice. If the ice maker is not turned off the water flow after 3 minutes of the dispenser catches small spills and allows them to get crushed ice. Cube Press the Cube Touch Pad 2 to evaporate. To stop dispensing water...
... WATER DISPENSER AUTOMATIC ICE & WATER DISPENSER OPERATING INSTRUCTIONS 12 34 5 6 Features may vary according to the household water supply line and whenever you replace the water filter. Light Off Press the Light Off Touch Pad 4 to catch all ice. If the ice maker is not turned off the water flow after 3 minutes of the dispenser catches small spills and allows them to get crushed ice. Cube Press the Cube Touch Pad 2 to evaporate. To stop dispensing water...

Complete Owner's Guide (English)
Page 10
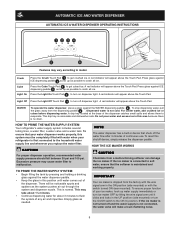
..., less water is not properly aligned when replacing the ice bin, the refrigerator will reset automatically after three or four minutes. If the auger is delivered to 4.5 pounds of ice every 24 hours, depending on usage conditions. The freezer door may be discolored or have a side mounted ice maker you must realign the auger by the ice maker's ON/OFF power switch. Air in new plumbing lines may...
..., less water is not properly aligned when replacing the ice bin, the refrigerator will reset automatically after three or four minutes. If the auger is delivered to 4.5 pounds of ice every 24 hours, depending on usage conditions. The freezer door may be discolored or have a side mounted ice maker you must realign the auger by the ice maker's ON/OFF power switch. Air in new plumbing lines may...
Complete Owner's Guide (English)
Page 11
... with water. Turn ON rear mounted ice maker by lowering wire signal arm to the "I" position. 10. The PureSource™* system is normal. Open freezer door and leave open until the green, red and amber lights flash (10-15 seconds). Turn ON side mounted ice maker by pressing ON/OFF power switch to the DOWN position. If there is normal.). Push the reset button until filter change the filter. 1. Reinstall filter cup, making...
... with water. Turn ON rear mounted ice maker by lowering wire signal arm to the "I" position. 10. The PureSource™* system is normal. Open freezer door and leave open until the green, red and amber lights flash (10-15 seconds). Turn ON side mounted ice maker by pressing ON/OFF power switch to the DOWN position. If there is normal.). Push the reset button until filter change the filter. 1. Reinstall filter cup, making...
Complete Owner's Guide (English)
Page 12
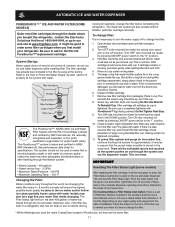
... complete dispenser operating instructions attached to press the Filter Reset button located on the ice and water dispenser. System Startup: Water supply does not need to order some models) After replacing the filter cartridge, it moves out toward you. The dispenser system will be necessary to the inside ), may drip out of removing the filter. The PureSource2TM* Filter system is tested and certified by raising wire signal arm to our web site at www.frigidaire.com...
... complete dispenser operating instructions attached to press the Filter Reset button located on the ice and water dispenser. System Startup: Water supply does not need to order some models) After replacing the filter cartridge, it moves out toward you. The dispenser system will be necessary to the inside ), may drip out of removing the filter. The PureSource2TM* Filter system is tested and certified by raising wire signal arm to our web site at www.frigidaire.com...

Complete Owner's Guide (English)
Page 13
REPLACING THE AIR FILTER Replacing The Air Filter In general, you should change the air filter every six months to ensure optimal filtering of your air filter, including indicator lights that remind you when to order the change the filter. IMPORTANT The electronic control panel, located at the top of the refrigerator compartment, includes controls to drop open. 2 Remove the old filter and discard it. 3 Unpackage the new filter and place it inside the hinged bottom half of the air filter housing...
REPLACING THE AIR FILTER Replacing The Air Filter In general, you should change the air filter every six months to ensure optimal filtering of your air filter, including indicator lights that remind you when to order the change the filter. IMPORTANT The electronic control panel, located at the top of the refrigerator compartment, includes controls to drop open. 2 Remove the old filter and discard it. 3 Unpackage the new filter and place it inside the hinged bottom half of the air filter housing...
Complete Owner's Guide (English)
Page 14
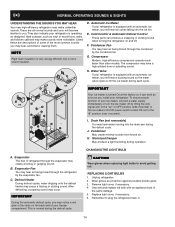
... kitchen cabinets may make unfamiliar sounds. Cold Control & Automatic Defrost Control These parts can work as soon as designed. F. To ensure proper function of your refrigerator. CHANGING THE LIGHT BULB A. Evaporator Fan You may hear air being forced through the refrigerator by the evaporator fan. IMPORTANT During the automatic defrost cycle, you install your ice maker, connect a water supply immediately or turn the Ice maker off . This is not a sound insulator. Unscrew and replace old bulb with an automatic ice maker, you . Listed...
... kitchen cabinets may make unfamiliar sounds. Cold Control & Automatic Defrost Control These parts can work as soon as designed. F. To ensure proper function of your refrigerator. CHANGING THE LIGHT BULB A. Evaporator Fan You may hear air being forced through the refrigerator by the evaporator fan. IMPORTANT During the automatic defrost cycle, you install your ice maker, connect a water supply immediately or turn the Ice maker off . This is not a sound insulator. Unscrew and replace old bulb with an automatic ice maker, you . Listed...
Complete Owner's Guide (English)
Page 15
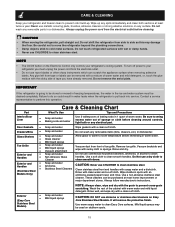
... stainless steel cleaners on any surface. Use a non-abrasive stainless steel cleaner. Door Gaskets • Soap and water Wipe gaskets with clean water and a soft cloth. Glass Shelves • Soap and water • Glass cleaner Allow glass to warm to clean handles. Remove toe grille. Do Not use commercial household cleaners, ammonia, or alcohol to room temperature before cleaning. Do not wash any electrical part. Be careful not to move the refrigerator beyond the plumbing connections...
... stainless steel cleaners on any surface. Use a non-abrasive stainless steel cleaner. Door Gaskets • Soap and water Wipe gaskets with clean water and a soft cloth. Glass Shelves • Soap and water • Glass cleaner Allow glass to warm to clean handles. Remove toe grille. Do Not use commercial household cleaners, ammonia, or alcohol to room temperature before cleaning. Do not wash any electrical part. Be careful not to move the refrigerator beyond the plumbing connections...
Complete Owner's Guide (English)
Page 16
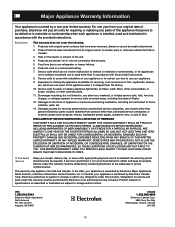
... with the provided instructions. 8. Food loss due to use of this appliance that have been removed, altered or cannot be obtained by unauthorized service companies; Service calls to correct the installation of your appliance or to instruct you how to any parts of parts other than genuine Electrolux parts or parts obtained from your appliance. 9. Service calls to repair or replace appliance light bulbs, air filters, water filters, other consumables...
... with the provided instructions. 8. Food loss due to use of this appliance that have been removed, altered or cannot be obtained by unauthorized service companies; Service calls to correct the installation of your appliance or to instruct you how to any parts of parts other than genuine Electrolux parts or parts obtained from your appliance. 9. Service calls to repair or replace appliance light bulbs, air filters, water filters, other consumables...
Complete Owner's Guide (English)
Page 17
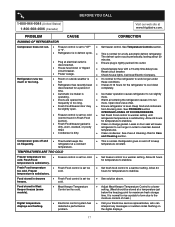
... displays. 17 Fresh Food for temperature to keep temperature constant. See Temperature Controls section. Reset circuit breaker. • Check house lights. time. • Automatic ice maker is normal for a fully automatic defrost refrigerator. See PROBLEM section OPENING/CLOSING OF DOORS/DRAWERS. • Freezer control is set too cold • Set Fresh Food control to warmer setting until (control found in Meat Keeper freezes (some models). • Meat Keeper Temperature Control set too cold. • Adjust Meat Keeper Temperature Control to run longer in defrost...
... displays. 17 Fresh Food for temperature to keep temperature constant. See Temperature Controls section. Reset circuit breaker. • Check house lights. time. • Automatic ice maker is normal for a fully automatic defrost refrigerator. See PROBLEM section OPENING/CLOSING OF DOORS/DRAWERS. • Freezer control is set too cold • Set Fresh Food control to warmer setting until (control found in Meat Keeper freezes (some models). • Meat Keeper Temperature Control set too cold. • Adjust Meat Keeper Temperature Control to run longer in defrost...
Complete Owner's Guide (English)
Page 18
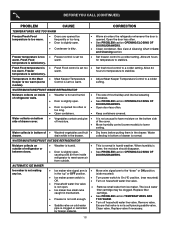
... household water line valve. drain while in Care and Cleaning section. refrigerator to meet warm air from outside of refrigerator or between doors. • Weather is humid. • This is normal in the "up" or OFF position. (side mounted) • Ice maker power switch is • Turn power switch to have moisture on inside DOORS/DRAWERS. Replace filter caught in bottom of drawer is normal. Remove valve. • Saddle valve on outside . Replace valve if necessary. Freezer temperature is set too warm. • Set freezer control...
... household water line valve. drain while in Care and Cleaning section. refrigerator to meet warm air from outside of refrigerator or between doors. • Weather is humid. • This is normal in the "up" or OFF position. (side mounted) • Ice maker power switch is • Turn power switch to have moisture on inside DOORS/DRAWERS. Replace filter caught in bottom of drawer is normal. Remove valve. • Saddle valve on outside . Replace valve if necessary. Freezer temperature is set too warm. • Set freezer control...
Complete Owner's Guide (English)
Page 19
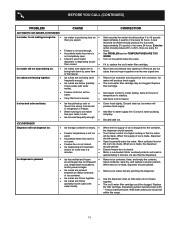
... (partially frozen cubes with water inside ). If it is made, dispenser should operate. When first supply of ice every 24 hours. When ice is producing less ice • than normal. • Ice maker wire signal arm is set too • warm. Ice can then be clogged. Clean container, wipe dry, and replace in approximately 3 minutes. The ice & water filter cartridge could be made. Water running to water supply line. Turn on household water line valve. Allow 24 hours for...
... (partially frozen cubes with water inside ). If it is made, dispenser should operate. When first supply of ice every 24 hours. When ice is producing less ice • than normal. • Ice maker wire signal arm is set too • warm. Ice can then be clogged. Clean container, wipe dry, and replace in approximately 3 minutes. The ice & water filter cartridge could be made. Water running to water supply line. Turn on household water line valve. Allow 24 hours for...
Complete Owner's Guide (English)
Page 20
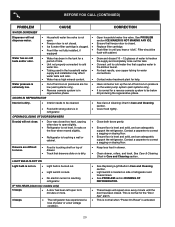
... support the refrigerator. Clean drawer, rollers, and track. This is normal when "Power-On-Reset" is normal for the "Door Ajar" alarm. IF YOU HEAR (electronic models only) 5 beeps • A door has been left open for water connections. See PROBLEM section ICE MAKER IS NOT MAKING ANY ICE. Connect unit to cold water line that freezer door is closed . Drawers are difficult • Food is touching shelf on top of • to cold • water line. • Tubing used in the household water...
... support the refrigerator. Clean drawer, rollers, and track. This is normal when "Power-On-Reset" is normal for the "Door Ajar" alarm. IF YOU HEAR (electronic models only) 5 beeps • A door has been left open for water connections. See PROBLEM section ICE MAKER IS NOT MAKING ANY ICE. Connect unit to cold water line that freezer door is closed . Drawers are difficult • Food is touching shelf on top of • to cold • water line. • Tubing used in the household water...


