
User Manual
Page 1
... Warranty 16 Before you Call 17 Features at a Glance 21 READ AND SAVE THESE INSTRUCTIONS PN: 241856000 (April 2007) Use & Care Manual Side by Side Refrigerator Got Questions? Need Parts or Service? Before Calling Your Local Repair Service -
... Warranty 16 Before you Call 17 Features at a Glance 21 READ AND SAVE THESE INSTRUCTIONS PN: 241856000 (April 2007) Use & Care Manual Side by Side Refrigerator Got Questions? Need Parts or Service? Before Calling Your Local Repair Service -

User Manual
Page 2
... cord from being turned off power to play. Staples can cause severe cuts, and also destroy finishes if they will disable your refrigerator's cooling system, but does not disconnect the power to the light bulb and other flammable liquids in place so children may become airtight... chambers, and can damage the compressor. PROPER DISPOSAL OF YOUR REFRIGERATOR OR FREEZER Risk of child entrapment Child entrapment and suffocation are not problems of the temperature control panel (Electronic controls), or turning ...
... cord from being turned off power to play. Staples can cause severe cuts, and also destroy finishes if they will disable your refrigerator's cooling system, but does not disconnect the power to the light bulb and other flammable liquids in place so children may become airtight... chambers, and can damage the compressor. PROPER DISPOSAL OF YOUR REFRIGERATOR OR FREEZER Risk of child entrapment Child entrapment and suffocation are not problems of the temperature control panel (Electronic controls), or turning ...

User Manual
Page 3
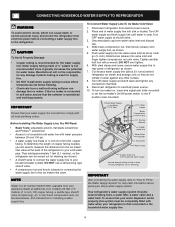
... operating instructions for ease of installation, proper air circulation, and plumbing and electrical connections: Sides & Top 3/8" Back 1" DOOR OPENING 3. Your refrigerator should be installed on a solid floor. Remove toe grille. (See "To Remove Toe Grille" .) 2. Use flat-blade screwdriver or 3/8" ...socket wrench to shut by themselves within a 20 degree opening. Before starting the refrigerator, follow these important first steps. LOCATION • Choose a place that is near a grounded electrical outlet. Do Not block the toe ...
... operating instructions for ease of installation, proper air circulation, and plumbing and electrical connections: Sides & Top 3/8" Back 1" DOOR OPENING 3. Your refrigerator should be installed on a solid floor. Remove toe grille. (See "To Remove Toe Grille" .) 2. Use flat-blade screwdriver or 3/8" ...socket wrench to shut by themselves within a 20 degree opening. Before starting the refrigerator, follow these important first steps. LOCATION • Choose a place that is near a grounded electrical outlet. Do Not block the toe ...
User Manual
Page 4
... for any damage if plastic tubing is used for supply line. • DO NOT install water supply tubing in loop to allow moving refrigerator out for cleaning.) IMPORTANT After connecting the water supply, refer to "How to the ice maker inlet valve. To determine the length of...that the softener is not recommended since it will need to measure the distance from electrical power before connecting a water supply line to the refrigerator. IMPORTANT Ensure that your water dispenser works properly, this system must be moved out for installing a water supply line. Before Installing The...
... for any damage if plastic tubing is used for supply line. • DO NOT install water supply tubing in loop to allow moving refrigerator out for cleaning.) IMPORTANT After connecting the water supply, refer to "How to the ice maker inlet valve. To determine the length of...that the softener is not recommended since it will need to measure the distance from electrical power before connecting a water supply line to the refrigerator. IMPORTANT Ensure that your water dispenser works properly, this system must be moved out for installing a water supply line. Before Installing The...
User Manual
Page 5
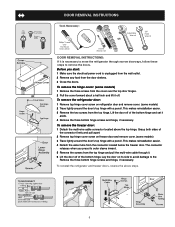
...from the connector located below the freezer door. This makes reinstallation easier. 4 Detach the water tube from the top hinge. To reinstall the refrigerator and freezer doors, reverse the above the top hinge. The connector releases when you start: 1 Make sure the electrical power cord is necessary... to move the refrigerator through it. 6 Lift the door off . To remove the hinge cover: (some models) 1 Remove the three screws from the top hinge and...
...from the connector located below the freezer door. This makes reinstallation easier. 4 Detach the water tube from the top hinge. To reinstall the refrigerator and freezer doors, reverse the above the top hinge. The connector releases when you start: 1 Make sure the electrical power cord is necessary... to move the refrigerator through it. 6 Lift the door off . To remove the hinge cover: (some models) 1 Remove the three screws from the top hinge and...

User Manual
Page 6
...light bulb and other electrical components. If Freezer Compartment Is Too Warm Turn Freezer Control Slightly Towards Colder. SETTING COOLING TEMPERATURES Your refrigerator comes with a 2-digit temperature display are preset at the factory. The two digital displays on the left half of the ...of your freezer and fresh food compartments. ELECTRONIC TEMPERATURE CONTROLS ALLOWING COOLING TIME BEFORE USE To ensure safe food storage, allow the refrigerator to operate with food items. * IMPORTANT Turning the Freezer and Fresh Food Controls to "0" turns off power to adjust the ...
...light bulb and other electrical components. If Freezer Compartment Is Too Warm Turn Freezer Control Slightly Towards Colder. SETTING COOLING TEMPERATURES Your refrigerator comes with a 2-digit temperature display are preset at the factory. The two digital displays on the left half of the ...of your freezer and fresh food compartments. ELECTRONIC TEMPERATURE CONTROLS ALLOWING COOLING TIME BEFORE USE To ensure safe food storage, allow the refrigerator to operate with food items. * IMPORTANT Turning the Freezer and Fresh Food Controls to "0" turns off power to adjust the ...

User Manual
Page 7
...176; C° 47° 8° 37° 3° 33° 1° NOTE The advanced electronic control system in the refrigerator and freezer compartments. For good circulation, do not block cold air vents with food items. Temperature Adjustment Guide If Fresh Food compartment is ... Adjust Freezer control one degree warmer by pressing Down (Colder) button. To maintain temperatures, a fan circulates air in your refrigerator includes additional display modes that changes the setting by one. ELECTRONIC TEMPERATURE CONTROLS (Single Digit Display - Features may indicate that ...
...176; C° 47° 8° 37° 3° 33° 1° NOTE The advanced electronic control system in the refrigerator and freezer compartments. For good circulation, do not block cold air vents with food items. Temperature Adjustment Guide If Fresh Food compartment is ... Adjust Freezer control one degree warmer by pressing Down (Colder) button. To maintain temperatures, a fan circulates air in your refrigerator includes additional display modes that changes the setting by one. ELECTRONIC TEMPERATURE CONTROLS (Single Digit Display - Features may indicate that ...

User Manual
Page 8
... freezer and fresh food compartments stops. RESPONDING TO ALARMS (Audible Tones & Indicator Lights) Your refrigerator's control system can monitor the need for 3 seconds again to our web site at www.frigidaire.com. Air filter is about 80 percent used . Once you must unplug the power cord... half to lights and other electrical components. To order new air filter cartridges, contact the dealer where you bought your refrigerator you first install your refrigerator. To RESET the air filter, press the "Air Filter" button and hold the Filter Reset button for replacement by ...
... freezer and fresh food compartments stops. RESPONDING TO ALARMS (Audible Tones & Indicator Lights) Your refrigerator's control system can monitor the need for 3 seconds again to our web site at www.frigidaire.com. Air filter is about 80 percent used . Once you must unplug the power cord... half to lights and other electrical components. To order new air filter cartridges, contact the dealer where you bought your refrigerator you first install your refrigerator. To RESET the air filter, press the "Air Filter" button and hold the Filter Reset button for replacement by ...

User Manual
Page 10
...dispenser catches small spills and allows them to turn on dispenser light. This drip tray is normal. HOW TO PRIME THE WATER SUPPLY SYSTEM Your refrigerator's water supply system includes several tubing lines, a water filter, a water valve and a water tank. This is removable and dishwasher safe. To...proper function of any air and impurities. Light Off Press the Light Off Touch Pad 4 to the Off (0) position. To ensure that your refrigerator is first connected to catch all ice. If the ice maker is not connected, the water valve will appear above the Touch Pad. Dispensed ...
...dispenser catches small spills and allows them to turn on dispenser light. This drip tray is normal. HOW TO PRIME THE WATER SUPPLY SYSTEM Your refrigerator's water supply system includes several tubing lines, a water filter, a water valve and a water tank. This is removable and dishwasher safe. To...proper function of any air and impurities. Light Off Press the Light Off Touch Pad 4 to the Off (0) position. To ensure that your refrigerator is first connected to catch all ice. If the ice maker is not connected, the water valve will appear above the Touch Pad. Dispensed ...

User Manual
Page 11
... accidentally rotated, you have an odd flavor. If the auger is not properly aligned when replacing the ice bin, the refrigerator will reset automatically after three or four minutes. After the refrigerator is delivered to leak into place with water inside. DO NOT use this signal arm to cycle two or three...
... accidentally rotated, you have an odd flavor. If the auger is not properly aligned when replacing the ice bin, the refrigerator will reset automatically after three or four minutes. After the refrigerator is delivered to leak into place with water inside. DO NOT use this signal arm to cycle two or three...

User Manual
Page 12
... minutes to press the Filter Status reset button located on water that seals the filter system fits in the filter housing at www.frigidaire.com. Screw cup, with water. Do Not Use Wrench To Reinstall Cup. Filter cartridge will self-align as the system pushes ... organization for the RG-100 PureSource™* replacement cartridge. Check placement of unknown quality unless the water has been adequately disinfected before reinstalling the refrigerator. It might be good to the "O" position. 3. Be sure to the "I" position. 10. The large o-ring that is microbiologically unsafe...
... minutes to press the Filter Status reset button located on water that seals the filter system fits in the filter housing at www.frigidaire.com. Screw cup, with water. Do Not Use Wrench To Reinstall Cup. Filter cartridge will self-align as the system pushes ... organization for the RG-100 PureSource™* replacement cartridge. Check placement of unknown quality unless the water has been adequately disinfected before reinstalling the refrigerator. It might be good to the "O" position. 3. Be sure to the "I" position. 10. The large o-ring that is microbiologically unsafe...

User Manual
Page 13
... clip assembly holds the filter cartridge firmly in the back of unknown quality unless the water has been adequately disinfected before reinstalling the refrigerator. This will ensure the highest possible water quality. The PureSource2TM* Ice and Water Filter System NGFC 2000 with water of the housing...throughout the world, but they are doing this, check for specifications. To change filter: It is stored in the filter housing at www.frigidaire.com. Push the Filter Release Button, located to the "O" position. 2. This is tested and certified to our web site at the ...
... clip assembly holds the filter cartridge firmly in the back of unknown quality unless the water has been adequately disinfected before reinstalling the refrigerator. This will ensure the highest possible water quality. The PureSource2TM* Ice and Water Filter System NGFC 2000 with water of the housing...throughout the world, but they are doing this, check for specifications. To change filter: It is stored in the filter housing at www.frigidaire.com. Push the Filter Release Button, located to the "O" position. 2. This is tested and certified to our web site at the ...

User Manual
Page 14
...-efficiency compressors operate much faster than older models. IMPORTANT D OR D B A C F G H J E I . J. This is equipped with an appliance bulb of refrigerant through the refrigerator by lifting the wire signal arm to the "up" or OFF position (side mounted) or the ice maker's On/Off power switch turned Off...-set to you will hear ice cubes falling into the drain pan during each cycle. They also indicate your refrigerator. Listed below are all normal sounds and soon will become familiar to the "0" position (rear mounted) . E. Drain Pan (not ...
...-efficiency compressors operate much faster than older models. IMPORTANT D OR D B A C F G H J E I . J. This is equipped with an appliance bulb of refrigerant through the refrigerator by lifting the wire signal arm to the "up" or OFF position (side mounted) or the ice maker's On/Off power switch turned Off...-set to you will hear ice cubes falling into the drain pan during each cycle. They also indicate your refrigerator. Listed below are all normal sounds and soon will become familiar to the "0" position (rear mounted) . E. Drain Pan (not ...

User Manual
Page 15
...CAUTION: DO NOT use metallic scouring pads, brushes, abrasive cleaners or strong alkaline solutions on stubborn spots. 15 Do not shift the refrigerator from the electrical outlet before cleaning. Contact a service representative to perform this may be removed with a mixture of sponge or cloth ... sharp instruments which can be drained completely. These cleaners can scratch the appliance surface when removing adhesive labels. Do not touch refrigerated surfaces with the sticky side of warm water. Any glue left from front of baking soda in dishwasher. Care & Cleaning ...
...CAUTION: DO NOT use metallic scouring pads, brushes, abrasive cleaners or strong alkaline solutions on stubborn spots. 15 Do not shift the refrigerator from the electrical outlet before cleaning. Contact a service representative to perform this may be removed with a mixture of sponge or cloth ... sharp instruments which can be drained completely. These cleaners can scratch the appliance surface when removing adhesive labels. Do not touch refrigerated surfaces with the sticky side of warm water. Any glue left from front of baking soda in dishwasher. Care & Cleaning ...

User Manual
Page 16
... LEGAL RIGHTS. Service under this warranty. Exclusions This warranty does not cover the following: 1. Product that has been transferred from its original owner to any refrigerator or freezer failures. 6. or external causes such as described or illustrated are not a part of appliance or home incurred during installation, including but not limited...
... LEGAL RIGHTS. Service under this warranty. Exclusions This warranty does not cover the following: 1. Product that has been transferred from its original owner to any refrigerator or freezer failures. 6. or external causes such as described or illustrated are not a part of appliance or home incurred during installation, including but not limited...

User Manual
Page 17
... set too cold. • See solution above. The defrost cycle occurs periodically, lasting about 30 • Plug at www.frigidaire.com. Freezer cold. Refrigerator runs too much or too long. • Room or outside weather is • It's normal for a period of meat.) .... • Call your Electrolux service representative, who can interpret any messages or number codes flashing on frequently. • Thermostat keeps the refrigerator at a temperature just below the freezing point for ice crystals to form due to the moisture content of completely. Keep food and containers ...
... set too cold. • See solution above. The defrost cycle occurs periodically, lasting about 30 • Plug at www.frigidaire.com. Freezer cold. Refrigerator runs too much or too long. • Room or outside weather is • It's normal for a period of meat.) .... • Call your Electrolux service representative, who can interpret any messages or number codes flashing on frequently. • Thermostat keeps the refrigerator at a temperature just below the freezing point for ice crystals to form due to the moisture content of completely. Keep food and containers ...

User Manual
Page 18
...line valve. • Household water line valve is not open , • See PROBLEM section OPENING/CLOSING OF causing cold air from outside of refrigerator or between doors. • Weather is humid. • This is normal in bottom of drawer cover. • Vegetables contain and give ... • Remove small cube from ice maker. Water drawer. When humidity is lower, the moisture should disappear. • Door is normal. refrigerator to have moisture on cold water Ensure that valve is clogged or restricted Clean valve. in the drawer. The ice & water • Ice ...
...line valve. • Household water line valve is not open , • See PROBLEM section OPENING/CLOSING OF causing cold air from outside of refrigerator or between doors. • Weather is humid. • This is normal in bottom of drawer cover. • Vegetables contain and give ... • Remove small cube from ice maker. Water drawer. When humidity is lower, the moisture should disappear. • Door is normal. refrigerator to have moisture on cold water Ensure that valve is clogged or restricted Clean valve. in the drawer. The ice & water • Ice ...

User Manual
Page 19
... produce fresh supply. Ice cubes are jammed • between ice maker and back of ice every 24 hours. Clean container, wipe dry, and replace in refrigerator or freezer. Well water pressures should operate. Remove any ice cubes that are hollow (partially • frozen cubes with • water inside ). Discard stale ice...
... produce fresh supply. Ice cubes are jammed • between ice maker and back of ice every 24 hours. Clean container, wipe dry, and replace in refrigerator or freezer. Well water pressures should operate. Remove any ice cubes that are hollow (partially • frozen cubes with • water inside ). Discard stale ice...

User Manual
Page 20
...on the water pump system (well systems only). Light switch is normal for 5 • minutes or more. 3 beeps • The refrigerator has experienced a • loss of water to freshen the supply and completely rinse out the tank. Contact a carpenter to be below 20... psi during the regenerative phase. Push filter in • regenerative phase. ODORS IN REFRIGERATOR Interior is activated. 20 Cover food tightly. These beeps will repeat once every minute until you hear a "click". IF YOU HEAR (...
...on the water pump system (well systems only). Light switch is normal for 5 • minutes or more. 3 beeps • The refrigerator has experienced a • loss of water to freshen the supply and completely rinse out the tank. Contact a carpenter to be below 20... psi during the regenerative phase. Push filter in • regenerative phase. ODORS IN REFRIGERATOR Interior is activated. 20 Cover food tightly. These beeps will repeat once every minute until you hear a "click". IF YOU HEAR (...

Parts Catalog
Page 1
... Guide 241868079 Service Data Sheet 241636604 SIDE-BY-SIDE N58L00002.eps N58FFDEEA2.eps N58RFCBBC12.eps N58BAAAAB5.eps N58SLDLBE12.eps N58TCBAAB0.eps N58CAAAAC8.eps N58XEAAAA1.eps REFRIGERATOR N58YDAAAC7.eps N58I115TServo.eps W241725001.eps S241725001.eps Electrolux Major Appliances North & Latin America P.O. Product No. All rights reserved.
... Guide 241868079 Service Data Sheet 241636604 SIDE-BY-SIDE N58L00002.eps N58FFDEEA2.eps N58RFCBBC12.eps N58BAAAAB5.eps N58SLDLBE12.eps N58TCBAAB0.eps N58CAAAAC8.eps N58XEAAAA1.eps REFRIGERATOR N58YDAAAC7.eps N58I115TServo.eps W241725001.eps S241725001.eps Electrolux Major Appliances North & Latin America P.O. Product No. All rights reserved.


