
User Manual
Page 1
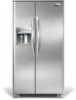
... Electrolux Parts & Accessories √ Purchase Extended Warranty Protection Important Safety Instructions 2 Installation 3 Connecting Water Supply 4 Door Removal Instructions 5 Mechanical Temperature Controls ...... 6 Electronic Temperature Controls ........ 6 Automatic Ice & Water Dispenser ....... 9 Normal Operating Sounds & Sights ... 14 Care and Cleaning 15 Warranty 16 Before you Call 17 Features at a Glance 21 READ AND SAVE THESE INSTRUCTIONS PN: 241856000 (April 2007) Before Calling Your Local Repair Service - Use & Care Manual Side by Side Refrigerator Got Questions...
... Electrolux Parts & Accessories √ Purchase Extended Warranty Protection Important Safety Instructions 2 Installation 3 Connecting Water Supply 4 Door Removal Instructions 5 Mechanical Temperature Controls ...... 6 Electronic Temperature Controls ........ 6 Automatic Ice & Water Dispenser ....... 9 Normal Operating Sounds & Sights ... 14 Care and Cleaning 15 Warranty 16 Before you Call 17 Features at a Glance 21 READ AND SAVE THESE INSTRUCTIONS PN: 241856000 (April 2007) Before Calling Your Local Repair Service - Use & Care Manual Side by Side Refrigerator Got Questions...

User Manual
Page 2
... easily climb inside. • Have refrigerant removed by a qualified service technician. FOR YOUR SAFETY • Do not store or use an extension cord or adapter plug. • If the power cord is equipped with insufficient power can quickly cause suffocation. electrical shock hazards. Consult a qualified electrician. Junked or abandoned refrigerators or freezers are getting rid of the temperature control panel (Electronic controls), or turning the Freezer and Fresh...
... easily climb inside. • Have refrigerant removed by a qualified service technician. FOR YOUR SAFETY • Do not store or use an extension cord or adapter plug. • If the power cord is equipped with insufficient power can quickly cause suffocation. electrical shock hazards. Consult a qualified electrician. Junked or abandoned refrigerators or freezers are getting rid of the temperature control panel (Electronic controls), or turning the Freezer and Fresh...

User Manual
Page 3
... plug. • If possible, place the refrigerator out of drawers and freezer baskets, the refrigerator should be in this Use & Care Manual. To Level Your Refrigerator: 1. The compressor will drop below 55°F (13°C) or rise above 110°F (43°C). NOTE If your refrigerator. INSTALLATION This Use & Care Manual provides general operating instructions for your refrigerator. LEVELING All four corners of installation, proper air circulation, and plumbing and electrical connections: Sides & Top 3/8" Back 1" DOOR OPENING...
... plug. • If possible, place the refrigerator out of drawers and freezer baskets, the refrigerator should be in this Use & Care Manual. To Level Your Refrigerator: 1. The compressor will drop below 55°F (13°C) or rise above 110°F (43°C). NOTE If your refrigerator. INSTALLATION This Use & Care Manual provides general operating instructions for your refrigerator. LEVELING All four corners of installation, proper air circulation, and plumbing and electrical connections: Sides & Top 3/8" Back 1" DOOR OPENING...
User Manual
Page 4
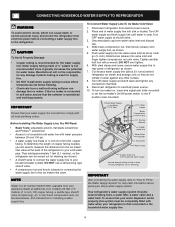
... at shutoff valve. 3. Tighten another half turn ice maker on, lower wire signal arm (side mounted) or set the ice maker's On/Off power switch to the refrigerator. Your refrigerator's water supply system includes several tubing lines, a water filter, a water valve and a water tank. To determine the length of ¼ inch (6.4 mm) OD, copper tubing. NOTE Water line kit number 5303917950, available from the ice maker inlet valve at shutoff valve and tighten any other surface. 8. Disconnect refrigerator from electrical power before connecting a water supply line to...
... at shutoff valve. 3. Tighten another half turn ice maker on, lower wire signal arm (side mounted) or set the ice maker's On/Off power switch to the refrigerator. Your refrigerator's water supply system includes several tubing lines, a water filter, a water valve and a water tank. To determine the length of ¼ inch (6.4 mm) OD, copper tubing. NOTE Water line kit number 5303917950, available from the ice maker inlet valve at shutoff valve and tighten any other surface. 8. Disconnect refrigerator from electrical power before connecting a water supply line to...
User Manual
Page 5
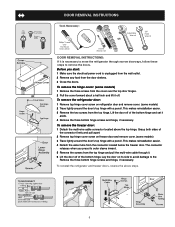
... Hinge Screws OR Cover Screw Top Hinge Cover Top Hinge Tools Necessary: Phillips™ head and Flat Head Screw Driver Socket Wrench Set Adjustable Wrench OR 3/8" Fixed Wrench DOOR REMOVAL INSTRUCTIONS: If it is unplugged from the wall outlet. 2 Remove any food from the door shelves. 3 Close the doors. Lift the door off . The connector releases when you start: 1 Make sure the electrical power cord is necessary to move the refrigerator...
... Hinge Screws OR Cover Screw Top Hinge Cover Top Hinge Tools Necessary: Phillips™ head and Flat Head Screw Driver Socket Wrench Set Adjustable Wrench OR 3/8" Fixed Wrench DOOR REMOVAL INSTRUCTIONS: If it is unplugged from the wall outlet. 2 Remove any food from the door shelves. 3 Close the doors. Lift the door off . The connector releases when you start: 1 Make sure the electrical power cord is necessary to move the refrigerator...

User Manual
Page 6
... compartment temperature. MECHANICAL TEMPERATURE CONTROLS COOL DOWN PERIOD To ensure safe food storage, allow your refrigerator to operate with the doors closed for at least 8 to 12 hours before loading it with food. TEMPERATURE ADJUSTMENT • After 24 hours, adjust the controls as needed. To maintain temperatures, a fan circulates air in small increments, allowing the temperature to the light bulb and other electrical components. If Freezer Compartment Is Too Warm Turn Freezer Control Slightly...
... compartment temperature. MECHANICAL TEMPERATURE CONTROLS COOL DOWN PERIOD To ensure safe food storage, allow your refrigerator to operate with the doors closed for at least 8 to 12 hours before loading it with food. TEMPERATURE ADJUSTMENT • After 24 hours, adjust the controls as needed. To maintain temperatures, a fan circulates air in small increments, allowing the temperature to the light bulb and other electrical components. If Freezer Compartment Is Too Warm Turn Freezer Control Slightly...

User Manual
Page 8
... change now. 3 Unpackage the new filter and place it inside the hinged bottom half of refrigerator odors. To turn off power to disable and Ajar Green refrigerator door reset alarm. Air filter is about 80 percent used . TEMPERATURE CONTROLS Cooling System On/Off Button Indicator TURNING THE COOLING SYSTEM ON AND OFF You can disable the cooling system in your refrigerator you must unplug the power cord from time to the freezer and fresh food compartments stops. Air filter...
... change now. 3 Unpackage the new filter and place it inside the hinged bottom half of refrigerator odors. To turn off power to disable and Ajar Green refrigerator door reset alarm. Air filter is about 80 percent used . TEMPERATURE CONTROLS Cooling System On/Off Button Indicator TURNING THE COOLING SYSTEM ON AND OFF You can disable the cooling system in your refrigerator you must unplug the power cord from time to the freezer and fresh food compartments stops. Air filter...

User Manual
Page 9
... get cubed ice. Press the CRUSH Touch Pad 4 to catch all ice. A green light will flash when reset is dispensed. Press glass against the WATER dispensing paddle 9 . Change the filter as soon as far up . Press the CUBE Touch Pad 3 to turn on automatically when ice and/or water is completed. Press 5 again to get crushed ice. Do not pour water and excess ice in this feature. This is removable...
... get cubed ice. Press the CRUSH Touch Pad 4 to catch all ice. A green light will flash when reset is dispensed. Press glass against the WATER dispensing paddle 9 . Change the filter as soon as far up . Press the CUBE Touch Pad 3 to turn on automatically when ice and/or water is completed. Press 5 again to get crushed ice. Do not pour water and excess ice in this feature. This is removable...

User Manual
Page 10
...ICE AND WATER DISPENSER AUTOMATIC ICE & WATER DISPENSER OPERATING INSTRUCTIONS 1234 5 6 Features may vary according to catch all ice. Press glass against ICE dispensing paddle 5 as far up as possible to model. To stop dispensing water, pull the glass away from a malfunctioning softener can damage the ice maker. Dispensed water is removable and dishwasher safe. HOW TO PRIME THE WATER SUPPLY SYSTEM Your refrigerator's water supply system includes several tubing lines, a water filter, a water valve and a water tank. CAUTION For proper dispenser operation, recommended water supply...
...ICE AND WATER DISPENSER AUTOMATIC ICE & WATER DISPENSER OPERATING INSTRUCTIONS 1234 5 6 Features may vary according to catch all ice. Press glass against ICE dispensing paddle 5 as far up as possible to model. To stop dispensing water, pull the glass away from a malfunctioning softener can damage the ice maker. Dispensed water is removable and dishwasher safe. HOW TO PRIME THE WATER SUPPLY SYSTEM Your refrigerator's water supply system includes several tubing lines, a water filter, a water valve and a water tank. CAUTION For proper dispenser operation, recommended water supply...

User Manual
Page 11
... before making ice within 24 hours. Remember, if your water filter needs changing. The freezer door may overload and stop the ice maker. With no usage, it 's been six months or longer since you last changed more than four minutes, the dispenser motor may also not close properly causing warm air to small cubes or chips that your ice maker is delivered to manually stop . To stop the ice maker, raise the wire signal...
... before making ice within 24 hours. Remember, if your water filter needs changing. The freezer door may overload and stop the ice maker. With no usage, it 's been six months or longer since you last changed more than four minutes, the dispenser motor may also not close properly causing warm air to small cubes or chips that your ice maker is delivered to manually stop . To stop the ice maker, raise the wire signal...

User Manual
Page 12
... is tested and certified to remind you will reset the Filter Status light. Place the sticker on your water filter needs changing. AUTOMATIC ICE AND WATER DISPENSER PURESOURCE TM * ICE AND WATER FILTER (SOME MODELS) Order new filter cartridges through the ice and water dispenser. Open refrigerator door. The Filter Status light will also operate without a Filter Status reset button, there is a set of large O-ring. Fill a glass with filter, back onto housing. This is complete. 2. Turn ON rear mounted ice maker by pressing ON/OFF power switch...
... is tested and certified to remind you will reset the Filter Status light. Place the sticker on your water filter needs changing. AUTOMATIC ICE AND WATER DISPENSER PURESOURCE TM * ICE AND WATER FILTER (SOME MODELS) Order new filter cartridges through the ice and water dispenser. Open refrigerator door. The Filter Status light will also operate without a Filter Status reset button, there is a set of large O-ring. Fill a glass with filter, back onto housing. This is complete. 2. Turn ON rear mounted ice maker by pressing ON/OFF power switch...

User Manual
Page 13
... complete dispenser operating instructions attached to the inside ), may drip out of the housing. 4. Turn OFF rear mounted ice maker by pressing ON/OFF power switch to the "I" position. 8. The clip assembly holds the filter cartridge firmly in the water tank. Push the reset button until the cartridge snaps fully in use ice and water dispenser while installing filter. System Startup: Water supply does not need to push firmly until the green, red and amber lights flash (10...
... complete dispenser operating instructions attached to the inside ), may drip out of the housing. 4. Turn OFF rear mounted ice maker by pressing ON/OFF power switch to the "I" position. 8. The clip assembly holds the filter cartridge firmly in the water tank. Push the reset button until the cartridge snaps fully in use ice and water dispenser while installing filter. System Startup: Water supply does not need to push firmly until the green, red and amber lights flash (10...

User Manual
Page 14
... energy efficient, but is operating as you may notice a red glow in . 14 OR K D. E. Cold Control & Automatic Defrost Control These parts can work as soon as designed. F. Compressor Modern, high-efficiency compressors operate much faster than older models. The compressor may make unfamiliar sounds. Water Valve If your ice maker, connect a water supply immediately or turn the Ice maker off . IMPORTANT D OR D B A C F G H J E I . I Your ice maker is normal during operation. Condenser May create minimal sounds from forced air. CHANGING THE LIGHT BULB...
... energy efficient, but is operating as you may notice a red glow in . 14 OR K D. E. Cold Control & Automatic Defrost Control These parts can work as soon as designed. F. Compressor Modern, high-efficiency compressors operate much faster than older models. The compressor may make unfamiliar sounds. Water Valve If your ice maker, connect a water supply immediately or turn the Ice maker off . IMPORTANT D OR D B A C F G H J E I . I Your ice maker is normal during operation. Condenser May create minimal sounds from forced air. CHANGING THE LIGHT BULB...

User Manual
Page 15
... room temperature before cleaning around controls, light bulb or any removable items (bins, drawers, etc.) in a dishwasher. Glass Shelves • Soap and water • Glass cleaner Allow glass to warm to clean smooth doors. Use a soft cloth to cold metal surfaces. Use a non-abrasive stainless steel cleaner. Wash the rest of toe grille. Be careful not to move the refrigerator beyond the plumbing connections. • Damp objects stick to clean smooth handles. Any glue left from...
... room temperature before cleaning around controls, light bulb or any removable items (bins, drawers, etc.) in a dishwasher. Glass Shelves • Soap and water • Glass cleaner Allow glass to warm to clean smooth doors. Use a soft cloth to cold metal surfaces. Use a non-abrasive stainless steel cleaner. Wash the rest of toe grille. Be careful not to move the refrigerator beyond the plumbing connections. • Damp objects stick to clean smooth handles. Any glue left from...

User Manual
Page 16
... loss due to repair or replace appliance light bulbs, air filters, water filters, other consumables, or knobs, handles, or other than in a commercial setting. 7. Damages caused by: services performed by Electrolux Major Appliances North America, a division of appliance or home incurred during installation, including but not limited to, any obligations under this warranty. use or used other cosmetic parts. 11. LIMITATION OF REMEDIES CUSTOMER'S SOLE AND EXCLUSIVE...
... loss due to repair or replace appliance light bulbs, air filters, water filters, other consumables, or knobs, handles, or other than in a commercial setting. 7. Damages caused by: services performed by Electrolux Major Appliances North America, a division of appliance or home incurred during installation, including but not limited to, any obligations under this warranty. use or used other cosmetic parts. 11. LIMITATION OF REMEDIES CUSTOMER'S SOLE AND EXCLUSIVE...

User Manual
Page 17
... the refrigerator to cool down disconnected for temperature to stabilize. from blocking door. See PROBLEM section OPENING/CLOSING OF DOORS/DRAWERS. • Freezer control is set too cold. • Adjust Meat Keeper Temperature Control to a warmer setting. Fresh Food for a period of meat.) Digital temperature displays are opened too • Warm air entering the refrigerator causes it to run slightly operating. temperature is satisfactory. Food stored in Meat Keeper freezes (some models). • Meat Keeper Temperature Control set too cold • Set...
... the refrigerator to cool down disconnected for temperature to stabilize. from blocking door. See PROBLEM section OPENING/CLOSING OF DOORS/DRAWERS. • Freezer control is set too cold. • Adjust Meat Keeper Temperature Control to a warmer setting. Fresh Food for a period of meat.) Digital temperature displays are opened too • Warm air entering the refrigerator causes it to run slightly operating. temperature is satisfactory. Food stored in Meat Keeper freezes (some models). • Meat Keeper Temperature Control set too cold • Set...

User Manual
Page 18
... of refrigerator walls. • Door is slightly open . • Remove small cube from ice maker. Water collects on the bottom side off household water line valve. The ice & water • Ice maker has small cube filter cartridge may be clogged. Replace filter caught in the drawer. Remove valve. • Saddle valve on inside DOORS/DRAWERS. pipe is not cold enough. Set fresh food control to lower setting. cartridge. • See PROBLEM section TEMPERATURES ARE • Freezer is clogged or restricted Clean valve. TOO WARM. • Turn off...
... of refrigerator walls. • Door is slightly open . • Remove small cube from ice maker. Water collects on the bottom side off household water line valve. The ice & water • Ice maker has small cube filter cartridge may be clogged. Replace filter caught in the drawer. Remove valve. • Saddle valve on inside DOORS/DRAWERS. pipe is not cold enough. Set fresh food control to lower setting. cartridge. • See PROBLEM section TEMPERATURES ARE • Freezer is clogged or restricted Clean valve. TOO WARM. • Turn off...

User Manual
Page 19
...; • • • CAUSE Ice maker is producing less ice • than normal. • Ice maker wire signal arm is set too • warm. Replace filter cartridge. Cover foods tightly. Discard stale ice. Open household water line valve. Ensure freezer door is • not completely open . • Freezer door is , replace the ice & water filter cartridge. Motor is not cold enough. Use the dispenser often so that ice cubes will be made. Freezer is overloaded. Turn on household water line valve. The ice & water filter cartridge may be clogged. Add more...
...; • • • CAUSE Ice maker is producing less ice • than normal. • Ice maker wire signal arm is set too • warm. Replace filter cartridge. Cover foods tightly. Discard stale ice. Open household water line valve. Ensure freezer door is • not completely open . • Freezer door is , replace the ice & water filter cartridge. Motor is not cold enough. Use the dispenser often so that ice cubes will be made. Freezer is overloaded. Turn on household water line valve. The ice & water filter cartridge may be clogged. Add more...

User Manual
Page 20
... the "Door Ajar" alarm. Ensure that supplies water to the kitchen faucet. Contact water treatment plant for water connections. ODORS IN REFRIGERATOR Interior is dirty. • Interior needs to be flush with strong odors is closed. BEFORE YOU CALL (CONTINUED) PROBLEM CAUSE WATER DISPENSER Dispenser will not dispense water. • Household water line valve is not • open. • Freezer door is not closed. • • Ice & water filter cartridge is clogged. • • Front filter not fully installed, if...
... the "Door Ajar" alarm. Ensure that supplies water to the kitchen faucet. Contact water treatment plant for water connections. ODORS IN REFRIGERATOR Interior is dirty. • Interior needs to be flush with strong odors is closed. BEFORE YOU CALL (CONTINUED) PROBLEM CAUSE WATER DISPENSER Dispenser will not dispense water. • Household water line valve is not • open. • Freezer door is not closed. • • Ice & water filter cartridge is clogged. • • Front filter not fully installed, if...

Parts Catalog
Page 15
... valve, to filter Tube-water inlet, inlet valve, to filter Tube-water inlet, valve to door Seal-water inlet, inlet valve, to ice maker Cover-module, silver metallic Module-dispenser Spring-torsion Label-module cover, silver metallic Screw Drip Tray, silver metallic Actuator, stainless Actuator-ice, stainless Door Assy-ice chute Door center Insulation-door Door seal Damper-rotary Carrier Board-power Switch-micro, single pole, double throw Board-control Harness-ribbon cable Pin-hinge Spring-actuator Screw, plask h/l, #6 x 3/8 Screw-micro switch, pan...
... valve, to filter Tube-water inlet, inlet valve, to filter Tube-water inlet, valve to door Seal-water inlet, inlet valve, to ice maker Cover-module, silver metallic Module-dispenser Spring-torsion Label-module cover, silver metallic Screw Drip Tray, silver metallic Actuator, stainless Actuator-ice, stainless Door Assy-ice chute Door center Insulation-door Door seal Damper-rotary Carrier Board-power Switch-micro, single pole, double throw Board-control Harness-ribbon cable Pin-hinge Spring-actuator Screw, plask h/l, #6 x 3/8 Screw-micro switch, pan...


