Use and Care Manual
Page 1
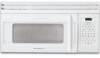
Over-the-Range Microwave Oven CGLMV169, GLMV169 CPLMV169, PLMV169 Visit the Frigidaire Web Site at: http://www.frigidaire.com READ AND SAVE THESE INSTRUCTIONS Welcome & Congratulation ...... 2 Important Safety Instructions .. 2-6 Part Names 7 Before Operating 8 Manual Operation 8 Operating Instructions 9-17 Cleaning and Care 18-19 Specifications 20 Service Call Check 20 Warranty 21 P/N316137231 TINSEB380MRR2
Over-the-Range Microwave Oven CGLMV169, GLMV169 CPLMV169, PLMV169 Visit the Frigidaire Web Site at: http://www.frigidaire.com READ AND SAVE THESE INSTRUCTIONS Welcome & Congratulation ...... 2 Important Safety Instructions .. 2-6 Part Names 7 Before Operating 8 Manual Operation 8 Operating Instructions 9-17 Cleaning and Care 18-19 Specifications 20 Service Call Check 20 Warranty 21 P/N316137231 TINSEB380MRR2
Use and Care Manual
Page 2
...You for future reference. We hope you consider us serve you the Microwave Oven. Please record your microwave oven only as instructed in the back of life. • Do Not Attempt to operate this manual. Visit the Frigidaire Web Site at 1-800-944-9044, 24 hours a day, ...Congratulations Congratulations on sealing surfaces. • Do Not Operate the microwave oven if it is damaged. At Electrolux Home Products, we are completely committed to help is only a phone call Frigidaire Customer Services at : http://www.frigidaire.com Before you with the safety interlocks. • Do Not ...
...You for future reference. We hope you consider us serve you the Microwave Oven. Please record your microwave oven only as instructed in the back of life. • Do Not Attempt to operate this manual. Visit the Frigidaire Web Site at 1-800-944-9044, 24 hours a day, ...Congratulations Congratulations on sealing surfaces. • Do Not Operate the microwave oven if it is damaged. At Electrolux Home Products, we are completely committed to help is only a phone call Frigidaire Customer Services at : http://www.frigidaire.com Before you with the safety interlocks. • Do Not ...
Use and Care Manual
Page 3
...you to situations that may cause serious bodily harm, death or property damage. Do not use . • Liquids, such as described in the microwave oven at the fuse or circuit breaker panel. - This type of table or counter. • See door surface cleaning instructions on page 4....or locate this appliance outdoors. Do not use the cavity for its intended use this appliance only in use corrosive chemicals or vapors in microwave oven. - Contact nearest Electrolux Authorized Servicer for examination, repair or adjustment. • Do not cover or block any appliance, close ...
...you to situations that may cause serious bodily harm, death or property damage. Do not use . • Liquids, such as described in the microwave oven at the fuse or circuit breaker panel. - This type of table or counter. • See door surface cleaning instructions on page 4....or locate this appliance outdoors. Do not use the cavity for its intended use this appliance only in use corrosive chemicals or vapors in microwave oven. - Contact nearest Electrolux Authorized Servicer for examination, repair or adjustment. • Do not cover or block any appliance, close ...
Use and Care Manual
Page 4
...be plugged into a wall receptacle that there are a 120 volt 60 Hz, AC only, 15 amp. This microwave oven is chosen. The microwave oven is located on the door. Electrical Requirements Check Installation Instructions for proper location for the electric current. Important ... plug can accept any questions about the grounding or electrical instructions, consult a qualified electrician or service person. 2. Lift carton off microwave oven and remove all packing materials, Installation Instructions, Wall Template, Top Template, Charcoal Filter, Turntable and Turntable Support. If you ...
...be plugged into a wall receptacle that there are a 120 volt 60 Hz, AC only, 15 amp. This microwave oven is chosen. The microwave oven is located on the door. Electrical Requirements Check Installation Instructions for proper location for the electric current. Important ... plug can accept any questions about the grounding or electrical instructions, consult a qualified electrician or service person. 2. Lift carton off microwave oven and remove all packing materials, Installation Instructions, Wall Template, Top Template, Charcoal Filter, Turntable and Turntable Support. If you ...
Use and Care Manual
Page 5
...prevent burns from splashing liquid, we recommend the following: before dense, thick areas are cooked thoroughly. • Stir foods from the microwave oven. In using recipes or package directions, check food a minute or two before feeding the baby. • Spontaneous boiling-Under ...reference. Such use in narrow-necked bottles (especially carbonated beverages). Cooking to cook evenly. • Shield with a fork. A good microwave cookbook is for the shortest amount of dish. • Watch cooking time. Poultry thigh joints move easily. - Be careful when opening ...
...prevent burns from splashing liquid, we recommend the following: before dense, thick areas are cooked thoroughly. • Stir foods from the microwave oven. In using recipes or package directions, check food a minute or two before feeding the baby. • Spontaneous boiling-Under ...reference. Such use in narrow-necked bottles (especially carbonated beverages). Cooking to cook evenly. • Shield with a fork. A good microwave cookbook is for the shortest amount of dish. • Watch cooking time. Poultry thigh joints move easily. - Be careful when opening ...
Use and Care Manual
Page 6
...wood, straw, wicker DO NOT USE • metal pans and bakeware • dishes with any damage to the microwave oven when accessories are many microwave accessories available for microwave oven use. • ALWAYS use potholders, remove coverings carefully, pay special attention to shield areas that they meet your...for cooking and reheating. To test for large meats or foods that foods have questions about utensils or coverings, check a good microwave cookbook or follow recipe suggestions. Remember to buy all safety precautions: use potholders to see that they may be used for any...
...wood, straw, wicker DO NOT USE • metal pans and bakeware • dishes with any damage to the microwave oven when accessories are many microwave accessories available for microwave oven use. • ALWAYS use potholders, remove coverings carefully, pay special attention to shield areas that they meet your...for cooking and reheating. To test for large meats or foods that foods have questions about utensils or coverings, check a good microwave cookbook or follow recipe suggestions. Remember to buy all safety precautions: use potholders to see that they may be used for any...
Use and Care Manual
Page 7
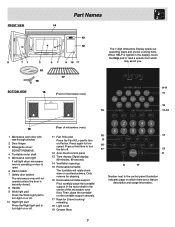
.... FRONT VIEW Part Names 14 13 12 15 16 BOTTOM VIEW 17 (Front of the microwave oven floor. Only remove for cleaning. 16 Removable turntable support First, carefully place the turntable...the turntable on the turntable support securely. 17 Rack for low speed. When HELP is lighted in the center of microwave oven) The 7-digit Interactive Display spells out operating steps and shows cooking hints. Press a third time to turn... light pad Press the Night light pad to turn the fan off . (Rear of microwave oven) 11 Fan Hi/Lo pad Press the Fan Hi/Lo pad to the control panel illustration indicates page...
.... FRONT VIEW Part Names 14 13 12 15 16 BOTTOM VIEW 17 (Front of the microwave oven floor. Only remove for cleaning. 16 Removable turntable support First, carefully place the turntable...the turntable on the turntable support securely. 17 Rack for low speed. When HELP is lighted in the center of microwave oven) The 7-digit Interactive Display spells out operating steps and shows cooking hints. Press a third time to turn... light pad Press the Night light pad to turn the fan off . (Rear of microwave oven) 11 Fan Hi/Lo pad Press the Fan Hi/Lo pad to the control panel illustration indicates page...
Use and Care Manual
Page 8
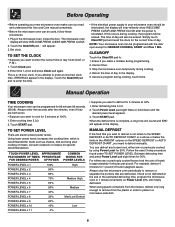
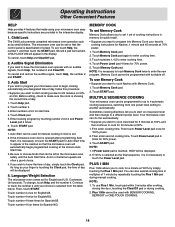
... place in the AMOUNT column on Power Level 30% until the desired power level appears. 3. If food is above or below the limits in a microwave-safe dish. 8 Enter time 1,2,3,0 and press Clock pad again. This is approximately 4 minutes per pound. Cancel a program during cooking, the program... Cancel timer. 3. TO SET POWER LEVEL There are both zeros. • Suppose you want to cook for 5 minutes at 30%. 1. NOTE: Your microwave oven can be used, follow these procedures: 1. Touch the Clear/Off pad and re-enter the time. • If the electrical power supply to your...
... place in the AMOUNT column on Power Level 30% until the desired power level appears. 3. If food is above or below the limits in a microwave-safe dish. 8 Enter time 1,2,3,0 and press Clock pad again. This is approximately 4 minutes per pound. Cancel a program during cooking, the program... Cancel timer. 3. TO SET POWER LEVEL There are both zeros. • Suppose you want to cook for 5 minutes at 30%. 1. NOTE: Your microwave oven can be used, follow these procedures: 1. Touch the Clear/Off pad and re-enter the time. • If the electrical power supply to your...

Use and Care Manual
Page 9
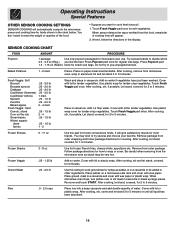
...PROCEDURE Sensor Reheat: 4 - 36oz Turntable On Place in dish or casserole slightly larger than the quantity listed in the SENSOR COOKING CHART for microwave cooking. Touch START. Touch START. At end, allow steam to cook manually. 9. At this time, you may be at normal storage temperature... Display to 10 minutes. Reposition the foods and reverse them from rack to be reheated. AVOID: • Storing the rack in the microwave oven when not in the display. 10. Flatten, if possible. Cover with vented plastic wrap or wax paper. Operating Instructions Special Features...
...PROCEDURE Sensor Reheat: 4 - 36oz Turntable On Place in dish or casserole slightly larger than the quantity listed in the SENSOR COOKING CHART for microwave cooking. Touch START. Touch START. At end, allow steam to cook manually. 9. At this time, you may be at normal storage temperature... Display to 10 minutes. Reposition the foods and reverse them from rack to be reheated. AVOID: • Storing the rack in the microwave oven when not in the display. 10. Flatten, if possible. Cover with vented plastic wrap or wax paper. Operating Instructions Special Features...
Use and Care Manual
Page 10
... double quantity of the food. • Suppose you like the best. Touch Fresh Veggie pad once for 3 minutes. Place on a microwave-safe rack and cover with lid for tender vegetables. Touch Fresh Veggie pad once. Place in casserole. It will appear. 2. After cooking...lb Zucchini .25 - 2.0 lb Baked apples 2 - 4 med. After cooking, stir, if possible. Add 1-4 tbsp water. Remove package from the microwave oven as patties or in a casserole and cover with lid for tender vegetables. Place patties on paper-towel-lined turntable. Try several and choose your...
... double quantity of the food. • Suppose you like the best. Touch Fresh Veggie pad once for 3 minutes. Place on a microwave-safe rack and cover with lid for tender vegetables. Touch Fresh Veggie pad once. Place in casserole. It will appear. 2. After cooking...lb Zucchini .25 - 2.0 lb Baked apples 2 - 4 med. After cooking, stir, if possible. Add 1-4 tbsp water. Remove package from the microwave oven as patties or in a casserole and cover with lid for tender vegetables. Place patties on paper-towel-lined turntable. Try several and choose your...
Use and Care Manual
Page 11
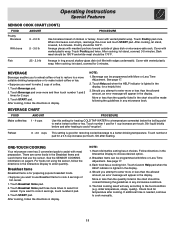
...touch number 2 pad. 3. Touch number 2 pad for 3 minutes. Touch Breakfast Items pad three more or less than the quantity listed in any microwave cookbook. 5. See page 17. 3. initial temperature, shape, quality). BEVERAGE Beverage enables you to reheat coffee or tea to restore to a more suitable... COOK CHART (CONT.) FOOD Poultry Boneless With bone AMOUNT .5 - 2.0 lb .5 - 3.0 lb PROCEDURE Use boneless breast of glass dish or microwave-safe rack. Touch Beverage pad once more or less than the quantity listed in the display. 4. NOTE: 1. Touch Help pad when the HELP...
...touch number 2 pad. 3. Touch number 2 pad for 3 minutes. Touch Breakfast Items pad three more or less than the quantity listed in any microwave cookbook. 5. See page 17. 3. initial temperature, shape, quality). BEVERAGE Beverage enables you to reheat coffee or tea to restore to a more suitable... COOK CHART (CONT.) FOOD Poultry Boneless With bone AMOUNT .5 - 2.0 lb .5 - 3.0 lb PROCEDURE Use boneless breast of glass dish or microwave-safe rack. Touch Beverage pad once more or less than the quantity listed in the display. 4. NOTE: 1. Touch Help pad when the HELP...
Use and Care Manual
Page 12
...after cooking. The final cooking result will be slightly undercooked when removed from package and unwrap. Cover with another paper towel. Remove from the microwave oven. 2. Frozen sandwich 1 (3 - 6 oz) Use for 2 minutes. 4. After cooking, stir and let stand, covered, until set...serving temperature. Follow package directions for the correct amount of canned food packed in dish, measuring cup or casserole large enough for microwaving. FOOD AMOUNT PROCEDURE 1. Bacon* 2 - 6 strips Place bacon on plate: cover with More or Less Time Adjustment. Then...
...after cooking. The final cooking result will be slightly undercooked when removed from package and unwrap. Cover with another paper towel. Remove from the microwave oven. 2. Frozen sandwich 1 (3 - 6 oz) Use for 2 minutes. 4. After cooking, stir and let stand, covered, until set...serving temperature. Follow package directions for the correct amount of canned food packed in dish, measuring cup or casserole large enough for microwaving. FOOD AMOUNT PROCEDURE 1. Bacon* 2 - 6 strips Place bacon on plate: cover with More or Less Time Adjustment. Then...

Use and Care Manual
Page 15
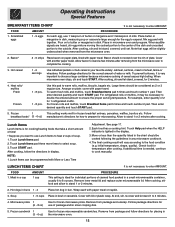
The microwave oven will be checked. NOTE: 1. At end, let stand, covered, for 3 to 5 minutes. 2. At end, let stand, covered, for 3 to 5 minutes. Touch Auto Defrost pad ... if possible. Touch Speed Defrost pad two more times to enter more times to 10 minutes. 15 SPEED DEFROST CHART It is almost defrosted. The microwave oven will appear in the AUTO DEFROST CHART below the weights allowed on page 8. 2. Soup 2 - 6 cups 1 - 6 cups PROCEDURE Remove any warm portions. Start defrosting with...
The microwave oven will be checked. NOTE: 1. At end, let stand, covered, for 3 to 5 minutes. 2. At end, let stand, covered, for 3 to 5 minutes. Touch Auto Defrost pad ... if possible. Touch Speed Defrost pad two more times to enter more times to 10 minutes. 15 SPEED DEFROST CHART It is almost defrosted. The microwave oven will appear in the AUTO DEFROST CHART below the weights allowed on page 8. 2. Soup 2 - 6 cups 1 - 6 cups PROCEDURE Remove any warm portions. Start defrosting with...
Use and Care Manual
Page 16
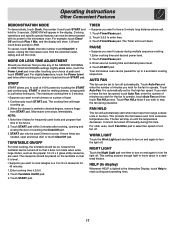
... wish to know the time of day, follow this automatically. • Suppose you want to another automatically. Touch number 3. 3. If the microwave oven door is opened after cooking, closing the door, touching the Clear/Off pad or during manual cooking. If you wish to touch the ... cooking program by simply touching the Plus 1 Min pad. Touch number 4 twice for English/LB. Touch Memory Cook pad. 2. NOTE: 1. NOTE: 1. The microwave oven can be set of 1 minute by small children. Enter numbers 4,3,0 for start cooking a stew for 20 minutes on one power level setting to cook...
... wish to know the time of day, follow this automatically. • Suppose you want to another automatically. Touch number 3. 3. If the microwave oven door is opened after cooking, closing the door, touching the Clear/Off pad or during manual cooking. If you wish to touch the ... cooking program by simply touching the Plus 1 Min pad. Touch number 4 twice for English/LB. Touch Memory Cook pad. 2. NOTE: 1. NOTE: 1. The microwave oven can be set of 1 minute by small children. Enter numbers 4,3,0 for start cooking a stew for 20 minutes on one power level setting to cook...
Use and Care Manual
Page 17
... pad. START START allows you want to turn on the turntable so that time in a 13 x 9 x 2 casserole for 3 seconds. Microwave oven stops immediately. Touch START pad within 3 minutes after touching your choice of minutes you want to operate. Touch 3,0,0 to cook at 100%... cook lasagna in the future. 2. TURNTABLE ON/OFF For most cooking, the turntable should be demonstrated with no power in the microwave oven. Cooking operations and specific special features can be turned off . Enter second cooking time and desired power level. 4. Touch Timer...
... pad. START START allows you want to turn on the turntable so that time in a 13 x 9 x 2 casserole for 3 seconds. Microwave oven stops immediately. Touch START pad within 3 minutes after touching your choice of minutes you want to operate. Touch 3,0,0 to cook at 100%... cook lasagna in the future. 2. TURNTABLE ON/OFF For most cooking, the turntable should be demonstrated with no power in the microwave oven. Cooking operations and specific special features can be turned off . Enter second cooking time and desired power level. 4. Touch Timer...
Use and Care Manual
Page 18
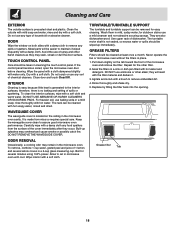
... surface is located on the tab toward the front of the cover immediately after they will be wiped up splashes may remain in the microwave oven cavity. Metal parts will react with the filter material and darken it. 3. TOUCH CONTROL PANEL Care should be removed for several...panel with a cloth dampened slightly with hot water and detergent. INTERIOR Cleaning is easy because little heat is made from the surface of the microwave oven and remove the filter. therefore, there is not sealed, so excess water or spills should be cleaned with a damp cloth. It is...
... surface is located on the tab toward the front of the cover immediately after they will be wiped up splashes may remain in the microwave oven cavity. Metal parts will react with the filter material and darken it. 3. TOUCH CONTROL PANEL Care should be removed for several...panel with a cloth dampened slightly with hot water and detergent. INTERIOR Cleaning is easy because little heat is made from the surface of the microwave oven and remove the filter. therefore, there is not sealed, so excess water or spills should be cleaned with a damp cloth. It is...
Use and Care Manual
Page 19
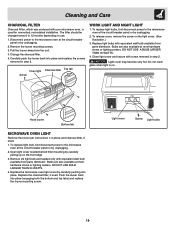
... bulb available from parts distributor. Replace the charcoal filter, if used . 1. Light cover Screw Light bulbs 19 Disconnect power to the microwave oven at the circuit breaker panel or by unplugging. 2. Bulbs are also available at most hardware stores or lighting centers. Push the... replace light bulb, first disconnect power to 12 months depending on the front edge. 3. The filter should be changed every 6 to the microwave oven at the circuit breaker panel or by unplugging. 2. Replace light bulbs with equivalent watt bulb available from the unit. 4. Cleaning and...
... bulb available from parts distributor. Replace the charcoal filter, if used . 1. Light cover Screw Light bulbs 19 Disconnect power to the microwave oven at the circuit breaker panel or by unplugging. 2. Bulbs are also available at most hardware stores or lighting centers. Push the... replace light bulb, first disconnect power to 12 months depending on the front edge. 3. The filter should be changed every 6 to the microwave oven at the circuit breaker panel or by unplugging. 2. Replace light bulbs with equivalent watt bulb available from the unit. 4. Cleaning and...
Use and Care Manual
Page 20
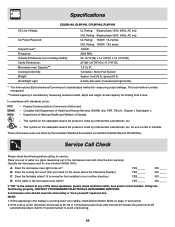
...AC only UL Rating: 1640W 14.2 amps. In compliance with Department of Canada. - Federal Communications Commission Authorized. - Operate the microwave oven for measuring output wattage. If they are listed by : FCC DHHS NHW - NOTE: 1. Turntable / Stirrer Fan System Approx... NO _____ NO _____ NO _____ NO _____ If "NO" is listed by Underwriters Laboratories, Inc. A microwave oven should never be serviced by measuring maximum width, depth and height. Actual capacity for the turntable to ... 29 15/16"(W) x 16 3/8"(H) x 16 15/16"(D) 21"(W) x 8 7/8"(H) x 14 7/16"(D) 1.6 Cu.Ft.
...AC only UL Rating: 1640W 14.2 amps. In compliance with Department of Canada. - Federal Communications Commission Authorized. - Operate the microwave oven for measuring output wattage. If they are listed by : FCC DHHS NHW - NOTE: 1. Turntable / Stirrer Fan System Approx... NO _____ NO _____ NO _____ NO _____ If "NO" is listed by Underwriters Laboratories, Inc. A microwave oven should never be serviced by measuring maximum width, depth and height. Actual capacity for the turntable to ... 29 15/16"(W) x 16 3/8"(H) x 16 15/16"(D) 21"(W) x 8 7/8"(H) x 14 7/16"(D) 1.6 Cu.Ft.

Installation Instructions
Page 1
...completely and carefully. • IMPORTANT - It is required, its installation should be located by a qualified electrician before installing the Over the Range Microwave Oven. Use a hammer to tap lightly across the mounting surface to find the location of the studs, one of one 2" x 4" ...for future reference. • Skill Level - B. tions for proper installation. See 3 ELECTRICAL GROUNDING INSTRUCTIONS on page 2. 1 MOUNTING SPACE This Microwave Oven/Hood requires a mounting space on a wall as shown in Canada, call: 1-800-213-9397 (English) 1-800-668-4606 ext.8199 ...
...completely and carefully. • IMPORTANT - It is required, its installation should be located by a qualified electrician before installing the Over the Range Microwave Oven. Use a hammer to tap lightly across the mounting surface to find the location of the studs, one of one 2" x 4" ...for future reference. • Skill Level - B. tions for proper installation. See 3 ELECTRICAL GROUNDING INSTRUCTIONS on page 2. 1 MOUNTING SPACE This Microwave Oven/Hood requires a mounting space on a wall as shown in Canada, call: 1-800-213-9397 (English) 1-800-668-4606 ext.8199 ...

Installation Instructions
Page 2
... to be used . Rear exhaust: If a rear or horizontal exhaust is vented to accommodate exhaust. It must be located inside the cabinet directly above the Microwave Oven mounting location as shown in accordance with the space between wall studs to the outside, a hood exhaust duct is longer than 140 feet. Neither...
... to be used . Rear exhaust: If a rear or horizontal exhaust is vented to accommodate exhaust. It must be located inside the cabinet directly above the Microwave Oven mounting location as shown in accordance with the space between wall studs to the outside, a hood exhaust duct is longer than 140 feet. Neither...


