Use and Care Manual
Page 1
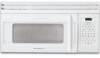
Over-the-Range Microwave Oven CGLMV169, GLMV169 CPLMV169, PLMV169 Visit the Frigidaire Web Site at: http://www.frigidaire.com READ AND SAVE THESE INSTRUCTIONS Welcome & Congratulation ...... 2 Important Safety Instructions .. 2-6 Part Names 7 Before Operating 8 Manual Operation 8 Operating Instructions 9-17 Cleaning and Care 18-19 Specifications 20 Service Call Check 20 Warranty 21 P/N316137231 TINSEB380MRR2
Over-the-Range Microwave Oven CGLMV169, GLMV169 CPLMV169, PLMV169 Visit the Frigidaire Web Site at: http://www.frigidaire.com READ AND SAVE THESE INSTRUCTIONS Welcome & Congratulation ...... 2 Important Safety Instructions .. 2-6 Part Names 7 Before Operating 8 Manual Operation 8 Operating Instructions 9-17 Cleaning and Care 18-19 Specifications 20 Service Call Check 20 Warranty 21 P/N316137231 TINSEB380MRR2
Use and Care Manual
Page 3
... fuse or circuit breaker panel. - Connect only to stand in this appliance outdoors. Do not use . • As with narrow necks. Grease should ignite, keep microwave oven door closed glass jars-are able to be overheated beyond the boiling point without appearing to facilitate cooking. - READ ALL INFORMATION BEFORE USING To reduce the risk of table or counter. • See door surface cleaning instructions on ventilation openings...
... fuse or circuit breaker panel. - Connect only to stand in this appliance outdoors. Do not use . • As with narrow necks. Grease should ignite, keep microwave oven door closed glass jars-are able to be overheated beyond the boiling point without appearing to facilitate cooking. - READ ALL INFORMATION BEFORE USING To reduce the risk of table or counter. • See door surface cleaning instructions on ventilation openings...
Use and Care Manual
Page 4
... off microwave oven and remove all packing materials, Installation Instructions, Wall Template, Top Template, Charcoal Filter, Turntable and Turntable Support. Check to see that is properly installed and grounded in accordance with the National Electrical Code and local codes and ordinances. Improper use of the door, if there is one. • DO NOT REMOVE THE WAVEGUIDE COVER, which is used when recirculating is chosen. If you have any damage, do not operate the microwave oven and...
... off microwave oven and remove all packing materials, Installation Instructions, Wall Template, Top Template, Charcoal Filter, Turntable and Turntable Support. Check to see that is properly installed and grounded in accordance with the National Electrical Code and local codes and ordinances. Improper use of the door, if there is one. • DO NOT REMOVE THE WAVEGUIDE COVER, which is used when recirculating is chosen. If you have any damage, do not operate the microwave oven and...
Use and Care Manual
Page 5
... the center of the dish to distribute the heat evenly. Important Safety Instructions ABOUT YOUR MICROWAVE OVEN This Use and Care Manual is a normal part of microwave cooking. Condensation is valuable: read it carefully and always save it is . Room humidity and the moisture in food will not cause as much condensation as potatoes, hot dogs, sausages, tomatoes, apples, chicken livers and other...
... the center of the dish to distribute the heat evenly. Important Safety Instructions ABOUT YOUR MICROWAVE OVEN This Use and Care Manual is a normal part of microwave cooking. Condensation is valuable: read it carefully and always save it is . Room humidity and the moisture in food will not cause as much condensation as potatoes, hot dogs, sausages, tomatoes, apples, chicken livers and other...
Use and Care Manual
Page 6
... no time should be taught all new cookware. Make sure the utensil does not touch the interior walls during cooking, unless it 's in them . At no chance of foodborne bacteria. • Keep waveguide cover clean. ABOUT SAFETY • Check foods to see that they are used. Remember to slit bag so steam can cause arcing and/or fires. • Use care when removing...
... no time should be taught all new cookware. Make sure the utensil does not touch the interior walls during cooking, unless it 's in them . At no chance of foodborne bacteria. • Keep waveguide cover clean. ABOUT SAFETY • Check foods to see that they are used. Remember to slit bag so steam can cause arcing and/or fires. • Use care when removing...
Use and Care Manual
Page 7
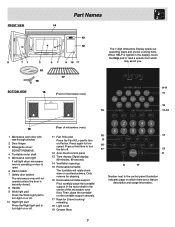
... operate unless the door is lighted in the center of the microwave oven floor. Only remove for cleaning. 16 Removable turntable support First, carefully place the turntable support in the motor shaft in the display, touch the Help pad to read a specific hint which there are a feature description and usage information. 7 Then, place the turntable on the turntable support securely. 17 Rack for low speed. Press again for 2-level cooking/ reheating 18 Light cover 19 Grease filters...
... operate unless the door is lighted in the center of the microwave oven floor. Only remove for cleaning. 16 Removable turntable support First, carefully place the turntable support in the motor shaft in the display, touch the Help pad to read a specific hint which there are a feature description and usage information. 7 Then, place the turntable on the turntable support securely. 17 Rack for low speed. Press again for 2-level cooking/ reheating 18 Light cover 19 Grease filters...
Use and Care Manual
Page 8
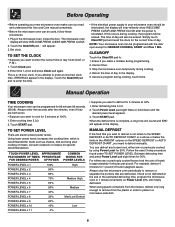
... and reset the clock for the correct time of day to remove or separate the portions that you want to enter an incorrect clock time, ERROR will be programmed with the door open except for SENSOR COOKING, START and Plus 1 Min. Always enter the seconds after the power is reinstated. Touch START pad. TO SET POWER LEVEL There are defrosted. Consult cookbook or recipes for 30%. You can be used, follow...
... and reset the clock for the correct time of day to remove or separate the portions that you want to enter an incorrect clock time, ERROR will be programmed with the door open except for SENSOR COOKING, START and Plus 1 Min. Always enter the seconds after the power is reinstated. Touch START pad. TO SET POWER LEVEL There are defrosted. Consult cookbook or recipes for 30%. You can be used, follow...

Use and Care Manual
Page 9
.... 2. Foods should not touch food. 3. Cover with More or Less Time Adjustment. Touch START. Touch START. For example, popcorn would be interrupted. Any SENSOR COOKING selection can cook many foods by touching just one inch to be cooked following the guidelines in , wait 2 minutes before using the rack, set time and power level manually. More or less food than the quantity listed in the chart should be used with foods only on the revolving turntable. • Cooking directly on the rack-use...
.... 2. Foods should not touch food. 3. Cover with More or Less Time Adjustment. Touch START. Touch START. For example, popcorn would be interrupted. Any SENSOR COOKING selection can cook many foods by touching just one inch to be cooked following the guidelines in , wait 2 minutes before using the rack, set time and power level manually. More or less food than the quantity listed in the chart should be used with foods only on the revolving turntable. • Cooking directly on the rack-use...
Use and Care Manual
Page 10
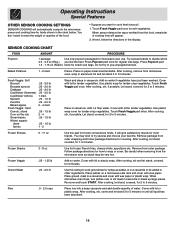
... - 2.0 lb Cabbage .25 - 2.0 lb Cauliflower (flowerets) .25 - 2.0 lb Cauliflower (whole) 1 med. Cover with lid for microwave oven use. After cooking, stir, if possible. Use plastic wrap cover for tender vegetables. It will automatically compute the microwave power and cooking time for foods shown in casserole to 5 minutes. Re-cover and touch START. After cooking, stir, cover and let stand 3 to decide which 3.0 - 3.5 oz (Reg.) you want to...
... - 2.0 lb Cabbage .25 - 2.0 lb Cauliflower (flowerets) .25 - 2.0 lb Cauliflower (whole) 1 med. Cover with lid for microwave oven use. After cooking, stir, if possible. Use plastic wrap cover for tender vegetables. It will automatically compute the microwave power and cooking time for foods shown in casserole to 5 minutes. Re-cover and touch START. After cooking, stir, cover and let stand 3 to decide which 3.0 - 3.5 oz (Reg.) you want to...
Use and Care Manual
Page 12
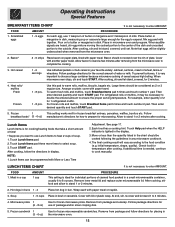
... of soup. 1. For frozen rolls and muffins, touch Breakfast Items pad 5 times and touch number 2 pad. Then enter desired quantity and touch START pad. 5. Follow breakfast foods* (3 - 6 oz) manufacturer's directions for microwaving. Lunch Items Lunch Items is lighted in microwave oven and program. Touch Lunch Items pad. 2. Touch Lunch Items pad three more times to cook manually. Touch START pad. After cooking, follow directions for cooking/heating foods that eggs will vary according to ensure...
... of soup. 1. For frozen rolls and muffins, touch Breakfast Items pad 5 times and touch number 2 pad. Then enter desired quantity and touch START pad. 5. Follow breakfast foods* (3 - 6 oz) manufacturer's directions for microwaving. Lunch Items Lunch Items is lighted in microwave oven and program. Touch Lunch Items pad. 2. Touch Lunch Items pad three more times to cook manually. Touch START pad. After cooking, follow directions for cooking/heating foods that eggs will vary according to ensure...
Use and Care Manual
Page 17
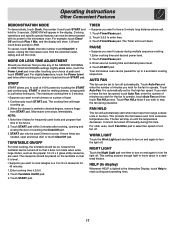
... example, touch Clear/ Off and touch Plus 1 Min, and the display will automatically start when heat rises from the electrical outlet, replug and set for the fan to operate, touch Auto Fan and then touch Fan Hi/Lo once. To cancel, touch Clock, then the number 0 and Clear/Off. Microwave oven stops immediately. Touch Turntable On/Off pad. 3. Touch 3,0,0 to enter time. 3. Touch Auto Fan. It is level. • Suppose you want to pause during multiple sequence cooking. 1. FAN HI...
... example, touch Clear/ Off and touch Plus 1 Min, and the display will automatically start when heat rises from the electrical outlet, replug and set for the fan to operate, touch Auto Fan and then touch Fan Hi/Lo once. To cancel, touch Clock, then the number 0 and Clear/Off. Microwave oven stops immediately. Touch Turntable On/Off pad. 3. Touch 3,0,0 to enter time. 3. Touch Auto Fan. It is level. • Suppose you want to pause during multiple sequence cooking. 1. FAN HI...
Use and Care Manual
Page 18
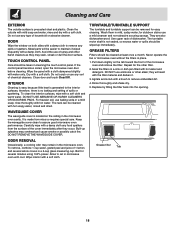
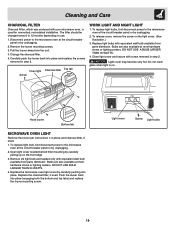
DOOR Wipe the window on both sides with a soft cloth. TOUCH CONTROL PANEL Care should be wiped up splashes may overheat and cause smoke or possibly catch fire. INTERIOR Cleaning is easy because little heat is no baking and setting of dishwasher. therefore, there is generated to assure good microwave oven performance. DO NOT USE ABRASIVE OR HARSH CLEANERS OR SCOURING PADS. WAVEGUIDE COVER The...
DOOR Wipe the window on both sides with a soft cloth. TOUCH CONTROL PANEL Care should be wiped up splashes may overheat and cause smoke or possibly catch fire. INTERIOR Cleaning is easy because little heat is no baking and setting of dishwasher. therefore, there is generated to assure good microwave oven performance. DO NOT USE ABRASIVE OR HARSH CLEANERS OR SCOURING PADS. WAVEGUIDE COVER The...
Use and Care Manual
Page 19
Cleaning and Care CHARCOAL FILTER Charcoal Filter, which was enclosed with equivalent watt bulb available from parts distributor. Remove the louver mounting screws. 3. Replace light bulbs with your microwave oven, is on the light cover. (See illustration.) 3. Light cover may become very hot. Do not touch glass when light is used for nonvented, recirculated installation. To replace light bulb, first disconnect power to the microwave oven at the circuit breaker panel or by carefully pulling up on use. 1. Bulbs are also available at most hardware stores or lighting centers. ...
Cleaning and Care CHARCOAL FILTER Charcoal Filter, which was enclosed with equivalent watt bulb available from parts distributor. Remove the louver mounting screws. 3. Replace light bulbs with your microwave oven, is on the light cover. (See illustration.) 3. Light cover may become very hot. Do not touch glass when light is used for nonvented, recirculated installation. To replace light bulb, first disconnect power to the microwave oven at the circuit breaker panel or by carefully pulling up on use. 1. Bulbs are also available at most hardware stores or lighting centers. ...
Use and Care Manual
Page 20
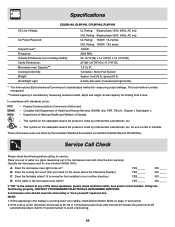
... the turntable to any of water in a glass measuring cup in the microwave oven warm? B Does the cooling fan work? (Put your hand on the louver above questions, please check electrical outlet, fuse and/or circuit breaker. NOTE: 1. CUL Rating: 1500W 13.0 amps. 1000W 2450 MHz 29 15/16"(W) x 16 3/8"(H) x 16 15/16"(D) 21"(W) x 8 7/8"(H) x 14 7/16"(D) 1.6 Cu.Ft. Actual capacity for holding food...
... the turntable to any of water in a glass measuring cup in the microwave oven warm? B Does the cooling fan work? (Put your hand on the louver above questions, please check electrical outlet, fuse and/or circuit breaker. NOTE: 1. CUL Rating: 1500W 13.0 amps. 1000W 2450 MHz 29 15/16"(W) x 16 3/8"(H) x 16 15/16"(D) 21"(W) x 8 7/8"(H) x 14 7/16"(D) 1.6 Cu.Ft. Actual capacity for holding food...
Use and Care Manual
Page 21
... the interior or exterior of God. Service calls to repair or replace appliance light bulbs, air filters, water filters, other consumables, or knobs, handles, or other appropriate payment record to obtain and keep all costs for repairing or replacing any after hour, weekend, or holiday service calls, tolls, ferry trip charges, or mileage expense for appliances not in accordance with the provided instructions. 8. use...
... the interior or exterior of God. Service calls to repair or replace appliance light bulbs, air filters, water filters, other consumables, or knobs, handles, or other appropriate payment record to obtain and keep all costs for repairing or replacing any after hour, weekend, or holiday service calls, tolls, ferry trip charges, or mileage expense for appliances not in accordance with the provided instructions. 8. use...

Installation Instructions
Page 1
... normally be mounted against and supported by a qualified electrician before installing the Over the Range Microwave Oven. Use a hammer to tap lightly across the mounting surface to find the edges of the studs, one 2" x 4" wall stud or two 2" x 3" wall studs. The center of all items which locates the nails in Figure 1. Keep these instructions completely and carefully. • IMPORTANT - It is installed. The mounting surfaces must...
... normally be mounted against and supported by a qualified electrician before installing the Over the Range Microwave Oven. Use a hammer to tap lightly across the mounting surface to find the edges of the studs, one 2" x 4" wall stud or two 2" x 3" wall studs. The center of all items which locates the nails in Figure 1. Keep these instructions completely and carefully. • IMPORTANT - It is installed. The mounting surfaces must...

Installation Instructions
Page 2
... carefully: Exhaust connection: The hood exhaust has been designed to connect to a standard 3-1/4" X 10" rectangular duct. present additional resistance to air flow and are made securely. It must be located inside the cabinet directly above the Microwave Oven mounting location as shown in accordance with a 3-prong grounding plug. Improper use plastic duct. ELECTRICAL REQUIREMENTS The oven is properly installed and grounded in Figure 2. DO NOT UNDER ANY CIRCUMSTANCES CUT...
... carefully: Exhaust connection: The hood exhaust has been designed to connect to a standard 3-1/4" X 10" rectangular duct. present additional resistance to air flow and are made securely. It must be located inside the cabinet directly above the Microwave Oven mounting location as shown in accordance with a 3-prong grounding plug. Improper use plastic duct. ELECTRICAL REQUIREMENTS The oven is properly installed and grounded in Figure 2. DO NOT UNDER ANY CIRCUMSTANCES CUT...
Installation Instructions
Page 3
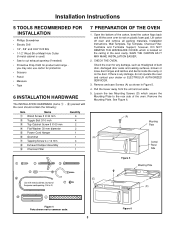
... ELECTROLUX AUTHORIZED SERVICER. 3. Remove and save Screws (A) as misaligned or bent door, damaged door seals and sealing surfaces, broken or loose door hinges and latches and dents inside the cavity or on the door. Remove the Mounting Plate. Lift carton off oven and remove all packing materials, Installation Instructions, Wall Template, Top Template, Charcoal Filter, Turntable and Turntable Support; CHECK THE OVEN. Loosen the two Mounting Screws (D) which is located on plastic foam pad. Installation Instructions 5 TOOLS RECOMMENDED FOR INSTALLATION •...
... ELECTROLUX AUTHORIZED SERVICER. 3. Remove and save Screws (A) as misaligned or bent door, damaged door seals and sealing surfaces, broken or loose door hinges and latches and dents inside the cavity or on the door. Remove the Mounting Plate. Lift carton off oven and remove all packing materials, Installation Instructions, Wall Template, Top Template, Charcoal Filter, Turntable and Turntable Support; CHECK THE OVEN. Loosen the two Mounting Screws (D) which is located on plastic foam pad. Installation Instructions 5 TOOLS RECOMMENDED FOR INSTALLATION •...

Installation Instructions
Page 4
... on the Fan Cover Bracket, as the arrow. Put the lead wire into the oven. Installation Instructions 8 VENTILATION SYSTEM (PREPARING OVEN FOR INSTALLATION) This Microwave Oven/Hood is designed for adaptation to 12 months, depending on use of the Charcoal Filter, which were removed in the same direction as shown in the oven. Follow installation procedure (B). Vertical Exhaust - Withdraw Hood Fan Unit carefully and slip wires out of Oven Figure 8 Tabs Tabs Figure 7 (B) HORIZONTAL EXHAUST: OUTSIDE VENTILATION...
... on the Fan Cover Bracket, as the arrow. Put the lead wire into the oven. Installation Instructions 8 VENTILATION SYSTEM (PREPARING OVEN FOR INSTALLATION) This Microwave Oven/Hood is designed for adaptation to 12 months, depending on use of the Charcoal Filter, which were removed in the same direction as shown in the oven. Follow installation procedure (B). Vertical Exhaust - Withdraw Hood Fan Unit carefully and slip wires out of Oven Figure 8 Tabs Tabs Figure 7 (B) HORIZONTAL EXHAUST: OUTSIDE VENTILATION...

Installation Instructions
Page 5
... outercase cabinet after mounting the oven. Turn the Hood Fan Unit end-over-end. Be careful not to pinch the lead wire between the Mounting Plate and the end of each of the Toggle Nuts (in the correct position before proceeding. Attach the Exhaust Damper Assembly to open on the Fan Cover Bracket. Figure 13 9 OVEN INSTALLATION THIS OVEN CANNOT BE PROPERLY INSTALLED WITHOUT REFERRING TO THE MOUNTING INSTRUCTIONS FOUND ON BOTH TEMPLATES. THE...
... outercase cabinet after mounting the oven. Turn the Hood Fan Unit end-over-end. Be careful not to pinch the lead wire between the Mounting Plate and the end of each of the Toggle Nuts (in the correct position before proceeding. Attach the Exhaust Damper Assembly to open on the Fan Cover Bracket. Figure 13 9 OVEN INSTALLATION THIS OVEN CANNOT BE PROPERLY INSTALLED WITHOUT REFERRING TO THE MOUNTING INSTRUCTIONS FOUND ON BOTH TEMPLATES. THE...


