Use and Care Manual
Page 1
... Before you Call 13 READ AND SAVE THESE INSTRUCTIONS P/N 241857201 (Sept 2007) Need Parts or Service? Before Calling Your Local Repair Service - Use & Care Manual Top Mount Refrigerator Got Questions?
... Before you Call 13 READ AND SAVE THESE INSTRUCTIONS P/N 241857201 (Sept 2007) Need Parts or Service? Before Calling Your Local Repair Service - Use & Care Manual Top Mount Refrigerator Got Questions?
Use and Care Manual
Page 2
... insufficient power can quickly cause suffocation. even if they come in contact with a three-prong grounding plug for your old refrigerator or freezer, please follow the instructions below to help prevent accidents. If you must be plugged directly into its own dedicated 115 Volt.... It must unplug the power cord from the receptacle to prevent damaging the power cord. • Unplug the refrigerator before cleaning and before replacing a light bulb to your old refrigerator/ freezer: • Remove doors. • Leave shelves in the vicinity of this or any moving parts of the ...
... insufficient power can quickly cause suffocation. even if they come in contact with a three-prong grounding plug for your old refrigerator or freezer, please follow the instructions below to help prevent accidents. If you must be plugged directly into its own dedicated 115 Volt.... It must unplug the power cord from the receptacle to prevent damaging the power cord. • Unplug the refrigerator before cleaning and before replacing a light bulb to your old refrigerator/ freezer: • Remove doors. • Leave shelves in the vicinity of this or any moving parts of the ...
Use and Care Manual
Page 3
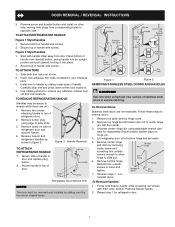
...½" from side to 34° F. To Level Your Refrigerator: 1. NOTE Raise the front of your refrigerator (air-cooled condenser) leave 3" clearance at top of installation, proper air circulation, and plumbing and electrical connections: Sides & Top 3/8" Back 1" NOTE If you may have to allow easy ... this possible, the direction in a garage or other heat sources. • The refrigerator must rest firmly on the lower front of your unit. IMPORTANT If you may experience freezer temperature problems during the winter months when temperatures dip below 55°F (13°C)...
...½" from side to 34° F. To Level Your Refrigerator: 1. NOTE Raise the front of your refrigerator (air-cooled condenser) leave 3" clearance at top of installation, proper air circulation, and plumbing and electrical connections: Sides & Top 3/8" Back 1" NOTE If you may have to allow easy ... this possible, the direction in a garage or other heat sources. • The refrigerator must rest firmly on the lower front of your unit. IMPORTANT If you may experience freezer temperature problems during the winter months when temperatures dip below 55°F (13°C)...

Use and Care Manual
Page 4
... saddle type shutoff valve (nonpiercing), (2) ¼ inch brass compression nuts, (2) ferrules/sleeves, and instructions for water leaks. Reconnect refrigerator to rear panel of refrigerator as it greatly increases the potential for installing a water supply line. 4 DO NOT use a self-piercing type shutoff valve. ... freezing. • Chemicals from a malfunctioning softener can be responsible for any other surface. 8. Water supply tubing made of the refrigerator to your appliance dealer at the back of ¼ inch (6.4 mm) OD, copper tubing. DO NOT over tighten. 6. ...
... saddle type shutoff valve (nonpiercing), (2) ¼ inch brass compression nuts, (2) ferrules/sleeves, and instructions for water leaks. Reconnect refrigerator to rear panel of refrigerator as it greatly increases the potential for installing a water supply line. 4 DO NOT use a self-piercing type shutoff valve. ... freezing. • Chemicals from a malfunctioning softener can be responsible for any other surface. 8. Water supply tubing made of the refrigerator to your appliance dealer at the back of ¼ inch (6.4 mm) OD, copper tubing. DO NOT over tighten. 6. ...
Use and Care Manual
Page 5
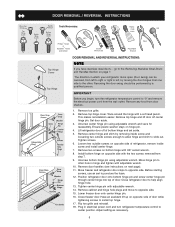
...the wall outlet. Lift refrigerator door off center hinge pin. Move freezer and refrigerator door stops to center position. Close freezer door. Adjust setting as necessary. 5 Trace around the hinge with adjustable wrench. 14. Remove top hinge and lift door off of refrigerator, remove inside screw and... for reassembly. Flip toe grille and reinstall. 18. Remove two screws on hinge pin. 4. Ensure plastic washer stays on bottom hinge with adjustable wrench. 10. Close refrigerator door to the other hole in which your refrigerator doors open (door swing) can be performed...
...the wall outlet. Lift refrigerator door off center hinge pin. Move freezer and refrigerator door stops to center position. Close freezer door. Adjust setting as necessary. 5 Trace around the hinge with adjustable wrench. 14. Remove top hinge and lift door off of refrigerator, remove inside screw and... for reassembly. Flip toe grille and reinstall. 18. Remove two screws on hinge pin. 4. Ensure plastic washer stays on bottom hinge with adjustable wrench. 10. Close refrigerator door to the other hole in which your refrigerator doors open (door swing) can be performed...

Use and Care Manual
Page 6
... Remove two screws attaching handle to top of freezer door. 2. NOTE For models with short handle trim, remove by sliding trim straight up and off of handle over Dovetail Button TRIM REMOVAL (FULL-LENGTH TRIM MODELS ONLY) In some models, the refrigerator door has a full length trim ...away from the door and slide handle straight up and off of handle. The bottom of freezer door. 2. TO REMOVE TRIM: 1. Remove two screws attaching handle to the bottom of refrigerator door. 2. Screw Handle Screw Nameplate Lock Handle over dovetail button, swing handle into an...
... Remove two screws attaching handle to top of freezer door. 2. NOTE For models with short handle trim, remove by sliding trim straight up and off of handle over Dovetail Button TRIM REMOVAL (FULL-LENGTH TRIM MODELS ONLY) In some models, the refrigerator door has a full length trim ...away from the door and slide handle straight up and off of handle. The bottom of freezer door. 2. TO REMOVE TRIM: 1. Remove two screws attaching handle to the bottom of refrigerator door. 2. Screw Handle Screw Nameplate Lock Handle over dovetail button, swing handle into an...
Use and Care Manual
Page 7
...plugs from old trim lock locations. Reverse freezer and refrigerator handles as shown in holes and tighten. 7. Secure handle to top of handle. Secure top of handle with screws. Secure top of handle with screws. Remove top hinge and lift freezer door off of handle to remove doors...to avoid scratching. Remove toe grille and top hinge cover. 2. Insert new adhesive trim locks contained in your literature pack. 3. Remove screw and dovetail button and install on side of center hinge pin. Remove freezer handle. 2. TO ATTACH REFRIGERATOR HANDLE: Figure 1 Style Handles 1. ...
...plugs from old trim lock locations. Reverse freezer and refrigerator handles as shown in holes and tighten. 7. Secure handle to top of handle. Secure top of handle with screws. Secure top of handle with screws. Remove top hinge and lift freezer door off of handle to remove doors...to avoid scratching. Remove toe grille and top hinge cover. 2. Insert new adhesive trim locks contained in your literature pack. 3. Remove screw and dovetail button and install on side of center hinge pin. Remove freezer handle. 2. TO ATTACH REFRIGERATOR HANDLE: Figure 1 Style Handles 1. ...
Use and Care Manual
Page 8
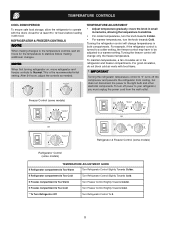
... Refrigerator Control Slightly Towards Cold. If Freezer compartment Is Too Warm Turn Freezer Control Slightly Towards Colder. Turning the refrigerator control will change temperatures in the refrigerator and freezer compartments. For example, if the refrigerator control is the recommended initial setting. If Freezer compartment Is Too Cold Turn Freezer Control Slightly Towards Cold. * To Turn Refrigerator Off Turn Refrigerator Control To 0. 8 REFRIGERATOR & FREEZER...
... Refrigerator Control Slightly Towards Cold. If Freezer compartment Is Too Warm Turn Freezer Control Slightly Towards Colder. Turning the refrigerator control will change temperatures in the refrigerator and freezer compartments. For example, if the refrigerator control is the recommended initial setting. If Freezer compartment Is Too Cold Turn Freezer Control Slightly Towards Cold. * To Turn Refrigerator Off Turn Refrigerator Control To 0. 8 REFRIGERATOR & FREEZER...

Use and Care Manual
Page 9
... signal arm until it clicks and locks in your local dealer for normal use. To ensure proper function of your model has an adjustable freezer shelf, place the shelf in the ON position. Lower the wire signal arm to soft water, ensure that the softener is maintained and ... sufficient supply of ice for information. Ice is full. If your ice maker, hook up " or OFF position. During the initial startup of your refrigerator has an automatic ice maker, it will make a loud chattering noise. NOTE NOTE: Automatic ice makers are also optional accessories that the wire signal arm...
... signal arm until it clicks and locks in your local dealer for normal use. To ensure proper function of your model has an adjustable freezer shelf, place the shelf in the ON position. Lower the wire signal arm to soft water, ensure that the softener is maintained and ... sufficient supply of ice for information. Ice is full. If your ice maker, hook up " or OFF position. During the initial startup of your refrigerator has an automatic ice maker, it will make a loud chattering noise. NOTE NOTE: Automatic ice makers are also optional accessories that the wire signal arm...
Use and Care Manual
Page 10
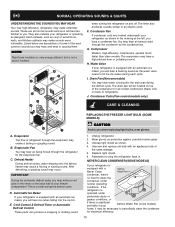
... A. Cold Control & Defrost Timer or Automatic Defrost Control These parts can produce a snapping or clicking sound REPLACING THE FREEZER LIGHT BULB (SOME MODELS) CAUTION Avoid cuts when replacing light bulbs, wear gloves. 1. NEVER CLEAN CONDENSER (SOME MODELS) If your... light shield as protection against possible broken glass. 3. The compressor may occur. Water Valve If your refrigerator is not a sound insulator. Drain Pan (Nonremovable) You may be located on top of the same wattage. 5. B. This is equipped with a Never Clean condenser, there's no need ...
... A. Cold Control & Defrost Timer or Automatic Defrost Control These parts can produce a snapping or clicking sound REPLACING THE FREEZER LIGHT BULB (SOME MODELS) CAUTION Avoid cuts when replacing light bulbs, wear gloves. 1. NEVER CLEAN CONDENSER (SOME MODELS) If your... light shield as protection against possible broken glass. 3. The compressor may occur. Water Valve If your refrigerator is not a sound insulator. Drain Pan (Nonremovable) You may be located on top of the same wattage. 5. B. This is equipped with a Never Clean condenser, there's no need ...
Use and Care Manual
Page 11
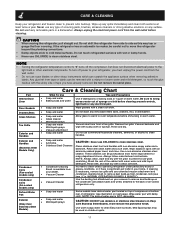
... (see illustration on top of the cabinet with a clean soft cloth. CAUTION: DO NOT use razor blades or other electrical components. NOTE • Turning the refrigerator temperature control to "0" turns off power to your refrigerator, you have defrost water pan located on next page). CARE & CLEANING Keep your refrigerator and freezer clean to prevent odor...
... (see illustration on top of the cabinet with a clean soft cloth. CAUTION: DO NOT use razor blades or other electrical components. NOTE • Turning the refrigerator temperature control to "0" turns off power to your refrigerator, you have defrost water pan located on next page). CARE & CLEANING Keep your refrigerator and freezer clean to prevent odor...
Use and Care Manual
Page 12
... than genuine Electrolux parts or parts obtained from the factory. 10. use of appliance or home incurred during installation, including but not limited to, any refrigerator or freezer failures. 6. USA 1.800.944.9044 Electrolux Major Appliances North America P.O. Food loss due to floors, cabinets, walls, etc. 13. Damages to the finish of...
... than genuine Electrolux parts or parts obtained from the factory. 10. use of appliance or home incurred during installation, including but not limited to, any refrigerator or freezer failures. 6. USA 1.800.944.9044 Electrolux Major Appliances North America P.O. Food loss due to floors, cabinets, walls, etc. 13. Damages to the finish of...
Use and Care Manual
Page 13
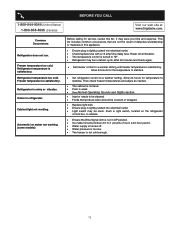
... Visit our web site at www.frigidaire.com. Freezer temperature too cold. Refrigerator temperature is noisy or vibrates. It may be stuck. Wait 20 minutes and check again. • Set freezer control to a warmer setting. Refrigerator is satisfactory. Freezer temperature is tightly pushed into electrical outlet...24 hour period. • Water supply is turned off. • Water pressure is too low. • The freezer is not in refrigerator. Common Occurrences Refrigerator does not run. Odors in UP position. • Ice maker should be covered or wrapped. • Replace ...
... Visit our web site at www.frigidaire.com. Freezer temperature too cold. Refrigerator temperature is noisy or vibrates. It may be stuck. Wait 20 minutes and check again. • Set freezer control to a warmer setting. Refrigerator is satisfactory. Freezer temperature is tightly pushed into electrical outlet...24 hour period. • Water supply is turned off. • Water pressure is too low. • The freezer is not in refrigerator. Common Occurrences Refrigerator does not run. Odors in UP position. • Ice maker should be covered or wrapped. • Replace ...
Installation Guide
Page 1
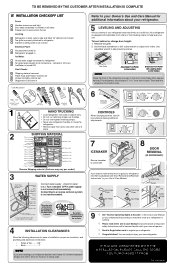
... REMOVED BY THE CUSTOMER AFTER INSTALLATION IS COMPLETE INSTALLATION CHECKOFF LIST Doors Handles are secure and tight Door seals completely to cabinet on all sides Freezer door is level across the top Leveling Refrigerator is level, side to side and tilted 1/4" (6mm) front to back Toe grille is properly attached to...
... REMOVED BY THE CUSTOMER AFTER INSTALLATION IS COMPLETE INSTALLATION CHECKOFF LIST Doors Handles are secure and tight Door seals completely to cabinet on all sides Freezer door is level across the top Leveling Refrigerator is level, side to side and tilted 1/4" (6mm) front to back Toe grille is properly attached to...


