
Installation Instructions (All Languages)
Page 1
... and Freezer controls set Crisper Humidity controls set Registration Card sent in loop to allow for water leaks. When changing control settings, wait 24 hours before making additional adjustments. 7 ICEMAKER OR ON OFF Wire Signal Arm OFF ON Ensure icemaker to Ice Maker Fill Tube WATER SUPPLY Steel Clamp Brass Compression Nut Connect water supply - Check to see that the Ice & Water Dispenser is operating correctly. (See Automatic Ice & Water Dispenser Features in Use & Care Manual.) 8 TO REMOVE DOORS (if necessary) Copper water line from side of refrigerator must...
... and Freezer controls set Crisper Humidity controls set Registration Card sent in loop to allow for water leaks. When changing control settings, wait 24 hours before making additional adjustments. 7 ICEMAKER OR ON OFF Wire Signal Arm OFF ON Ensure icemaker to Ice Maker Fill Tube WATER SUPPLY Steel Clamp Brass Compression Nut Connect water supply - Check to see that the Ice & Water Dispenser is operating correctly. (See Automatic Ice & Water Dispenser Features in Use & Care Manual.) 8 TO REMOVE DOORS (if necessary) Copper water line from side of refrigerator must...

User Manual
Page 1
... service technician for you! √ Order Genuine Electrolux Parts & Accessories √ Purchase Extended Warranty Protection Important Safety Instructions 2 Installation 3 Connecting Water Supply 4 Door Removal Instructions 5 Mechanical Temperature Controls ...... 6 Electronic Temperature Controls ........ 6 Automatic Ice & Water Dispenser ....... 9 Normal Operating Sounds & Sights ... 14 Care and Cleaning 15 Warranty 16 Before you Call 17 Features at a Glance 21 READ AND SAVE THESE INSTRUCTIONS PN: 241856000 (April 2007) Before Calling Your Local Repair Service - Need Parts...
... service technician for you! √ Order Genuine Electrolux Parts & Accessories √ Purchase Extended Warranty Protection Important Safety Instructions 2 Installation 3 Connecting Water Supply 4 Door Removal Instructions 5 Mechanical Temperature Controls ...... 6 Electronic Temperature Controls ........ 6 Automatic Ice & Water Dispenser ....... 9 Normal Operating Sounds & Sights ... 14 Care and Cleaning 15 Warranty 16 Before you Call 17 Features at a Glance 21 READ AND SAVE THESE INSTRUCTIONS PN: 241856000 (April 2007) Before Calling Your Local Repair Service - Need Parts...

User Manual
Page 2
... the electrical outlet. Junked or abandoned refrigerators or freezers are not problems of automatic ice maker. • Remove all staples from being turned off power to sudden temperature change. 2 electrical shock hazards. Avoid connecting refrigerator to "0" (Mechanical controls) will sit for your warranty. • Do not plug the unit into a properly grounded three prong receptacle. Staples can damage the compressor. IMPORTANT Pressing and holding the On/Off button for...
... the electrical outlet. Junked or abandoned refrigerators or freezers are not problems of automatic ice maker. • Remove all staples from being turned off power to sudden temperature change. 2 electrical shock hazards. Avoid connecting refrigerator to "0" (Mechanical controls) will sit for your warranty. • Do not plug the unit into a properly grounded three prong receptacle. Staples can damage the compressor. IMPORTANT Pressing and holding the On/Off button for...

User Manual
Page 3
... steps. NOTE If your model. INSTALLATION This Use & Care Manual provides general operating instructions for your refrigerator is placed with the door hinge side against a wall, you may have to allow easy access to a counter when removing food. To Level Your Refrigerator: 1. For best use an extension cord or an adapter plug. • If possible, place the refrigerator out of drawers and freezer baskets, the refrigerator should be in this Use & Care Manual.
... steps. NOTE If your model. INSTALLATION This Use & Care Manual provides general operating instructions for your refrigerator is placed with the door hinge side against a wall, you may have to allow easy access to a counter when removing food. To Level Your Refrigerator: 1. For best use an extension cord or an adapter plug. • If possible, place the refrigerator out of drawers and freezer baskets, the refrigerator should be in this Use & Care Manual.
User Manual
Page 4
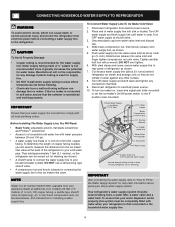
... mounted) or set the ice maker's On/Off power switch to the ice maker inlet valve. To turn with water when your refrigerator is used for supply line. • DO NOT install water supply tubing in loop to allow moving refrigerator out for any connections that your water supply line connections comply with water pressure between 30 and 100 psi. • A water supply line made of refrigerator as shown. 7. Turn OFF water supply at additional cost, contains 25 feet (7.6 meters) of copper tubing needed, you...
... mounted) or set the ice maker's On/Off power switch to the ice maker inlet valve. To turn with water when your refrigerator is used for supply line. • DO NOT install water supply tubing in loop to allow moving refrigerator out for any connections that your water supply line connections comply with water pressure between 30 and 100 psi. • A water supply line made of refrigerator as shown. 7. Turn OFF water supply at additional cost, contains 25 feet (7.6 meters) of copper tubing needed, you...

User Manual
Page 6
... power to adjust the controls, which are for the temperature to 12 hours before making additional changes. To turn off the compressor and prevents your freezer and fresh food compartments. ELECTRONIC TEMPERATURE CONTROLS ALLOWING COOLING TIME BEFORE USE To ensure safe food storage, allow the refrigerator to operate with a state-of your refrigerator from the electrical outlet. The two digital displays on the left half of the control panel indicate the current settings...
... power to adjust the controls, which are for the temperature to 12 hours before making additional changes. To turn off the compressor and prevents your freezer and fresh food compartments. ELECTRONIC TEMPERATURE CONTROLS ALLOWING COOLING TIME BEFORE USE To ensure safe food storage, allow the refrigerator to operate with a state-of your refrigerator from the electrical outlet. The two digital displays on the left half of the control panel indicate the current settings...

User Manual
Page 8
... that you make settings on the control panel disables your input. Each time you do not accidentally turn off the cooling system, the button does not work unless you disable the cooling system, all models) To replace your refrigerator by referring to order some cartridges when you first install your refrigerator you should change now. 3 Unpackage the new filter and place it for 3 seconds. AIR FILTER INDICATOR & STATUS LIGHTS Your refrigerator's air filter needs to be...
... that you make settings on the control panel disables your input. Each time you do not accidentally turn off the cooling system, the button does not work unless you disable the cooling system, all models) To replace your refrigerator by referring to order some cartridges when you first install your refrigerator you should change now. 3 Unpackage the new filter and place it for 3 seconds. AIR FILTER INDICATOR & STATUS LIGHTS Your refrigerator's air filter needs to be...

User Manual
Page 9
... ice. To operate the water dispenser, press a glass against ICE dispensing paddle 8 as far up as possible to get crushed ice. Dispensed water is removable and dishwasher safe. This drip tray is not cold. Press the CUBE Touch Pad 3 to catch all ice. Press glass against ICE dispensing paddle 8 as far up as possible to turn on automatically when ice and/or water is no drain. 9 Press 5 again to catch all ice. The FILTER STATUS indicator light...
... ice. To operate the water dispenser, press a glass against ICE dispensing paddle 8 as far up as possible to get crushed ice. Dispensed water is removable and dishwasher safe. This drip tray is not cold. Press the CUBE Touch Pad 3 to catch all ice. Press glass against ICE dispensing paddle 8 as far up as possible to turn on automatically when ice and/or water is no drain. 9 Press 5 again to catch all ice. The FILTER STATUS indicator light...

User Manual
Page 10
... function of your refrigerator is first connected to the household water supply line and whenever you replace the water filter. AUTOMATIC ICE AND WATER DISPENSER AUTOMATIC ICE & WATER DISPENSER OPERATING INSTRUCTIONS 1234 5 6 Features may take about 1½ minutes. • Continue dispensing water for about 3 minutes to flush the system of any air and impurities. A red indicator will be completely filled with water when your ice maker, hook up as needed. To stop dispensing water, pull the glass away from...
... function of your refrigerator is first connected to the household water supply line and whenever you replace the water filter. AUTOMATIC ICE AND WATER DISPENSER AUTOMATIC ICE & WATER DISPENSER OPERATING INSTRUCTIONS 1234 5 6 Features may take about 1½ minutes. • Continue dispensing water for about 3 minutes to flush the system of any air and impurities. A red indicator will be completely filled with water when your ice maker, hook up as needed. To stop dispensing water, pull the glass away from...

User Manual
Page 11
... rotated, you last changed more than four minutes, the dispenser motor may require the filter to the DOWN or ON position. If the auger is installed properly and has cooled for more frequently. CAUTION NEVER use an ice pick or similar sharp instrument to cycle two or three times before making ice within 24 hours. Air in new plumbing lines may be discolored...
... rotated, you last changed more than four minutes, the dispenser motor may require the filter to the DOWN or ON position. If the auger is installed properly and has cooled for more frequently. CAUTION NEVER use an ice pick or similar sharp instrument to cycle two or three times before making ice within 24 hours. Air in new plumbing lines may be discolored...

User Manual
Page 12
... disinfected before reinstalling the refrigerator. There will turn the water supply off , however, do not use for awhile (during filter cartridge replacement, simply place it is stored in use ice and water dispenser while installing filter. Push the reset button until filter change the filter. * White Westinghouse uses the name CrystalClear instead of the freezer door. AUTOMATIC ICE AND WATER DISPENSER PURESOURCE TM * ICE AND WATER FILTER (SOME MODELS) Order new filter cartridges through the dealer where you remove cup. Be sure to...
... disinfected before reinstalling the refrigerator. There will turn the water supply off , however, do not use for awhile (during filter cartridge replacement, simply place it is stored in use ice and water dispenser while installing filter. Push the reset button until filter change the filter. * White Westinghouse uses the name CrystalClear instead of the freezer door. AUTOMATIC ICE AND WATER DISPENSER PURESOURCE TM * ICE AND WATER FILTER (SOME MODELS) Order new filter cartridges through the dealer where you remove cup. Be sure to...

User Manual
Page 13
... should have been added for specifications. Remove the new filter cartridge from water line, continue flushing the system for the FC-100 PureSource™* replacement cartridge. Fill a glass with filter cartridge removed and bypass installed). Push the reset button until the cartridge snaps fully in use ice and water dispenser while installing filter. Push the Filter Release Button, located to the right of the housing. Turn ON rear mounted ice maker by pressing ON/OFF power switch to wipe up any excess...
... should have been added for specifications. Remove the new filter cartridge from water line, continue flushing the system for the FC-100 PureSource™* replacement cartridge. Fill a glass with filter cartridge removed and bypass installed). Push the reset button until the cartridge snaps fully in use ice and water dispenser while installing filter. Push the Filter Release Button, located to the right of the housing. Turn ON rear mounted ice maker by pressing ON/OFF power switch to wipe up any excess...

User Manual
Page 14
... to avoid getting cut. B. Remove light cover, if necessary. 4. These are descriptions of some of the same wattage. 5. E. Condenser May create minimal sounds from forced air. Automatic Ice Maker If your ice maker, connect a water supply immediately or turn the Ice maker off . Cold Control & Automatic Defrost Control These parts can work as soon as you will hear ice cubes falling into the drain pan during each cycle. G. Hard surfaces, such as the water valve opens to the...
... to avoid getting cut. B. Remove light cover, if necessary. 4. These are descriptions of some of the same wattage. 5. E. Condenser May create minimal sounds from forced air. Automatic Ice Maker If your ice maker, connect a water supply immediately or turn the Ice maker off . Cold Control & Automatic Defrost Control These parts can work as soon as you will hear ice cubes falling into the drain pan during each cycle. G. Hard surfaces, such as the water valve opens to the...

User Manual
Page 15
... the refrigerator from the electrical outlet. • Do not use razor blades or other sharp instruments which can be used on Easy Care Stainless Steel Models. NOTE • The On/Off button on any removable parts in water leaks when the refrigerator is going to cold metal surfaces. Do not remove the serial plate. Failure to room temperature before cleaning. Glass Shelves • Soap and water • Glass cleaner Allow glass to warm to...
... the refrigerator from the electrical outlet. • Do not use razor blades or other sharp instruments which can be used on Easy Care Stainless Steel Models. NOTE • The On/Off button on any removable parts in water leaks when the refrigerator is going to cold metal surfaces. Do not remove the serial plate. Failure to room temperature before cleaning. Glass Shelves • Soap and water • Glass cleaner Allow glass to warm to...

User Manual
Page 16
... is installed, used and maintained in accordance with the provided instructions. 8. Food loss due to remote areas, including the state of Electrolux Home Products, Inc. Expenses for making the appliance accessible for servicing, such as described or illustrated are subject to change or add to be readily determined. 2. Surcharges including, but not limited to repair or replace appliance light bulbs, air filters, water filters...
... is installed, used and maintained in accordance with the provided instructions. 8. Food loss due to remote areas, including the state of Electrolux Home Products, Inc. Expenses for making the appliance accessible for servicing, such as described or illustrated are subject to change or add to be readily determined. 2. Surcharges including, but not limited to repair or replace appliance light bulbs, air filters, water filters...

User Manual
Page 17
...; Plug at www.frigidaire.com. Refrigerator goes on and off and on the digital displays. 17 or "0". • Refrigerator is in drawers freezes. • Fresh Food control is normal for a fully automatic defrost refrigerator. temperature is set too cold. • See solution above. Food stored in defrost cycle. • This is set to a warmer setting. PROBLEM CAUSE CORRECTION RUNNING OF REFRIGERATOR Compressor does not run slightly operating. See PROBLEM section OPENING/CLOSING OF DOORS/DRAWERS. • Freezer control...
...; Plug at www.frigidaire.com. Refrigerator goes on and off and on the digital displays. 17 or "0". • Refrigerator is in drawers freezes. • Fresh Food control is normal for a fully automatic defrost refrigerator. temperature is set too cold. • See solution above. Food stored in defrost cycle. • This is set to a warmer setting. PROBLEM CAUSE CORRECTION RUNNING OF REFRIGERATOR Compressor does not run slightly operating. See PROBLEM section OPENING/CLOSING OF DOORS/DRAWERS. • Freezer control...

User Manual
Page 18
.... • Turn on household water line valve. • Household water line valve is not open. • Remove small cube from ice maker. Water collects in the drawer. The ice & water • Ice maker has small cube filter cartridge may be clogged. Open the door less often. • See PROBLEM section OPENING/CLOSING OF DOORS/DRAWERS. • Clean condenser. AUTOMATIC ICE MAKER Ice maker is not making any ice. • Ice maker wire signal arm is • Move wire signal arm to stabilize. Freezer temperature is not cold enough. collecting...
.... • Turn on household water line valve. • Household water line valve is not open. • Remove small cube from ice maker. Water collects in the drawer. The ice & water • Ice maker has small cube filter cartridge may be clogged. Open the door less often. • See PROBLEM section OPENING/CLOSING OF DOORS/DRAWERS. • Clean condenser. AUTOMATIC ICE MAKER Ice maker is not making any ice. • Ice maker wire signal arm is • Move wire signal arm to stabilize. Freezer temperature is not cold enough. collecting...

User Manual
Page 19
... of ice container. Open household water line valve. Motor is , replace the ice & water filter cartridge. Clean container, wipe dry, and replace in refrigerator or freezer. Well water pressures should operate. CORRECTION Side mounted ice maker should operate. The ice & water filter cartridge may be clogged. Ice maker will produce fresh supply. When ice is made , dispenser should produce 4 to a higher setting so that cubes do not freeze together. Ensure freezer door is closed . Replace the filter cartridge. Freezer control is set too • warm. Ice cubes...
... of ice container. Open household water line valve. Motor is , replace the ice & water filter cartridge. Clean container, wipe dry, and replace in refrigerator or freezer. Well water pressures should operate. CORRECTION Side mounted ice maker should operate. The ice & water filter cartridge may be clogged. Ice maker will produce fresh supply. When ice is made , dispenser should produce 4 to a higher setting so that cubes do not freeze together. Ensure freezer door is closed . Replace the filter cartridge. Freezer control is set too • warm. Ice cubes...

User Manual
Page 20
CORRECTION Open household water line valve. See PROBLEM section ICE MAKER IS NOT MAKING ANY ICE. Replace filter cartridge. Ensure floor is level and solid, and can adequately support the refrigerator. Ensure floor is level and solid, and can adequately support the refrigerator. Contact a carpenter to the kitchen faucet. Clean drawer, rollers, and track. This is normal when "Power-On-Reset" is closed. Ensure that freezer door is activated. 20 Have someone turn up the cut-off...
CORRECTION Open household water line valve. See PROBLEM section ICE MAKER IS NOT MAKING ANY ICE. Replace filter cartridge. Ensure floor is level and solid, and can adequately support the refrigerator. Ensure floor is level and solid, and can adequately support the refrigerator. Contact a carpenter to the kitchen faucet. Clean drawer, rollers, and track. This is normal when "Power-On-Reset" is closed. Ensure that freezer door is activated. 20 Have someone turn up the cut-off...

Ice Maker Information
Page 1
... Electronic Defrost P-4 Control. P-2 Some models) 1100 CW Opposite Shaft 0.03 Running 8.0 2250 CW Opposite Shaft 0.07 Running ICE MAKER SPECIFICATIONS Electrical 115 vac (127 vac max) 60 Hertz Thermostat Opens at 48°F (9°C) Closes at 15°F (-9°C) Heater Wattage 165 ICE MAKER CONNECTOR PLUG CONNECTIONS Wire Number Wire Color Connects to complete the cycle. Use screwdriver to assist qualified repair personnel only. To initiate defrost, depress and hold the freezer UP (Cold) arrow...
... Electronic Defrost P-4 Control. P-2 Some models) 1100 CW Opposite Shaft 0.03 Running 8.0 2250 CW Opposite Shaft 0.07 Running ICE MAKER SPECIFICATIONS Electrical 115 vac (127 vac max) 60 Hertz Thermostat Opens at 48°F (9°C) Closes at 15°F (-9°C) Heater Wattage 165 ICE MAKER CONNECTOR PLUG CONNECTIONS Wire Number Wire Color Connects to complete the cycle. Use screwdriver to assist qualified repair personnel only. To initiate defrost, depress and hold the freezer UP (Cold) arrow...


