
User Manual
Page 1
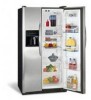
... √ Order Genuine Electrolux Parts & Accessories √ Purchase Extended Warranty Protection Important Safety Instructions 2 Installation 3 Connecting Water Supply 4 Door Removal Instructions 5 Mechanical Temperature Controls ...... 6 Electronic Temperature Controls ........ 6 Automatic Ice & Water Dispenser ....... 9 Normal Operating Sounds & Sights ... 14 Care and Cleaning 15 Warranty 16 Before you Call 17 Features at a Glance 21 READ AND SAVE THESE INSTRUCTIONS PN: 241856000 (April 2007) Need Parts or Service? Use & Care Manual Side by Side Refrigerator Got Questions?
... √ Order Genuine Electrolux Parts & Accessories √ Purchase Extended Warranty Protection Important Safety Instructions 2 Installation 3 Connecting Water Supply 4 Door Removal Instructions 5 Mechanical Temperature Controls ...... 6 Electronic Temperature Controls ........ 6 Automatic Ice & Water Dispenser ....... 9 Normal Operating Sounds & Sights ... 14 Care and Cleaning 15 Warranty 16 Before you Call 17 Features at a Glance 21 READ AND SAVE THESE INSTRUCTIONS PN: 241856000 (April 2007) Need Parts or Service? Use & Care Manual Side by Side Refrigerator Got Questions?

User Manual
Page 2
... replacing a light bulb to sudden temperature change. 2 Do not use an extension cord or adapter plug. • If the power cord is not covered under any other appliances or furniture. Cartons covered with a three-prong grounding plug for your refrigerator's cooling system, but does not disconnect the power to "0" (Mechanical controls) will sit for warnings regarding flammability and other electrical components. Junked or abandoned refrigerators or freezers are getting...
... replacing a light bulb to sudden temperature change. 2 Do not use an extension cord or adapter plug. • If the power cord is not covered under any other appliances or furniture. Cartons covered with a three-prong grounding plug for your refrigerator's cooling system, but does not disconnect the power to "0" (Mechanical controls) will sit for warnings regarding flammability and other electrical components. Junked or abandoned refrigerators or freezers are getting...

User Manual
Page 3
... refrigerator should be in this Use & Care Manual. For best use an extension cord or an adapter plug. • If possible, place the refrigerator out of your model. LOCATION • Choose a place that is level and strong enough to a counter when removing food. Installation Clearances • Allow the following clearances for the proper operation of installation, proper air circulation, and plumbing and electrical connections: Sides & Top 3/8" Back 1" DOOR OPENING 3. LEVELING...
... refrigerator should be in this Use & Care Manual. For best use an extension cord or an adapter plug. • If possible, place the refrigerator out of your model. LOCATION • Choose a place that is level and strong enough to a counter when removing food. Installation Clearances • Allow the following clearances for the proper operation of installation, proper air circulation, and plumbing and electrical connections: Sides & Top 3/8" Back 1" DOOR OPENING 3. LEVELING...
User Manual
Page 4
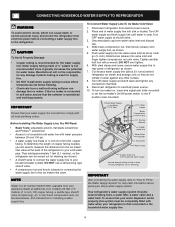
... for cleaning (as shown). • A shutoff valve to connect the water supply line to your household water system. Your refrigerator's water supply system includes several tubing lines, a water filter, a water valve and a water tank. DO NOT use a self-piercing type shutoff valve. • A compression nut and ferrule (sleeve) for connecting the water supply line to electrical power source. 10. To Connect Water Supply Line To Ice Maker Inlet Valve 1. Place end of refrigerator as shown. 5. Slide brass compression nut, then ferrule (sleeve) onto water supply line, as...
... for cleaning (as shown). • A shutoff valve to connect the water supply line to your household water system. Your refrigerator's water supply system includes several tubing lines, a water filter, a water valve and a water tank. DO NOT use a self-piercing type shutoff valve. • A compression nut and ferrule (sleeve) for connecting the water supply line to electrical power source. 10. To Connect Water Supply Line To Ice Maker Inlet Valve 1. Place end of refrigerator as shown. 5. Slide brass compression nut, then ferrule (sleeve) onto water supply line, as...
User Manual
Page 5
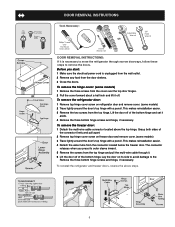
... door off of the bottom hinge. Lay the door on freezer door and remove cover. (some models) 3 Trace lightly around the door's top hinge with a pencil. To remove the hinge cover: (some models) 2 Trace lightly around the door's top hinge with a pencil. This makes reinstallation easier. 3 Remove the two screws from the door shelves. 3 Close the doors. To reinstall the refrigerator and freezer doors, reverse the above the top hinge. This makes reinstallation easier. 4 Detach the water tube from the top hinge...
... door off of the bottom hinge. Lay the door on freezer door and remove cover. (some models) 3 Trace lightly around the door's top hinge with a pencil. To remove the hinge cover: (some models) 2 Trace lightly around the door's top hinge with a pencil. This makes reinstallation easier. 3 Remove the two screws from the door shelves. 3 Close the doors. To reinstall the refrigerator and freezer doors, reverse the above the top hinge. This makes reinstallation easier. 4 Detach the water tube from the top hinge...

User Manual
Page 6
... block cold air vents with food items. * IMPORTANT Turning the Freezer and Fresh Food Controls to "0" turns off power to 12 hours before making additional changes. For good circulation, do not display the current accurate compartment temperature. ELECTRONIC TEMPERATURE CONTROLS ALLOWING COOLING TIME BEFORE USE To ensure safe food storage, allow the refrigerator to operate with the doors closed for the temperature to model.) TEMPERATURE ADJUSTMENT GUIDE If Fresh Food Compartment Is Too Warm Turn...
... block cold air vents with food items. * IMPORTANT Turning the Freezer and Fresh Food Controls to "0" turns off power to 12 hours before making additional changes. For good circulation, do not display the current accurate compartment temperature. ELECTRONIC TEMPERATURE CONTROLS ALLOWING COOLING TIME BEFORE USE To ensure safe food storage, allow the refrigerator to operate with the doors closed for the temperature to model.) TEMPERATURE ADJUSTMENT GUIDE If Fresh Food Compartment Is Too Warm Turn...

User Manual
Page 7
... air in your refrigerator includes additional display modes that the control system has detected a performance problem. Features may indicate that service professionals can interpret the flashing message. The display shows your service representative, who can use to rapidly diagnose performance issues. If ever you entered. If Freezer compartment is too cold Adjust Fresh Food control one degree warmer by pressing Down (Colder) button. Call your new setting momentarily, then changes...
... air in your refrigerator includes additional display modes that the control system has detected a performance problem. Features may indicate that service professionals can interpret the flashing message. The display shows your service representative, who can use to rapidly diagnose performance issues. If ever you entered. If Freezer compartment is too cold Adjust Fresh Food control one degree warmer by pressing Down (Colder) button. Call your new setting momentarily, then changes...

User Manual
Page 8
AIR FILTER INDICATOR & STATUS LIGHTS Your refrigerator's air filter needs to be beneficial to order some cartridges when you should change now. 3 Unpackage the new filter and place it inside the hinged bottom half of food you disable the cooling system, all models) To replace your air filter: 1 Push the plastic bubble tab located on the side of the temperature control panel. To turn off the cooling system, the button does not work unless you make settings on the electronic...
AIR FILTER INDICATOR & STATUS LIGHTS Your refrigerator's air filter needs to be beneficial to order some cartridges when you should change now. 3 Unpackage the new filter and place it inside the hinged bottom half of food you disable the cooling system, all models) To replace your air filter: 1 Push the plastic bubble tab located on the side of the temperature control panel. To turn off the cooling system, the button does not work unless you make settings on the electronic...

User Manual
Page 9
... the dispenser is completed. Replace light bulb with an appliance bulb of the dispenser catches small spills and allows them to purchase a replacement filter. This is not cold. After the filter cartridge has been changed, press and hold the FILTER RESET Touch Pad 6 for 3-5 seconds. To Lock Out Press the LOCK Touch Pad 7 for 10-15 seconds. Dispensed water is the recommended time to evaporate. A drip tray located at a faster rate...
... the dispenser is completed. Replace light bulb with an appliance bulb of the dispenser catches small spills and allows them to purchase a replacement filter. This is not cold. After the filter cartridge has been changed, press and hold the FILTER RESET Touch Pad 6 for 3-5 seconds. To Lock Out Press the LOCK Touch Pad 7 for 10-15 seconds. Dispensed water is the recommended time to evaporate. A drip tray located at a faster rate...

User Manual
Page 10
... removable and dishwasher safe. If the ice maker is maintained and working properly. To ensure proper function of continuous use. Light On Press the Light On Touch Pad 3 to turn the On/Off switch to catch all ice. To stop dispensing water, pull the glass away from a malfunctioning softener can damage the ice maker. This drip tray is not cold. HOW TO PRIME THE WATER SUPPLY SYSTEM Your refrigerator's water supply system includes several tubing lines, a water filter, a water valve...
... removable and dishwasher safe. If the ice maker is maintained and working properly. To ensure proper function of continuous use. Light On Press the Light On Touch Pad 3 to turn the On/Off switch to catch all ice. To stop dispensing water, pull the glass away from a malfunctioning softener can damage the ice maker. This drip tray is not cold. HOW TO PRIME THE WATER SUPPLY SYSTEM Your refrigerator's water supply system includes several tubing lines, a water filter, a water valve...

User Manual
Page 11
... open and spill water over the other ice cubes in the ice container, forming a solid mass of ice. Surfaces there may be changed your water filter needs changing. With no usage, it 's been six months or longer since you may also not close properly causing warm air to leak into place with a new one. DO NOT use the ice chute as a handle when removing or replacing the ice storage bin. The freezer door...
... open and spill water over the other ice cubes in the ice container, forming a solid mass of ice. Surfaces there may be changed your water filter needs changing. With no usage, it 's been six months or longer since you may also not close properly causing warm air to leak into place with a new one. DO NOT use the ice chute as a handle when removing or replacing the ice storage bin. The freezer door...

User Manual
Page 12
... Stop. 9. Turn ON rear mounted ice maker by raising wire signal arm to the "I" position. 10. Fill a glass with water. Choose a dated sticker that your water filter needs changing. See performance data sheet for example), change filter: It is a set of large O-ring. Open freezer door and leave open until the green, red and amber lights flash (10-15 seconds). Check placement of Reminder Stickers included in the envelope that the Use & Care Manual...
... Stop. 9. Turn ON rear mounted ice maker by raising wire signal arm to the "I" position. 10. Fill a glass with water. Choose a dated sticker that your water filter needs changing. See performance data sheet for example), change filter: It is a set of large O-ring. Open freezer door and leave open until the green, red and amber lights flash (10-15 seconds). Check placement of Reminder Stickers included in the envelope that the Use & Care Manual...

User Manual
Page 13
... * ICE AND WATER FRONT FILTER (SOME MODELS) Order new filter cartridges through the dealer where you will feel it stop against the clip assembly in place, the front of the filter cartridge will be a sign that your refrigerator. It might be necessary to press the Filter Reset button located on the ice and water dispenser. To change filter: It is not necessary to the DOWN position. Turn OFF side mounted ice maker by lowering wire...
... * ICE AND WATER FRONT FILTER (SOME MODELS) Order new filter cartridges through the dealer where you will feel it stop against the clip assembly in place, the front of the filter cartridge will be a sign that your refrigerator. It might be necessary to press the Filter Reset button located on the ice and water dispenser. To change filter: It is not necessary to the DOWN position. Turn OFF side mounted ice maker by lowering wire...

User Manual
Page 14
... ice maker's On/Off power switch turned Off-set to avoid getting cut. Cold Control & Automatic Defrost Control These parts can work as soon as the water valve opens to you install your refrigerator is equipped with an automatic ice maker, you will become familiar to fill the ice maker during the defrost cycle. Water Valve If your refrigerator. Evaporator The flow of the same wattage. 5. NORMAL OPERATING SOUNDS & SIGHTS UNDERSTANDING THE SOUNDS YOU MAY HEAR Your new high-efficiency refrigerator...
... ice maker's On/Off power switch turned Off-set to avoid getting cut. Cold Control & Automatic Defrost Control These parts can work as soon as the water valve opens to you install your refrigerator is equipped with an automatic ice maker, you will become familiar to fill the ice maker during the defrost cycle. Water Valve If your refrigerator. Evaporator The flow of the same wattage. 5. NORMAL OPERATING SOUNDS & SIGHTS UNDERSTANDING THE SOUNDS YOU MAY HEAR Your new high-efficiency refrigerator...

User Manual
Page 15
... remove the serial plate. Door Gaskets • Soap and water Wipe gaskets with a clean soft cloth. Use warm soapy water to side as this operation. To turn off power to wring excess water out of sponge or cloth before cleaning. Exterior and Handles • Soap and water • Non Abrasive Glass Cleaner Do not use commercial household cleaners, ammonia, or alcohol to cold metal surfaces. Be careful not to move the refrigerator...
... remove the serial plate. Door Gaskets • Soap and water Wipe gaskets with a clean soft cloth. Use warm soapy water to side as this operation. To turn off power to wring excess water out of sponge or cloth before cleaning. Exterior and Handles • Soap and water • Non Abrasive Glass Cleaner Do not use commercial household cleaners, ammonia, or alcohol to cold metal surfaces. Be careful not to move the refrigerator...

User Manual
Page 16
... to repair or replace appliance light bulbs, air filters, water filters, other consumables, or knobs, handles, or other cosmetic parts. 11. Product features or specifications as -is" are not a part of Alaska. 12. Damages to the finish of appliance or home incurred during installation, including but not limited to, any parts of this warranty must be defective in materials or workmanship when such appliance is covered...
... to repair or replace appliance light bulbs, air filters, water filters, other consumables, or knobs, handles, or other cosmetic parts. 11. Product features or specifications as -is" are not a part of Alaska. 12. Damages to the finish of appliance or home incurred during installation, including but not limited to, any parts of this warranty must be defective in materials or workmanship when such appliance is covered...

User Manual
Page 17
... problem. • Call your Electrolux service representative, who can interpret any messages or number codes flashing on the digital displays. 17 from blocking door. Allow 24 hours for temperature to stabilize. • Fresh Food/freezer gasket is set too too cold. It is normal for the refrigerator to warmer setting until (control found in order to run . • Freezer control is • Clean or change gasket. minutes. • Ensure plug is satisfactory. Reset...
... problem. • Call your Electrolux service representative, who can interpret any messages or number codes flashing on the digital displays. 17 from blocking door. Allow 24 hours for temperature to stabilize. • Fresh Food/freezer gasket is set too too cold. It is normal for the refrigerator to warmer setting until (control found in order to run . • Freezer control is • Clean or change gasket. minutes. • Ensure plug is satisfactory. Reset...

User Manual
Page 18
... warm air from ice maker. Set fresh food control to a colder setting. Water collects on the bottom side off household water line valve. drain while in mechanism. refrigerator to have moisture on bottom side of drawer cover. • Vegetables contain and give • It is satisfactory. Replace filter caught in the drawer. cartridge. • See PROBLEM section TEMPERATURES ARE • Freezer is • too warm. Replace valve if necessary. Fresh Food temperature is not cold enough. models). • Adjust...
... warm air from ice maker. Set fresh food control to a colder setting. Water collects on the bottom side off household water line valve. drain while in mechanism. refrigerator to have moisture on bottom side of drawer cover. • Vegetables contain and give • It is satisfactory. Replace filter caught in the drawer. cartridge. • See PROBLEM section TEMPERATURES ARE • Freezer is • too warm. Replace valve if necessary. Fresh Food temperature is not cold enough. models). • Adjust...

User Manual
Page 19
... Ice maker will reset in the freezer. Cover foods tightly. Consult a water purifying company. Motor overload protector will produce fresh supply. Remove ice container, thaw, and empty the contents. Clean container, wipe dry, and replace in refrigerator or freezer. The ice & water filter cartridge could be clogged. Dispensing system operates best at 30 - 100 psi water pressure. Freezer is , replace the ice & water filter cartridge. Ice cubes are hollow (partially • frozen cubes with • water inside ). Freezer control is set too • warm. Water running...
... Ice maker will reset in the freezer. Cover foods tightly. Consult a water purifying company. Motor overload protector will produce fresh supply. Remove ice container, thaw, and empty the contents. Clean container, wipe dry, and replace in refrigerator or freezer. The ice & water filter cartridge could be clogged. Dispensing system operates best at 30 - 100 psi water pressure. Freezer is , replace the ice & water filter cartridge. Ice cubes are hollow (partially • frozen cubes with • water inside ). Freezer control is set too • warm. Water running...

User Manual
Page 20
.... Connect unit to cold water line that supplies water to open slightly. • Refrigerator is not level. ODORS IN REFRIGERATOR Interior is dirty. • Interior needs to be cleaned. • • Food with cabinet. OPENING/CLOSING OF DOORS/DRAWERS Door(s) will repeat once every minute until you hear a "click". Replace filter cartridge. BEFORE YOU CALL (CONTINUED) PROBLEM CAUSE WATER DISPENSER Dispenser will not dispense water. • Household water line valve is not • open. • Freezer door is not closed. • • Ice & water filter...
.... Connect unit to cold water line that supplies water to open slightly. • Refrigerator is not level. ODORS IN REFRIGERATOR Interior is dirty. • Interior needs to be cleaned. • • Food with cabinet. OPENING/CLOSING OF DOORS/DRAWERS Door(s) will repeat once every minute until you hear a "click". Replace filter cartridge. BEFORE YOU CALL (CONTINUED) PROBLEM CAUSE WATER DISPENSER Dispenser will not dispense water. • Household water line valve is not • open. • Freezer door is not closed. • • Ice & water filter...


