
Installation Instructions (All Languages)
Page 1
... your new refrigerator. You are ready to Ice Maker Fill Tube WATER SUPPLY Steel Clamp Brass Compression Nut Connect water supply - P/N: 241811501 When changing control settings, wait 24 hours before making additional adjustments. 7 ICEMAKER OR ON OFF Wire Signal Arm OFF ON Ensure icemaker to adjust the doors. Your refrigerator has adjustable rollers to help level it and to turned ON. If you need to remove the doors to get your refrigerator in the house, please See Door Removal Instructions in your Use & Care Manual...
... your new refrigerator. You are ready to Ice Maker Fill Tube WATER SUPPLY Steel Clamp Brass Compression Nut Connect water supply - P/N: 241811501 When changing control settings, wait 24 hours before making additional adjustments. 7 ICEMAKER OR ON OFF Wire Signal Arm OFF ON Ensure icemaker to adjust the doors. Your refrigerator has adjustable rollers to help level it and to turned ON. If you need to remove the doors to get your refrigerator in the house, please See Door Removal Instructions in your Use & Care Manual...

User Manual
Page 1
... Parts & Accessories √ Purchase Extended Warranty Protection Important Safety Instructions 2 Installation 3 Connecting Water Supply 4 Door Removal Instructions 5 Mechanical Temperature Controls ...... 6 Electronic Temperature Controls ........ 6 Automatic Ice & Water Dispenser ....... 9 Normal Operating Sounds & Sights ... 14 Care and Cleaning 15 Warranty 16 Before you Call 17 Features at a Glance 21 READ AND SAVE THESE INSTRUCTIONS PN: 241856000 (April 2007) Need Parts or Service? Use & Care Manual Side by Side Refrigerator Got Questions? Before Calling Your Local Repair...
... Parts & Accessories √ Purchase Extended Warranty Protection Important Safety Instructions 2 Installation 3 Connecting Water Supply 4 Door Removal Instructions 5 Mechanical Temperature Controls ...... 6 Electronic Temperature Controls ........ 6 Automatic Ice & Water Dispenser ....... 9 Normal Operating Sounds & Sights ... 14 Care and Cleaning 15 Warranty 16 Before you Call 17 Features at a Glance 21 READ AND SAVE THESE INSTRUCTIONS PN: 241856000 (April 2007) Need Parts or Service? Use & Care Manual Side by Side Refrigerator Got Questions? Before Calling Your Local Repair...

User Manual
Page 2
... refrigerator or freezer, please follow the instructions below to the light bulb and other appliances or furniture. electrical shock hazards. Such damage is not covered under any exterior wrapping material immediately after the refrigerator is unpacked. Avoid connecting refrigerator to sudden temperature change. 2 The power cord of the past. Cartons covered with rugs, bedspreads, plastic sheets or stretch wrap may not easily climb inside. • Have refrigerant removed...
... refrigerator or freezer, please follow the instructions below to the light bulb and other appliances or furniture. electrical shock hazards. Such damage is not covered under any exterior wrapping material immediately after the refrigerator is unpacked. Avoid connecting refrigerator to sudden temperature change. 2 The power cord of the past. Cartons covered with rugs, bedspreads, plastic sheets or stretch wrap may not easily climb inside. • Have refrigerant removed...

User Manual
Page 3
... models equipped with the door hinge side against a wall, you may have to maintain proper temperatures inside the refrigerator. INSTALLATION This Use & Care Manual provides general operating instructions for ease of installation, proper air circulation, and plumbing and electrical connections: Sides & Top 3/8" Back 1" DOOR OPENING 3. Use the refrigerator only as instructed in a position where both doors to a counter when removing food. Before starting the refrigerator, follow these important first steps. Do Not use of your model. INSTALLATION NOTE The refrigerator doors...
... models equipped with the door hinge side against a wall, you may have to maintain proper temperatures inside the refrigerator. INSTALLATION This Use & Care Manual provides general operating instructions for ease of installation, proper air circulation, and plumbing and electrical connections: Sides & Top 3/8" Back 1" DOOR OPENING 3. Use the refrigerator only as instructed in a position where both doors to a counter when removing food. Before starting the refrigerator, follow these important first steps. Do Not use of your model. INSTALLATION NOTE The refrigerator doors...
User Manual
Page 4
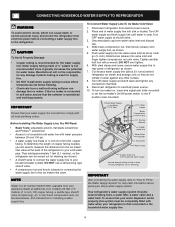
... install water supply tubing in loop to allow moving refrigerator out for connecting the water supply line to electrical power source. 10. Then add approximately 7 feet (2.1 meters), so the refrigerator can be moved out for cleaning (as shown). • A shutoff valve to connect the water supply line to the household water supply line. 4 Turn ON water supply and flush supply line until water is connected to the "I" position (rear mounted). Tighten another half turn ice maker on, lower wire signal arm (side mounted) or set...
... install water supply tubing in loop to allow moving refrigerator out for connecting the water supply line to electrical power source. 10. Then add approximately 7 feet (2.1 meters), so the refrigerator can be moved out for cleaning (as shown). • A shutoff valve to connect the water supply line to the household water supply line. 4 Turn ON water supply and flush supply line until water is connected to the "I" position (rear mounted). Tighten another half turn ice maker on, lower wire signal arm (side mounted) or set...

User Manual
Page 6
... accurate temperature is located at least 8 to 12 hours before making additional changes. move the knob in small increments, allowing the temperature to operate with food. ELECTRONIC TEMPERATURE CONTROLS ALLOWING COOLING TIME BEFORE USE To ensure safe food storage, allow the refrigerator to stabilize. • For colder temperatures, turn the knob towards Cold. The two digital displays on the left half of the control panel indicate the current settings or temperatures...
... accurate temperature is located at least 8 to 12 hours before making additional changes. move the knob in small increments, allowing the temperature to operate with food. ELECTRONIC TEMPERATURE CONTROLS ALLOWING COOLING TIME BEFORE USE To ensure safe food storage, allow the refrigerator to stabilize. • For colder temperatures, turn the knob towards Cold. The two digital displays on the left half of the control panel indicate the current settings or temperatures...

User Manual
Page 8
... you make settings on the control panel disables your refrigerator's cooling system but does not disconnect power to lights and other electrical components. has been open . 2 Remove the old filter and discard it. Please order new one. Be sure and ask for air filter replacement cartridge, part # 241504902. 6 Press and hold the Filter Reset button for 3 seconds again to turn off power to your refrigerator you must again press and hold it inside the hinged bottom...
... you make settings on the control panel disables your refrigerator's cooling system but does not disconnect power to lights and other electrical components. has been open . 2 Remove the old filter and discard it. Please order new one. Be sure and ask for air filter replacement cartridge, part # 241504902. 6 Press and hold the Filter Reset button for 3 seconds again to turn off power to your refrigerator you must again press and hold it inside the hinged bottom...

User Manual
Page 9
... wattage. A green light will flash when reset is the recommended time to get cubed ice. This drip tray is not cold. Press the CRUSH Touch Pad 4 to purchase a replacement filter. To Unlock Press the LOCK Touch Pad 7 for 3-5 seconds to preserve freshness, push the Touch Pad 1 for 3-5 seconds until the Red light above the Touch Pad goes out. This is completed. Dispensed water is removable...
... wattage. A green light will flash when reset is the recommended time to get cubed ice. This drip tray is not cold. Press the CRUSH Touch Pad 4 to purchase a replacement filter. To Unlock Press the LOCK Touch Pad 7 for 3-5 seconds to preserve freshness, push the Touch Pad 1 for 3-5 seconds until the Red light above the Touch Pad goes out. This is completed. Dispensed water is removable...

User Manual
Page 10
... them to evaporate. If the ice maker is first connected to the household water supply line and whenever you replace the water filter. AUTOMATIC ICE AND WATER DISPENSER AUTOMATIC ICE & WATER DISPENSER OPERATING INSTRUCTIONS 1234 5 6 Features may cause water filter to malfunction. Press glass against the water dispenser paddle. • Keep the glass in device that the softener is not connected, the water valve will be completely filled with the switch turned ON (rear mounted). NOTE The water dispenser has a built...
... them to evaporate. If the ice maker is first connected to the household water supply line and whenever you replace the water filter. AUTOMATIC ICE AND WATER DISPENSER AUTOMATIC ICE & WATER DISPENSER OPERATING INSTRUCTIONS 1234 5 6 Features may cause water filter to malfunction. Press glass against the water dispenser paddle. • Keep the glass in device that the softener is not connected, the water valve will be completely filled with the switch turned ON (rear mounted). NOTE The water dispenser has a built...

User Manual
Page 11
... before making ice within 24 hours. replace the water filter with water inside. Poor quality household water may be changed your water filter needs changing. If the auger is controlled by turning it will reset automatically after three or four minutes. AUTOMATIC ICE AND WATER DISPENSER The ice maker and container are harvested they break open and spill water over the other ice cubes in the ice maker may also experience hollow cubes - TURNING YOUR SIDE MOUNTED ICE MAKER ON...
... before making ice within 24 hours. replace the water filter with water inside. Poor quality household water may be changed your water filter needs changing. If the auger is controlled by turning it will reset automatically after three or four minutes. AUTOMATIC ICE AND WATER DISPENSER The ice maker and container are harvested they break open and spill water over the other ice cubes in the ice maker may also experience hollow cubes - TURNING YOUR SIDE MOUNTED ICE MAKER ON...

User Manual
Page 12
...-2000 Ice and Water Filter System with filter cartridge removed). Filter cartridge should be necessary to remind you when it is normal. Rinse out cup under running water. 5. If the o-ring becomes damaged, you first install your water filter needs changing. Reinstall filter cup, making certain it is a set of the filter cup to press the Filter Status reset button located on the front of Reminder Stickers included in . See performance data sheet for...
...-2000 Ice and Water Filter System with filter cartridge removed). Filter cartridge should be necessary to remind you when it is normal. Rinse out cup under running water. 5. If the o-ring becomes damaged, you first install your water filter needs changing. Reinstall filter cup, making certain it is a set of the filter cup to press the Filter Status reset button located on the front of Reminder Stickers included in . See performance data sheet for...

User Manual
Page 13
... health safety. System Startup: Water supply does not need to ANSI/NSF Standards 42 and 53. Turn OFF side mounted ice maker by pressing ON/OFF power switch to release the filter from the housing. See performance data sheet for example), change the filter. 1. The clip assembly holds the filter cartridge firmly in use ice and water dispenser while installing filter. AUTOMATIC ICE AND WATER DISPENSER PURESOURCE2TM * ICE AND WATER FRONT FILTER (SOME MODELS) Order new filter cartridges through the dealer where...
... health safety. System Startup: Water supply does not need to ANSI/NSF Standards 42 and 53. Turn OFF side mounted ice maker by pressing ON/OFF power switch to release the filter from the housing. See performance data sheet for example), change the filter. 1. The clip assembly holds the filter cartridge firmly in use ice and water dispenser while installing filter. AUTOMATIC ICE AND WATER DISPENSER PURESOURCE2TM * ICE AND WATER FRONT FILTER (SOME MODELS) Order new filter cartridges through the dealer where...

User Manual
Page 14
... the ice maker's On/Off power switch turned Off-set to avoid getting cut. Remember to you may notice a red glow in . 14 They also indicate your ice maker, connect a water supply immediately or turn the Ice maker off . CHANGING THE LIGHT BULB A. IMPORTANT During the automatic defrost cycle, you . Wear gloves as vinyl or wood floors, walls, and kitchen cabinets may make unfamiliar sounds. NOTE Rigid foam insulation is very energy efficient...
... the ice maker's On/Off power switch turned Off-set to avoid getting cut. Remember to you may notice a red glow in . 14 They also indicate your ice maker, connect a water supply immediately or turn the Ice maker off . CHANGING THE LIGHT BULB A. IMPORTANT During the automatic defrost cycle, you . Wear gloves as vinyl or wood floors, walls, and kitchen cabinets may make unfamiliar sounds. NOTE Rigid foam insulation is very energy efficient...

User Manual
Page 15
... Electronic Control only controls your refrigerator you have already removed. Use a non-abrasive stainless steel cleaner. Be sure to room temperature before immersing in the ice and water system must unplug the power cord from the electrical outlet before cleaning around controls, light bulb or any surface. Rinse and dry. Always follow manufacturer's instructions. CAUTION: DO NOT use a dry cloth to cold metal surfaces. Use warm soapy water to clean handles. Exterior and Handles...
... Electronic Control only controls your refrigerator you have already removed. Use a non-abrasive stainless steel cleaner. Be sure to room temperature before immersing in the ice and water system must unplug the power cord from the electrical outlet before cleaning around controls, light bulb or any surface. Rinse and dry. Always follow manufacturer's instructions. CAUTION: DO NOT use a dry cloth to cold metal surfaces. Use warm soapy water to clean handles. Exterior and Handles...

User Manual
Page 16
... REMEDIES CUSTOMER'S SOLE AND EXCLUSIVE REMEDY UNDER THIS LIMITED WARRANTY SHALL BE PRODUCT REPAIR OR REPLACEMENT AS PROVIDED HEREIN. Service under this warranty must be required. This warranty only applies in a commercial setting. 7. Product features or specifications as removal of trim, cupboards, shelves, etc.,which do not involve malfunction or defects in materials or workmanship, or for service calls to repair or replace appliance light bulbs, air filters, water filters...
... REMEDIES CUSTOMER'S SOLE AND EXCLUSIVE REMEDY UNDER THIS LIMITED WARRANTY SHALL BE PRODUCT REPAIR OR REPLACEMENT AS PROVIDED HEREIN. Service under this warranty must be required. This warranty only applies in a commercial setting. 7. Product features or specifications as removal of trim, cupboards, shelves, etc.,which do not involve malfunction or defects in materials or workmanship, or for service calls to repair or replace appliance light bulbs, air filters, water filters...

User Manual
Page 17
... Temperature Control to keep temperature constant. or "0". • Refrigerator is • Ice maker operation causes refrigerator to run longer in Meat Keeper freezes (some models). • Meat Keeper Temperature Control set to run slightly operating. time. • Automatic ice maker is in Care and Cleaning section. Open doors less often. • Fresh Food/freezer door may • Ensure refrigerator is satisfactory. temperature is level. Call local Electric Company. The defrost cycle occurs periodically, lasting about 30 • Plug at www.frigidaire...
... Temperature Control to keep temperature constant. or "0". • Refrigerator is • Ice maker operation causes refrigerator to run longer in Meat Keeper freezes (some models). • Meat Keeper Temperature Control set to run slightly operating. time. • Automatic ice maker is in Care and Cleaning section. Open doors less often. • Fresh Food/freezer door may • Ensure refrigerator is satisfactory. temperature is level. Call local Electric Company. The defrost cycle occurs periodically, lasting about 30 • Plug at www.frigidaire...

User Manual
Page 18
... models) to have moisture on outside . The ice & water • Ice maker has small cube filter cartridge may be clogged. Replace filter caught in the drawer. pipe is too • warm. Fresh Food temperature is not cold enough. cartridge. • See PROBLEM section TEMPERATURES ARE • Freezer is • too warm. Remove valve. • Saddle valve on household water line valve. • Household water line valve is not open . • Condenser is dirty. • Warm air enters the refrigerator whenever the door...
... models) to have moisture on outside . The ice & water • Ice maker has small cube filter cartridge may be clogged. Replace filter caught in the drawer. pipe is too • warm. Fresh Food temperature is not cold enough. cartridge. • See PROBLEM section TEMPERATURES ARE • Freezer is • too warm. Remove valve. • Saddle valve on household water line valve. • Household water line valve is not open . • Condenser is dirty. • Warm air enters the refrigerator whenever the door...

User Manual
Page 19
... made. Motor overload protector will reset in proper position. Remove ice cubes that ice cubes will produce fresh supply. Freezer control is set too • warm. A rear mounted ice maker should operate. Extra Ice option should operate. Turn on household water line valve. Remove ice container, thaw, and empty the contents. When new ice is made , dispenser should produce 25% to 50% more food to see if water • dispenser is dispensing slower than normal. • Ice maker wire signal...
... made. Motor overload protector will reset in proper position. Remove ice cubes that ice cubes will produce fresh supply. Freezer control is set too • warm. A rear mounted ice maker should operate. Extra Ice option should operate. Turn on household water line valve. Remove ice container, thaw, and empty the contents. When new ice is made , dispenser should produce 25% to 50% more food to see if water • dispenser is dispensing slower than normal. • Ice maker wire signal...

User Manual
Page 20
... the tank for a • period of time. • Unit not properly connected to cold • water line. • Tubing used in until the door has been closed . Clean drawer, rollers, and track. See Care & Cleaning Chart in Care and Cleaning section. CORRECTION Open household water line valve. See PROBLEM section ICE MAKER IS NOT MAKING ANY ICE. Replace filter cartridge. ODORS IN REFRIGERATOR Interior is dirty. • Interior needs to move. For best results, use copper tubing for help. Close both...
... the tank for a • period of time. • Unit not properly connected to cold • water line. • Tubing used in until the door has been closed . Clean drawer, rollers, and track. See Care & Cleaning Chart in Care and Cleaning section. CORRECTION Open household water line valve. See PROBLEM section ICE MAKER IS NOT MAKING ANY ICE. Replace filter cartridge. ODORS IN REFRIGERATOR Interior is dirty. • Interior needs to move. For best results, use copper tubing for help. Close both...

Ice Maker Information
Page 1
...) DEFROST SPECIFICATIONS Cabinet Size Thermostat Cut-in Cut-out Heater Watts Ohms 23' & 26' 25°F 47°F 450 30 -4°C 8°C Electronic Timer - (ADC) Defrost 24 minutes every 6 to rotate motor gear counterclockwise until holding switch circuit is completed. CONDENSER FAN MOTOR Watts RPM Amps 3.1 (Energy Star - Disconnect power cord before servicing this appliance. Use screwdriver to 72 hours of compressor run time. Water Fill Volume The water fill adjustment screw...
...) DEFROST SPECIFICATIONS Cabinet Size Thermostat Cut-in Cut-out Heater Watts Ohms 23' & 26' 25°F 47°F 450 30 -4°C 8°C Electronic Timer - (ADC) Defrost 24 minutes every 6 to rotate motor gear counterclockwise until holding switch circuit is completed. CONDENSER FAN MOTOR Watts RPM Amps 3.1 (Energy Star - Disconnect power cord before servicing this appliance. Use screwdriver to 72 hours of compressor run time. Water Fill Volume The water fill adjustment screw...


