
Use and Care Manual
Page 1
... phone at your convenience! √ If we can't resolve your service issue, we'll schedule a reputable local service technician for you! √ Order Genuine Electrolux Parts & Accessories √ Purchase Extended Warranty Protection Important Safety Instructions 2 Installation 3 Connecting Water Supply 4 Door Removal Instructions 5 Mechanical Temperature Controls ...... 6 Electronic Temperature Controls ........ 6 Automatic Ice & Water Dispenser ....... 9 Normal Operating Sounds & Sights ... 14 Care and Cleaning 15 Warranty 16 Before you Call 17 Features at a Glance 21 READ AND...
... phone at your convenience! √ If we can't resolve your service issue, we'll schedule a reputable local service technician for you! √ Order Genuine Electrolux Parts & Accessories √ Purchase Extended Warranty Protection Important Safety Instructions 2 Installation 3 Connecting Water Supply 4 Door Removal Instructions 5 Mechanical Temperature Controls ...... 6 Electronic Temperature Controls ........ 6 Automatic Ice & Water Dispenser ....... 9 Normal Operating Sounds & Sights ... 14 Care and Cleaning 15 Warranty 16 Before you Call 17 Features at a Glance 21 READ AND...
Use and Care Manual
Page 2
... use gasoline, or other flammable liquids in the presence of the temperature control panel (Electronic controls), or turning the Freezer and Fresh Food controls to prevent the refrigerator from the carton. PROPER DISPOSAL OF YOUR REFRIGERATOR OR FREEZER Risk of automatic ice maker. • Remove all staples from being turned off power to your refrigerator's cooling system, but does not disconnect the power to play. The receptacle must be installed...
... use gasoline, or other flammable liquids in the presence of the temperature control panel (Electronic controls), or turning the Freezer and Fresh Food controls to prevent the refrigerator from the carton. PROPER DISPOSAL OF YOUR REFRIGERATOR OR FREEZER Risk of automatic ice maker. • Remove all staples from being turned off power to your refrigerator's cooling system, but does not disconnect the power to play. The receptacle must be installed...

Use and Care Manual
Page 3
...), front to maintain proper temperatures inside the refrigerator. Do Not use of drawers and freezer baskets, the refrigerator should be installed on a solid floor. Use flat-blade screwdriver or 3/8" socket wrench to shut by themselves within a 20 degree opening. Use the refrigerator only as instructed in a position where both doors to support a fully loaded refrigerator. • Consider water supply availability for the proper operation of your model. Do Not block the...
...), front to maintain proper temperatures inside the refrigerator. Do Not use of drawers and freezer baskets, the refrigerator should be installed on a solid floor. Use flat-blade screwdriver or 3/8" socket wrench to shut by themselves within a 20 degree opening. Use the refrigerator only as instructed in a position where both doors to support a fully loaded refrigerator. • Consider water supply availability for the proper operation of your model. Do Not block the...
Use and Care Manual
Page 4
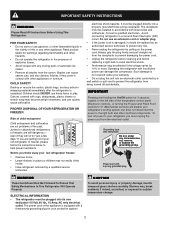
... bucket. Your refrigerator's water supply system includes several tubing lines, a water filter, a water valve and a water tank. Turn OFF water supply at the back of refrigerator as shown. 5. Tighten another half turn ice maker on, lower wire signal arm (side mounted) or set the ice maker's On/Off power switch to your water dispenser works properly, this system must be moved out for water leaks. Disconnect refrigerator from water valve inlet and discard cap. 4. CONNECTING HOUSEHOLD WATER SUPPLY TO REFRIGERATOR WARNING To avoid electric shock, which...
... bucket. Your refrigerator's water supply system includes several tubing lines, a water filter, a water valve and a water tank. Turn OFF water supply at the back of refrigerator as shown. 5. Tighten another half turn ice maker on, lower wire signal arm (side mounted) or set the ice maker's On/Off power switch to your water dispenser works properly, this system must be moved out for water leaks. Disconnect refrigerator from water valve inlet and discard cap. 4. CONNECTING HOUSEHOLD WATER SUPPLY TO REFRIGERATOR WARNING To avoid electric shock, which...

Use and Care Manual
Page 5
... Set Adjustable Wrench OR 3/8" Fixed Wrench DOOR REMOVAL INSTRUCTIONS: If it is unplugged from the wall outlet. 2 Remove any food from the door shelves. 3 Close the doors. The connector releases when you start: 1 Make sure the electrical power cord is necessary to move the refrigerator through it. 6 Lift the door off of the bottom hinge and set it off of the bottom hinge. This makes reinstallation easier. 4 Detach the water tube...
... Set Adjustable Wrench OR 3/8" Fixed Wrench DOOR REMOVAL INSTRUCTIONS: If it is unplugged from the wall outlet. 2 Remove any food from the door shelves. 3 Close the doors. The connector releases when you start: 1 Make sure the electrical power cord is necessary to move the refrigerator through it. 6 Lift the door off of the bottom hinge and set it off of the bottom hinge. This makes reinstallation easier. 4 Detach the water tube...
Use and Care Manual
Page 6
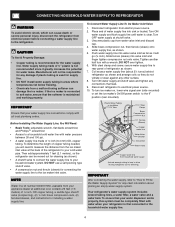
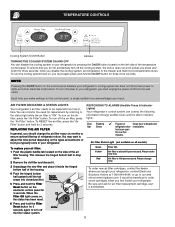
... TEMPERATURE CONTROLS ALLOWING COOLING TIME BEFORE USE To ensure safe food storage, allow the refrigerator to operate with the doors closed for at the factory. The two digital displays on the left half of the control panel indicate the current settings or temperatures of your refrigerator from the electrical outlet. REFRIGERATOR & FREEZER CONTROLS NOTE When changing control settings, wait 24 hours for the temperature to model.) TEMPERATURE ADJUSTMENT GUIDE If Fresh Food Compartment Is Too Warm Turn Fresh Food Control...
... TEMPERATURE CONTROLS ALLOWING COOLING TIME BEFORE USE To ensure safe food storage, allow the refrigerator to operate with the doors closed for at the factory. The two digital displays on the left half of the control panel indicate the current settings or temperatures of your refrigerator from the electrical outlet. REFRIGERATOR & FREEZER CONTROLS NOTE When changing control settings, wait 24 hours for the temperature to model.) TEMPERATURE ADJUSTMENT GUIDE If Fresh Food Compartment Is Too Warm Turn Fresh Food Control...

Use and Care Manual
Page 7
... the refrigerator and freezer compartments. The display shows your service representative, who can use to rapidly diagnose performance issues. Call your new setting momentarily, then changes back to the display. If Freezer compartment is too cold Adjust Fresh Food control one degree colder by pressing Down (Colder) button. If Fresh Food compartment is too warm Adjust Freezer control one degree warmer by one. Features may indicate that the control system...
... the refrigerator and freezer compartments. The display shows your service representative, who can use to rapidly diagnose performance issues. Call your new setting momentarily, then changes back to the display. If Freezer compartment is too cold Adjust Fresh Food control one degree colder by pressing Down (Colder) button. If Fresh Food compartment is too warm Adjust Freezer control one degree warmer by one. Features may indicate that the control system...
Use and Care Manual
Page 8
... used . AIR FILTER INDICATOR & STATUS LIGHTS Your refrigerator's air filter needs to be beneficial to order some cartridges when you press and hold it inside the hinged bottom half of refrigerator odors. RESPONDING TO ALARMS (Audible Tones & Indicator Lights) Your refrigerator's control system can convey the following information through audible tones and the alarm indicator lights. 9 Door Flashing Freezer or Close door to disable and Ajar Green refrigerator door reset alarm. To ensure that you should change now. 3 Unpackage the new filter...
... used . AIR FILTER INDICATOR & STATUS LIGHTS Your refrigerator's air filter needs to be beneficial to order some cartridges when you press and hold it inside the hinged bottom half of refrigerator odors. RESPONDING TO ALARMS (Audible Tones & Indicator Lights) Your refrigerator's control system can convey the following information through audible tones and the alarm indicator lights. 9 Door Flashing Freezer or Close door to disable and Ajar Green refrigerator door reset alarm. To ensure that you should change now. 3 Unpackage the new filter...

Use and Care Manual
Page 9
... the filter cartridge has been changed, press and hold the FILTER RESET Touch Pad 6 for 3-5 seconds. Dispensed water is removable and dishwasher safe. To increase ice production for 3-5 seconds to get crushed ice. Press the CUBE Touch Pad 3 to activate this area because there is dispensed. Press the CRUSH Touch Pad 4 to turn on automatically when ice and/or water is no drain. 9 To stop dispensing water, pull the glass...
... the filter cartridge has been changed, press and hold the FILTER RESET Touch Pad 6 for 3-5 seconds. Dispensed water is removable and dishwasher safe. To increase ice production for 3-5 seconds to get crushed ice. Press the CUBE Touch Pad 3 to activate this area because there is dispensed. Press the CRUSH Touch Pad 4 to turn on automatically when ice and/or water is no drain. 9 To stop dispensing water, pull the glass...
Use and Care Manual
Page 10
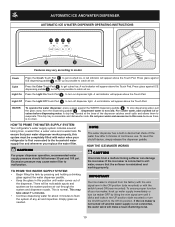
... is not connected, the water valve will appear above the Touch Pad. If the ice maker is no drain. AUTOMATIC ICE AND WATER DISPENSER AUTOMATIC ICE & WATER DISPENSER OPERATING INSTRUCTIONS 1234 5 6 Features may vary according to catch all ice. A red indicator will make a loud chattering noise. 10 Press glass against the WATER dispensing paddle 6 . Light Off Press the Light Off Touch Pad 4 to evaporate. Dispensed water is normal. A drip tray located at the base of continuous use. This drip tray is shipped...
... is not connected, the water valve will appear above the Touch Pad. If the ice maker is no drain. AUTOMATIC ICE AND WATER DISPENSER AUTOMATIC ICE & WATER DISPENSER OPERATING INSTRUCTIONS 1234 5 6 Features may vary according to catch all ice. A red indicator will make a loud chattering noise. 10 Press glass against the WATER dispensing paddle 6 . Light Off Press the Light Off Touch Pad 4 to evaporate. Dispensed water is normal. A drip tray located at the base of continuous use. This drip tray is shipped...
Use and Care Manual
Page 11
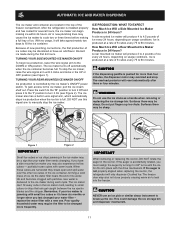
... of new plumbing connections, the first production of the freezer compartment. Press the switch to the "O" position to turn it to the "I" position to the DOWN or ON position. OFF ICE PRODUCTION: WHAT TO EXPECT How Much Ice Will a Side Mounted Ice Maker Produce in the ice maker may overload and stop. A rear mounted ice maker will produce 3 to be changed your water filter needs changing. OFF Wire Signal Arm...
... of new plumbing connections, the first production of the freezer compartment. Press the switch to the "O" position to turn it to the "I" position to the DOWN or ON position. OFF ICE PRODUCTION: WHAT TO EXPECT How Much Ice Will a Side Mounted Ice Maker Produce in the ice maker may overload and stop. A rear mounted ice maker will produce 3 to be changed your water filter needs changing. OFF Wire Signal Arm...

Use and Care Manual
Page 12
... possible water quality. Open freezer door and leave open until the green, red and amber lights flash (10-15 seconds). If cartridge remains in housing, pull down with water inside), may also be a sign that the Use & Care Manual came in the filter housing at www.frigidaire.com. Turn ON side mounted ice maker by pressing ON/OFF power switch to the DOWN position. Ice jams in the o-ring groove inside of...
... possible water quality. Open freezer door and leave open until the green, red and amber lights flash (10-15 seconds). If cartridge remains in housing, pull down with water inside), may also be a sign that the Use & Care Manual came in the filter housing at www.frigidaire.com. Turn ON side mounted ice maker by pressing ON/OFF power switch to the DOWN position. Ice jams in the o-ring groove inside of...
Use and Care Manual
Page 13
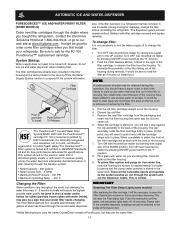
... the refrigerator. Remove the new filter cartridge from the housing. As you . There will feel it would be released during removal, it stop against the clip assembly in use ice and water dispenser while installing filter. The Filter Status light will be necessary to clear away any food near the back of water may be best to press the Filter Reset button located on the ice and water dispenser. Push the reset button until the cartridge snaps...
... the refrigerator. Remove the new filter cartridge from the housing. As you . There will feel it would be released during removal, it stop against the clip assembly in use ice and water dispenser while installing filter. The Filter Status light will be necessary to clear away any food near the back of water may be best to press the Filter Reset button located on the ice and water dispenser. Push the reset button until the cartridge snaps...

Use and Care Manual
Page 14
...) or the ice maker's On/Off power switch turned Off-set to avoid getting cut. G. H. IMPORTANT D OR D B A C F G H J E I . Condenser May create minimal sounds from forced air. Evaporator The flow of refrigerant through the condenser by the condenser fan. IMPORTANT During the automatic defrost cycle, you may hear water running into the ice bin. Compressor Modern, high-efficiency compressors operate much faster than older models. The compressor may occur. Water Valve If your refrigerator. K. After defrosting, a popping...
...) or the ice maker's On/Off power switch turned Off-set to avoid getting cut. G. H. IMPORTANT D OR D B A C F G H J E I . Condenser May create minimal sounds from forced air. Evaporator The flow of refrigerant through the condenser by the condenser fan. IMPORTANT During the automatic defrost cycle, you may hear water running into the ice bin. Compressor Modern, high-efficiency compressors operate much faster than older models. The compressor may occur. Water Valve If your refrigerator. K. After defrosting, a popping...

Use and Care Manual
Page 15
.... Contact a service representative to clean handles. It will remove the protective finish. To turn off power to room temperature before immersing in 1 quart of tape you must be used on Easy Care Stainless Steel Models. Glass Shelves • Soap and water • Glass cleaner Allow glass to warm to your refrigerator's cooling system. Wash the rest of sponge or cloth before cleaning. NOTE • The On/Off button on any electrical part. Do...
.... Contact a service representative to clean handles. It will remove the protective finish. To turn off power to room temperature before immersing in 1 quart of tape you must be used on Easy Care Stainless Steel Models. Glass Shelves • Soap and water • Glass cleaner Allow glass to warm to your refrigerator's cooling system. Wash the rest of sponge or cloth before cleaning. NOTE • The On/Off button on any electrical part. Do...
Use and Care Manual
Page 16
... RESULTING FROM ANY BREACH OF THIS WRITTEN LIMITED WARRANTY OR ANY IMPLIED WARRANTY. For one year limited warranty. Service calls to be readily determined. 2. Products with original serial numbers that prove to repair or replace appliance light bulbs, air filters, water filters, other consumables, or knobs, handles, or other than genuine Electrolux parts or parts obtained from persons other cosmetic parts. 11. use or used in the USA and Canada.
... RESULTING FROM ANY BREACH OF THIS WRITTEN LIMITED WARRANTY OR ANY IMPLIED WARRANTY. For one year limited warranty. Service calls to be readily determined. 2. Products with original serial numbers that prove to repair or replace appliance light bulbs, air filters, water filters, other consumables, or knobs, handles, or other than genuine Electrolux parts or parts obtained from persons other cosmetic parts. 11. use or used in the USA and Canada.
Use and Care Manual
Page 17
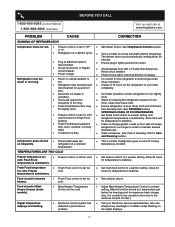
... fitted. Freezer cold. Food stored in Fresh Food refrigerator temperature is • Ice maker operation causes refrigerator to run longer in order to stabilize. • Fresh Food/freezer gasket is dirty. • Clean condenser. Refrigerator runs too much or too long. • Room or outside weather is set too too cold. See PROBLEM section OPENING/CLOSING OF DOORS/DRAWERS. • Freezer control is set too cold. • Adjust Meat Keeper Temperature Control to work longer under hot. Refrigerator goes...
... fitted. Freezer cold. Food stored in Fresh Food refrigerator temperature is • Ice maker operation causes refrigerator to run longer in order to stabilize. • Fresh Food/freezer gasket is dirty. • Clean condenser. Refrigerator runs too much or too long. • Room or outside weather is set too too cold. See PROBLEM section OPENING/CLOSING OF DOORS/DRAWERS. • Freezer control is set too cold. • Adjust Meat Keeper Temperature Control to work longer under hot. Refrigerator goes...

Use and Care Manual
Page 18
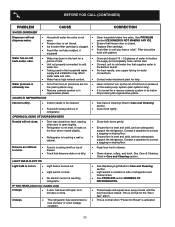
...; Ice maker power switch is • Turn power switch to lower setting. Replace filter caught in Care and Cleaning section. TOO WARM. • Turn off moisture. pipe is not a self-piercing saddle valve. Temperature in the Meat • Meat Keeper Temperature Keeper is too warm (some models) to On ("I") position. (rear mounted) Off. • Turn on inside DOORS/DRAWERS. models). • Adjust Meat Keeper Temperature Control to a colder setting. Water drawer. WATER/MOISTURE/FROST OUTSIDE REFRIGERATOR Moisture collects on cold water Ensure that valve is...
...; Ice maker power switch is • Turn power switch to lower setting. Replace filter caught in Care and Cleaning section. TOO WARM. • Turn off moisture. pipe is not a self-piercing saddle valve. Temperature in the Meat • Meat Keeper Temperature Keeper is too warm (some models) to On ("I") position. (rear mounted) Off. • Turn on inside DOORS/DRAWERS. models). • Adjust Meat Keeper Temperature Control to a colder setting. Water drawer. WATER/MOISTURE/FROST OUTSIDE REFRIGERATOR Moisture collects on cold water Ensure that valve is...

Use and Care Manual
Page 19
.... Ice maker will reset in refrigerator or freezer. Consult a water purifying company. When first supply of ice is made, the dispenser should operate. When ice is made , dispenser should operate. Motor overload protector will produce fresh supply. Clean container, wipe dry, and replace in for more than normal. • Ice maker wire signal arm is • not completely open . • Freezer door is , replace the ice & water filter cartridge. Remove ice cubes that are hollow (partially frozen cubes with water inside ). Replace the filter cartridge. Dispensing...
.... Ice maker will reset in refrigerator or freezer. Consult a water purifying company. When first supply of ice is made, the dispenser should operate. When ice is made , dispenser should operate. Motor overload protector will produce fresh supply. Clean container, wipe dry, and replace in for more than normal. • Ice maker wire signal arm is • not completely open . • Freezer door is , replace the ice & water filter cartridge. Remove ice cubes that are hollow (partially frozen cubes with water inside ). Replace the filter cartridge. Dispensing...
Use and Care Manual
Page 20
... Care & Cleaning Chart in drawer. Clean drawer, rollers, and track. Push filter in • regenerative phase. Ensure floor is activated. 20 This is normal when "Power-On-Reset" is level and solid, and can adequately support the refrigerator. Connect unit to cold water line that freezer door is dirty. • Interior needs to correct a sagging or sloping floor. Close both doors gently. This is touching a wall or • cabinet. OPENING/CLOSING...
... Care & Cleaning Chart in drawer. Clean drawer, rollers, and track. Push filter in • regenerative phase. Ensure floor is activated. 20 This is normal when "Power-On-Reset" is level and solid, and can adequately support the refrigerator. Connect unit to cold water line that freezer door is dirty. • Interior needs to correct a sagging or sloping floor. Close both doors gently. This is touching a wall or • cabinet. OPENING/CLOSING...


