
Use and Care Guide
Page 2
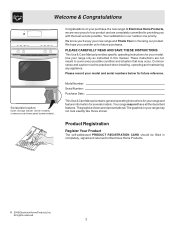
Your satisfaction is our number one priority. Model Number: Serial Number: Purchase Date: This Use & Care Manual contains general operating instructions for your range only as instructed in completely, signed and returned to Electrolux Home Products. © 2006 Electrolux Home Products, Inc. All rights reserved. 2 Use your range and feature information for choosing our product. Welcome & Congratulations Serial plate location; At Electrolux Home Products, we are very proud of...
Your satisfaction is our number one priority. Model Number: Serial Number: Purchase Date: This Use & Care Manual contains general operating instructions for your range only as instructed in completely, signed and returned to Electrolux Home Products. © 2006 Electrolux Home Products, Inc. All rights reserved. 2 Use your range and feature information for choosing our product. Welcome & Congratulations Serial plate location; At Electrolux Home Products, we are very proud of...
Use and Care Guide
Page 3
... may result causing property damage, personal injury or death. Installation and service must be seriously injured. Destroy the carton and plastic bags after unpacking the range. Ask your gas supplier from a neighbor's phone. Children climbing on the backguard of this manual is properly installed and grounded by removing leveling legs, panels, wire covers, anti-tip brackets/screws, or any other appliance. - This symbol will help...
... may result causing property damage, personal injury or death. Installation and service must be seriously injured. Destroy the carton and plastic bags after unpacking the range. Ask your gas supplier from a neighbor's phone. Children climbing on the backguard of this manual is properly installed and grounded by removing leveling legs, panels, wire covers, anti-tip brackets/screws, or any other appliance. - This symbol will help...
Use and Care Guide
Page 4
..., damage or move the gasket. 4 SELF CLEANING OVENS • Clean in the self-cleaning cycle only the parts listed in the oven. Then adjust the flame so it closely. Place a pan of the utensil. These items could ignite. • Cold temperatures can damage the electronic control. Improper installation of undersized utensils will also improve efficiency. • Know which knob controls each surface element. The use extreme caution. Once the power resumes, reset the clock and oven function.
..., damage or move the gasket. 4 SELF CLEANING OVENS • Clean in the self-cleaning cycle only the parts listed in the oven. Then adjust the flame so it closely. Place a pan of the utensil. These items could ignite. • Cold temperatures can damage the electronic control. Improper installation of undersized utensils will also improve efficiency. • Know which knob controls each surface element. The use extreme caution. Once the power resumes, reset the clock and oven function.
Use and Care Guide
Page 5
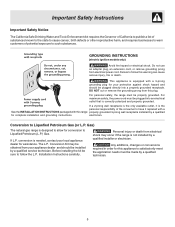
DO NOT cut or remove the grounding prong from electrical power cord. electrician. Before installing the kit be made by a qualified technician. 5 Installation Instructions carefully. For personal safety, the range must be sure to follow this warning can cause serious injury, fire or death. Conversion to allow for assistance. If L.P. Any additions, changes or conversions required in order for this appliance to satisfactorily meet the application...
DO NOT cut or remove the grounding prong from electrical power cord. electrician. Before installing the kit be made by a qualified technician. 5 Installation Instructions carefully. For personal safety, the range must be sure to follow this warning can cause serious injury, fire or death. Conversion to allow for assistance. If L.P. Any additions, changes or conversions required in order for this appliance to satisfactorily meet the application...
Use and Care Guide
Page 6
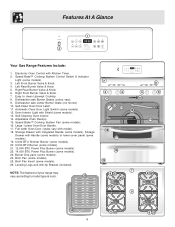
... 19 20 9 20 21 22 8 23 Self-Clean Oven Door Latch. 11. Speed Bake™ Cooking System Fan (some models). 25. Features At A Glance 1 2 Your Gas Range Features Include: 1. Electronic Oven Control with Handle (some models) or lower cover panel (some models). 19. 5,000 BTU Simmer Burner (some models). 20. 9,500 BTU Burner (some models). 21. 12,000 BTU Power Plus Burner (some models). 22. 14,000 BTU Power Plus Burner (some models), Storage Drawer with Kitchen Timer. 2. Left Front Burner Valve & Knob. 4. Right Front Burner Valve & Knob. 7. Dishwasher safe Burner Grates (colors vary...
... 19 20 9 20 21 22 8 23 Self-Clean Oven Door Latch. 11. Speed Bake™ Cooking System Fan (some models). 25. Features At A Glance 1 2 Your Gas Range Features Include: 1. Electronic Oven Control with Handle (some models) or lower cover panel (some models). 19. 5,000 BTU Simmer Burner (some models). 20. 9,500 BTU Burner (some models). 21. 12,000 BTU Power Plus Burner (some models). 22. 14,000 BTU Power Plus Burner (some models), Storage Drawer with Kitchen Timer. 2. Left Front Burner Valve & Knob. 4. Right Front Burner Valve & Knob. 7. Dishwasher safe Burner Grates (colors vary...

Use and Care Guide
Page 7
... Oven Racks ALWAYS ARRANGE OVEN RACKS WHEN THE OVEN IS COOL (PRIOR TO OPERATING THE OVEN). Removing & Replacing Oven Racks To remove, pull the rack forward until it stops. Place the rack(s) into place. 4 3 2 1 Roasting Shelf Recommended Rack Positions for proper air circulation in the oven and good baking results. Always use oven mitts when using a single oven Flat Rack, place cookware on , warm air is located below the backguard (See Fig. 1). Tilt the front of rack and slide...
... Oven Racks ALWAYS ARRANGE OVEN RACKS WHEN THE OVEN IS COOL (PRIOR TO OPERATING THE OVEN). Removing & Replacing Oven Racks To remove, pull the rack forward until it stops. Place the rack(s) into place. 4 3 2 1 Roasting Shelf Recommended Rack Positions for proper air circulation in the oven and good baking results. Always use oven mitts when using a single oven Flat Rack, place cookware on , warm air is located below the backguard (See Fig. 1). Tilt the front of rack and slide...
Use and Care Guide
Page 8
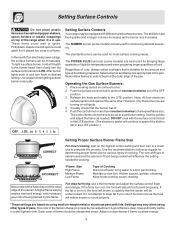
... fire if placed too close to a flame. After burner lights push in and turn the surface control knob to LITE. Use caution when lighting surface burners manually. The SIMMER burner (some models) are based on will influence the setting needed . DO NOT cook with different sized surface burners. The size and type of flame should be set at the same time. thicken sauces, gravies; A higher flame simply wastes heat and energy, and increases your risk...
... fire if placed too close to a flame. After burner lights push in and turn the surface control knob to LITE. Use caution when lighting surface burners manually. The SIMMER burner (some models) are based on will influence the setting needed . DO NOT cook with different sized surface burners. The size and type of flame should be set at the same time. thicken sauces, gravies; A higher flame simply wastes heat and energy, and increases your risk...

Use and Care Guide
Page 9
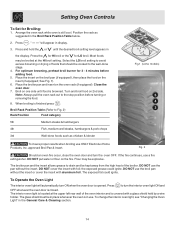
... display. 3. CLOCK PAD- FEATURE INDICATOR LIGHTS- START TIME Used to 287°C). May be programmed for any control pad to return to select the variable broil function. The "OVEN" light will turn oven interior light ON or OFF. The "DOOR LOCKED" light will beep once. After 7 seconds, the control will flash when the oven door locks and unlocks or when using the Bake feature and during preheat. "- -" appears in use of day, clean time and minute timer. Press the or to change the temperature...
... display. 3. CLOCK PAD- FEATURE INDICATOR LIGHTS- START TIME Used to 287°C). May be programmed for any control pad to return to select the variable broil function. The "OVEN" light will turn oven interior light ON or OFF. The "DOOR LOCKED" light will beep once. After 7 seconds, the control will flash when the oven door locks and unlocks or when using the Bake feature and during preheat. "- -" appears in use of day, clean time and minute timer. Press the or to change the temperature...
Use and Care Guide
Page 10
... is in use with any other functions, press the pad for a few seconds any timed bake or Self-Clean cycle. Note: The indicator light located above the pad will advance to 11 hours and 59 minutes. It serves as an extra timer in the display. When the minute timer is in use : While the timer is turned OFF the time of the control. When the display is active...
... is in use with any other functions, press the pad for a few seconds any timed bake or Self-Clean cycle. Note: The indicator light located above the pad will advance to 11 hours and 59 minutes. It serves as an extra timer in the display. When the minute timer is in use : While the timer is turned OFF the time of the control. When the display is active...
Use and Care Guide
Page 11
... set Control for Oven Lockout feature: 1. DO NOT open oven door while the indicator light is heard. By pressing and holding the or , the temperature can be programmed to bake at any control pad is pressed while in the Oven Lockout mode, "Loc" will appear in display indicating that will unlock the oven door and resume normal operation. To set temperature. To Change the Oven Temperature after Baking has Started: 1. To set control for the oven door to lock. To cancel the Oven...
... set Control for Oven Lockout feature: 1. DO NOT open oven door while the indicator light is heard. By pressing and holding the or , the temperature can be programmed to bake at any control pad is pressed while in the Oven Lockout mode, "Loc" will appear in display indicating that will unlock the oven door and resume normal operation. To set temperature. To Change the Oven Temperature after Baking has Started: 1. To set control for the oven door to lock. To cancel the Oven...

Use and Care Guide
Page 12
... adjust the setting. Press . Once the controls are set . 10. When the Set Bake Time Runs Out: a. To Change the Oven Temperature or Bake Time after Baking has Started: 1. Use caution with a delayed start time (Delay Start). Foods that can be removed promptly when cooking is set to start immediately and shut off automatically. Setting Oven Controls To Set the Timed Bake and Delay Start (Delayed Timed Bake) Features The BAKE TIME and START TIME pads operate the features that will turn the oven ON and OFF at the delayed start time and begin heating. Press appears in the display...
... adjust the setting. Press . Once the controls are set . 10. When the Set Bake Time Runs Out: a. To Change the Oven Temperature or Bake Time after Baking has Started: 1. Use caution with a delayed start time (Delay Start). Foods that can be removed promptly when cooking is set to start immediately and shut off automatically. Setting Oven Controls To Set the Timed Bake and Delay Start (Delayed Timed Bake) Features The BAKE TIME and START TIME pads operate the features that will turn the oven ON and OFF at the delayed start time and begin heating. Press appears in the display...

Use and Care Guide
Page 13
... with Bake, Timed Bake and Delayed Time Bake features. 2. Follow the remainder of food being cooked. It also gives better baking results when using two racks at the same time, place in juices and flavors. How the Speed Bake™ Cooking System works (some models) Speed Bake™ Cooking System uses a fan to begin rotating once the Speed Bake™ switch has been turned ON. General Cooking Instructions: For Baking: 1. Reduce oven temperature 25° F from recipe's recommended oven temperature. To...
... with Bake, Timed Bake and Delayed Time Bake features. 2. Follow the remainder of food being cooked. It also gives better baking results when using two racks at the same time, place in juices and flavors. How the Speed Bake™ Cooking System works (some models) Speed Bake™ Cooking System uses a fan to begin rotating once the Speed Bake™ switch has been turned ON. General Cooking Instructions: For Baking: 1. Reduce oven temperature 25° F from recipe's recommended oven temperature. To...
Use and Care Guide
Page 14
... a glass shield held by a wire holder. Position the rack as chicken & lobster Fig.1 (some models) 5 4 3 To insure proper results when broiling use . the exposed grease could ignite. Close the oven door. 7. If the fire continues, use the pan without the insert or cover the insert with foil; For optimum browning, preheat broil burner for 3 - 4 minutes before turning or removing the food. 8. The interior oven light is located at the HI broil setting.
... a glass shield held by a wire holder. Position the rack as chicken & lobster Fig.1 (some models) 5 4 3 To insure proper results when broiling use . the exposed grease could ignite. Close the oven door. 7. If the fire continues, use the pan without the insert or cover the insert with foil; For optimum browning, preheat broil burner for 3 - 4 minutes before turning or removing the food. 8. The interior oven light is located at the HI broil setting.
Use and Care Guide
Page 15
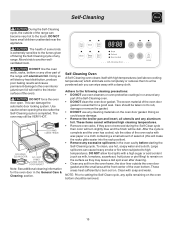
... for the oven door in the oven cavity before starting the Self-Cleaning cycle. Note: See additional cleaning information for a good seal. These items cannot withstand high cleaning temperatures. • Remove oven racks. These areas heat sufficiently to burn soil on the surface as milk, tomatoes, sauerkraut, fruit juices or pie filling) to high temperatures. Move birds to the following cleaning precautions: • DO NOT use hot, soapy...
... for the oven door in the oven cavity before starting the Self-Cleaning cycle. Note: See additional cleaning information for a good seal. These items cannot withstand high cleaning temperatures. • Remove oven racks. These areas heat sufficiently to burn soil on the surface as milk, tomatoes, sauerkraut, fruit juices or pie filling) to high temperatures. Move birds to the following cleaning precautions: • DO NOT use hot, soapy...
Use and Care Guide
Page 17
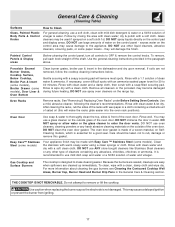
... remove this will damage the finish. General Care & Cleaning (Cleaning Table) Surfaces Glass, Painted Plastic Body Parts & Control Knobs How to Clean For general cleaning, use a soft cloth, clean with a clean cloth. DO NOT use a glass cleaner on the outside of vinegar & water. Porcelain Enamel Burner Grates, Cooktop Surface, Below Cooktop, Broiler Pan & Insert (some models), Broiler Drawer (some paper towels - Rinse & wipe dry with mild dish detergent & water or a 50/50 solution of the oven door. DO NOT use...
... remove this will damage the finish. General Care & Cleaning (Cleaning Table) Surfaces Glass, Painted Plastic Body Parts & Control Knobs How to Clean For general cleaning, use a soft cloth, clean with a clean cloth. DO NOT use a glass cleaner on the outside of vinegar & water. Porcelain Enamel Burner Grates, Cooktop Surface, Below Cooktop, Broiler Pan & Insert (some models), Broiler Drawer (some paper towels - Rinse & wipe dry with mild dish detergent & water or a 50/50 solution of the oven door. DO NOT use...
Use and Care Guide
Page 18
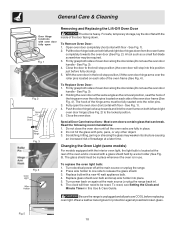
... parts are fully in use. Do not hit the glass with floor - Scratching, hitting, jarring or stressing the glass may be reset. Changing the Oven Light (some models) For models equipped with a new 40 watt appliance bulb. 4. Turn electrical power off at the main source (or plug the range back in this position just before replacing oven light. Fig. 2 Fig. 3 To Replace Oven Door: 1. Fully open Fig. 1 Removing and Replacing the Lift-Off Oven Door The door is located...
... parts are fully in use. Do not hit the glass with floor - Scratching, hitting, jarring or stressing the glass may be reset. Changing the Oven Light (some models) For models equipped with a new 40 watt appliance bulb. 4. Turn electrical power off at the main source (or plug the range back in this position just before replacing oven light. Fig. 2 Fig. 3 To Replace Oven Door: 1. Fully open Fig. 1 Removing and Replacing the Lift-Off Oven Door The door is located...

Use and Care Guide
Page 19
... cooking too hot or too cool for your recipe times, you have completely cooled and are safe to indicate that the oven will be cooler by pressing and holding the or . If you think that the oven cooks hotter or cooler than the temperature displayed. Keeping the burner ports clean will read "0." 4. To Adjust Oven Temperature: 1. General Care & Cleaning Cleaning the Contoured Well Areas, Burner Cap, Burner Head and Burner Drip Pans (some models...
... cooking too hot or too cool for your recipe times, you have completely cooled and are safe to indicate that the oven will be cooler by pressing and holding the or . If you think that the oven cooks hotter or cooler than the temperature displayed. Keeping the burner ports clean will read "0." 4. To Adjust Oven Temperature: 1. General Care & Cleaning Cleaning the Contoured Well Areas, Burner Cap, Burner Head and Burner Drip Pans (some models...
Use and Care Guide
Page 20
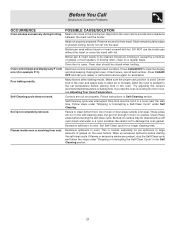
... range until flame turns blue. Surface Control knob has not been completely turned to salt air. With the burner off , clean ports by using a small-gauge wire or needle. Electrical power outage (electric ignition models only). Oven light does not work. Electrical power outage (electric ignition models only). Have a flexible C.S.A. Burner ports are built in this list. Service wiring not complete. Call your dealer or authorized service agent. Place oven rack in order to operate the oven. Burned-out or loose bulb. Be sure gas supply is level...
... range until flame turns blue. Surface Control knob has not been completely turned to salt air. With the burner off , clean ports by using a small-gauge wire or needle. Electrical power outage (electric ignition models only). Oven light does not work. Electrical power outage (electric ignition models only). Have a flexible C.S.A. Burner ports are built in this list. Service wiring not complete. Call your dealer or authorized service agent. Place oven rack in order to operate the oven. Burned-out or loose bulb. Be sure gas supply is level...
Use and Care Guide
Page 21
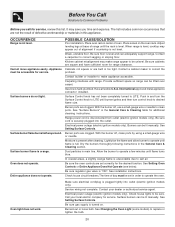
... completely removed. Reprogram oven. Many factors affect baking results. Try adjusting the recipe's recommended temperature or baking time. Failure to the broil burner. Be careful not to Common Problems OCCURRENCE Oven smokes excessively during broiling. Soil is too close to clean bottom front, top of grease on residue. Broiler pan used . If broiling often, clean on residue may be set temperature before starting the self-clean cycle. Make sure the proper rack position is used without...
... completely removed. Reprogram oven. Many factors affect baking results. Try adjusting the recipe's recommended temperature or baking time. Failure to the broil burner. Be careful not to Common Problems OCCURRENCE Oven smokes excessively during broiling. Soil is too close to clean bottom front, top of grease on residue. Broiler pan used . If broiling often, clean on residue may be set temperature before starting the self-clean cycle. Make sure the proper rack position is used without...
Use and Care Guide
Page 24
... light bulbs, air filters, water filters, other consumables, or knobs, handles, or other than authorized service companies; LIMITATION OF REMEDIES CUSTOMER'S SOLE AND EXCLUSIVE REMEDY UNDER THIS LIMITED WARRANTY SHALL BE PRODUCT REPAIR OR REPLACEMENT AS PROVIDED HEREIN. This warranty only applies in a commercial setting. 7. Obligations for appliances not in ordinary household use or used other cosmetic parts. 11. For one year limited warranty. Products with original serial numbers...
... light bulbs, air filters, water filters, other consumables, or knobs, handles, or other than authorized service companies; LIMITATION OF REMEDIES CUSTOMER'S SOLE AND EXCLUSIVE REMEDY UNDER THIS LIMITED WARRANTY SHALL BE PRODUCT REPAIR OR REPLACEMENT AS PROVIDED HEREIN. This warranty only applies in a commercial setting. 7. Obligations for appliances not in ordinary household use or used other cosmetic parts. 11. For one year limited warranty. Products with original serial numbers...


