Use and Care Manual
Page 3
... injury or death. WHAT TO DO IF YOU SMELL GAS: • Do not try to the range. • Never modify or alter the construction of a range by removing leveling legs, panels, wire covers, anti-tip brackets/screws, or any part of the appliance unless specifically recommended in the manuals. Follow...disconnect the power to sit or stand on or near these symbols and follow all instructions given. All other part of an emergency. • User servicing-Do not repair or replace any other servicing should not be done only by a qualified technician, This may cause serious bodily harm,...
... injury or death. WHAT TO DO IF YOU SMELL GAS: • Do not try to the range. • Never modify or alter the construction of a range by removing leveling legs, panels, wire covers, anti-tip brackets/screws, or any part of the appliance unless specifically recommended in the manuals. Follow...disconnect the power to sit or stand on or near these symbols and follow all instructions given. All other part of an emergency. • User servicing-Do not repair or replace any other servicing should not be done only by a qualified technician, This may cause serious bodily harm,...
Use and Care Manual
Page 4
...catch fire. If the power fails, always turn the burner off before you remove or replace food in burns from the oven. • Do Not Use Oven Cleaners-No commercial oven ... Clean the range regularly to reposition. Remove all utensils from the high heat of the broiler. • Do not cover the broiler insert with both hands to keep all parts free of ...may melt. • Protective Liners-Do not use the broiler pan without breaking due to the range manufacturer's instructions for cleaning. • Kitchen cleaners and aerosols-Always follow the manufacturer's recommended directions...
...catch fire. If the power fails, always turn the burner off before you remove or replace food in burns from the oven. • Do Not Use Oven Cleaners-No commercial oven ... Clean the range regularly to reposition. Remove all utensils from the high heat of the broiler. • Do not cover the broiler insert with both hands to keep all parts free of ...may melt. • Protective Liners-Do not use the broiler pan without breaking due to the range manufacturer's instructions for cleaning. • Kitchen cleaners and aerosols-Always follow the manufacturer's recommended directions...
Use and Care Manual
Page 25
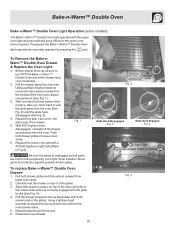
...to turn OFF the Bake-n-Warm™ Double Oven and let the drawer area cool completely. 2. Replace the lower oven light with a 40 Watt Appliance light bulb (Refer to line up and away from the ...oven. Fig. 1 Be sure the range is opened. Pull the drawer away from the oven. Close lower oven drawer. 25 Fig. 2 Glide ... the upper oven light and automatically turns ON when the upper oven door is unplugged and all parts are correctly engaged with both screw holes in place. Carefully rest the drawer on top of the...
...to turn OFF the Bake-n-Warm™ Double Oven and let the drawer area cool completely. 2. Replace the lower oven light with a 40 Watt Appliance light bulb (Refer to line up and away from the ...oven. Fig. 1 Be sure the range is opened. Pull the drawer away from the oven. Close lower oven drawer. 25 Fig. 2 Glide ... the upper oven light and automatically turns ON when the upper oven door is unplugged and all parts are correctly engaged with both screw holes in place. Carefully rest the drawer on top of the...
Use and Care Manual
Page 26
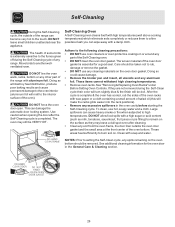
...soils completely or reduces them to the interior surface of the oven). The woven material of the oven door gasket is completed. See "Removing & Replacing Oven Racks" under Before Setting Oven Controls. Clean with a high sugar or acid content (such as they are not removed during the Self-...oven cleans itself with a damp cloth. Doing so could cause damage. • Remove the broiler pan and insert, all utensils and any other part of the range with wax paper or a cloth containing a small amount of salad oil (this will be taken not to the following cleaning precautions: • ...
...soils completely or reduces them to the interior surface of the oven). The woven material of the oven door gasket is completed. See "Removing & Replacing Oven Racks" under Before Setting Oven Controls. Clean with a high sugar or acid content (such as they are not removed during the Self-...oven cleans itself with a damp cloth. Doing so could cause damage. • Remove the broiler pan and insert, all utensils and any other part of the range with wax paper or a cloth containing a small amount of salad oil (this will be taken not to the following cleaning precautions: • ...
Use and Care Manual
Page 30
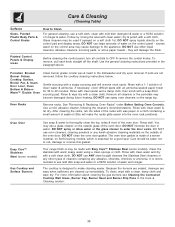
.... It is essential for 30 to 40 minutes. For more information about cleaning the gas burners see Cleaning the Contoured Cooktop Well Areas, Burner Cap, Burner Head and Burner Drip...may become damaged during future heating. Care & Cleaning (Cleaning Table) Surfaces Glass, Painted Plastic Body Parts & Control Knobs Painted Control Panels & Display areas How to Clean For general cleaning, use a ...a glass cleaner on the range top. DO NOT spray liquids directly on the control area may use large amounts of salad oil (this gasket. See "Removing & Replacing Oven Racks" under Before ...
.... It is essential for 30 to 40 minutes. For more information about cleaning the gas burners see Cleaning the Contoured Cooktop Well Areas, Burner Cap, Burner Head and Burner Drip...may become damaged during future heating. Care & Cleaning (Cleaning Table) Surfaces Glass, Painted Plastic Body Parts & Control Knobs Painted Control Panels & Display areas How to Clean For general cleaning, use a ...a glass cleaner on the range top. DO NOT spray liquids directly on the control area may use large amounts of salad oil (this gasket. See "Removing & Replacing Oven Racks" under Before ...
Use and Care Manual
Page 31
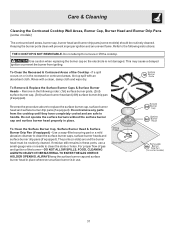
... the burner head must be routinely cleaned. Do not remove any parts from igniting. Keeping the burner ports clean will prevent improper ignition and an uneven flame. Do not attempt to handle. Use caution when replacing the burner cap so the electrode is in place. Reverse the ... cleaned. To Clean the Recessed & Contoured Areas of the burner-DO NOT ALLOW SPILLS, FOOD, CLEANING AGENTS OR ANY OTHER MATERIAL TO ENTER THE GAS ORIFICE HOLDER OPENING. Rinse with an absorbent cloth. To Clean the Surface Burner Cap, Surface Burner Head & Surface Burner Drip Pan (if equipped)...
... the burner head must be routinely cleaned. Do not remove any parts from igniting. Keeping the burner ports clean will prevent improper ignition and an uneven flame. Do not attempt to handle. Use caution when replacing the burner cap so the electrode is in place. Reverse the ... cleaned. To Clean the Recessed & Contoured Areas of the burner-DO NOT ALLOW SPILLS, FOOD, CLEANING AGENTS OR ANY OTHER MATERIAL TO ENTER THE GAS ORIFICE HOLDER OPENING. Rinse with an absorbent cloth. To Clean the Surface Burner Cap, Surface Burner Head & Surface Burner Drip Pan (if equipped)...
Use and Care Manual
Page 32
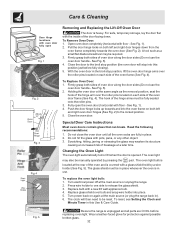
...or any other object. 3. See Fig. 1). 2. See Fig. 3). 2. See Fig. 1). 4. The oven light may be required. 3. Fig. 5 Be sure the range is covered with a glass shield held by pressing the pad. Firmly grasp both sides of the hinge arms must be fully seated onto the roller...Special Door Care Instructions Most oven doors contain glass that can break. Do not close the oven door until all parts are fully in this position just before replacing oven light. Read the following recommendations: 1. Scratching, hitting, jarring or stressing the glass may weaken its structure causing...
...or any other object. 3. See Fig. 1). 2. See Fig. 3). 2. See Fig. 1). 4. The oven light may be required. 3. Fig. 5 Be sure the range is covered with a glass shield held by pressing the pad. Firmly grasp both sides of the hinge arms must be fully seated onto the roller...Special Door Care Instructions Most oven doors contain glass that can break. Do not close the oven door until all parts are fully in this position just before replacing oven light. Read the following recommendations: 1. Scratching, hitting, jarring or stressing the glass may weaken its structure causing...
Use and Care Manual
Page 36
...SUCH AS PROPERTY DAMAGE AND INCIDENTAL EXPENSES RESULTING FROM ANY BREACH OF THIS WRITTEN LIMITED WARRANTY OR ANY IMPLIED WARRANTY. Box 212378 Augusta, GA 30907 Canada 1.800.668.4606 Electrolux Canada Corp. 5855 Terry Fox Way Mississauga, Ontario, Canada L5V 3E4 36 Rust on the interior... not limited to, any after hour, weekend, or holiday service calls, tolls, ferry trip charges, or mileage expense for repairing or replacing any parts of this warranty must be obtained by contacting Electrolux at the addresses or phone numbers below. DISCLAIMER OF IMPLIED WARRANTIES; In Canada, your...
...SUCH AS PROPERTY DAMAGE AND INCIDENTAL EXPENSES RESULTING FROM ANY BREACH OF THIS WRITTEN LIMITED WARRANTY OR ANY IMPLIED WARRANTY. Box 212378 Augusta, GA 30907 Canada 1.800.668.4606 Electrolux Canada Corp. 5855 Terry Fox Way Mississauga, Ontario, Canada L5V 3E4 36 Rust on the interior... not limited to, any after hour, weekend, or holiday service calls, tolls, ferry trip charges, or mileage expense for repairing or replacing any parts of this warranty must be obtained by contacting Electrolux at the addresses or phone numbers below. DISCLAIMER OF IMPLIED WARRANTIES; In Canada, your...

