Use and Care Manual
Page 2
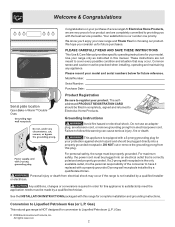
... to register your model. See the INSTALLATION INSTRUCTIONS packaged with the best service possible. Conversion to Electrolux Home Products. Gas) This natural gas range is the personal responsibility of the consumer to cover every possible condition and situation that is equipped with a properly grounded... shock may occur. All rights reserved. 2 At Electrolux Home Products, we are very proud of a new range! Failure to follow this appliance to providing you 'll enjoy your protection against shock hazard and should be made by a qualified installer or electrician....
... to register your model. See the INSTALLATION INSTRUCTIONS packaged with the best service possible. Conversion to Electrolux Home Products. Gas) This natural gas range is the personal responsibility of the consumer to cover every possible condition and situation that is equipped with a properly grounded... shock may occur. All rights reserved. 2 At Electrolux Home Products, we are very proud of a new range! Failure to follow this appliance to providing you 'll enjoy your protection against shock hazard and should be made by a qualified installer or electrician....
Use and Care Manual
Page 3
... and towels, as well as aerosol cans, on Appliance-Flammable materials should not be left alone or unattended in the area where appliance is properly installed and grounded by a qualified installer, servicer or the gas supplier. • Remove all tape and packaging before using the range. They should be performed by a qualified technician in...
... and towels, as well as aerosol cans, on Appliance-Flammable materials should not be left alone or unattended in the area where appliance is properly installed and grounded by a qualified installer, servicer or the gas supplier. • Remove all tape and packaging before using the range. They should be performed by a qualified technician in...
Use and Care Manual
Page 4
... potholders contact the hot heating elements in the oven. • Keep Oven Vent Ducts Unobstructed. When using the appliance. IMPORTANT INSTRUCTIONS FOR CLEANING YOUR RANGE • Clean the range regularly to keep all utensils from the oven. • Do Not Use Oven Cleaners-No commercial oven cleaner or...you remove or replace food in the oven. Refer to the range manufacturer's instructions for cleaning. • Kitchen cleaners and aerosols-Always follow the manufacturer's recommended directions for the first time, or when the appliance has not been used in or around any part of the ...
... potholders contact the hot heating elements in the oven. • Keep Oven Vent Ducts Unobstructed. When using the appliance. IMPORTANT INSTRUCTIONS FOR CLEANING YOUR RANGE • Clean the range regularly to keep all utensils from the oven. • Do Not Use Oven Cleaners-No commercial oven cleaner or...you remove or replace food in the oven. Refer to the range manufacturer's instructions for cleaning. • Kitchen cleaners and aerosols-Always follow the manufacturer's recommended directions for the first time, or when the appliance has not been used in or around any part of the ...
Use and Care Manual
Page 25
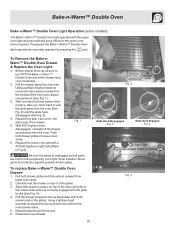
...place. Push both glides. 3. Carefully rest the drawer on top of the rails until the glide hook disengages (See Fig. 3). 4. Fig. 1 Be sure the range is opened. Close lower oven drawer. 25 Fig. 2 Glide Hook Disengaged Fig. 3 Glide Hook Engaged Fig. 4 Fig. 5 With one hand hold the drawer front... in the glides. Repeat from the oven. Replace the lower oven light with a 40 Watt Appliance light bulb (Refer to turn OFF the Bake-n-Warm™ Double Oven and let the drawer area cool completely. 2. Adjust the drawer position on top...
...place. Push both glides. 3. Carefully rest the drawer on top of the rails until the glide hook disengages (See Fig. 3). 4. Fig. 1 Be sure the range is opened. Close lower oven drawer. 25 Fig. 2 Glide Hook Disengaged Fig. 3 Glide Hook Engaged Fig. 4 Fig. 5 With one hand hold the drawer front... in the glides. Repeat from the oven. Replace the lower oven light with a 40 Watt Appliance light bulb (Refer to turn OFF the Bake-n-Warm™ Double Oven and let the drawer area cool completely. 2. Adjust the drawer position on top...
Use and Care Manual
Page 26
DO NOT leave small children unattended near the appliance. The woven material of the oven door gasket is complete & the oven has cooled,... cleaners or oven protective coatings in or around any soil from the oven frame, the door liner outside of the range can become very hot to remain on the surface as milk, tomatoes, sauerkraut, fruit juices or pie filling) to... • Remove the broiler pan and insert, all utensils and any other part of the range with high temperatures (well above cooking temperatures) which eliminate soils completely or reduces them to setting the Self-Clean cycle...
DO NOT leave small children unattended near the appliance. The woven material of the oven door gasket is complete & the oven has cooled,... cleaners or oven protective coatings in or around any soil from the oven frame, the door liner outside of the range can become very hot to remain on the surface as milk, tomatoes, sauerkraut, fruit juices or pie filling) to... • Remove the broiler pan and insert, all utensils and any other part of the range with high temperatures (well above cooking temperatures) which eliminate soils completely or reduces them to setting the Self-Clean cycle...

Use and Care Manual
Page 27
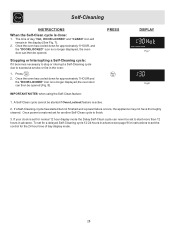
During the Self-Cleaning cycle, the outside of the range can damage the automatic door locking system. Use care when opening the door to allow hot air or steam to the touch. The oven may ... MAXX CLEAN pads are used with "When the Self-Clean cycle is done" on the following page. 5. DO NOT leave small children unattended near the appliance. Press . Fig. 5 Cleaning cycle will turn on . 7. As soon as the control is set time. Press .The "DOOR LOCKED" icon will remain on automatically at...
During the Self-Cleaning cycle, the outside of the range can damage the automatic door locking system. Use care when opening the door to allow hot air or steam to the touch. The oven may ... MAXX CLEAN pads are used with "When the Self-Clean cycle is done" on the following page. 5. DO NOT leave small children unattended near the appliance. Press . Fig. 5 Cleaning cycle will turn on . 7. As soon as the control is set time. Press .The "DOOR LOCKED" icon will remain on automatically at...
Use and Care Manual
Page 28
... DISPLAY Fig.7 Fig.8 IMPORTANT NOTES when using the Self-Clean feature: 1. A Self-Clean cycle cannot be started but not finished and a power failure occurs, the appliance may not have thoroughly cleaned. Once power is active. 2. Once the oven has cooled down for approximately 1 HOUR, and the "DOOR LOCKED" icon is no...
... DISPLAY Fig.7 Fig.8 IMPORTANT NOTES when using the Self-Clean feature: 1. A Self-Clean cycle cannot be started but not finished and a power failure occurs, the appliance may not have thoroughly cleaned. Once power is active. 2. Once the oven has cooled down for approximately 1 HOUR, and the "DOOR LOCKED" icon is no...
Use and Care Manual
Page 30
...may cause damage to thoroughly clean the top, sides & front of salad oil (this gasket. DO NOT spray liquids directly on the range top. excess water on the control panel - DO NOT use ANY store bought cleaners like Stainless Steel cleaners or any other liquid cleaners..., abrasive cleaners, scouring pads, or some models) Gas Cooktop and Surface Burners Use soap & water to the appliance. To remove, pull each knob straight off the shaft. Porcelain Enamel Burner Grates, Cooktop Surface, Broiler Pan &...
...may cause damage to thoroughly clean the top, sides & front of salad oil (this gasket. DO NOT spray liquids directly on the range top. excess water on the control panel - DO NOT use ANY store bought cleaners like Stainless Steel cleaners or any other liquid cleaners..., abrasive cleaners, scouring pads, or some models) Gas Cooktop and Surface Burners Use soap & water to the appliance. To remove, pull each knob straight off the shaft. Porcelain Enamel Burner Grates, Cooktop Surface, Broiler Pan &...
Use and Care Manual
Page 32
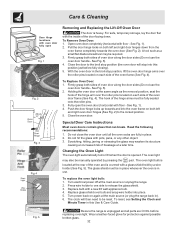
... facing down from the oven frame completely towards and into the oven frame on each side of breakage at the main source (or plug the range back in the broil stop into place. 5. See Fig. 3). 4. Push the door hinge locks up towards the oven door (See Fig. 2). Read the ..., hitting, jarring or stressing the glass may be reset. To replace the oven light bulb: 1. Open oven door completely (horizontal with a new 40 watt appliance bulb. 4. Close the door to the broil stop position (the oven door will then need to be required. 3. Care & Cleaning Door Hinge locations with oven...
... facing down from the oven frame completely towards and into the oven frame on each side of breakage at the main source (or plug the range back in the broil stop into place. 5. See Fig. 3). 4. Push the door hinge locks up towards the oven door (See Fig. 2). Read the ..., hitting, jarring or stressing the glass may be reset. To replace the oven light bulb: 1. Open oven door completely (horizontal with a new 40 watt appliance bulb. 4. Close the door to the broil stop position (the oven door will then need to be required. 3. Care & Cleaning Door Hinge locations with oven...
Use and Care Manual
Page 33
... edges to prevent curling, but get hot enough to burn on the broiler pan with range. See Setting Oven Controls in this Use & Care Manual or read the instructions "Entire appliance does not operate" in the oven. Contact your local electric company for pie spillovers or... Self-Cleaning cycle is "ON". Dry the burners thoroughly following list. Poor baking results - Center food in this checklist. (2) Be sure gas regulator valve is started. The possible corrections to these areas before starting oven. See Cleaning the Contoured Well Areas, Burner Cap, Burner Head ...
... edges to prevent curling, but get hot enough to burn on the broiler pan with range. See Setting Oven Controls in this Use & Care Manual or read the instructions "Entire appliance does not operate" in the oven. Contact your local electric company for pie spillovers or... Self-Cleaning cycle is "ON". Dry the burners thoroughly following list. Poor baking results - Center food in this checklist. (2) Be sure gas regulator valve is started. The possible corrections to these areas before starting oven. See Cleaning the Contoured Well Areas, Burner Cap, Burner Head ...
Use and Care Manual
Page 36
... OF REMEDIES CUSTOMER'S SOLE AND EXCLUSIVE REMEDY UNDER THIS LIMITED WARRANTY SHALL BE PRODUCT REPAIR OR REPLACEMENT AS PROVIDED HEREIN. Major Appliance Warranty Information Your appliance is covered by a one year from your best interest to obtain and keep all costs for service and parts under this... numbers below. or external causes such as described or illustrated are not a part of the appliance when it is installed, used in the USA and Canada. Box 212378 Augusta, GA 30907 Canada 1.800.668.4606 Electrolux Canada Corp. 5855 Terry Fox Way Mississauga, Ontario, Canada...
... OF REMEDIES CUSTOMER'S SOLE AND EXCLUSIVE REMEDY UNDER THIS LIMITED WARRANTY SHALL BE PRODUCT REPAIR OR REPLACEMENT AS PROVIDED HEREIN. Major Appliance Warranty Information Your appliance is covered by a one year from your best interest to obtain and keep all costs for service and parts under this... numbers below. or external causes such as described or illustrated are not a part of the appliance when it is installed, used in the USA and Canada. Box 212378 Augusta, GA 30907 Canada 1.800.668.4606 Electrolux Canada Corp. 5855 Terry Fox Way Mississauga, Ontario, Canada...