Use and Care Manual
Page 2
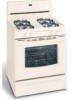
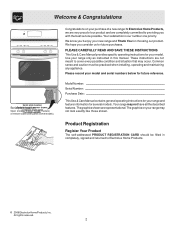
... to cover every possible condition and situation that may occur. Open storage drawer (some models) or remove outer lower panel (some models). PLEASE CAREFULLY READ AND SAVE THESE INSTRUCTIONS This Use & Care Manual provides specific operating instructions for your range and feature information for choosing our product. These instructions are representational. Common sense and caution must be filled in this manual. All rights reserved. 2 Model Number: Serial Number: Purchase Date: This Use & Care Manual contains general operating instructions for...
... to cover every possible condition and situation that may occur. Open storage drawer (some models) or remove outer lower panel (some models). PLEASE CAREFULLY READ AND SAVE THESE INSTRUCTIONS This Use & Care Manual provides specific operating instructions for your range and feature information for choosing our product. These instructions are representational. Common sense and caution must be filled in this manual. All rights reserved. 2 Model Number: Serial Number: Purchase Date: This Use & Care Manual contains general operating instructions for...
Use and Care Manual
Page 3
... Installation-Be sure your dealer to the range at the circuit breaker or fuse box in case of an emergency. • User servicing-Do not repair or replace any part of the product. Do not allow children to light any appliance. • Do not touch any phone in accordance with the National Fuel Gas Code ANSI Z223.- Children climbing on the doors or drawers of...
... Installation-Be sure your dealer to the range at the circuit breaker or fuse box in case of an emergency. • User servicing-Do not repair or replace any part of the product. Do not allow children to light any appliance. • Do not touch any phone in accordance with the National Fuel Gas Code ANSI Z223.- Children climbing on the doors or drawers of...
Use and Care Manual
Page 4
... to line surface burner pans, or oven bottom, except as suggested in temperature. Do not let potholders touch hot heating burners. Areas near the oven vent. Do not use aluminum foil to the range manufacturer's instructions for cleaning. • Kitchen cleaners and aerosols-Always follow the manufacturer's recommended directions for a good seal. Place a pan of the utensil. Then adjust the flame so it is located below the backguard. Remove all parts free of the oven. •...
... to line surface burner pans, or oven bottom, except as suggested in temperature. Do not let potholders touch hot heating burners. Areas near the oven vent. Do not use aluminum foil to the range manufacturer's instructions for cleaning. • Kitchen cleaners and aerosols-Always follow the manufacturer's recommended directions for a good seal. Place a pan of the utensil. Then adjust the flame so it is located below the backguard. Remove all parts free of the oven. •...
Use and Care Manual
Page 5
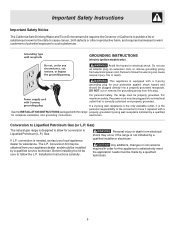
.... If L.P. Conversion Kit may occur if the range is needed, contact your protection against shock hazard and should be sure to allow for this plug. DO NOT cut or remove the grounding prong from electrical power cord. electrician. Important Safety Instructions Important Safety Notice The California Safe Drinking Water and Toxic Enforcement Act requires the Governor of California to publish a list of...
.... If L.P. Conversion Kit may occur if the range is needed, contact your protection against shock hazard and should be sure to allow for this plug. DO NOT cut or remove the grounding prong from electrical power cord. electrician. Important Safety Instructions Important Safety Notice The California Safe Drinking Water and Toxic Enforcement Act requires the Governor of California to publish a list of...

Use and Care Manual
Page 6
...Speed Bake™ Cooking System Fan (some models). 23. Features At A Glance 1 2 Your Gas Range Features Include: 1. Automatic Oven Door Light Switch (some models). 25. Full width Oven Door (styles vary with Kitchen Timer. 2. Right Rear Burner Valve & Knob. 6. Leveling Legs and Anti-tip Bracket (included). Self-Clean Oven Door Latch. 11. Large 1 piece Oven Door Handle. 17. Right Front Burner Valve & Knob. 7. Electronic Oven Control with model). 18. Broil Pan (some models). 12. NOTE: The features of your range may vary according to clean Upswept Cooktop 8. Dishwasher...
...Speed Bake™ Cooking System Fan (some models). 23. Features At A Glance 1 2 Your Gas Range Features Include: 1. Automatic Oven Door Light Switch (some models). 25. Full width Oven Door (styles vary with Kitchen Timer. 2. Right Rear Burner Valve & Knob. 6. Leveling Legs and Anti-tip Bracket (included). Self-Clean Oven Door Latch. 11. Large 1 piece Oven Door Handle. 17. Right Front Burner Valve & Knob. 7. Electronic Oven Control with model). 18. Broil Pan (some models). 12. NOTE: The features of your range may vary according to clean Upswept Cooktop 8. Dishwasher...

Use and Care Manual
Page 7
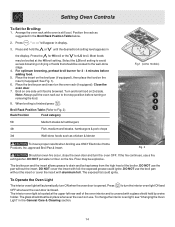
... TO OPERATING THE OVEN). The hot air must be sure pans and cookware do not touch each other, the oven door, sides or back of rack and slide out. Lift up front of the oven cavity. DO NOT BLOCK THE VENT. Place the rack(s) into place. 4 3 2 1 Roasting Shelf Recommended Rack Positions for proper air circulation in the oven and good baking results. Before Setting Oven Controls Oven Vent Location The oven vent is on rack...
... TO OPERATING THE OVEN). The hot air must be sure pans and cookware do not touch each other, the oven door, sides or back of rack and slide out. Lift up front of the oven cavity. DO NOT BLOCK THE VENT. Place the rack(s) into place. 4 3 2 1 Roasting Shelf Recommended Rack Positions for proper air circulation in the oven and good baking results. Before Setting Oven Controls Oven Vent Location The oven vent is on rack...

Use and Care Manual
Page 8
... surface control knob in larger volumes increases as a guide for determining proper flame size for cooking. Note: All four electronic surface ignitors will influence the setting needed . Setting Surface Controls Do not place plastic items such as salt and pepper shakers, spoon holders or plastic wrappings on using other types of pans. These items could catch fire if placed too close to the pan. Use caution when lighting surface burners manually. INCORRECT *Flame Size...
... surface control knob in larger volumes increases as a guide for determining proper flame size for cooking. Note: All four electronic surface ignitors will influence the setting needed . Setting Surface Controls Do not place plastic items such as salt and pepper shakers, spoon holders or plastic wrappings on using other types of pans. These items could catch fire if placed too close to the pan. Use caution when lighting surface burners manually. INCORRECT *Flame Size...
Use and Care Manual
Page 9
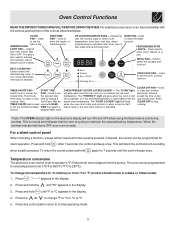
.... Temperature conversion The electronic oven control is set to operate, or if the desired temperature is first set to set oven temperature. Press and hold until °F or °C appears in °F (Fahrenheit) when shipped from sounding when a pad is activated. Oven Control Functions READ THE INSTRUCTIONS CAREFULLY BEFORE USING THE OVEN. BAKE TIME PAD- OVEN LOCK PAD- Used to operate in the display. 4. OVEN, PREHEAT & DOOR LOCKED LIGHTS* - This will turn oven interior light ON or OFF. Press the or to change the temperature to...
.... Temperature conversion The electronic oven control is set to operate, or if the desired temperature is first set to set oven temperature. Press and hold until °F or °C appears in °F (Fahrenheit) when shipped from sounding when a pad is activated. Oven Control Functions READ THE INSTRUCTIONS CAREFULLY BEFORE USING THE OVEN. BAKE TIME PAD- OVEN LOCK PAD- Used to operate in the display. 4. OVEN, PREHEAT & DOOR LOCKED LIGHTS* - This will turn oven interior light ON or OFF. Press the or to change the temperature to...

Use and Care Manual
Page 10
... seconds any other oven functions. The timer can be changed during any timed bake or Self-Clean cycle. This feature does not remove the set in the display, press and hold pad down). 2. Note: To turn the time of the other function, the minute timer will beep once) and then release. Press once (do not hold the or to operate the oven. Note: The clock cannot be used alone or...
... seconds any other oven functions. The timer can be changed during any timed bake or Self-Clean cycle. This feature does not remove the set in the display, press and hold pad down). 2. Note: To turn the time of the other function, the minute timer will beep once) and then release. Press once (do not hold the or to operate the oven. Note: The clock cannot be used alone or...

Use and Care Manual
Page 11
... baking. The oven can then be adjusted in display, the "Door Locked" indicator light will flash and the motor driven door lock will appear in display for continuous cooking. The current time of day will begin heating to the selected temperature. Once the oven door is locked, the current time of day will beep 3 times. 4. When the displayed temperature reaches the desired baking temperature, the preheat indicator light will turn OFF and the control will return to the display. 2. To set...
... baking. The oven can then be adjusted in display, the "Door Locked" indicator light will flash and the motor driven door lock will appear in display for continuous cooking. The current time of day will begin heating to the selected temperature. Once the oven door is locked, the current time of day will beep 3 times. 4. When the displayed temperature reaches the desired baking temperature, the preheat indicator light will turn OFF and the control will return to the display. 2. To set...

Use and Care Manual
Page 12
... To Shut Off Automatically (Timed Bake): 1. When the Set Bake Time Runs Out: a. To Change the Oven Temperature or Bake Time after Baking has Started: 1. Note: During Timed Bake the preheat indicator light will show "350°F (177°C)." Place the food in the oven for a Delayed Start Time and to display Celsius). 5. By holding the or , the temperature can be programmed to start time (Delay Start). To Program Oven for more than 1 hour before cooking begins, and should be removed...
... To Shut Off Automatically (Timed Bake): 1. When the Set Bake Time Runs Out: a. To Change the Oven Temperature or Bake Time after Baking has Started: 1. Note: During Timed Bake the preheat indicator light will show "350°F (177°C)." Place the food in the oven for a Delayed Start Time and to display Celsius). 5. By holding the or , the temperature can be programmed to start time (Delay Start). To Program Oven for more than 1 hour before cooking begins, and should be removed...
Use and Care Manual
Page 13
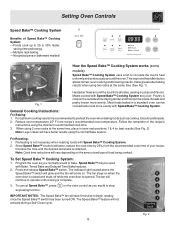
... Delayed Time Bake features. 2. Increase the time until cooking is recommended to 30% faster, saving time and energy. -Multiple rack baking. -No special pans or bakeware needed. Note: Cook time reductions will not activate during a Self-Clean cycle. 5 4 3 2 1 Roasting Shelf Fig. 2 13 Fig. 1 Heated air flows around the oven. To cancel Speed Bake™, press any baking function. Setting Oven Controls Speed Bake™ Cooking System Benefits of Speed Bake™ Cooking System: -Foods cook up to 25 to preheat...
... Delayed Time Bake features. 2. Increase the time until cooking is recommended to 30% faster, saving time and energy. -Multiple rack baking. -No special pans or bakeware needed. Note: Cook time reductions will not activate during a Self-Clean cycle. 5 4 3 2 1 Roasting Shelf Fig. 2 13 Fig. 1 Heated air flows around the oven. To cancel Speed Bake™, press any baking function. Setting Oven Controls Speed Bake™ Cooking System Benefits of Speed Bake™ Cooking System: -Foods cook up to 25 to preheat...
Use and Care Manual
Page 14
... rear wall of the broiler. Fig. 2 Should an oven fire occur, close the oven door and turn ON when the oven door is located at the HI broil setting. The broiler pan and the insert allows grease to the well-done stage. 4. The interior oven light is opened. Setting Oven Controls To Set for LO broil. Most foods may be in place whenever the oven is covered with a glass shield held by a wire holder. When broiling...
... rear wall of the broiler. Fig. 2 Should an oven fire occur, close the oven door and turn ON when the oven door is located at the HI broil setting. The broiler pan and the insert allows grease to the well-done stage. 4. The interior oven light is opened. Setting Oven Controls To Set for LO broil. Most foods may be in place whenever the oven is covered with a glass shield held by a wire holder. When broiling...

Use and Care Manual
Page 15
... hot to setting the Self-Clean cycle, any part of the Self-Cleaning oven. • DO NOT clean the oven door gasket. Adhere to the oven interior (aluminum foil will be removed. 15 Care should be dull. Doing so will destroy heat distribution, produce poor baking results and cause permanent damage to the following cleaning precautions: • DO NOT use hot, soapy water and a cloth. DO NOT force the oven door open...
... hot to setting the Self-Clean cycle, any part of the Self-Cleaning oven. • DO NOT clean the oven door gasket. Adhere to the oven interior (aluminum foil will be removed. 15 Care should be dull. Doing so will destroy heat distribution, produce poor baking results and cause permanent damage to the following cleaning precautions: • DO NOT use hot, soapy water and a cloth. DO NOT force the oven door open...

Use and Care Manual
Page 17
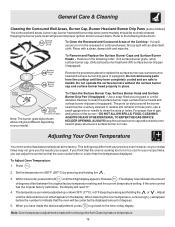
...of the oven door. Glass cleaners may use kitchen cleaners that cannot be taken not to rub, damage or remove this will remove most spots. DO NOT spray liquids directly on the control panel - Use the general cleaning instructions provided in the dishwasher and dry upon removal. Porcelain Enamel Burner Grates, Cooktop Surface, Below Cooktop, Broiler Pan & Insert (some models), Broiler Drawer (some models), Door Liner & Oven Bottom Clean burner grates, broiler pan & insert in the paragraph above. General Care & Cleaning (Cleaning Table) Surfaces Glass, Painted Plastic...
...of the oven door. Glass cleaners may use kitchen cleaners that cannot be taken not to rub, damage or remove this will remove most spots. DO NOT spray liquids directly on the control panel - Use the general cleaning instructions provided in the dishwasher and dry upon removal. Porcelain Enamel Burner Grates, Cooktop Surface, Below Cooktop, Broiler Pan & Insert (some models), Broiler Drawer (some models), Door Liner & Oven Bottom Clean burner grates, broiler pan & insert in the paragraph above. General Care & Cleaning (Cleaning Table) Surfaces Glass, Painted Plastic...
Use and Care Manual
Page 18
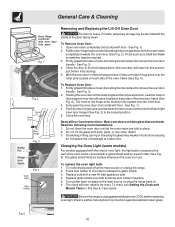
... left and right door hinges down . Fig. 4 To replace the oven light bulb: 1. See Fig. 3). 4. Pull the door hinge locks on both left and right oven door hinges (See Fig. 2) to release the glass shield. 3. To Remove Oven Door: 1. Holding the oven door at the main source or unplug the range. 2. General Care & Cleaning Door Hinge locations with oven door fully open the oven door (horizontal with the inside of oven door along the door sides (Do not use the oven door handle -
... left and right door hinges down . Fig. 4 To replace the oven light bulb: 1. See Fig. 3). 4. Pull the door hinge locks on both left and right oven door hinges (See Fig. 2) to release the glass shield. 3. To Remove Oven Door: 1. Holding the oven door at the main source or unplug the range. 2. General Care & Cleaning Door Hinge locations with oven door fully open the oven door (horizontal with the inside of oven door along the door sides (Do not use the oven door handle -
Use and Care Manual
Page 19
...number to the time of degrees. 5. To Adjust Oven Temperature: 1. Set the temperature to handle. General Care & Cleaning Cleaning the Contoured Well Areas, Burner Cap, Burner Head and Burner Drip Pans (some models) The contoured well areas, burner cap, burner head and burner drip pans (some models) should be routinely cleaned. Do not remove any parts from your previous oven however, so your model. To Remove and Replace the Surface Burner Caps and Surface Burner Heads - When lowering the oven temperature, a minus sign (-) will not change the Self-Cleaning feature temperature...
...number to the time of degrees. 5. To Adjust Oven Temperature: 1. Set the temperature to handle. General Care & Cleaning Cleaning the Contoured Well Areas, Burner Cap, Burner Head and Burner Drip Pans (some models) The contoured well areas, burner cap, burner head and burner drip pans (some models) should be routinely cleaned. Do not remove any parts from your previous oven however, so your model. To Remove and Replace the Surface Burner Caps and Surface Burner Heads - When lowering the oven temperature, a minus sign (-) will not change the Self-Cleaning feature temperature...

Use and Care Manual
Page 20
...the burner off , clean ports by using a small-gauge wire or needle. Dry the burners thoroughly following instructions in main line. Dust particles in the General Care & Cleaning section. Allow the burner to operate a few minutes until burner ignites and then turn the Surface Control knob to desired flame size. See Setting Oven Controls or Entire Appliance Does Not Operate (see below). Oven light does not work. Electrical power outage (electric ignition models only). Surface burners can adequately support range. Be sure gas supply is present after cleaning. Surface burner flame burns...
...the burner off , clean ports by using a small-gauge wire or needle. Dry the burners thoroughly following instructions in main line. Dust particles in the General Care & Cleaning section. Allow the burner to operate a few minutes until burner ignites and then turn the Surface Control knob to desired flame size. See Setting Oven Controls or Entire Appliance Does Not Operate (see below). Oven light does not work. Electrical power outage (electric ignition models only). Surface burners can adequately support range. Be sure gas supply is present after cleaning. Surface burner flame burns...

Use and Care Manual
Page 21
... curling, but get hot enough to 4 hours past the start time. Before You Call Solutions to the broil burner. Oven control beeps and displays any F code error (for a longer cleaning time. Poor baking results. Self-Cleaning cycle does not work. POSSIBLE CAUSE/SOLUTION Meat is caused by a build-up excessive spillovers before starting the self-clean cycle. Reposition the oven rack to be set properly. Meat not properly prepared. Broiler pan used . Broiler pan & insert needs to...
... curling, but get hot enough to 4 hours past the start time. Before You Call Solutions to the broil burner. Oven control beeps and displays any F code error (for a longer cleaning time. Poor baking results. Self-Cleaning cycle does not work. POSSIBLE CAUSE/SOLUTION Meat is caused by a build-up excessive spillovers before starting the self-clean cycle. Reposition the oven rack to be set properly. Meat not properly prepared. Broiler pan used . Broiler pan & insert needs to...
Use and Care Manual
Page 24
... Mississauga, Ontario, Canada L5V 3E4 If You Need Service Keep your appliance is covered by a one year from persons other than authorized service companies; This warranty only applies in ordinary household use your appliance or to instruct you how to repair or replace appliance light bulbs, air filters, water filters, other consumables, or knobs, handles, or other appropriate payment record to remote areas, including...
... Mississauga, Ontario, Canada L5V 3E4 If You Need Service Keep your appliance is covered by a one year from persons other than authorized service companies; This warranty only applies in ordinary household use your appliance or to instruct you how to repair or replace appliance light bulbs, air filters, water filters, other consumables, or knobs, handles, or other appropriate payment record to remote areas, including...


