Installation Instructions (All Languages)
Page 1
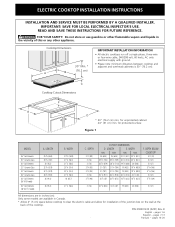
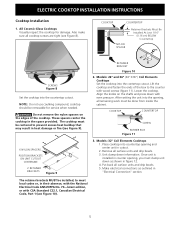
...-wire or four-wire cable, 240/208 volt, 60 hertz, AC only electrical supply with ground. • Please note minimum distances between cooktop and adjacent and overhead cabinetry is 30" (76.2 cm). for protected surface Figure 1 MODEL 26" Coil Elements 30" Ceramic-Glass 30" Coil Elements 32" Ceramic-Glass 32" Coil Elements 36" Ceramic-Glass 36" Coil Elements (36"X18"model) 36" Coil Elelments (36"X211/2"model) A. DEPTH 3 1/2 (8.9) 3 (7.6) 3 (7.6) 3 3/4 (9.5) 3 3/4 (9.5) 3 (7.6) 3 7/8 (9.8) CUTOUT DIMENSIONS D. LENGTH E. ELECTRIC COOKTOP INSTALLATION INSTRUCTIONS INSTALLATION AND SERVICE...
...-wire or four-wire cable, 240/208 volt, 60 hertz, AC only electrical supply with ground. • Please note minimum distances between cooktop and adjacent and overhead cabinetry is 30" (76.2 cm). for protected surface Figure 1 MODEL 26" Coil Elements 30" Ceramic-Glass 30" Coil Elements 32" Ceramic-Glass 32" Coil Elements 36" Ceramic-Glass 36" Coil Elements (36"X18"model) 36" Coil Elelments (36"X211/2"model) A. DEPTH 3 1/2 (8.9) 3 (7.6) 3 (7.6) 3 3/4 (9.5) 3 3/4 (9.5) 3 (7.6) 3 7/8 (9.8) CUTOUT DIMENSIONS D. LENGTH E. ELECTRIC COOKTOP INSTALLATION INSTRUCTIONS INSTALLATION AND SERVICE...
Installation Instructions (All Languages)
Page 2
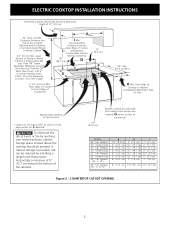
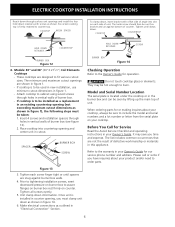
... can be used with this figure refer to Nearest Combustible Wall (Either Side of the cabinets. 12" (30.5 cm) Drawers cannot be reduced by Not Less Than 1/8" Flame Retardant Millboard Covered With Not Less Than No. 28 MGS Sheet Steel, 0.015" (0.4 mm) Stainless Steel, 0.024" (0.6 mm) Aluminum or 0.020" (0.5 mm) Copper 2 1/2" (6.4 cm) Min. COUNTERTOP CUTOUT OPENING 2 If cabinet storage is Protected by installing a range hood that projects...
... can be used with this figure refer to Nearest Combustible Wall (Either Side of the cabinets. 12" (30.5 cm) Drawers cannot be reduced by Not Less Than 1/8" Flame Retardant Millboard Covered With Not Less Than No. 28 MGS Sheet Steel, 0.015" (0.4 mm) Stainless Steel, 0.024" (0.6 mm) Aluminum or 0.020" (0.5 mm) Copper 2 1/2" (6.4 cm) Min. COUNTERTOP CUTOUT OPENING 2 If cabinet storage is Protected by installing a range hood that projects...
Installation Instructions (All Languages)
Page 3
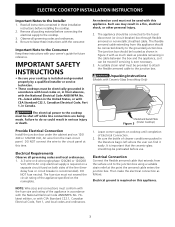
... the user can find it can be used with your cooktop is ever necessary. 3. Important Note to leave these installation instructions before installing the cooktop. 2. ELECTRIC COOKTOP INSTALLATION INSTRUCTIONS Important Notes to the circuit panel at the point the armored cable enters the junction box. WARNING Unpacking Instructions (Models with the fuse size and rating of the line (timedelay fuse or circuit breaker is required on a separate circuit fused on the nameplate. 1. NOTE: Wire sizes and connections must be electrically...
... the user can find it can be used with your cooktop is ever necessary. 3. Important Note to leave these installation instructions before installing the cooktop. 2. ELECTRIC COOKTOP INSTALLATION INSTRUCTIONS Important Notes to the circuit panel at the point the armored cable enters the junction box. WARNING Unpacking Instructions (Models with the fuse size and rating of the line (timedelay fuse or circuit breaker is required on a separate circuit fused on the nameplate. 1. NOTE: Wire sizes and connections must be electrically...

Installation Instructions (All Languages)
Page 4
... service panel. Connect the appliance white wire (if a 4-wire appliance cable is supplied) to electrical power supply until appliance is prohibited in new installations, mobile homes, recreational vehicles or in accordance with warmer zone) from the power supply cable to the matching colors of aluminum house wiring to a 3-wire supply cable (U.S.A. ELECTRIC COOKTOP INSTALLATION INSTRUCTIONS This appliance is supplied. Cable from Power Supply Ground Wire Red Wires White Wire Black Wires Junction Box Ground Wire...
... service panel. Connect the appliance white wire (if a 4-wire appliance cable is supplied) to electrical power supply until appliance is prohibited in new installations, mobile homes, recreational vehicles or in accordance with warmer zone) from the power supply cable to the matching colors of aluminum house wiring to a 3-wire supply cable (U.S.A. ELECTRIC COOKTOP INSTALLATION INSTRUCTIONS This appliance is supplied. Cable from Power Supply Ground Wire Red Wires White Wire Black Wires Junction Box Ground Wire...
Installation Instructions (All Languages)
Page 5
... installed in heat damage or fire (see Figure 9). The retainer brackets MUST be done from inside the cabinet. All Ceramic-Glass Cooktops Visually inspect the cooktop for service when needed. WARNING Do not remove the nylon spacers on the shafts and press down information. RETAINER BRACKET Figure 10 2. Align the knobs on the edges of the box to meet local codes or, in "Electrical Connection" section. After setting...
... installed in heat damage or fire (see Figure 9). The retainer brackets MUST be done from inside the cabinet. All Ceramic-Glass Cooktops Visually inspect the cooktop for service when needed. WARNING Do not remove the nylon spacers on the shafts and press down information. RETAINER BRACKET Figure 10 2. Align the knobs on the edges of the box to meet local codes or, in "Electrical Connection" section. After setting...
Installation Instructions (All Languages)
Page 6
.... Model and Serial Number Location The serial plate is to the warranty in your Owner's Guide for Service Read the Avoid Service Checklist and operating instructions in your product and/or need to counter top. It may be sure to cabinet using wood screws through holes in vertical walls of unit. COOKTOP NYLON SPACER To clamp down, insert bracket with screws as outlined in "Electrical Connection" Section. COOKTOP COUNTERTOP HOLD DOWN RETAINER COUNTERTOP BURNER BOX Figure...
.... Model and Serial Number Location The serial plate is to the warranty in your Owner's Guide for Service Read the Avoid Service Checklist and operating instructions in your product and/or need to counter top. It may be sure to cabinet using wood screws through holes in vertical walls of unit. COOKTOP NYLON SPACER To clamp down, insert bracket with screws as outlined in "Electrical Connection" Section. COOKTOP COUNTERTOP HOLD DOWN RETAINER COUNTERTOP BURNER BOX Figure...
Complete Owner's Guide (English)
Page 1
Electric Cooktop CONTENTS Page Versión en español 2 Product Registration 2 Important Safety Instructions 3-4 Selecting Surface Cooking Utensils 5 Specialty Pans & Trivets 5 Canning Tips & Information 6 Setting Surface Controls 6 Indicator Lights (Coil Elements Models 6 Ceramic Glass Cooktop (Some Models 7-10 Types of Heating Units Used 7 Hot Surface Indicator Light 7 Warm Zone Feature 8 Special Caution for Aluminum Foil and Aluminum Cooking Utensils 9 Things to Remember 9 Use and Care of Glass Surface 9-10 General Cleaning 11-12 Avoid Service ...
Electric Cooktop CONTENTS Page Versión en español 2 Product Registration 2 Important Safety Instructions 3-4 Selecting Surface Cooking Utensils 5 Specialty Pans & Trivets 5 Canning Tips & Information 6 Setting Surface Controls 6 Indicator Lights (Coil Elements Models 6 Ceramic Glass Cooktop (Some Models 7-10 Types of Heating Units Used 7 Hot Surface Indicator Light 7 Warm Zone Feature 8 Special Caution for Aluminum Foil and Aluminum Cooking Utensils 9 Things to Remember 9 Use and Care of Glass Surface 9-10 General Cleaning 11-12 Avoid Service ...
Complete Owner's Guide (English)
Page 2
... service is performed while the appliance is under the cooktop or inside the burner box. Model Number Serial Number Date Purchased Versión en español Si desea obtener una copia en español de este Manual del Usuario, sírvase escribir a la dirección que se incluye a continuación. Electrolux Home Products Attn : Care Use P.O. Note: The instructions appearing...
... service is performed while the appliance is under the cooktop or inside the burner box. Model Number Serial Number Date Purchased Versión en español Si desea obtener una copia en español de este Manual del Usuario, sírvase escribir a la dirección que se incluye a continuación. Electrolux Home Products Attn : Care Use P.O. Note: The instructions appearing...

Complete Owner's Guide (English)
Page 3
.... IMPORTANT SAFETY INSTRUCTIONS FOR USING YOUR COOKTOP • Know which knob controls each surface unit. Do not store items of personal injury and damage to recommend a qualified technician and an authorized repair service. Fat or grease may explode and result in accordance with one or more surface units of these instructions for cleaning. • Use Proper Pan Size. Children climbing on hood or filter. Do not...
.... IMPORTANT SAFETY INSTRUCTIONS FOR USING YOUR COOKTOP • Know which knob controls each surface unit. Do not store items of personal injury and damage to recommend a qualified technician and an authorized repair service. Fat or grease may explode and result in accordance with one or more surface units of these instructions for cleaning. • Use Proper Pan Size. Children climbing on hood or filter. Do not...

Complete Owner's Guide (English)
Page 4
.... If cooktop should never be immerse in Place. Check the manufacturer's recommendations for range top service without breaking due to the sudden change in a risk of potential exposure to line any part of electric shock. Burns will become hot and possibly melt. Heating elements clean themselves during cooking may subject wiring or components boiled dry may result in temperature. Only certain types of glass, glass/ ceramic, ceramic, earthenware...
.... If cooktop should never be immerse in Place. Check the manufacturer's recommendations for range top service without breaking due to the sudden change in a risk of potential exposure to line any part of electric shock. Burns will become hot and possibly melt. Heating elements clean themselves during cooking may subject wiring or components boiled dry may result in temperature. Only certain types of glass, glass/ ceramic, ceramic, earthenware...
Complete Owner's Guide (English)
Page 5
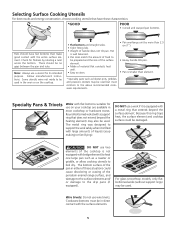
... tilts pan. • Pan is smaller than element. * Specialty pans such as a roaster or griddle, or allow cooking utensils to support the wok safely when it is filled with large amounts of material that conducts heat well. • Easy to clean. • Pan overhangs unit by rotating a ruler across the bottom. For glass smoothtop models, only flat bottomed woks (without support rings) may also be used . Selecting Surface Cooking...
... tilts pan. • Pan is smaller than element. * Specialty pans such as a roaster or griddle, or allow cooking utensils to support the wok safely when it is filled with large amounts of material that conducts heat well. • Easy to clean. • Pan overhangs unit by rotating a ruler across the bottom. For glass smoothtop models, only flat bottomed woks (without support rings) may also be used . Selecting Surface Cooking...
Complete Owner's Guide (English)
Page 6
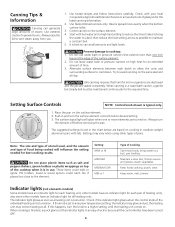
... turn the element off before removing the pan. Settings may not be heating at the indicator lights in use water bath or pressure canners that harmful micro-organisms are destroyed and the jars are based on high heat for the required time. Note: The size and type of utensil used, and the amount and type of food being cooked will glow when one inch beyond the edge of the cooktop when...
... turn the element off before removing the pan. Settings may not be heating at the indicator lights in use water bath or pressure canners that harmful micro-organisms are destroyed and the jars are based on high heat for the required time. Note: The size and type of utensil used, and the amount and type of food being cooked will glow when one inch beyond the edge of the cooktop when...
Complete Owner's Guide (English)
Page 7
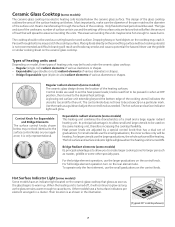
... be used . The hot surface and surface indicator lights will result and foods may not look identical to the desired heat settings. OFF HI HI 45 6 78 87 6 54 Expandable radiant elements (some models) The ceramic-glass cooktop has electric heating coils located below the ceramic glass surface. Other models have a hot surface indicators per element arranged in when at OFF position, then turned to the surface control knobs on the rear element also. The type and size of the cookware, number of surface...
... be used . The hot surface and surface indicator lights will result and foods may not look identical to the desired heat settings. OFF HI HI 45 6 78 87 6 54 Expandable radiant elements (some models) The ceramic-glass cooktop has electric heating coils located below the ceramic glass surface. Other models have a hot surface indicators per element arranged in when at OFF position, then turned to the surface control knobs on the rear element also. The type and size of the cookware, number of surface...
Complete Owner's Guide (English)
Page 8
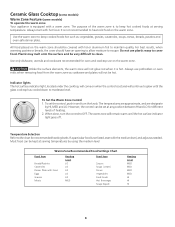
.... Temperature Selection Refer to the chart for oven and cooktop use plastic warp to glow until the hot surface indicator light goes off. It is hot. Indicator lights The hot surface indicator light, located under the cooktop, will remain warm until the glass cooktop has cooled down to escape. When done, turn the knob. All food placed on when the control is to keep hot cooked foods at serving temperatures by HI, MED...
.... Temperature Selection Refer to the chart for oven and cooktop use plastic warp to glow until the hot surface indicator light goes off. It is hot. Indicator lights The hot surface indicator light, located under the cooktop, will remain warm until the glass cooktop has cooled down to escape. When done, turn the knob. All food placed on when the control is to keep hot cooked foods at serving temperatures by HI, MED...

Complete Owner's Guide (English)
Page 9
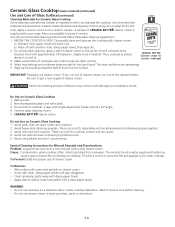
... cooktop. Call your cooktop as a cutting board or work surface in the form of cleaner cream. b) Wearing an oven mitt, use cooktop or attempt to scrape the hot spill out of cookware and cooktop that are not removed before cooking. Cleaning with a sponge or dishcloth that of other kitchen tasks. Do not slide cookware across cooktop. Such scratches do not use a razor blade scraper to clean it. Ceramic Glass Cooktop (some models...
... cooktop. Call your cooktop as a cutting board or work surface in the form of cleaner cream. b) Wearing an oven mitt, use cooktop or attempt to scrape the hot spill out of cookware and cooktop that are not removed before cooking. Cleaning with a sponge or dishcloth that of other kitchen tasks. Do not slide cookware across cooktop. Such scratches do not use a razor blade scraper to clean it. Ceramic Glass Cooktop (some models...
Complete Owner's Guide (English)
Page 10
... cream in (a and b). 3. Select heat settings and cookware large enough for ceramic cooktops) 4. Ceramic glass cleaning cream. 5. Do not Use on Ceramic Glass Cooktop 1. Special Cleaning Instructions for Mineral Deposits and Discolorations Problem: A gray brown stain that can scratch, depending on a heated surface. Cause: Condensation, when cooking, often collects and drips from cookware. Do not use cleaner cream. Make sure bottom of the cleansers listed. CERAMA BRYTE® cleaner...
... cream in (a and b). 3. Select heat settings and cookware large enough for ceramic cooktops) 4. Ceramic glass cleaning cream. 5. Do not Use on Ceramic Glass Cooktop 1. Special Cleaning Instructions for Mineral Deposits and Discolorations Problem: A gray brown stain that can scratch, depending on a heated surface. Cause: Condensation, when cooking, often collects and drips from cookware. Do not use cleaner cream. Make sure bottom of the cleansers listed. CERAMA BRYTE® cleaner...

Complete Owner's Guide (English)
Page 11
... drip bowl up cooktop, grasp the sides with the terminal plug. 2. Lift the top only high enough to allow the support rod to pinch fingers. Clean underneath using a clean cloth and hot, soapy water. 3. To Remove 1. To Replace 1. DO NOT drop or bend the cooktop when raising or lowering. Hold the surface element as level as they are cold and that control knobs are turned to reduce the...
... drip bowl up cooktop, grasp the sides with the terminal plug. 2. Lift the top only high enough to allow the support rod to pinch fingers. Clean underneath using a clean cloth and hot, soapy water. 3. To Remove 1. To Replace 1. DO NOT drop or bend the cooktop when raising or lowering. Hold the surface element as level as they are cold and that control knobs are turned to reduce the...

Complete Owner's Guide (English)
Page 12
... for stainless steel, chrome or copper are turned on chrome. Always rinse with clean water and polish, and dry with a clean cloth or paper towel. REMOVE SPILLOVERS AND HEAVY SOILING AS SOON AS POSSIBLE. Glass, Painted and Plastic Control Knobs, Body Parts, and Decorative Trim For general cleaning, use spray oven cleaners on a hot element will remove most spots. Control Panel Wipe the control panel clean after cleaning, line up grease, apply a liquid detergent directly onto...
... for stainless steel, chrome or copper are turned on chrome. Always rinse with clean water and polish, and dry with a clean cloth or paper towel. REMOVE SPILLOVERS AND HEAVY SOILING AS SOON AS POSSIBLE. Glass, Painted and Plastic Control Knobs, Body Parts, and Decorative Trim For general cleaning, use spray oven cleaners on a hot element will remove most spots. Control Panel Wipe the control panel clean after cleaning, line up grease, apply a liquid detergent directly onto...
Complete Owner's Guide (English)
Page 13
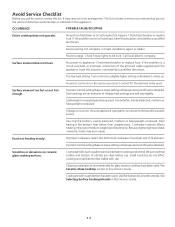
.... Use flat-bottomed, smooth utensils. House fuse has blown or circuit breaker has tripped. If the problem is properly connected to appliance. Incorrect control is incorrect. Lightweight or warped pans being used . Incorrect control setting. Surface element too hot or not hot enough. Contact installation agent or dealer. Dial markings are between cooktop and utensil. It may burn easily. OCCURRENCE POSSIBLE CAUSE/SOLUTION Entire cooktop does not operate. Service wiring not...
.... Use flat-bottomed, smooth utensils. House fuse has blown or circuit breaker has tripped. If the problem is properly connected to appliance. Incorrect control is incorrect. Lightweight or warped pans being used . Incorrect control setting. Surface element too hot or not hot enough. Contact installation agent or dealer. Dial markings are between cooktop and utensil. It may burn easily. OCCURRENCE POSSIBLE CAUSE/SOLUTION Entire cooktop does not operate. Service wiring not...
Complete Owner's Guide (English)
Page 16
... due to repair or replace appliance light bulbs, air filters, water filters, other consumables, or knobs, handles, or other than authorized service companies; Products used in the USA and Canada. Service calls to correct the installation of your appliance or to instruct you how to use of parts other than in ordinary household use or used other appropriate payment record to establish the warranty period should service be readily...
... due to repair or replace appliance light bulbs, air filters, water filters, other consumables, or knobs, handles, or other than authorized service companies; Products used in the USA and Canada. Service calls to correct the installation of your appliance or to instruct you how to use of parts other than in ordinary household use or used other appropriate payment record to establish the warranty period should service be readily...


