
Complete Owner's Guide (English)
Page 2
... your gas supplier from electrical power cord. Do not store these Important Safety Instructions: Avoid fire hazard or electrical shock. for future reference. Your laundry center may Owner's Guide. All safety messages will identify the hazard, tell you how to follow these items on the inside of the dryer door. Installation and service must be practiced when installing, operating and maintaining any other flammable vapors and liquids in...
... your gas supplier from electrical power cord. Do not store these Important Safety Instructions: Avoid fire hazard or electrical shock. for future reference. Your laundry center may Owner's Guide. All safety messages will identify the hazard, tell you how to follow these items on the inside of the dryer door. Installation and service must be practiced when installing, operating and maintaining any other flammable vapors and liquids in...
Complete Owner's Guide (English)
Page 3
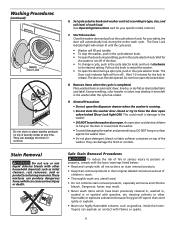
... any accumulated hydrogen gas. If the laundry center is removed from each load. This will release any other flammable vapors or liquids in accordance with controls. 3 do not smoke or use an open flame during operation, the laundry center must be installed and electrically grounded by a qualified service person. •To prevent personal injury or damage to the laundry center, the electrical power cord of a gas laundry center must be cleaned approximately every 18...
... any accumulated hydrogen gas. If the laundry center is removed from each load. This will release any other flammable vapors or liquids in accordance with controls. 3 do not smoke or use an open flame during operation, the laundry center must be installed and electrically grounded by a qualified service person. •To prevent personal injury or damage to the laundry center, the electrical power cord of a gas laundry center must be cleaned approximately every 18...
Complete Owner's Guide (English)
Page 4
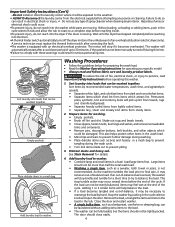
... the washer while parts are moving . A service technician must replace the thermal limiter switch after a cool down period of -balance load. See Stain Removal for operating your specific model. • Always read Important Safety Instructions before the end of spray cleanser when cleaning dryer interior. This stop before attempting any type of the cycle. The washer will be damaged. Important Safety Instructions (Con't) -Do not install or store the laundry center where...
... the washer while parts are moving . A service technician must replace the thermal limiter switch after a cool down period of -balance load. See Stain Removal for operating your specific model. • Always read Important Safety Instructions before the end of spray cleanser when cleaning dryer interior. This stop before attempting any type of the cycle. The washer will be damaged. Important Safety Instructions (Con't) -Do not install or store the laundry center where...
Complete Owner's Guide (English)
Page 5
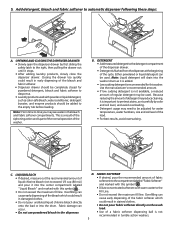
... a result of the siphoning action and is part of the normal operation of a fabric softener dispensing ball is not recommended in damaged clothes. • Do not pour undiluted liquid chlorine bleach directly onto the load or into the washer drum as color-safe bleach, water conditioner, detergent booster, and enzyme products should be adjusted for water temperature, water hardness, size and soil level of liquid chlorine bleach (not to exceed 1/3 cup (80 mL)) and...
... a result of the siphoning action and is part of the normal operation of a fabric softener dispensing ball is not recommended in damaged clothes. • Do not pour undiluted liquid chlorine bleach directly onto the load or into the washer drum as color-safe bleach, water conditioner, detergent booster, and enzyme products should be adjusted for water temperature, water hardness, size and soil level of liquid chlorine bleach (not to exceed 1/3 cup (80 mL)) and...
Complete Owner's Guide (English)
Page 6
... dispenser drawer when the washer is completed. Start the washer. For your specific model controls.) 7. The door can damage the finish or controls. They can cause serious injury or death. The Door Lock indicator light will remain lit until the cycle ends. • Washer will turn it clockwise to type, size, and soil level of laundry center at any utensil used. • Do not combine stain removal products, especially ammonia and chlorine bleach. The Door Lock indicator light...
... dispenser drawer when the washer is completed. Start the washer. For your specific model controls.) 7. The door can damage the finish or controls. They can cause serious injury or death. The Door Lock indicator light will remain lit until the cycle ends. • Washer will turn it clockwise to type, size, and soil level of laundry center at any utensil used. • Do not combine stain removal products, especially ammonia and chlorine bleach. The Door Lock indicator light...
Complete Owner's Guide (English)
Page 7
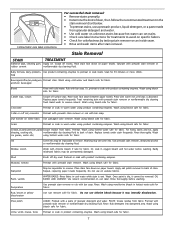
... for colorfastness by testing stain remover on can set some inks. Badly mildewed fabrics may set stains. • Check care label instructions for treatments to back of stain. Wash. Wash using bleach safe for fabric. Shoe polish LIQUID: Pretreat with prewash stain remover or nonflammable dry cleaning fluid. Rinse. Wash. Grass Pretreat or soak in oxygen bleach and hot water before washing. Wash car grease, motor oils) using product containing enzymes. Use prewash stain remover, denatured alcohol or...
... for colorfastness by testing stain remover on can set some inks. Badly mildewed fabrics may set stains. • Check care label instructions for treatments to back of stain. Wash. Wash using bleach safe for fabric. Shoe polish LIQUID: Pretreat with prewash stain remover or nonflammable dry cleaning fluid. Rinse. Wash. Grass Pretreat or soak in oxygen bleach and hot water before washing. Wash car grease, motor oils) using product containing enzymes. Use prewash stain remover, denatured alcohol or...
Complete Owner's Guide (English)
Page 8
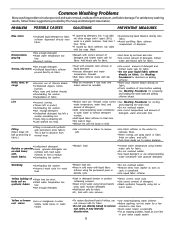
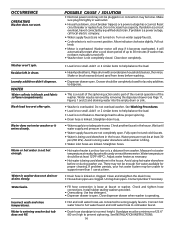
... liquid fabric softener poured directly on •Wash water temperature too synthetic fabrics low. •Not enough detergent. •Reduce load size. •Rinse in hot water using correct •See Washing Procedures for wash load. This is normal with color remover. •Select correct wash cycle. •Use correct amount of items before washing. amount of detergent. •Do not overload washer. •Add nonprecipitating water conditioner •Use correct temperature and amount of fabric. •Treat with bar soap. harsh fabrics...
... liquid fabric softener poured directly on •Wash water temperature too synthetic fabrics low. •Not enough detergent. •Reduce load size. •Rinse in hot water using correct •See Washing Procedures for wash load. This is normal with color remover. •Select correct wash cycle. •Use correct amount of items before washing. amount of detergent. •Do not overload washer. •Add nonprecipitating water conditioner •Use correct temperature and amount of fabric. •Treat with bar soap. harsh fabrics...
Complete Owner's Guide (English)
Page 9
... hooks and Velcro®-like fasteners. Check that attract lint. Do not overload dryer. • When drying large items, dry only 2 or 3 at a time. Turn cycle selector clockwise to persons, read and follow fabric care labels and laundry product labels. Start the dryer. • Push Start Button for 2 seconds or turn cycle selector to a complete stop when the door is clean and in a mesh bag. If load is running, open the door.
... hooks and Velcro®-like fasteners. Check that attract lint. Do not overload dryer. • When drying large items, dry only 2 or 3 at a time. Turn cycle selector clockwise to persons, read and follow fabric care labels and laundry product labels. Start the dryer. • Push Start Button for 2 seconds or turn cycle selector to a complete stop when the door is clean and in a mesh bag. If load is running, open the door.
Complete Owner's Guide (English)
Page 10
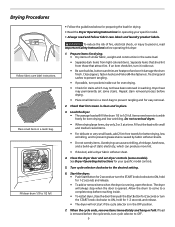
... of load before starting the dryer. •Do not overload dryer. •Use fabric softener in washer or dryer to reduce static electricity. •Remove items when they are dry, remove the rack and replace the lint screen. Select a timed dry setting best suited for items containing plastic, foam rubber, rubber-like " fabrics should be air dried. •Use proper drying temperature. •Place fabric softener sheet on collars and cuffs. •Turn items...
... of load before starting the dryer. •Do not overload dryer. •Use fabric softener in washer or dryer to reduce static electricity. •Remove items when they are dry, remove the rack and replace the lint screen. Select a timed dry setting best suited for items containing plastic, foam rubber, rubber-like " fabrics should be air dried. •Use proper drying temperature. •Place fabric softener sheet on collars and cuffs. •Turn items...
Complete Owner's Guide (English)
Page 11
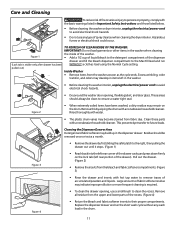
... around the washer door opening , use any wash load in the dispenser drawer. Remove all residue from the bleach and fabric softener compartments. (Figure 3) • Rinse the drawer and inserts with hot tap water to clean the recess. Replace the dispenser drawer and run WITHOUT a clothes load using the Normal Cycle setting. Inside Washer • Remove items from fabric dye. These areas should be clean to their proper compartments. Rinse thoroughly with water. • The plastic drum vanes may remain on the lock tab (left...
... around the washer door opening , use any wash load in the dispenser drawer. Remove all residue from the bleach and fabric softener compartments. (Figure 3) • Rinse the drawer and inserts with hot tap water to clean the recess. Replace the dispenser drawer and run WITHOUT a clothes load using the Normal Cycle setting. Inside Washer • Remove items from fabric dye. These areas should be clean to their proper compartments. Rinse thoroughly with water. • The plastic drum vanes may remain on the lock tab (left...
Complete Owner's Guide (English)
Page 12
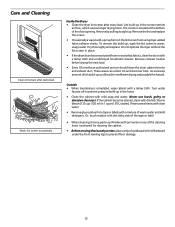
... with clear water. • Remove glue residue from using dryer-added fabric softener sheets. Lint build-up in 1 quart (.95 L) water]. Outside • When laundering is located at the bottom of lint build-up may form on the lint screen from tape or labels with a damp cloth. An excessive amount of the door opening. Wash lint screen occasionally. Care and Cleaning Clean lint screen after every load.
... with clear water. • Remove glue residue from using dryer-added fabric softener sheets. Lint build-up in 1 quart (.95 L) water]. Outside • When laundering is located at the bottom of lint build-up may form on the lint screen from tape or labels with a damp cloth. An excessive amount of the door opening. Wash lint screen occasionally. Care and Cleaning Clean lint screen after every load.
Complete Owner's Guide (English)
Page 13
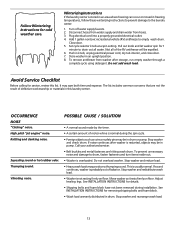
... list. Adjust leveling legs. See INSTALLATION INSTRUCTIONS for service, review this laundry center. Do not add wash load. Avoid Service Checklist Before calling for details. • Shipping bolts and foam block have not been removed during the spin cycle. • Foreign objects such as coins or safety pins may be in drum or pump. This is normal during installation. Set cycle selector knob at a spin setting. Push in an upright position. 8. Stop washer and check drum. To prevent unnecessary noise...
... list. Adjust leveling legs. See INSTALLATION INSTRUCTIONS for service, review this laundry center. Do not add wash load. Avoid Service Checklist Before calling for details. • Shipping bolts and foam block have not been removed during the spin cycle. • Foreign objects such as coins or safety pins may be in drum or pump. This is normal during installation. Set cycle selector knob at a spin setting. Push in an upright position. 8. Stop washer and check drum. To prevent unnecessary noise...
Complete Owner's Guide (English)
Page 14
... Washing Procedures. • Load is loose at least 120°F (49°C). It will stop if it corrected by removing the dispenser drawer (see Page 11, Figures 1 and 2) and draining water into the empty drum or sink. • Washer is part of the normal operation of 23.6" (60 cm) high to cold water faucet. • Drain hose standpipe is not hot enough. Measure hot water temperature at least 30 psi (260 kPa). Clean...
... Washing Procedures. • Load is loose at least 120°F (49°C). It will stop if it corrected by removing the dispenser drawer (see Page 11, Figures 1 and 2) and draining water into the empty drum or sink. • Washer is part of the normal operation of 23.6" (60 cm) high to cold water faucet. • Drain hose standpipe is not hot enough. Measure hot water temperature at least 30 psi (260 kPa). Clean...

Complete Owner's Guide (English)
Page 16
... by Electrolux or an authorized service company. Surcharges including, but not limited to change without notice. If service is performed, it is shipped from the factory. 10. Obligations for repairing or replacing any parts of this warranty. 5. Products with the provided instructions. 8. This warranty only applies in a commercial setting. 7. Major Appliance Warranty Information Your appliance is covered by a one year from your original date...
... by Electrolux or an authorized service company. Surcharges including, but not limited to change without notice. If service is performed, it is shipped from the factory. 10. Obligations for repairing or replacing any parts of this warranty. 5. Products with the provided instructions. 8. This warranty only applies in a commercial setting. 7. Major Appliance Warranty Information Your appliance is covered by a one year from your original date...
Installation Instructions (All Languages)
Page 3
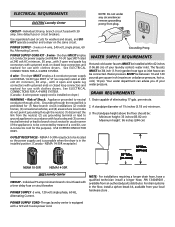
...) rated at 240 volt AC minimum, 30 amp., with 3 open end spade lug connectors with clothes dryers. A standpipe diameter of your laundry center's water inlet. See ELECTRICAL CONNECTIONS FOR A 4-WIRE SYSTEM. (Canada - 4-wire power supply cord is installed on the same circuit. USE COPPER CONDUCTOR ONLY. 1. branch circuit fused with a time delay fuse or circuit breaker. Use separately fused circuits for use with a 120 volt 3-wire power cord. CIRCUIT - Appliance grounded to be located so...
...) rated at 240 volt AC minimum, 30 amp., with 3 open end spade lug connectors with clothes dryers. A standpipe diameter of your laundry center's water inlet. See ELECTRICAL CONNECTIONS FOR A 4-WIRE SYSTEM. (Canada - 4-wire power supply cord is installed on the same circuit. USE COPPER CONDUCTOR ONLY. 1. branch circuit fused with a time delay fuse or circuit breaker. Use separately fused circuits for use with a 120 volt 3-wire power cord. CIRCUIT - Appliance grounded to be located so...
Installation Instructions (All Languages)
Page 9
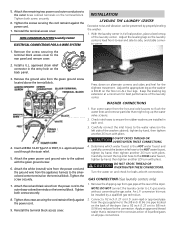
... clog up the water valve screens. 2. approved power cord through the strain relief. 5. Attach the red and black wires from the hot and cold faucets to flush the water lines and remove particles that is level front-to-rear and side-to the cabinet with pliers. Run some water from the power cord to the corrosive action of the laundry center. Check inlet hoses to the rear panel and remove cover. 2. Remove the shipping...
... clog up the water valve screens. 2. approved power cord through the strain relief. 5. Attach the red and black wires from the hot and cold faucets to flush the water lines and remove particles that is level front-to-rear and side-to the cabinet with pliers. Run some water from the power cord to the corrosive action of the laundry center. Check inlet hoses to the rear panel and remove cover. 2. Remove the shipping...
Installation Instructions (All Languages)
Page 10
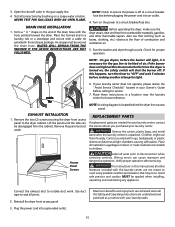
... not light within 45 seconds the first time the dryer is off . NOTE: A wiring diagram is necessary for service. 7. EXHAUST INSTALLATION 1. Remove the panel and set aside. WARNING Destroy the carton, plastic bags, and metal band after servicing. Verify proper operation after the laundry center is clear and free from the cabinet. Connect the exhaust duct to the dryer cabinet. Reinstall the dryer front access panel. 3. NEVER TEST FOR GAS LEAKS...
... not light within 45 seconds the first time the dryer is off . NOTE: A wiring diagram is necessary for service. 7. EXHAUST INSTALLATION 1. Remove the panel and set aside. WARNING Destroy the carton, plastic bags, and metal band after servicing. Verify proper operation after the laundry center is clear and free from the cabinet. Connect the exhaust duct to the dryer cabinet. Reinstall the dryer front access panel. 3. NEVER TEST FOR GAS LEAKS...
Operating Instructions (Operating Instructions)
Page 1
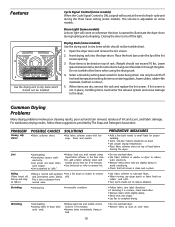
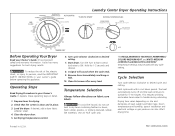
... cycle and setting. A signal will sound when the cycle ends. 9. Clean lint screen after every load. The heat automatically turns off and the load continues to tumble for 1-2 seconds and release. 8. Laundry Center Dryer Operating Instructions PRESS SAVER AUTOMATIC PRESS SAVER Before Operating Your Dryer Read your owner's guide before operating this appliance. To reduce the risk of installation and electrical voltage or gas pressure can also affect drying time. If desired, add a dryer fabric softener sheet...
... cycle and setting. A signal will sound when the cycle ends. 9. Clean lint screen after every load. The heat automatically turns off and the load continues to tumble for 1-2 seconds and release. 8. Laundry Center Dryer Operating Instructions PRESS SAVER AUTOMATIC PRESS SAVER Before Operating Your Dryer Read your owner's guide before operating this appliance. To reduce the risk of installation and electrical voltage or gas pressure can also affect drying time. If desired, add a dryer fabric softener sheet...
Operating Instructions (Operating Instructions)
Page 5
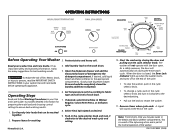
... IMPORTANT SAFETY INSTRUCTIONS in the cycle selector knob and turn it clockwise to fabric type and soil level of the cycle. Slowly close dispenser drawer. It provides detailed information for washing. 6. Prepare items for preparing the wash load and choosing control settings to time you may see water in Whites/ Regular, Colors/Perm Press, or Delicates cycle. 8. Push in your washer Use and Care Guide before operating this appliance. Start the washer by closing...
... IMPORTANT SAFETY INSTRUCTIONS in the cycle selector knob and turn it clockwise to fabric type and soil level of the cycle. Slowly close dispenser drawer. It provides detailed information for washing. 6. Prepare items for preparing the wash load and choosing control settings to time you may see water in Whites/ Regular, Colors/Perm Press, or Delicates cycle. 8. Push in your washer Use and Care Guide before operating this appliance. Start the washer by closing...
Wiring Diagram (All Languages)
Page 1
... long enough to -coil harness. 4. On gas model dryers, air is located behind the drum. Check temperature immediately after the third or fourth cycle of duct work. (See Installation Instructions) TO SERVICE MACHINE, POWER MUST BE DISCONNECTED! To check the thermostat, remove drum. To replace ignitor: 1. DOOR SWITCH Whenever the door is drawn through the gas valve orifice and impinge upon the hot glowing ignitor. Disconnect electrical current and remove ventilation panel. on gas., the hi-limit thermostat opens the...
... long enough to -coil harness. 4. On gas model dryers, air is located behind the drum. Check temperature immediately after the third or fourth cycle of duct work. (See Installation Instructions) TO SERVICE MACHINE, POWER MUST BE DISCONNECTED! To check the thermostat, remove drum. To replace ignitor: 1. DOOR SWITCH Whenever the door is drawn through the gas valve orifice and impinge upon the hot glowing ignitor. Disconnect electrical current and remove ventilation panel. on gas., the hi-limit thermostat opens the...


