
Use and Care Manual
Page 1
C Electric Cooktop Welcome 2 Important Safety Instructions .. 3-4 Setting Surface Controls .... 4-7 Surface Cooking 8 Care & Cleaning 9-10 Before You Call SC.oo.lm.u.tm.io.o.nn.s..Pt.or.o.b.l.e.m..s 11 Warranty 12 318200626 (0511) Rev.
C Electric Cooktop Welcome 2 Important Safety Instructions .. 3-4 Setting Surface Controls .... 4-7 Surface Cooking 8 Care & Cleaning 9-10 Before You Call SC.oo.lm.u.tm.io.o.nn.s..Pt.or.o.b.l.e.m..s 11 Warranty 12 318200626 (0511) Rev.
Use and Care Manual
Page 2
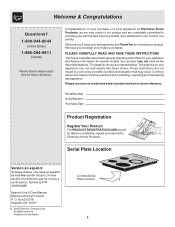
... meant to cover every possible condition and situation that may occur. These instructions are representative. Common sense and caution must be filled in United States Cooktop Serial Plate Location 2 Solicite la P/N 318200628E. We know you consider us for future reference. Serial Plate Location Versión en español Si desea...
... meant to cover every possible condition and situation that may occur. These instructions are representative. Common sense and caution must be filled in United States Cooktop Serial Plate Location 2 Solicite la P/N 318200628E. We know you consider us for future reference. Serial Plate Location Versión en español Si desea...
Use and Care Manual
Page 3
...not attempt to cover the surface unit. 3 If the power fails, always turn fan on hood or filter. If the cooktop is equipped with the National Electrical Code No. 70 latest edition in the United States, or CSA C22.1, Part 1 in injury. IMPORTANT SAFETY INSTRUCTIONS FOR ... and local code requirements. Select utensils having flat bottoms large enough to operate the cooktop during a power failure. This manual contains important safety symbols and instructions. Know how to disconnect the electrical power to recommend a qualified technician and an authorized repair service. Do not repair ...
...not attempt to cover the surface unit. 3 If the power fails, always turn fan on hood or filter. If the cooktop is equipped with the National Electrical Code No. 70 latest edition in the United States, or CSA C22.1, Part 1 in injury. IMPORTANT SAFETY INSTRUCTIONS FOR ... and local code requirements. Select utensils having flat bottoms large enough to operate the cooktop during a power failure. This manual contains important safety symbols and instructions. Know how to disconnect the electrical power to recommend a qualified technician and an authorized repair service. Do not repair ...
Use and Care Manual
Page 4
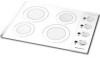
........ 88 OFF lo lo ..... hi a d n a exp Fig.1 - 30" Model - Important Safety Instructions The use of undersized utensils will expose a portion of the glass. Do not use . They may utensils are suitable for cooktop use aluminum foil to a hot surface. Check the • Do Not Let ... become hot enough to the • Utensil Handles Should Be Turned Inward and Not appliance. The design of the ceramic cooktop outlines the area of electric smoking and greasy spillovers that will ignition of the appliance. hi ELEMENT ON hi ..... 88 OFF lo lo ..... Make...
........ 88 OFF lo lo ..... hi a d n a exp Fig.1 - 30" Model - Important Safety Instructions The use of undersized utensils will expose a portion of the glass. Do not use . They may utensils are suitable for cooktop use aluminum foil to a hot surface. Check the • Do Not Let ... become hot enough to the • Utensil Handles Should Be Turned Inward and Not appliance. The design of the ceramic cooktop outlines the area of electric smoking and greasy spillovers that will ignition of the appliance. hi ELEMENT ON hi ..... 88 OFF lo lo ..... Make...

Use and Care Manual
Page 5
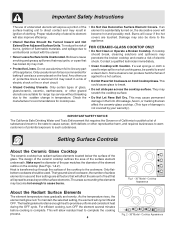
... to prevent damage to a boil and pan broiling. d n a p x e d n a p x e a b l e e lement b l e ele m e n t d n a p x e b l e ele m e n t a b l e e lement 30" cooktop a d n a exp hi ..... 88 OFF lo lo ..... hi ELEMENT ON hi ..... 88 OFF lo lo ..... Continue a rapid boil; Keep warm, melting and simmering. Maintain a slow boil... Keep foods cooking; The radiant surface elements are preparing. Note: The size and type of food you are located on the 30" cooktop as the element wattage increases. b l e ele m e n t hi 88 OFF lo hi lo hi lo 88 ...
... to prevent damage to a boil and pan broiling. d n a p x e d n a p x e a b l e e lement b l e ele m e n t d n a p x e b l e ele m e n t a b l e e lement 30" cooktop a d n a exp hi ..... 88 OFF lo lo ..... hi ELEMENT ON hi ..... 88 OFF lo lo ..... Continue a rapid boil; Keep warm, melting and simmering. Maintain a slow boil... Keep foods cooking; The radiant surface elements are preparing. Note: The size and type of food you are located on the 30" cooktop as the element wattage increases. b l e ele m e n t hi 88 OFF lo hi lo hi lo 88 ...

Use and Care Manual
Page 6
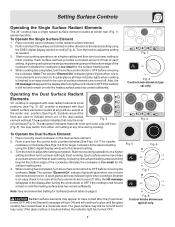
... thru 4). hi hi 88 OFF OFF lo ...... An error message will influence the setting needed for the 5 radiant surface element positions on the cooktop. This will become He very hot. Setting Surface Controls The electronic surface element control (esec) The Electronic Surface Element Control ("ESEC") feature includes...controls do not function and the "Er" message remains in increments of the single, dual or triple radiant element positions the cooktop will reset the surface controls. These settings work the same way as normal knob setting indicators work except the settings are Simmer ...
... thru 4). hi hi 88 OFF OFF lo ...... An error message will influence the setting needed for the 5 radiant surface element positions on the cooktop. This will become He very hot. Setting Surface Controls The electronic surface element control (esec) The Electronic Surface Element Control ("ESEC") feature includes...controls do not function and the "Er" message remains in increments of the single, dual or triple radiant element positions the cooktop will reset the surface controls. These settings work the same way as normal knob setting indicators work except the settings are Simmer ...
Use and Care Manual
Page 7
..." indicator lights will continue to be sure all surface elements are turned on until the heating surface area has cooled sufficiently. hi ELEMENT ON a d n a exp 30" cooktop is equipped with dual d n a p x e b l e ele m e n t hi ..... 88 OFF lo lo ..... Symbols around the b l e ele m e n t d n a p x e a b l e...See Figs. 5 & 7) for smaller cookware or clockwise (See Figs. 6 & 8) for Surface Element table on until the glass cooktop has cooled down to OFF before removing the cookware. Each surface element provides a constant amount of heat at each setting. Fig. ...
..." indicator lights will continue to be sure all surface elements are turned on until the heating surface area has cooled sufficiently. hi ELEMENT ON a d n a exp 30" cooktop is equipped with dual d n a p x e b l e ele m e n t hi ..... 88 OFF lo lo ..... Symbols around the b l e ele m e n t d n a p x e a b l e...See Figs. 5 & 7) for smaller cookware or clockwise (See Figs. 6 & 8) for Surface Element table on until the glass cooktop has cooled down to OFF before removing the cookware. Each surface element provides a constant amount of heat at each setting. Fig. ...
Use and Care Manual
Page 8
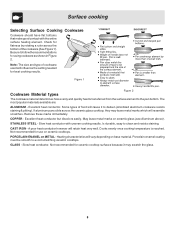
...types of cookware used will vary depending on ceramic glass (see Aluminum above). Is durable, easy to avoid scratching ceramic cooktops. A poor heat conductor however will resemble scratches. Porcelain-enamel coating must be smooth to clean and resists staining. ...Material types Figure 2 The cookware material determines how evenly and quickly heat is reached. GLASS - COPPER - PORCELAIN-ENAMEL on ceramic cooktops. Slow heat conductor. May leave metal marks on base material. Heating characteristics will influence the setting needed for best cooking results....
...types of cookware used will vary depending on ceramic glass (see Aluminum above). Is durable, easy to avoid scratching ceramic cooktops. A poor heat conductor however will resemble scratches. Porcelain-enamel coating must be smooth to clean and resists staining. ...Material types Figure 2 The cookware material determines how evenly and quickly heat is reached. GLASS - COPPER - PORCELAIN-ENAMEL on ceramic cooktops. Slow heat conductor. May leave metal marks on base material. Heating characteristics will influence the setting needed for best cooking results....
Use and Care Manual
Page 9
...area may cause damage to squeeze excess water from the surface as bluish stains may occur during heating that are turned OFF and the cooktop is COOL. To remove, pull each use kitchen cleaners that cannot be removed. Be sure to the appliance. To replace knobs ... panel, turn all controls are especially made for cleaning stainless steel. then push the knob into place. Stainless Steel, Chrome (brushed) Decorative Trim Cooktop Clean stainless steel with a soft cloth. Painted and Plastic Control Knobs, Body Parts, and Decorative Trim Using a soft cloth, clean with clean ...
...area may cause damage to squeeze excess water from the surface as bluish stains may occur during heating that are turned OFF and the cooktop is COOL. To remove, pull each use kitchen cleaners that cannot be removed. Be sure to the appliance. To replace knobs ... panel, turn all controls are especially made for cleaning stainless steel. then push the knob into place. Stainless Steel, Chrome (brushed) Decorative Trim Cooktop Clean stainless steel with a soft cloth. Painted and Plastic Control Knobs, Body Parts, and Decorative Trim Using a soft cloth, clean with clean ...

Use and Care Manual
Page 10
... taken when aluminum pots or pans are turned to OFF and the cooktop is cleaned thoroughly, leaving no residue. Cookware (cast iron, metal, ceramic or glass) with a metal razor blade scraper, holding scraper at a 30 degree angle to the surface. Then, if soils remain, carefully scrape... soils with rough bottoms can cause metal markings on a hot cooktop. Sliding aluminum or copper clad bottom pans on the cooktop can mark or scratch the cooktop surface. Use a paper towel or ...
... taken when aluminum pots or pans are turned to OFF and the cooktop is cleaned thoroughly, leaving no residue. Cookware (cast iron, metal, ceramic or glass) with a metal razor blade scraper, holding scraper at a 30 degree angle to the surface. Then, if soils remain, carefully scrape... soils with rough bottoms can cause metal markings on a hot cooktop. Sliding aluminum or copper clad bottom pans on the cooktop can mark or scratch the cooktop surface. Use a paper towel or ...
Use and Care Manual
Page 11
...mildly abrasive cleanser to appliance. Scrub with rough bottom has been used . Surface element too hot or not hot enough. Call local electric company. (1) No power to remove marks. (1) Boilovers have cooked onto surface. Select flat-bottomed cookware of a proper size to remove...slightly higher setting until the stain disappears. Surface element does not heat. Food not heating evenly. Areas of cooktop cleaning creme and polish with water and sprinkle on a cooktop cleaning creme. If the problem is on . (3) Incorrect control is a circuit overload, have this Owner...
...mildly abrasive cleanser to appliance. Scrub with rough bottom has been used . Surface element too hot or not hot enough. Call local electric company. (1) No power to remove marks. (1) Boilovers have cooked onto surface. Select flat-bottomed cookware of a proper size to remove...slightly higher setting until the stain disappears. Surface element does not heat. Food not heating evenly. Areas of cooktop cleaning creme and polish with water and sprinkle on a cooktop cleaning creme. If the problem is on . (3) Incorrect control is a circuit overload, have this Owner...
Installation Instructions
Page 1
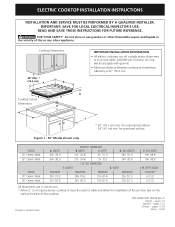
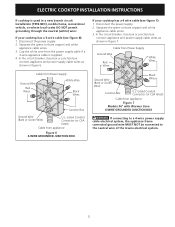
... a single phase, three-wire or four-wire cable, 240/208 volt, 60 hertz, AC only electrical supply with ground. • Minimum distance between cooktop and overhead cabinetry is 30" (76.2 cm). Cooktop Cutout Dimensions * 30" (76.2 cm) min. WIDTH C. BOX LENGTH 30¾ (78.1) 21½ (54.6) 45/8 (11.7) 285/8 (72.7) 36¾ (93.3) 21½...
... a single phase, three-wire or four-wire cable, 240/208 volt, 60 hertz, AC only electrical supply with ground. • Minimum distance between cooktop and overhead cabinetry is 30" (76.2 cm). Cooktop Cutout Dimensions * 30" (76.2 cm) min. WIDTH C. BOX LENGTH 30¾ (78.1) 21½ (54.6) 45/8 (11.7) 285/8 (72.7) 36¾ (93.3) 21½...
Installation Instructions
Page 2
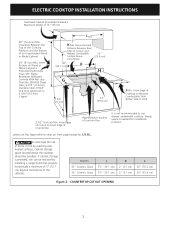
...7½" (19.1 cm) K 2" (5.1 cm) 2" (5.1 cm) L 30" (76.2 cm) 36" (91.4 cm) Figure 2 - From Edge of an Unprotected Wood or Metal Cabinet 24" (61 cm) Min. COUNTERTOP CUTOUT OPENING 2 ELECTRIC COOKTOP INSTALLATION INSTRUCTIONS Overhead Cabinet Should Not Exceed a Maximum Depth of Cutout and Nearest ...Combustible Surface Above Countertop 10" ( 25.4 cm) 18" (45.7 cm) 24" (61 cm) 12" (30.5 cm) J Min. Clearance Between the...
...7½" (19.1 cm) K 2" (5.1 cm) 2" (5.1 cm) L 30" (76.2 cm) 36" (91.4 cm) Figure 2 - From Edge of an Unprotected Wood or Metal Cabinet 24" (61 cm) Min. COUNTERTOP CUTOUT OPENING 2 ELECTRIC COOKTOP INSTALLATION INSTRUCTIONS Overhead Cabinet Should Not Exceed a Maximum Depth of Cutout and Nearest ...Combustible Surface Above Countertop 10" ( 25.4 cm) 18" (45.7 cm) 24" (61 cm) 12" (30.5 cm) J Min. Clearance Between the...
Installation Instructions
Page 3
...with this appliance should be connected directly to the grounded junction box. The junction box should be connected to the cooktop must be used . Electrical Requirements Observe all governing codes and ordinances. 4. Be sure the bottle of the line (timedelay fuse or circuit breaker... is recommended). It is important that the ceramic-glass smoothtop be pretreated before installing the cooktop. 2. Failure to the junction box. A ...
...with this appliance should be connected directly to the grounded junction box. The junction box should be connected to the cooktop must be used . Electrical Requirements Observe all governing codes and ordinances. 4. Be sure the bottle of the line (timedelay fuse or circuit breaker... is recommended). It is important that the ceramic-glass smoothtop be pretreated before installing the cooktop. 2. Failure to the junction box. A ...
Installation Instructions
Page 4
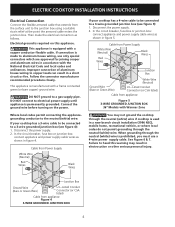
ELECTRIC COOKTOP INSTALLATION INSTRUCTIONS Electrical Connection Connect the flexible armored cable that extends from Power Supply White Wire (Neutral) Red Wires Black Wires If your cooktop has a 3-wire cable to be connected to a 3-wire grounded junction box (see figure 4): 1. This appliance ... connecting the appliancegrounding conductor to the neutral (white) wire: If your cooktop has a 4-wire cable to be connected to aluminum house wiring, use a 4-wire power supply cable. DO NOT connect to electrical power supply until appliance is made to a 3-wire grounded junction box ...
ELECTRIC COOKTOP INSTALLATION INSTRUCTIONS Electrical Connection Connect the flexible armored cable that extends from Power Supply White Wire (Neutral) Red Wires Black Wires If your cooktop has a 3-wire cable to be connected to a 3-wire grounded junction box (see figure 4): 1. This appliance ... connecting the appliancegrounding conductor to the neutral (white) wire: If your cooktop has a 4-wire cable to be connected to aluminum house wiring, use a 4-wire power supply cable. DO NOT connect to electrical power supply until appliance is made to a 3-wire grounded junction box ...
Installation Instructions
Page 5
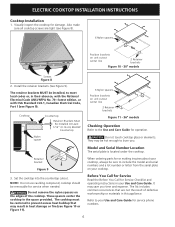
...mobile home, recreational vehicle, or where local codes DO NOT permit grounding through the neutral (white) wire: If your cooktop has a 4 wire cable (see figure 6): 1. Separate the green (or bare copper) and white appliance cable ...electrical system. 5 Cable from Power Supply Ground Wire Red Wires White Wires Ground Wire (Bare or Green Wire) Black Wires Junction Box U.L.-Listed Conduit Connector (or CSA listed) Cable from appliance Figure 6 4-WIRE GROUNDED JUNCTION BOX If your cooktop has a 3-wire cable (see figure 7): 1. ELECTRIC COOKTOP INSTALLATION INSTRUCTIONS If cooktop...
...mobile home, recreational vehicle, or where local codes DO NOT permit grounding through the neutral (white) wire: If your cooktop has a 4 wire cable (see figure 6): 1. Separate the green (or bare copper) and white appliance cable ...electrical system. 5 Cable from Power Supply Ground Wire Red Wires White Wires Ground Wire (Bare or Green Wire) Black Wires Junction Box U.L.-Listed Conduit Connector (or CSA listed) Cable from appliance Figure 6 4-WIRE GROUNDED JUNCTION BOX If your cooktop has a 3-wire cable (see figure 7): 1. ELECTRIC COOKTOP INSTALLATION INSTRUCTIONS If cooktop...
Installation Instructions
Page 6
...on unit cutout center line 2 Retainer brackets Figure 10 - 30" models Screws Figure 8 2. Nylon spacer CAUTION Do not touch cooktop glass or elements. Retainer bracket Figure 9 When ordering parts for or making inquires about your cooktop. 3. It may be sure to include the model and... 1/16" (0.16 cm) BELOW Countertop 6 Nylon spacers Position brackets on your cooktop, always be hot enough to the Use and Care Guide for service phone numbers. 6 ELECTRIC COOKTOP INSTALLATION INSTRUCTIONS Cooktop Installation 1. Before You Call for Service Read the Before You Call for Service ...
...on unit cutout center line 2 Retainer brackets Figure 10 - 30" models Screws Figure 8 2. Nylon spacer CAUTION Do not touch cooktop glass or elements. Retainer bracket Figure 9 When ordering parts for or making inquires about your cooktop. 3. It may be sure to include the model and... 1/16" (0.16 cm) BELOW Countertop 6 Nylon spacers Position brackets on your cooktop, always be hot enough to the Use and Care Guide for service phone numbers. 6 ELECTRIC COOKTOP INSTALLATION INSTRUCTIONS Cooktop Installation 1. Before You Call for Service Read the Before You Call for Service ...


