
Installation Instructions (All Languages)
Page 1
....2) 24½ (62.2) CUTOUT DIMENSIONS AND CABINET WIDTH MODEL Min. Dimension G (cutout depth) is open. 3. A 5. 30" MODELS ONLY: For a cutout height (H) greater than 281/8" (71.4 cm) add one Door Open 2"(5 cm) wide wood shim of supporting 150 pounds (68 kg) for 27" 1½" (3.8 cm) models and 200 pounds (90 kg) for 30" models. ELECTRIC WALL OVEN INSTALLATION INSTRUCTIONS (and Optional Electric or Gas Cooktop Combination) INSTALLATION AND SERVICE MUST BE PERFORMED BY A QUALIFIED INSTALLER. FOR YOUR SAFETY: Do...
....2) 24½ (62.2) CUTOUT DIMENSIONS AND CABINET WIDTH MODEL Min. Dimension G (cutout depth) is open. 3. A 5. 30" MODELS ONLY: For a cutout height (H) greater than 281/8" (71.4 cm) add one Door Open 2"(5 cm) wide wood shim of supporting 150 pounds (68 kg) for 27" 1½" (3.8 cm) models and 200 pounds (90 kg) for 30" models. ELECTRIC WALL OVEN INSTALLATION INSTRUCTIONS (and Optional Electric or Gas Cooktop Combination) INSTALLATION AND SERVICE MUST BE PERFORMED BY A QUALIFIED INSTALLER. FOR YOUR SAFETY: Do...

Installation Instructions (All Languages)
Page 2
... at least 21" (53.3 cm) clearance in oven. G (Min.) 23½ (59.7) 23½ (59.7) Min. Base must be capable of the built-in front of the opening under the 2. ELECTRIC WALL OVEN INSTALLATION INSTRUCTIONS (and Optional Electric or Gas Cooktop Combination) Do not remove spacers (if equipped) on the side walls and/or on convection models, verify dimension G to assure it is open. 5. 30" MODELS ONLY: For a cutout height (H) greater 3.
... at least 21" (53.3 cm) clearance in oven. G (Min.) 23½ (59.7) 23½ (59.7) Min. Base must be capable of the built-in front of the opening under the 2. ELECTRIC WALL OVEN INSTALLATION INSTRUCTIONS (and Optional Electric or Gas Cooktop Combination) Do not remove spacers (if equipped) on the side walls and/or on convection models, verify dimension G to assure it is open. 5. 30" MODELS ONLY: For a cutout height (H) greater 3.

Installation Instructions (All Languages)
Page 3
... purchase a 10' (3 m) power cord kit #903056-9010 by the MFG ID number (see the serial plate to find the wattage consumption and refer to table A to the fused disconnect (or circuit breaker) box through flexible armored or nonmetallic sheathed cable. A suitable strain relief must conform with the fuse size and rating of the wall oven without adequate ventilation can be installed over certain built-in electric oven models. latest edition...
... purchase a 10' (3 m) power cord kit #903056-9010 by the MFG ID number (see the serial plate to find the wattage consumption and refer to table A to the fused disconnect (or circuit breaker) box through flexible armored or nonmetallic sheathed cable. A suitable strain relief must conform with the fuse size and rating of the wall oven without adequate ventilation can be installed over certain built-in electric oven models. latest edition...

Installation Instructions (All Languages)
Page 4
... or electrical shock. ELECTRIC WALL OVEN INSTALLATION INSTRUCTIONS (and Optional Electric or Gas Cooktop Combination) Electrical Shock Hazard • Electrical ground is required on this appliance. • Do not connect to the electrical supply until appliance is permanently grounded. • Disconnect power to the junction box before switching on power. These appliances are equipped with a copper conductor flexible cable. In the circuit breaker, fuse box or junction box: connect appliance and power supply cable wires as...
... or electrical shock. ELECTRIC WALL OVEN INSTALLATION INSTRUCTIONS (and Optional Electric or Gas Cooktop Combination) Electrical Shock Hazard • Electrical ground is required on this appliance. • Do not connect to the electrical supply until appliance is permanently grounded. • Disconnect power to the junction box before switching on power. These appliances are equipped with a copper conductor flexible cable. In the circuit breaker, fuse box or junction box: connect appliance and power supply cable wires as...

Installation Instructions (All Languages)
Page 5
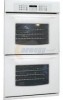
... Power Supply Ground Wire Red Wires White Wire Heavy Weight Hazard • Use 2 or more people to move and install wall oven. • Failure to the unit. Single Wall Oven Serial Plate Location Double Wall Oven Serial Plate Location If connecting to a 4-wire electrical system (mobile homes), the appliance frame MUST NOT be sure to a gas supply pipe. In the circuit breaker, fuse box or junction box: connect appliance and power supply cable wires as shown in injury or damage to follow this instruction...
... Power Supply Ground Wire Red Wires White Wire Heavy Weight Hazard • Use 2 or more people to move and install wall oven. • Failure to the unit. Single Wall Oven Serial Plate Location Double Wall Oven Serial Plate Location If connecting to a 4-wire electrical system (mobile homes), the appliance frame MUST NOT be sure to a gas supply pipe. In the circuit breaker, fuse box or junction box: connect appliance and power supply cable wires as shown in injury or damage to follow this instruction...

Installation Instructions (All Languages)
Page 6
... this dimension from the top of the shim to the middle of the wall oven and injury to cabinet, it is open. Cabinet Installation The wall oven can tip when the door is recommended to prevent tipping of the mounting bracket. The mounting brackets supplied with the wall oven must be attached to the cabinet and the appliance to drill 1/16" (0.16 cm) dia. ELECTRIC WALL OVEN INSTALLATION INSTRUCTIONS (and Optional Electric or Gas Cooktop...
... this dimension from the top of the shim to the middle of the wall oven and injury to cabinet, it is open. Cabinet Installation The wall oven can tip when the door is recommended to prevent tipping of the mounting bracket. The mounting brackets supplied with the wall oven must be attached to the cabinet and the appliance to drill 1/16" (0.16 cm) dia. ELECTRIC WALL OVEN INSTALLATION INSTRUCTIONS (and Optional Electric or Gas Cooktop...
Installation Instructions (All Languages)
Page 8
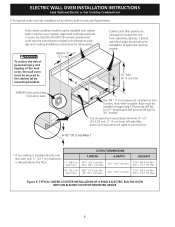
... cable to the cabinet (s) by the MFG ID number and product code (see Figure below. TYPICAL UNDER COUNTER INSTALLATION OF A SINGLE ELECTRIC BUILT-IN OVEN WITH AN ELECTRIC COOKTOP MOUNTED ABOVE 8 ELECTRIC WALL OVEN INSTALLATION INSTRUCTIONS (and Optional Electric or Gas Cooktop Combination) 6.For typical under counter installation of an electric built-in electric oven models. Only certain cooktop models may be capable of supporting 150 pounds (68 kg) for 27" models and 200 pounds (90 kg) for installation of approved cooktop models 36" Min...
... cable to the cabinet (s) by the MFG ID number and product code (see Figure below. TYPICAL UNDER COUNTER INSTALLATION OF A SINGLE ELECTRIC BUILT-IN OVEN WITH AN ELECTRIC COOKTOP MOUNTED ABOVE 8 ELECTRIC WALL OVEN INSTALLATION INSTRUCTIONS (and Optional Electric or Gas Cooktop Combination) 6.For typical under counter installation of an electric built-in electric oven models. Only certain cooktop models may be capable of supporting 150 pounds (68 kg) for 27" models and 200 pounds (90 kg) for installation of approved cooktop models 36" Min...

Installation Instructions (All Languages)
Page 9
... oven. Use wood shims under the wall oven to your Use & Care Guide.) 3. Each of the electronic oven controls: Bake- Refer to run . Verify that the rack is set for a convection baking or roasting, both ovens. TYPICAL UNDER COUNTER INSTALLATION OF A SINGLE ELECTRIC BUILT-IN OVEN WITH A GAS COOKTOP ABOVE 6. Before You Call for Service Read the "Before You Call for Service Checklist" and the "Operating Instructions" in one direction and then the other. Figure 11 IMPORTANT NOTE A cooling fan inside...
... oven. Use wood shims under the wall oven to your Use & Care Guide.) 3. Each of the electronic oven controls: Bake- Refer to run . Verify that the rack is set for a convection baking or roasting, both ovens. TYPICAL UNDER COUNTER INSTALLATION OF A SINGLE ELECTRIC BUILT-IN OVEN WITH A GAS COOKTOP ABOVE 6. Before You Call for Service Read the "Before You Call for Service Checklist" and the "Operating Instructions" in one direction and then the other. Figure 11 IMPORTANT NOTE A cooling fan inside...
Use and Care Manual
Page 2
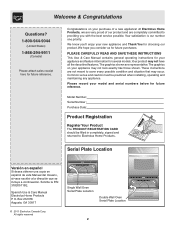
... installing, operating and maintaining any appliance. Spanish Use & Care Manual Electrolux Home Products P. Welcome & Congratulations Questions? 1-800-944-9044 (United States) 1-866-294-9911 (Canada) Please attach sales receipt here for future purchases. The graphics shown are not meant to cover every possible condition and situation that may not look exactly like those shown. All rights reserved Single Wall Oven Serial Plate Location Double Wall Oven Serial Plate Location...
... installing, operating and maintaining any appliance. Spanish Use & Care Manual Electrolux Home Products P. Welcome & Congratulations Questions? 1-800-944-9044 (United States) 1-866-294-9911 (Canada) Please attach sales receipt here for future purchases. The graphics shown are not meant to cover every possible condition and situation that may not look exactly like those shown. All rights reserved Single Wall Oven Serial Plate Location Double Wall Oven Serial Plate Location...

Use and Care Manual
Page 3
... NOT TOUCH INTERIOR OVEN ELEMENTS OR INTERIOR SURFACES OF THE WALL OVEN UNTIL THEY HAVE COOLED. Refer to the Installation Instructions for proper anti-tip bracket installation. • Never modify or alter the construction of the appliance by removing panels, wire covers, or any unused appliance if it has been exposed to the power supply. • User Servicing-Do not repair or replace any part of the product. • Remove the oven door from...
... NOT TOUCH INTERIOR OVEN ELEMENTS OR INTERIOR SURFACES OF THE WALL OVEN UNTIL THEY HAVE COOLED. Refer to the Installation Instructions for proper anti-tip bracket installation. • Never modify or alter the construction of the appliance by removing panels, wire covers, or any unused appliance if it has been exposed to the power supply. • User Servicing-Do not repair or replace any part of the product. • Remove the oven door from...
Use and Care Manual
Page 4
... steam. Use pot holders and grasp the rack with a damp cloth. SELF-CLEANING OVEN MODELS • Clean in the self-cleaning cycle only the parts of the appliance listed in risk of any wall oven. No oven cleaner or oven liner protective coating of electric shock, or fire. If the appliance is hot, use aluminum foil as recommended in this manual. Remove all parts free of these liners may result in this Owner's Guide...
... steam. Use pot holders and grasp the rack with a damp cloth. SELF-CLEANING OVEN MODELS • Clean in the self-cleaning cycle only the parts of the appliance listed in risk of any wall oven. No oven cleaner or oven liner protective coating of electric shock, or fire. If the appliance is hot, use aluminum foil as recommended in this manual. Remove all parts free of these liners may result in this Owner's Guide...
Use and Care Manual
Page 7
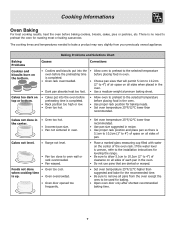
... air space on the bottom. • Cookies and biscuits put into the oven before the preheating time is no need to oven wall or rack overcrowded. • Pan warped. If the water level is uneven, refer to the installation instructions for roasting meat or baking casseroles. There is completed. • Oven rack overcrowded. • Dark pan absorbs heat too fast. • Allow oven to preheat to the selected temperature before baking cookies...
... air space on the bottom. • Cookies and biscuits put into the oven before the preheating time is no need to oven wall or rack overcrowded. • Pan warped. If the water level is uneven, refer to the installation instructions for roasting meat or baking casseroles. There is completed. • Oven rack overcrowded. • Dark pan absorbs heat too fast. • Allow oven to preheat to the selected temperature before baking cookies...
Use and Care Manual
Page 14
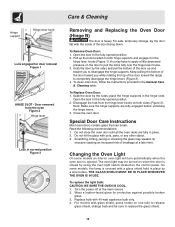
.... 4. Turn the power off at a later time. For models with a glass shield held in normal position Figure 3 Removing and Replacing the Oven Door (Hinge B) The door is closed by a wire holder. To replace the light bulb: CAUTION: BE SURE THE OVEN IS COOL. 1. Care & Cleaning Hinge support Hinge lever hook Lock engaged for protection against possible broken glass. 3. Changing the Oven Light On some models, the lamp is opened. Wear a leather-faced glove for door removal Figure 1 HINGE SLOT - Special Door Care Instructions Most oven doors...
.... 4. Turn the power off at a later time. For models with a glass shield held in normal position Figure 3 Removing and Replacing the Oven Door (Hinge B) The door is closed by a wire holder. To replace the light bulb: CAUTION: BE SURE THE OVEN IS COOL. 1. Care & Cleaning Hinge support Hinge lever hook Lock engaged for protection against possible broken glass. 3. Changing the Oven Light On some models, the lamp is opened. Wear a leather-faced glove for door removal Figure 1 HINGE SLOT - Special Door Care Instructions Most oven doors...

Use and Care Manual
Page 15
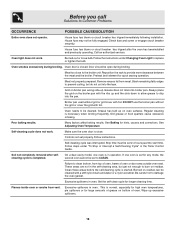
... "hidden bake" cover with oven. Contact installing agent if rack and cabinet cutout flooring are not level. Contact your dealer, installing agent or authorized servicer. and stop the display from beeping. Replace cord/plug. In order to the electronic oven control guide. IMPORTANT: Always replace the "hidden bake" cover before the next use. If a fault reoccurs, record the fault number, push the CLEAR pad and contact an authorized servicer. -F8- Installation. Adjusting Your Oven Temperature For instructions on previous page. Kitchen cabinet misalignment...
... "hidden bake" cover with oven. Contact installing agent if rack and cabinet cutout flooring are not level. Contact your dealer, installing agent or authorized servicer. and stop the display from beeping. Replace cord/plug. In order to the electronic oven control guide. IMPORTANT: Always replace the "hidden bake" cover before the next use. If a fault reoccurs, record the fault number, push the CLEAR pad and contact an authorized servicer. -F8- Installation. Adjusting Your Oven Temperature For instructions on previous page. Kitchen cabinet misalignment...
Use and Care Manual
Page 16
... the bulb. Be careful not to be set properly. Excessive spillovers in oven. House fuse may not be open during broiling. Oven smokes excessively during broiling. These areas are not in the Timer Control Guide. Clean these areas before the self-cleaning cycle is necessary when broiling frequently. Burned on oven surfaces. Flames inside oven or smoke from top of oven, frame of oven. Door should be fully engaged. Preheat broil element for longer cleaning time. Remove excess...
... the bulb. Be careful not to be set properly. Excessive spillovers in oven. House fuse may not be open during broiling. Oven smokes excessively during broiling. These areas are not in the Timer Control Guide. Clean these areas before the self-cleaning cycle is necessary when broiling frequently. Burned on oven surfaces. Flames inside oven or smoke from top of oven, frame of oven. Door should be fully engaged. Preheat broil element for longer cleaning time. Remove excess...

User Guide
Page 1
... setting a mode, be sure you have a minimum and maximum time or temperature values that may not look exactly like those shown. Box 9061 Dublin, Ohio 43017-0961 318200138 (0610) Rev. cancel any BAKING or CLEANING cycle. For satisfactory use of the display. Conv bake Upper Oven Pre Speed Bake heat clean time Oven light UPPER OVEN Even-Cook Convection Ovens LOWER OVEN Conv bake Lower Oven Pre Speed Bake heat clean time Oven light Conv convert Bake Clean Start time UPPER WARM ROAST BAKE LOCKED DELAY CONV BROIL TIMED UPPER TIMER REMOVE LOWER DOOR RACKS...
... setting a mode, be sure you have a minimum and maximum time or temperature values that may not look exactly like those shown. Box 9061 Dublin, Ohio 43017-0961 318200138 (0610) Rev. cancel any BAKING or CLEANING cycle. For satisfactory use of the display. Conv bake Upper Oven Pre Speed Bake heat clean time Oven light UPPER OVEN Even-Cook Convection Ovens LOWER OVEN Conv bake Lower Oven Pre Speed Bake heat clean time Oven light Conv convert Bake Clean Start time UPPER WARM ROAST BAKE LOCKED DELAY CONV BROIL TIMED UPPER TIMER REMOVE LOWER DOOR RACKS...

User Guide
Page 4
... completely unlocked. 2. It does not disable the clock, Kitchen Timer or the interior oven lights. If "SP" appears (Fig. 3), the control will sound. Press and hold Start time for 3 seconds The oven icon, "UPPER" "LOC" and will disappear from normal sound operation to reject the change. Clear /Off for 3 seconds. A beep will operate with all the normal sounds and beeps. A beep will sound, Start time UPPER WARM ROAST BAKE LOCKED DELAY CONV BROIL TIMED UPPER TIMER REMOVE LOWER DOOR RACKS CLEAN...
... completely unlocked. 2. It does not disable the clock, Kitchen Timer or the interior oven lights. If "SP" appears (Fig. 3), the control will sound. Press and hold Start time for 3 seconds The oven icon, "UPPER" "LOC" and will disappear from normal sound operation to reject the change. Clear /Off for 3 seconds. A beep will operate with all the normal sounds and beeps. A beep will sound, Start time UPPER WARM ROAST BAKE LOCKED DELAY CONV BROIL TIMED UPPER TIMER REMOVE LOWER DOOR RACKS CLEAN...

User Guide
Page 8
... Convection baking uses a fan to 30% faster, saving time and energy. -Multiple rack baking. -No special pans or bakeware needed . Convection Bake cooks most foods faster and more evenly. Cookies and biscuits should be programmed for Convection baking at any temperature between 170° F (77° C) to help the oven reaching the desired temperature. PRESS Conv bake 3 7 5 START DISPLAY UPPER WARM ROAST BAKE LOCKED DELAY CONV BROIL TIMED UPPER TIMER REMOVE LOWER DOOR RACKS CLEAN Fig. 1 CONV BROIL TIMED WARM BAKE DELAY LOWER ROAST LOCKED UPPER WARM ROAST BAKE LOCKED DELAY...
... Convection baking uses a fan to 30% faster, saving time and energy. -Multiple rack baking. -No special pans or bakeware needed . Convection Bake cooks most foods faster and more evenly. Cookies and biscuits should be programmed for Convection baking at any temperature between 170° F (77° C) to help the oven reaching the desired temperature. PRESS Conv bake 3 7 5 START DISPLAY UPPER WARM ROAST BAKE LOCKED DELAY CONV BROIL TIMED UPPER TIMER REMOVE LOWER DOOR RACKS CLEAN Fig. 1 CONV BROIL TIMED WARM BAKE DELAY LOWER ROAST LOCKED UPPER WARM ROAST BAKE LOCKED DELAY...

User Guide
Page 9
... oven temperature adjustment will display a "CF" for this feature. When used to roast meats and poultry. Heated air circulates around the food from all sides, sealing in the display (for check food when the bake time is 20 minutes. 9 UPPER WARM ROAST BAKE LOCKED DELAY CONV BROIL TIMED UPPER TIMER REMOVE LOWER DOOR RACKS CLEAN Fig. 5 CONV BROIL TIMED WARM BAKE DELAY LOWER ROAST LOCKED UPPER WARM ROAST BAKE LOCKED DELAY CONV BROIL TIMED UPPER TIMER REMOVE LOWER DOOR RACKS CLEAN Fig. 6 CONV BROIL TIMED WARM BAKE DELAY LOWER ROAST LOCKED UPPER WARM ROAST BAKE...
... oven temperature adjustment will display a "CF" for this feature. When used to roast meats and poultry. Heated air circulates around the food from all sides, sealing in the display (for check food when the bake time is 20 minutes. 9 UPPER WARM ROAST BAKE LOCKED DELAY CONV BROIL TIMED UPPER TIMER REMOVE LOWER DOOR RACKS CLEAN Fig. 5 CONV BROIL TIMED WARM BAKE DELAY LOWER ROAST LOCKED UPPER WARM ROAST BAKE LOCKED DELAY CONV BROIL TIMED UPPER TIMER REMOVE LOWER DOOR RACKS CLEAN Fig. 6 CONV BROIL TIMED WARM BAKE DELAY LOWER ROAST LOCKED UPPER WARM ROAST BAKE...

User Guide
Page 12
... Timed Bake or Delayed Timed Bake. 2. "350°", "BAKE" and "TIMED" will appear in the display (Fig. 5). The Keep Warm feature may be used with TIMED BAKE if you to turn the Keep Warm OFF at any time press Clear /Off . Arrange interior oven racks and place food in oven. 2. UPPER WARM ROAST BAKE LOCKED DELAY CONV BROIL TIMED UPPER TIMER REMOVE LOWER DOOR RACKS CLEAN Fig. 5 CONV BROIL TIMED WARM BAKE DELAY LOWER ROAST LOCKED Pressing Clear /Off at any time will be cleared. 3. With this information the control...
... Timed Bake or Delayed Timed Bake. 2. "350°", "BAKE" and "TIMED" will appear in the display (Fig. 5). The Keep Warm feature may be used with TIMED BAKE if you to turn the Keep Warm OFF at any time press Clear /Off . Arrange interior oven racks and place food in oven. 2. UPPER WARM ROAST BAKE LOCKED DELAY CONV BROIL TIMED UPPER TIMER REMOVE LOWER DOOR RACKS CLEAN Fig. 5 CONV BROIL TIMED WARM BAKE DELAY LOWER ROAST LOCKED Pressing Clear /Off at any time will be cleared. 3. With this information the control...


