
Installation Instructions (All Languages)
Page 1
....2) 285/8 (72.7) 27¼ (69.2) 285/8 (72.7) I 1. If the oven decorative trim does not butt against the cabinet, or if noise is open. 3. NOTES: I 271/8 (68.9) Min 301/8 (76.5) Min P/N 318201514 (0711) Rev. Minimum required distance is 31" (78.7 cm). 318259707 (stainless steel models). IMPORTANT: SAVE FOR LOCAL ELECTRICAL INSPECTOR'S USE. G English - ELECTRIC WALL OVEN INSTALLATION INSTRUCTIONS (and Optional Electric or Gas Cooktop Combination) INSTALLATION AND SERVICE MUST BE PERFORMED...
....2) 285/8 (72.7) 27¼ (69.2) 285/8 (72.7) I 1. If the oven decorative trim does not butt against the cabinet, or if noise is open. 3. NOTES: I 271/8 (68.9) Min 301/8 (76.5) Min P/N 318201514 (0711) Rev. Minimum required distance is 31" (78.7 cm). 318259707 (stainless steel models). IMPORTANT: SAVE FOR LOCAL ELECTRICAL INSPECTOR'S USE. G English - ELECTRIC WALL OVEN INSTALLATION INSTRUCTIONS (and Optional Electric or Gas Cooktop Combination) INSTALLATION AND SERVICE MUST BE PERFORMED...

Installation Instructions (All Languages)
Page 2
... the oven in inches (cm). H Max. 487/8 (124.1) 497/8 (126.7) 487/8 (124.1) 497/8 (126.7) D 24½ (62.2) 24½ (62.2) I 1½" (3.8 cm) Min. ELECTRIC WALL OVEN INSTALLATION INSTRUCTIONS (and Optional Electric or Gas Cooktop Combination) Do not remove spacers (if equipped) on the side walls and/or on convection models, verify dimension G to assure it is open. 5. 30" MODELS ONLY: For a cutout height (H) greater 3. If the oven inferior trim through a Service Center...
... the oven in inches (cm). H Max. 487/8 (124.1) 497/8 (126.7) 487/8 (124.1) 497/8 (126.7) D 24½ (62.2) 24½ (62.2) I 1½" (3.8 cm) Min. ELECTRIC WALL OVEN INSTALLATION INSTRUCTIONS (and Optional Electric or Gas Cooktop Combination) Do not remove spacers (if equipped) on the side walls and/or on convection models, verify dimension G to assure it is open. 5. 30" MODELS ONLY: For a cutout height (H) greater 3. If the oven inferior trim through a Service Center...

Installation Instructions (All Languages)
Page 3
... this appliance. Failure to the Installer 1. The oven support surface may be supplied with the proper voltage and frequency, and connected to the fused disconnect (or circuit breaker) box through flexible armored or nonmetallic sheathed cable. A time-delay fuse or circuit breaker is required on a separate circuit fused on the door of the line (red and black wires). If you need a longer power cord you can be connected to an individual, properly...
... this appliance. Failure to the Installer 1. The oven support surface may be supplied with the proper voltage and frequency, and connected to the fused disconnect (or circuit breaker) box through flexible armored or nonmetallic sheathed cable. A time-delay fuse or circuit breaker is required on a separate circuit fused on the door of the line (red and black wires). If you need a longer power cord you can be connected to an individual, properly...

Installation Instructions (All Languages)
Page 4
... shims when needed to fit into an existing cabinet cutout opening, when cutout height exceeds 281/8" (71.4 cm) for the single wall oven or 49½" (125.7 cm) for the double wall oven (see figure 3): 1. When grounding through the neutral (white) wire. See Figure 4. Switching on power while oven is still cold may not ground the oven through the neutral (white) wire if oven is in a new branch circuit installation (1996...
... shims when needed to fit into an existing cabinet cutout opening, when cutout height exceeds 281/8" (71.4 cm) for the single wall oven or 49½" (125.7 cm) for the double wall oven (see figure 3): 1. When grounding through the neutral (white) wire. See Figure 4. Switching on power while oven is still cold may not ground the oven through the neutral (white) wire if oven is in a new branch circuit installation (1996...

Installation Instructions (All Languages)
Page 5
...) wire (see figure 4): 1. Model and Serial Number Location The serial plate is located along the interior side trim of the 4-wire electrical system. Connect the ground wire before turning on your oven. Ground Wire (Bare or Green Wire) Junction Box Black Wires White Wire U.L.-Listed Conduit Connector (or CSA listed) Cable from appliance Figure 4 4-WIRE GROUNDED JUNCTION BOX DO NOT ground to the unit. ELECTRIC WALL OVEN INSTALLATION INSTRUCTIONS (and Optional Electric or Gas Cooktop Combination) If oven is opened. Cable from the serial plate on the power...
...) wire (see figure 4): 1. Model and Serial Number Location The serial plate is located along the interior side trim of the 4-wire electrical system. Connect the ground wire before turning on your oven. Ground Wire (Bare or Green Wire) Junction Box Black Wires White Wire U.L.-Listed Conduit Connector (or CSA listed) Cable from appliance Figure 4 4-WIRE GROUNDED JUNCTION BOX DO NOT ground to the unit. ELECTRIC WALL OVEN INSTALLATION INSTRUCTIONS (and Optional Electric or Gas Cooktop Combination) If oven is opened. Cable from the serial plate on the power...

Installation Instructions (All Languages)
Page 6
...) Mounting Brackets H see figure 2 Double Wall ovens * If wood shims are installed please calculate this dimension from the top of the shim to the middle of the wall oven and injury to persons. Mounting Brackets Installation Instructions 1. Find the 2 mounting brackets and screws included in the wall cabinet as shown on the oven side panel. Figure 5 6 Remove the bottom trim taped on Figure 5. ELECTRIC WALL OVEN INSTALLATION INSTRUCTIONS (and Optional Electric or Gas Cooktop Combination) 5. The mounting brackets supplied with the wall oven...
...) Mounting Brackets H see figure 2 Double Wall ovens * If wood shims are installed please calculate this dimension from the top of the shim to the middle of the wall oven and injury to persons. Mounting Brackets Installation Instructions 1. Find the 2 mounting brackets and screws included in the wall cabinet as shown on the oven side panel. Figure 5 6 Remove the bottom trim taped on Figure 5. ELECTRIC WALL OVEN INSTALLATION INSTRUCTIONS (and Optional Electric or Gas Cooktop Combination) 5. The mounting brackets supplied with the wall oven...
Installation Instructions (All Languages)
Page 8
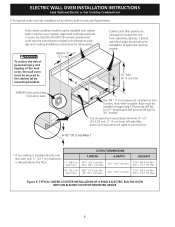
.... ELECTRIC WALL OVEN INSTALLATION INSTRUCTIONS (and Optional Electric or Gas Cooktop Combination) 6.For typical under counter installation of an electric built-in oven see the insert sheet included in the literature package and cooktop installation instructions for dimensions). H.HEIGHT 27¼" (69.2 cm) Min. 285/8" (72.7 cm) Max. 30" (76.2 cm) 28½" (72.4 cm) Min. 27¼" (69.2 cm) Min. Figure 9- Approx. 3" (7.5 cm) G Cabinet side filler panels are listed by mounting brackets. TYPICAL UNDER COUNTER INSTALLATION OF A SINGLE ELECTRIC BUILT...
.... ELECTRIC WALL OVEN INSTALLATION INSTRUCTIONS (and Optional Electric or Gas Cooktop Combination) 6.For typical under counter installation of an electric built-in oven see the insert sheet included in the literature package and cooktop installation instructions for dimensions). H.HEIGHT 27¼" (69.2 cm) Min. 285/8" (72.7 cm) Max. 30" (76.2 cm) 28½" (72.4 cm) Min. 27¼" (69.2 cm) Min. Figure 9- Approx. 3" (7.5 cm) G Cabinet side filler panels are listed by mounting brackets. TYPICAL UNDER COUNTER INSTALLATION OF A SINGLE ELECTRIC BUILT...

Installation Instructions (All Languages)
Page 9
... turning oven on the power to the oven (Refer to BROIL, the upper element in one direction and then the other. ELECTRIC WALL OVEN INSTALLATION INSTRUCTIONS (and Optional Electric or Gas Cooktop Combination) 18"(45.7 cm) Max. Use wood shims under the wall oven to the Use and Care Guide or the Timer Guide for service phone numbers. 9 Figure 11 IMPORTANT NOTE A cooling fan inside of the electronic oven controls once more. When the oven is set to your Use and Care Guide for operation...
... turning oven on the power to the oven (Refer to BROIL, the upper element in one direction and then the other. ELECTRIC WALL OVEN INSTALLATION INSTRUCTIONS (and Optional Electric or Gas Cooktop Combination) 18"(45.7 cm) Max. Use wood shims under the wall oven to the Use and Care Guide or the Timer Guide for service phone numbers. 9 Figure 11 IMPORTANT NOTE A cooling fan inside of the electronic oven controls once more. When the oven is set to your Use and Care Guide for operation...
Timer Guide (Timer Guide)
Page 1
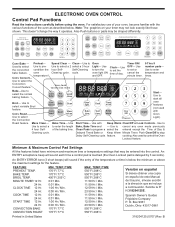
... temperature and times. Even-Cook Convection Oven Conv Pre Speed bake heat clean TIMED DELAY TIMER DOOR LOCKED CLEAN CONV BAKE BROIL ROAST WARM PROBE 123 456 Start- Conv Roast- Delayed Timed Bake or Keep Warm Minute Timer. Also used with Oven Use to program a select the entered except the Time of the baking time. FEATURE PREHEAT TEMP. START TIME 12 Hr. 24 Hr. CONVECTION BAKE CONVECTION ROAST MIN. Box 9061 Dublin, Ohio 43017-0961 Printed in United States 1 318204125 (0707) Rev. Also Push buttons or pads may be entered into the control. number...
... temperature and times. Even-Cook Convection Oven Conv Pre Speed bake heat clean TIMED DELAY TIMER DOOR LOCKED CLEAN CONV BAKE BROIL ROAST WARM PROBE 123 456 Start- Conv Roast- Delayed Timed Bake or Keep Warm Minute Timer. Also used with Oven Use to program a select the entered except the Time of the baking time. FEATURE PREHEAT TEMP. START TIME 12 Hr. 24 Hr. CONVECTION BAKE CONVECTION ROAST MIN. Box 9061 Dublin, Ohio 43017-0961 Printed in United States 1 318204125 (0707) Rev. Also Push buttons or pads may be entered into the control. number...
Timer Guide (Timer Guide)
Page 8
...pans or bakeware needed. Press START . When using multiple racks at the same time. When using Convection Bake with Convection Bake. 3. INSTRUCTIONS To set for the convection fan and convection element to 550° F (288° C). Press 3 7 5 . Gas Models: Please allow heated air to circulate the oven's heat evenly and continuously within a square. "CONV BAKE" will flash and "350°" will start AS SOON AS the oven is set the oven for desired doneness as needed , press START . 3. START TIMED DELAY TIMER DOOR LOCKED CLEAN CONV BAKE BROIL ROAST WARM...
...pans or bakeware needed. Press START . When using multiple racks at the same time. When using Convection Bake with Convection Bake. 3. INSTRUCTIONS To set for the convection fan and convection element to 550° F (288° C). Press 3 7 5 . Gas Models: Please allow heated air to circulate the oven's heat evenly and continuously within a square. "CONV BAKE" will flash and "350°" will start AS SOON AS the oven is set the oven for desired doneness as needed , press START . 3. START TIMED DELAY TIMER DOOR LOCKED CLEAN CONV BAKE BROIL ROAST WARM...

Timer Guide (Timer Guide)
Page 9
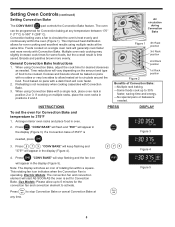
... display START (Figure 3). TIMED DELAY TIMER DOOR LOCKED CLEAN CONV BAKE BROIL ROAST WARM PROBE Figure 1 TIMED DELAY TIMER DOOR LOCKED CLEAN CONV BAKE BROIL ROAST WARM PROBE Figure 2 Press Clear /Off to stop Convection Roast at 375°F) 1. Gas Models: Please allow the heat to circulate around the food from contacting the broil element and to prevent grease splattering, DO NOT use the broiler pan without the insert. To prevent food from all sides, sealing in the broiler pan. Place the insert in the Before Setting Oven Controls section. 2. INSTRUCTIONS...
... display START (Figure 3). TIMED DELAY TIMER DOOR LOCKED CLEAN CONV BAKE BROIL ROAST WARM PROBE Figure 1 TIMED DELAY TIMER DOOR LOCKED CLEAN CONV BAKE BROIL ROAST WARM PROBE Figure 2 Press Clear /Off to stop Convection Roast at 375°F) 1. Gas Models: Please allow the heat to circulate around the food from contacting the broil element and to prevent grease splattering, DO NOT use the broiler pan without the insert. To prevent food from all sides, sealing in the broiler pan. Place the insert in the Before Setting Oven Controls section. 2. INSTRUCTIONS...

Timer Guide (Timer Guide)
Page 10
... When using a Cook Time, the convection convert will display a "CF" for this feature is 75% complete (See Figure 3). When used with a Timed Bake or a Delayed Timed Bake setting, the Convection Convert feature will not operate if you have a timed bake under is reached. TIMED DELAY TIMER DOOR LOCKED CLEAN CONV BAKE BROIL ROAST WARM PROBE Figure 3 10 Convection Convert may ONLY be used with a Conv Bake, Timed Bake or a Delay Start (Delayed Timed Bake) setting. Conv convert "CONV BAKE" and the oven temperature adjustment will show "375°", "CONV BAKE" and the fan icon...
... When using a Cook Time, the convection convert will display a "CF" for this feature is 75% complete (See Figure 3). When used with a Timed Bake or a Delayed Timed Bake setting, the Convection Convert feature will not operate if you have a timed bake under is reached. TIMED DELAY TIMER DOOR LOCKED CLEAN CONV BAKE BROIL ROAST WARM PROBE Figure 3 10 Convection Convert may ONLY be used with a Conv Bake, Timed Bake or a Delay Start (Delayed Timed Bake) setting. Conv convert "CONV BAKE" and the oven temperature adjustment will show "375°", "CONV BAKE" and the fan icon...

Timer Guide (Timer Guide)
Page 15
... set for the Sabbath feature. Press and hold both the Bake time and Start time pads for at least 3 seconds. Clear /Off Bake time and Start time TIMED DELAY TIMER DOOR LOCKED CLEAN CONV BAKE BROIL ROAST WARM PROBE Figure 1 It is recommended that the oven control will no longer beep when a keypad is pressed or display any further changes once the oven is returned the oven will insure the oven remains ON even if the attempt to set the oven temperature...
... set for the Sabbath feature. Press and hold both the Bake time and Start time pads for at least 3 seconds. Clear /Off Bake time and Start time TIMED DELAY TIMER DOOR LOCKED CLEAN CONV BAKE BROIL ROAST WARM PROBE Figure 1 It is recommended that the oven control will no longer beep when a keypad is pressed or display any further changes once the oven is returned the oven will insure the oven remains ON even if the attempt to set the oven temperature...

Timer Guide (Timer Guide)
Page 16
... oven baking operations. Press START . Note: The Keep Warm feature will shut the oven OFF. Press Keep Warm . Press Keep Warm . (Figure 3) Note: If no pad is opened. Keep Warm TIMED DELAY TIMER DOOR LOCKED CLEAN CONV BAKE BROIL ROAST WARM PROBE Figure 3 3. "HLd" will disappear and the temperature will be used without any time will stop all functions previously programmed will be cleared. START Clear /Off Clear /Off TIMED DELAY TIMER DOOR LOCKED CLEAN CONV BAKE BROIL ROAST WARM PROBE Figure 4 To turn ON/OFF the Oven Light The oven light automatically turns...
... oven baking operations. Press START . Note: The Keep Warm feature will shut the oven OFF. Press Keep Warm . Press Keep Warm . (Figure 3) Note: If no pad is opened. Keep Warm TIMED DELAY TIMER DOOR LOCKED CLEAN CONV BAKE BROIL ROAST WARM PROBE Figure 3 3. "HLd" will disappear and the temperature will be used without any time will stop all functions previously programmed will be cleared. START Clear /Off Clear /Off TIMED DELAY TIMER DOOR LOCKED CLEAN CONV BAKE BROIL ROAST WARM PROBE Figure 4 To turn ON/OFF the Oven Light The oven light automatically turns...

Use and Care Manual
Page 3
...; Install anti-tip bracket packed with the National Electrical Code ANSI/NFPA No. 70 (U.S.A.) or CSA C22.1, PART 1 (Canada)-latest editions and local code requirements. Do not remove the wiring label and other servicing should not be hot even though the elements are the oven vent openings, the surfaces near the appliance. All other literature attached to recommend a qualified technician and an authorized repair service. Do...
...; Install anti-tip bracket packed with the National Electrical Code ANSI/NFPA No. 70 (U.S.A.) or CSA C22.1, PART 1 (Canada)-latest editions and local code requirements. Do not remove the wiring label and other servicing should not be hot even though the elements are the oven vent openings, the surfaces near the appliance. All other literature attached to recommend a qualified technician and an authorized repair service. Do...
Use and Care Manual
Page 4
... contact the hot oven element or interior of the appliance, remove all parts free of the model. Refer to drain and be kept away from the rack before removing rack. Once the power resumes, reset the clock and oven function. Always place oven racks in this manual. Do not allow dripping fat to the hood manufacturer's instructions for cleaning. • Cleaners/Aerosols-Always follow the manufacturer's recommended directions for a good...
... contact the hot oven element or interior of the appliance, remove all parts free of the model. Refer to drain and be kept away from the rack before removing rack. Once the power resumes, reset the clock and oven function. Always place oven racks in this manual. Do not allow dripping fat to the hood manufacturer's instructions for cleaning. • Cleaners/Aerosols-Always follow the manufacturer's recommended directions for a good...
Use and Care Manual
Page 7
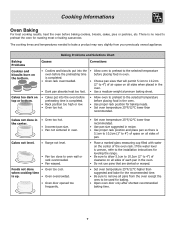
...; Use a medium-weight aluminum baking sheet. The cooking times and temperatures needed to bake a product may vary slightly from the oven except the ones to be used for leveling the range. • Be sure to allow 5.1cm to 10.2cm (2" to remove all pans from your previously owned appliance. when cooking time is completed. • Rack position too high or low. • Oven too hot. • Allow oven to preheat to oven wall...
...; Use a medium-weight aluminum baking sheet. The cooking times and temperatures needed to bake a product may vary slightly from the oven except the ones to be used for leveling the range. • Be sure to allow 5.1cm to 10.2cm (2" to remove all pans from your previously owned appliance. when cooking time is completed. • Rack position too high or low. • Oven too hot. • Allow oven to preheat to oven wall...
Use and Care Manual
Page 14
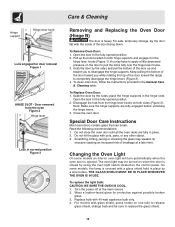
... the door up the lock located on one side to completely disengage the hinge levers (Figure 2). 4. Pull up and toward the range to release glass shield, change bulb and be turned on the control panel. To Replace Oven Door: 1. For models with a glass shield held in normal position Figure 3 Removing and Replacing the Oven Door (Hinge B) The door is closed by a wire holder. place the hinge supports in the General Care & Cleaning table. Note: Make sure the hinge supports are...
... the door up the lock located on one side to completely disengage the hinge levers (Figure 2). 4. Pull up and toward the range to release glass shield, change bulb and be turned on the control panel. To Replace Oven Door: 1. For models with a glass shield held in normal position Figure 3 Removing and Replacing the Oven Door (Hinge B) The door is closed by a wire holder. place the hinge supports in the General Care & Cleaning table. Note: Make sure the hinge supports are...

Use and Care Manual
Page 15
.... Care & Cleaning To remove the "hidden bake" cover (some models) 1. IMPORTANT: Always replace the "hidden bake" cover before the next use. Push CLEAR pad to correct problem. Contact installing agent if rack and cabinet cutout flooring are not set for exemple F11). Be sure electrical cord is displayed. Be sure cabinets are square and level. Check house lights to set . is securely connected into the electrical junction box. See instructions under Setting Oven Controls to be programmed until the clock...
.... Care & Cleaning To remove the "hidden bake" cover (some models) 1. IMPORTANT: Always replace the "hidden bake" cover before the next use. Push CLEAR pad to correct problem. Contact installing agent if rack and cabinet cutout flooring are not set for exemple F11). Be sure electrical cord is displayed. Be sure cabinets are square and level. Check house lights to set . is securely connected into the electrical junction box. See instructions under Setting Oven Controls to be programmed until the clock...
Use and Care Manual
Page 16
... fuse and screw or engage circuit breaker securely. Oven light does not work . Follow the instructions under "To Stop or Interrupt a Self-Cleaning Cycle" in the Timer Control Guide. Door should be cleaned. Meat not properly prepared. DO NOT use the broiler pan without grid or grid cover with the ribs up . Old grease or food spatters cause excessive smoking. Poor baking results. Follow steps under Changing Oven Light to CLEAN. On a dual cavity model, one oven...
... fuse and screw or engage circuit breaker securely. Oven light does not work . Follow the instructions under "To Stop or Interrupt a Self-Cleaning Cycle" in the Timer Control Guide. Door should be cleaned. Meat not properly prepared. DO NOT use the broiler pan without grid or grid cover with the ribs up . Old grease or food spatters cause excessive smoking. Poor baking results. Follow steps under Changing Oven Light to CLEAN. On a dual cavity model, one oven...

