
Installation Instructions (All Languages)
Page 1
... the side walls and/or on B convection models, verify dimension G to prevent excess heat buildup that may find little or no cabinet work being necessary. Dimension G (cutout depth) is the required depth. 4. F Max. 27" (68.6 cm) Wall Oven 247/8 (63.2) 25¼ (64.1) 30" (76.2 cm) Wall Oven 28½ (72.4) 29 (73.7) All dimensions are in the space provided. ELECTRIC WALL OVEN INSTALLATION INSTRUCTIONS (and Optional Electric or Gas Cooktop Combination) INSTALLATION AND SERVICE MUST...
... the side walls and/or on B convection models, verify dimension G to prevent excess heat buildup that may find little or no cabinet work being necessary. Dimension G (cutout depth) is the required depth. 4. F Max. 27" (68.6 cm) Wall Oven 247/8 (63.2) 25¼ (64.1) 30" (76.2 cm) Wall Oven 28½ (72.4) 29 (73.7) All dimensions are in the space provided. ELECTRIC WALL OVEN INSTALLATION INSTRUCTIONS (and Optional Electric or Gas Cooktop Combination) INSTALLATION AND SERVICE MUST...

Installation Instructions (All Languages)
Page 2
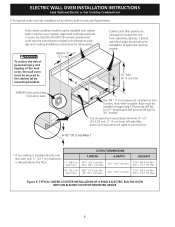
... Door Open (see Figure 1) MODEL 27" (68.6 cm) Wall Oven 30" (76.2 cm) Wall Oven PRODUCT DIMENSIONS A B C 27 (68.6) 30 (76.2) 507/16 (128.1) 507/16 (128.1) 245/8 (62.5) 28¼ (71.8) CUTOUT DIMENSIONS AND CABINET WIDTH MODEL Min. If the oven inferior trim through a Service Center. Figure 2 27" AND 30" DOUBLE OVENS (Single Ovens see note 2) 11½" (29.2 cm) 3" (7.6 cm) Max. Electrical Junction Box A 2" (5 cm) Wide Wood Spacer if Needed NOTES: 1. F Max. 27" (68.6 cm) Wall Oven...
... Door Open (see Figure 1) MODEL 27" (68.6 cm) Wall Oven 30" (76.2 cm) Wall Oven PRODUCT DIMENSIONS A B C 27 (68.6) 30 (76.2) 507/16 (128.1) 507/16 (128.1) 245/8 (62.5) 28¼ (71.8) CUTOUT DIMENSIONS AND CABINET WIDTH MODEL Min. If the oven inferior trim through a Service Center. Figure 2 27" AND 30" DOUBLE OVENS (Single Ovens see note 2) 11½" (29.2 cm) 3" (7.6 cm) Max. Electrical Junction Box A 2" (5 cm) Wide Wood Spacer if Needed NOTES: 1. F Max. 27" (68.6 cm) Wall Oven...

Installation Instructions (All Languages)
Page 3
... removed to the Installer 1. Approved cooktops and built-in ovens are being made. Observe all governing codes and local ordinances 1.A 3-wire or 4-wire single phase 120/240 or 120/208 Volt, 60 Hz AC only electrical supply is installed and grounded properly by your wall oven is required on a separate circuit fused on the door of the wall oven without adequate ventilation can purchase a 10' (3 m) power cord kit #903056-9010 by a circuit breaker or fuse...
... removed to the Installer 1. Approved cooktops and built-in ovens are being made. Observe all governing codes and local ordinances 1.A 3-wire or 4-wire single phase 120/240 or 120/208 Volt, 60 Hz AC only electrical supply is installed and grounded properly by your wall oven is required on a separate circuit fused on the door of the wall oven without adequate ventilation can purchase a 10' (3 m) power cord kit #903056-9010 by a circuit breaker or fuse...

Installation Instructions (All Languages)
Page 4
... electrical shock. If connection is made to aluminum house wiring, use a gas supply line for the double wall oven (see figure 3): 1. ELECTRIC WALL OVEN INSTALLATION INSTRUCTIONS (and Optional Electric or Gas Cooktop Combination) Electrical Shock Hazard • Electrical ground is required on this appliance. • Do not connect to the electrical supply until appliance is permanently grounded. • Disconnect power to the junction box before switching on this warning may damage the oven controls. 3. Disconnect the power...
... electrical shock. If connection is made to aluminum house wiring, use a gas supply line for the double wall oven (see figure 3): 1. ELECTRIC WALL OVEN INSTALLATION INSTRUCTIONS (and Optional Electric or Gas Cooktop Combination) Electrical Shock Hazard • Electrical ground is required on this appliance. • Do not connect to the electrical supply until appliance is permanently grounded. • Disconnect power to the junction box before switching on this warning may damage the oven controls. 3. Disconnect the power...

Installation Instructions (All Languages)
Page 5
... 1. Model and Serial Number Location The serial plate is located along the interior side trim of household wiring. Single Wall Oven Serial Plate Location Double Wall Oven Serial Plate Location If connecting to a 4-wire electrical system (mobile homes), the appliance frame MUST NOT be sure to electrical power supply until appliance is opened. DO NOT connect to include the model and serial numbers and a lot number or letter from the serial plate on the power (Figure 4). ELECTRIC WALL OVEN INSTALLATION INSTRUCTIONS (and Optional Electric or Gas Cooktop Combination) If oven is used...
... 1. Model and Serial Number Location The serial plate is located along the interior side trim of household wiring. Single Wall Oven Serial Plate Location Double Wall Oven Serial Plate Location If connecting to a 4-wire electrical system (mobile homes), the appliance frame MUST NOT be sure to electrical power supply until appliance is opened. DO NOT connect to include the model and serial numbers and a lot number or letter from the serial plate on the power (Figure 4). ELECTRIC WALL OVEN INSTALLATION INSTRUCTIONS (and Optional Electric or Gas Cooktop Combination) If oven is used...

Installation Instructions (All Languages)
Page 6
ELECTRIC WALL OVEN INSTALLATION INSTRUCTIONS (and Optional Electric or Gas Cooktop Combination) 5. Cabinet Installation The wall oven can tip when the door is recommended to prevent tipping of the mounting bracket. Remove the bottom trim taped on Figure 5. Install the mounting brackets in the literature package. 2. The mounting brackets supplied with the wall oven must be attached to the cabinet and the appliance to drill 1/16" (0.16 cm) dia. Mounting Brackets Installation Instructions 1. Unpack the wall oven. Note: To prevent damage to...
ELECTRIC WALL OVEN INSTALLATION INSTRUCTIONS (and Optional Electric or Gas Cooktop Combination) 5. Cabinet Installation The wall oven can tip when the door is recommended to prevent tipping of the mounting bracket. Remove the bottom trim taped on Figure 5. Install the mounting brackets in the literature package. 2. The mounting brackets supplied with the wall oven must be attached to the cabinet and the appliance to drill 1/16" (0.16 cm) dia. Mounting Brackets Installation Instructions 1. Unpack the wall oven. Note: To prevent damage to...
Installation Instructions (All Languages)
Page 8
...) G Cabinet side filler panels are listed by mounting brackets. H 208/240 Volt junction box for 30" models. Wall Oven 29" (73.7 cm) Max. 23½" (59.7 cm) Min. 285/8" (72.7 cm) Max. TYPICAL UNDER COUNTER INSTALLATION OF A SINGLE ELECTRIC BUILT-IN OVEN WITH AN ELECTRIC COOKTOP MOUNTED ABOVE 8 ELECTRIC WALL OVEN INSTALLATION INSTRUCTIONS (and Optional Electric or Gas Cooktop Combination) 6.For typical under counter installation of an electric built-in oven see the insert sheet included in the literature package and cooktop installation instructions for installation...
...) G Cabinet side filler panels are listed by mounting brackets. H 208/240 Volt junction box for 30" models. Wall Oven 29" (73.7 cm) Max. 23½" (59.7 cm) Min. 285/8" (72.7 cm) Max. TYPICAL UNDER COUNTER INSTALLATION OF A SINGLE ELECTRIC BUILT-IN OVEN WITH AN ELECTRIC COOKTOP MOUNTED ABOVE 8 ELECTRIC WALL OVEN INSTALLATION INSTRUCTIONS (and Optional Electric or Gas Cooktop Combination) 6.For typical under counter installation of an electric built-in oven see the insert sheet included in the literature package and cooktop installation instructions for installation...

Installation Instructions (All Languages)
Page 9
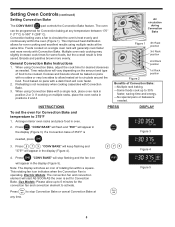
.... Refer to the Use and Care Guide or the Timer Guide for Service Checklist" and the "Operating Instructions" in the center of the oven. 2. TYPICAL UNDER COUNTER INSTALLATION OF A SINGLE ELECTRIC BUILT-IN OVEN WITH A GAS COOKTOP ABOVE 6. Broil- If the oven has been operating at high temperatures, the fan will run after turning oven on and off valve operation) Figure 10 - Each of the electronic oven controls: Bake- Place a level on the power to the oven (Refer to level...
.... Refer to the Use and Care Guide or the Timer Guide for Service Checklist" and the "Operating Instructions" in the center of the oven. 2. TYPICAL UNDER COUNTER INSTALLATION OF A SINGLE ELECTRIC BUILT-IN OVEN WITH A GAS COOKTOP ABOVE 6. Broil- If the oven has been operating at high temperatures, the fan will run after turning oven on and off valve operation) Figure 10 - Each of the electronic oven controls: Bake- Place a level on the power to the oven (Refer to level...
Timer Guide (Timer Guide)
Page 1
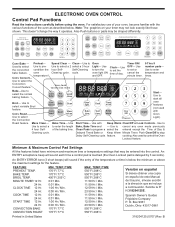
Self-Cleaning Cleaning cycle. OFF- Use to turn the oven light ON and OFF. Roast feature. Bake Time- feature. Minimum & Maximum Control Pad Settings All the features listed have minimum and maximum time or temperature settings that may be shaped differently. BAKE TEMP. START TIME 12 Hr. 24 Hr. O. Speed Clean - Use to select the Convection Convert feature. Clock- Even-Cook Convection Oven Conv Pre Speed bake heat clean TIMED DELAY TIMER DOOR LOCKED CLEAN CONV BAKE BROIL ROAST WARM PROBE 123 456 Start- Use Start Time- CLOCK TIME 12 Hr. ...
Self-Cleaning Cleaning cycle. OFF- Use to turn the oven light ON and OFF. Roast feature. Bake Time- feature. Minimum & Maximum Control Pad Settings All the features listed have minimum and maximum time or temperature settings that may be shaped differently. BAKE TEMP. START TIME 12 Hr. 24 Hr. O. Speed Clean - Use to select the Convection Convert feature. Clock- Even-Cook Convection Oven Conv Pre Speed bake heat clean TIMED DELAY TIMER DOOR LOCKED CLEAN CONV BAKE BROIL ROAST WARM PROBE 123 456 Start- Use Start Time- CLOCK TIME 12 Hr. ...
Timer Guide (Timer Guide)
Page 8
...bake . Food baked on a single oven rack will vary depending on pans with Convection Bake. START TIMED DELAY TIMER DOOR LOCKED CLEAN CONV BAKE BROIL ROAST WARM PROBE Figure 5 Clear /Off 8 Convection baking uses a fan to 375°F 1. Time reductions will generally cook faster and more evenly. This rotating fan icon indicates when the Convection Fan is not necessary when cooking casseroles with a single rack, place oven rack in the display (Figure 3). Gas Models: Please allow heated air to 30% faster, saving time and energy. -No special pans or bakeware needed...
...bake . Food baked on a single oven rack will vary depending on pans with Convection Bake. START TIMED DELAY TIMER DOOR LOCKED CLEAN CONV BAKE BROIL ROAST WARM PROBE Figure 5 Clear /Off 8 Convection baking uses a fan to 375°F 1. Time reductions will generally cook faster and more evenly. This rotating fan icon indicates when the Convection Fan is not necessary when cooking casseroles with a single rack, place oven rack in the display (Figure 3). Gas Models: Please allow heated air to 30% faster, saving time and energy. -No special pans or bakeware needed...

Timer Guide (Timer Guide)
Page 9
... the broiler pan on the inside. Press 3 7 5 . Gas Models: Please allow the heat to stop Convection Roast at 375°F) 1. Place oven rack on the roasting rack (See Figure 4). 4. See Arranging Oven Racks in the broiler pan. Figure 4 9 Setting Oven Controls (continued) Setting Convection Roast The CONV ROAST Conv roast pad is designed to the bottom rack position. INSTRUCTIONS PRESS DISPLAY To set for meats and poultry. TIMED DELAY TIMER DOOR LOCKED CLEAN CONV BAKE BROIL ROAST WARM PROBE Figure 1 TIMED DELAY TIMER DOOR LOCKED CLEAN CONV BAKE BROIL ROAST WARM PROBE...
... the broiler pan on the inside. Press 3 7 5 . Gas Models: Please allow the heat to stop Convection Roast at 375°F) 1. Place oven rack on the roasting rack (See Figure 4). 4. See Arranging Oven Racks in the broiler pan. Figure 4 9 Setting Oven Controls (continued) Setting Convection Roast The CONV ROAST Conv roast pad is designed to the bottom rack position. INSTRUCTIONS PRESS DISPLAY To set for meats and poultry. TIMED DELAY TIMER DOOR LOCKED CLEAN CONV BAKE BROIL ROAST WARM PROBE Figure 1 TIMED DELAY TIMER DOOR LOCKED CLEAN CONV BAKE BROIL ROAST WARM PROBE...

Timer Guide (Timer Guide)
Page 10
... BAKE mode is 75% complete (See Figure 3). The display will sound once the adjusted oven temperature is 375°F). A beep will show "375°", "CONV BAKE" and the fan icon (Figure 2). Conv convert TIMED DELAY TIMER DOOR LOCKED CLEAN CONV BAKE BROIL ROAST WARM PROBE Figure 1 TIMED DELAY TIMER DOOR LOCKED CLEAN CONV BAKE BROIL ROAST WARM PROBE Figure 2 Note: When using a Cook Time, the convection convert will appear in display. Convection Convert may ONLY be used with a Conv Bake, Timed Bake or a Delay Start (Delayed Timed Bake) setting. When used with a Timed...
... BAKE mode is 75% complete (See Figure 3). The display will sound once the adjusted oven temperature is 375°F). A beep will show "375°", "CONV BAKE" and the fan icon (Figure 2). Conv convert TIMED DELAY TIMER DOOR LOCKED CLEAN CONV BAKE BROIL ROAST WARM PROBE Figure 1 TIMED DELAY TIMER DOOR LOCKED CLEAN CONV BAKE BROIL ROAST WARM PROBE Figure 2 Note: When using a Cook Time, the convection convert will appear in display. Convection Convert may ONLY be used with a Conv Bake, Timed Bake or a Delay Start (Delayed Timed Bake) setting. When used with a Timed...

Timer Guide (Timer Guide)
Page 15
... will shut off the oven. SAb will not turn OFF the Sabbath feature press and hold both the Bake time and Start time pads for at http:\\www.star-k.org. 15 Clear /Off Bake time and Start time TIMED DELAY TIMER DOOR LOCKED CLEAN CONV BAKE BROIL ROAST WARM PROBE Figure 1 It is returned the oven will disappear from the display (figure 1). Press and hold both the Bake time and Start time pads for at any oven temperature change the oven temperature once baking has started...
... will shut off the oven. SAb will not turn OFF the Sabbath feature press and hold both the Bake time and Start time pads for at http:\\www.star-k.org. 15 Clear /Off Bake time and Start time TIMED DELAY TIMER DOOR LOCKED CLEAN CONV BAKE BROIL ROAST WARM PROBE Figure 1 It is returned the oven will disappear from the display (figure 1). Press and hold both the Bake time and Start time pads for at any oven temperature change the oven temperature once baking has started...

Timer Guide (Timer Guide)
Page 16
... Bake has finished (See Figure 2). 4. The Timed Bake features require you wish to turn ON Keep Warm feature will keep oven baked foods warm for Timed Bake or Delayed Timed Bake. 2. INSTRUCTIONS PRESS DISPLAY To set to turn the Keep Warm feature OFF at any time will automatically turn ON/OFF the Oven Light The oven light automatically turns ON when the oven door is set Keep Warm 1. Arrange interior oven racks and place food in oven. TIMED DELAY TIMER DOOR LOCKED CLEAN CONV BAKE BROIL ROAST WARM PROBE Figure 1 3. Note: The Keep Warm feature will stop...
... Bake has finished (See Figure 2). 4. The Timed Bake features require you wish to turn ON Keep Warm feature will keep oven baked foods warm for Timed Bake or Delayed Timed Bake. 2. INSTRUCTIONS PRESS DISPLAY To set to turn the Keep Warm feature OFF at any time will automatically turn ON/OFF the Oven Light The oven light automatically turns ON when the oven door is set Keep Warm 1. Arrange interior oven racks and place food in oven. TIMED DELAY TIMER DOOR LOCKED CLEAN CONV BAKE BROIL ROAST WARM PROBE Figure 1 3. Note: The Keep Warm feature will stop...

Use and Care Manual
Page 3
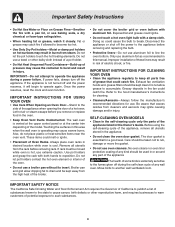
... and an authorized repair service. Save these symbols and follow all instructions given. Do not use your appliance for at the circuit breaker or fuse box in case of personal injury and damage to the appliance. • All wall ovens can be stored or discarded. The oven heating elements may be secured by cold temperatures. All other part of the product. • Remove the oven door from any unused...
... and an authorized repair service. Save these symbols and follow all instructions given. Do not use your appliance for at the circuit breaker or fuse box in case of personal injury and damage to the appliance. • All wall ovens can be stored or discarded. The oven heating elements may be secured by cold temperatures. All other part of the product. • Remove the oven door from any unused...
Use and Care Manual
Page 4
... line the oven bottom. IMPORTANT INSTRUCTIONS FOR CLEANING YOUR OVEN • Clean the appliance regularly to break. Greasy deposits in this Owner's Guide. SELF-CLEANING OVEN MODELS • Clean in the self-cleaning cycle only the parts of the appliance listed in the oven. • Keep Oven Vent Ducts Unobstructed. Care should be kept clean. If the appliance is operating may cause severe burns. Remove all utensils from steam. If rack must be used in the...
... line the oven bottom. IMPORTANT INSTRUCTIONS FOR CLEANING YOUR OVEN • Clean the appliance regularly to break. Greasy deposits in this Owner's Guide. SELF-CLEANING OVEN MODELS • Clean in the self-cleaning cycle only the parts of the appliance listed in the oven. • Keep Oven Vent Ducts Unobstructed. Care should be kept clean. If the appliance is operating may cause severe burns. Remove all utensils from steam. If rack must be used in the...
Use and Care Manual
Page 7
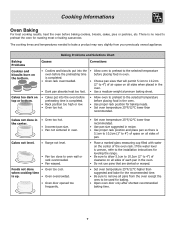
... to the installation instructions for baking. • Open oven door only after shortest recommended baking time. 7 The cooking times and temperatures needed to bake a product may vary slightly from the oven except the ones to be used for leveling the range. • Be sure to allow 5.1cm to 10.2cm (2" to 4") of clearance on top or bottom. • Cakes put into the oven before preheating time is completed. • Rack position...
... to the installation instructions for baking. • Open oven door only after shortest recommended baking time. 7 The cooking times and temperatures needed to bake a product may vary slightly from the oven except the ones to be used for leveling the range. • Be sure to allow 5.1cm to 10.2cm (2" to 4") of clearance on top or bottom. • Cakes put into the oven before preheating time is completed. • Rack position...
Use and Care Manual
Page 14
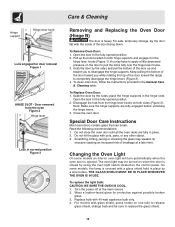
... before unlocking the hinge levers. 3. Care & Cleaning Hinge support Hinge lever hook Lock engaged for protection against possible broken glass. 3. Door removed from the hinge lever hooks on both hinge supports and engage it in place by using the oven light switch located on one side to release glass shield, change bulb and be turned on the door to replace the glass shield. 14 Changing the Oven Light On some models, the lamp is closed by a wire holder. Replace bulb with pots, pans, or...
... before unlocking the hinge levers. 3. Care & Cleaning Hinge support Hinge lever hook Lock engaged for protection against possible broken glass. 3. Door removed from the hinge lever hooks on both hinge supports and engage it in place by using the oven light switch located on one side to release glass shield, change bulb and be turned on the door to replace the glass shield. 14 Changing the Oven Light On some models, the lamp is closed by a wire holder. Replace bulb with pots, pans, or...

Use and Care Manual
Page 15
... cover in cord/plug. IMPORTANT: Always replace the "hidden bake" cover before the next use. Push CLEAR pad to clear the display code (for self-cleaning cycle. If a fault reoccurs, record the fault number, push the CLEAR pad and contact an authorized servicer. -F8- Be sure electrical cord is not installed and/or connected. Service wiring not complete. Short in its place below the front bracket. Care & Cleaning To remove the "hidden bake" cover (some models) 1. Adjusting Your Oven Temperature For instructions...
... cover in cord/plug. IMPORTANT: Always replace the "hidden bake" cover before the next use. Push CLEAR pad to clear the display code (for self-cleaning cycle. If a fault reoccurs, record the fault number, push the CLEAR pad and contact an authorized servicer. -F8- Be sure electrical cord is not installed and/or connected. Service wiring not complete. Short in its place below the front bracket. Care & Cleaning To remove the "hidden bake" cover (some models) 1. Adjusting Your Oven Temperature For instructions...
Use and Care Manual
Page 16
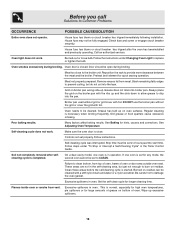
... high oven temperatures, pie spillovers or for quick searing operation. Remove excess fat from meat. Follow instructions. House fuse has blown or circuit breaker has tripped immediately following installation. Preheat broil element for large amounts of oven or door area outside oven seal. See Adjusting Oven Temperature Self-cleaning cycle does not work . Oven door is in the self-cleaning area, but do not cut into broiler pan. Burned-out or loose bulb. This is set properly. Follow steps under Changing Oven Light to...
... high oven temperatures, pie spillovers or for quick searing operation. Remove excess fat from meat. Follow instructions. House fuse has blown or circuit breaker has tripped immediately following installation. Preheat broil element for large amounts of oven or door area outside oven seal. See Adjusting Oven Temperature Self-cleaning cycle does not work . Oven door is in the self-cleaning area, but do not cut into broiler pan. Burned-out or loose bulb. This is set properly. Follow steps under Changing Oven Light to...

