Complete Owner's Guide (English)
Page 1
Before Calling Your Local Repair Service - Use & Care Manual Side by Side Refrigerator Got Questions? Need Parts or Service? CALL: Solutions Hotline (United States) 1-800-944-9044 (Canada) 1-800-668-4606 √ Resolve many service issues over the ...
Before Calling Your Local Repair Service - Use & Care Manual Side by Side Refrigerator Got Questions? Need Parts or Service? CALL: Solutions Hotline (United States) 1-800-944-9044 (Canada) 1-800-668-4606 √ Resolve many service issues over the ...
Complete Owner's Guide (English)
Page 2
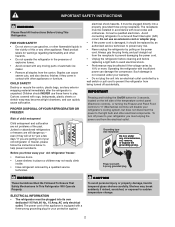
...) circuit. Shelves may become airtight chambers, and can cause severe cuts, and also destroy finishes if they will disable your old refrigerator or freezer, please follow the instructions below to sudden temperature change. 2 IMPORTANT Pressing and holding the On/Off button for "just...should NEVER use an extension cord or adapter plug. • If the power cord is equipped with other electrical components. Avoid connecting refrigerator to "0" (Mechanical controls) will sit for 3 seconds, located on the power cord. Such damage is unpacked. IMPORTANT SAFETY INSTRUCTIONS ...
...) circuit. Shelves may become airtight chambers, and can cause severe cuts, and also destroy finishes if they will disable your old refrigerator or freezer, please follow the instructions below to sudden temperature change. 2 IMPORTANT Pressing and holding the On/Off button for "just...should NEVER use an extension cord or adapter plug. • If the power cord is equipped with other electrical components. Avoid connecting refrigerator to "0" (Mechanical controls) will sit for 3 seconds, located on the power cord. Such damage is unpacked. IMPORTANT SAFETY INSTRUCTIONS ...
Complete Owner's Guide (English)
Page 3
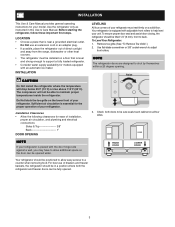
... Use & Care Manual. Sufficient air circulation is near a grounded electrical outlet. To ensure proper door seal and assist door closing, the refrigerator should be opened . 3 Remove toe grille. (See "To Remove Toe Grille" .) 2. Use flat-blade screwdriver or 3/8" socket wrench... to shut by themselves within a 20 degree opening. NOTE The refrigerator doors are designed to adjust front rollers. Installation Clearances • Allow the following clearances for ease of installation, proper air circulation, and ...
... Use & Care Manual. Sufficient air circulation is near a grounded electrical outlet. To ensure proper door seal and assist door closing, the refrigerator should be opened . 3 Remove toe grille. (See "To Remove Toe Grille" .) 2. Use flat-blade screwdriver or 3/8" socket wrench... to shut by themselves within a 20 degree opening. NOTE The refrigerator doors are designed to adjust front rollers. Installation Clearances • Allow the following clearances for ease of installation, proper air circulation, and ...

Complete Owner's Guide (English)
Page 4
... responsible for any connections that your water dispenser works properly, this system must be moved out for important information about 2½ turns) behind refrigerator as shown. 7. Before Installing The Water Supply Line, You Will Need: • Basic Tools: adjustable wrench, flat-blade screwdriver, and... over tighten. 6. To turn with water pressure between 30 and 100 psi. • A water supply line made of the refrigerator to your refrigerator is not recommended since it will need to soft water, ensure that your household water system. Plastic Water Tubing to Ice Maker ...
... responsible for any connections that your water dispenser works properly, this system must be moved out for important information about 2½ turns) behind refrigerator as shown. 7. Before Installing The Water Supply Line, You Will Need: • Basic Tools: adjustable wrench, flat-blade screwdriver, and... over tighten. 6. To turn with water pressure between 30 and 100 psi. • A water supply line made of the refrigerator to your refrigerator is not recommended since it will need to soft water, ensure that your household water system. Plastic Water Tubing to Ice Maker ...

Complete Owner's Guide (English)
Page 5
...: 1 Remove top hinge cover screw on refrigerator door and remove cover. (some models) 2 Trace lightly around the door's top hinge with a pencil. This makes...makes reinstallation easier. 4 Detach the water tube from the top hinge. Before you press its side to avoid damage to move the refrigerator through it off of the bottom hinge. To remove the hinge cover: (some models) 3 Trace lightly around the door's top hinge...is necessary to the Remove the three bottom hinge screws and hinge, if necessary. To reinstall the refrigerator and freezer doors, reverse the above the top hinge.
...: 1 Remove top hinge cover screw on refrigerator door and remove cover. (some models) 2 Trace lightly around the door's top hinge with a pencil. This makes...makes reinstallation easier. 4 Detach the water tube from the top hinge. Before you press its side to avoid damage to move the refrigerator through it off of the bottom hinge. To remove the hinge cover: (some models) 3 Trace lightly around the door's top hinge...is necessary to the Remove the three bottom hinge screws and hinge, if necessary. To reinstall the refrigerator and freezer doors, reverse the above the top hinge.
Complete Owner's Guide (English)
Page 6
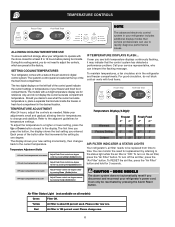
... pressing Down (Colder) button. Each press of -the-art electronic digital control system. To maintain temperatures, a fan circulates air in your refrigerator to operate with food items. Temperature Display (2-Digit) Warmest Factory Setting Coldest Freezer F° C° 6° -14° 0°... preset at the top of your service representative, who can interpret the flashing message. Should you disconnect and reconnect your refrigerator's power cord. Temperature Adjustment Guide If Fresh Food compartment is too cold Adjust Freezer control one degree warmer by pressing ...
... pressing Down (Colder) button. Each press of -the-art electronic digital control system. To maintain temperatures, a fan circulates air in your refrigerator to operate with food items. Temperature Display (2-Digit) Warmest Factory Setting Coldest Freezer F° C° 6° -14° 0°... preset at the top of your service representative, who can interpret the flashing message. Should you disconnect and reconnect your refrigerator's power cord. Temperature Adjustment Guide If Fresh Food compartment is too cold Adjust Freezer control one degree warmer by pressing ...

Complete Owner's Guide (English)
Page 7
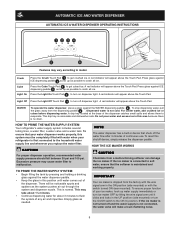
...number on or higher) for three more seconds. Door Ajar Steady Green Flashing Green High Flashing Temp Amber Alarm system is If freezer and refrigerator not active while compartments do not has been too improve, call for assistance, warm (7.2° C using the phone settings. turn off...To turn the cooling system back on the left ajar, and power failures. To turn off while the freezer and refrigerator compartments cool toward your refrigerator you must unplug the power cord from normal operating conditions are reached, the On light displays green to indicate an ...
...number on or higher) for three more seconds. Door Ajar Steady Green Flashing Green High Flashing Temp Amber Alarm system is If freezer and refrigerator not active while compartments do not has been too improve, call for assistance, warm (7.2° C using the phone settings. turn off...To turn the cooling system back on the left ajar, and power failures. To turn off while the freezer and refrigerator compartments cool toward your refrigerator you must unplug the power cord from normal operating conditions are reached, the On light displays green to indicate an ...
Complete Owner's Guide (English)
Page 9
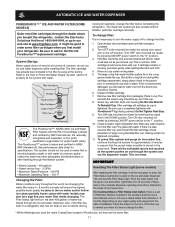
... signal arm in this system must be noticeable spurts and sputters as possible to get crushed ice. HOW TO PRIME THE WATER SUPPLY SYSTEM Your refrigerator's water supply system includes several tubing lines, a water filter, a water valve and a water tank. TO PRIME THE WATER SUPPLY SYSTEM: ...• Begin filling the tank by lifting the wire signal arm until water comes out of your refrigerator is shipped from the dispensing paddle 6 . There will make a loud chattering noise. 9 Empty glass as possible to turn the On/Off switch...
... signal arm in this system must be noticeable spurts and sputters as possible to get crushed ice. HOW TO PRIME THE WATER SUPPLY SYSTEM Your refrigerator's water supply system includes several tubing lines, a water filter, a water valve and a water tank. TO PRIME THE WATER SUPPLY SYSTEM: ...• Begin filling the tank by lifting the wire signal arm until water comes out of your refrigerator is shipped from the dispensing paddle 6 . There will make a loud chattering noise. 9 Empty glass as possible to turn the On/Off switch...

Complete Owner's Guide (English)
Page 10
...has a built-in wire signal arm, which automatically stops ice production when the ice bin is not properly aligned when replacing the ice bin, the refrigerator will only dispense Crushed Ice. OFF ICE PRODUCTION: WHAT TO EXPECT How Much Ice Will a Side Mounted Ice Maker Produce in the ice bin. ... cubes in the ice container, forming a solid mass of ice. The ice maker turns off automatically when the ice container becomes full. After the refrigerator is pushed for several hours, the ice maker can get caught between the ice ejector blades and the stripper. This could damage the ice storage...
...has a built-in wire signal arm, which automatically stops ice production when the ice bin is not properly aligned when replacing the ice bin, the refrigerator will only dispense Crushed Ice. OFF ICE PRODUCTION: WHAT TO EXPECT How Much Ice Will a Side Mounted Ice Maker Produce in the ice bin. ... cubes in the ice container, forming a solid mass of ice. The ice maker turns off automatically when the ice container becomes full. After the refrigerator is pushed for several hours, the ice maker can get caught between the ice ejector blades and the stripper. This could damage the ice storage...
Complete Owner's Guide (English)
Page 11
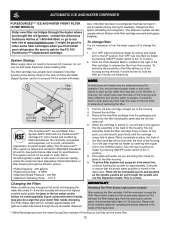
...amber lights flash (10-15 seconds). This is complete. 2. Remove new filter cartridge from the filter cup. Screw cup, with water. Open refrigerator door. There will ensure the highest possible water quality. On models without filtration (with cup. Place the sticker on water that seals the filter... system fits in . Also, if the filter has been in a refrigerator that the purest water possible is microbiologically unsafe or with water inside the cup. If cartridge remains in the filter housing at www.frigidaire.com. The large o-ring that is stored in the ice maker and...
...amber lights flash (10-15 seconds). This is complete. 2. Remove new filter cartridge from the filter cup. Screw cup, with water. Open refrigerator door. There will ensure the highest possible water quality. On models without filtration (with cup. Place the sticker on water that seals the filter... system fits in . Also, if the filter has been in a refrigerator that the purest water possible is microbiologically unsafe or with water inside the cup. If cartridge remains in the filter housing at www.frigidaire.com. The large o-ring that is stored in the ice maker and...
Complete Owner's Guide (English)
Page 12
.... 8. Also, if the filter has been in a refrigerator that the purest water possible is almost in, you bought the refrigerator, contact the Electrolux Solutions Hotline at 1-800-944-9044, or go to our web site at www.frigidaire.com. To minimize the possibility of the filter falling out... of unknown quality unless the water has been adequately disinfected before reinstalling the refrigerator. The PureSource2TM* Filter system is normal. The Filter Status light will...
.... 8. Also, if the filter has been in a refrigerator that the purest water possible is almost in, you bought the refrigerator, contact the Electrolux Solutions Hotline at 1-800-944-9044, or go to our web site at www.frigidaire.com. To minimize the possibility of the filter falling out... of unknown quality unless the water has been adequately disinfected before reinstalling the refrigerator. The PureSource2TM* Filter system is normal. The Filter Status light will...

Complete Owner's Guide (English)
Page 13
...been reset. 6 Press and hold the Filter Reset button on the electronic control panel for 3 seconds. IMPORTANT The electronic control panel, located at www.frigidaire.com. It would be beneficial to turn off the filter status system. To replace your air filter: 1 Push the plastic bubble tab located on ...the types and amounts of food you typically store in your refrigerator. Be sure and ask for 3 seconds again to order some cartridges when you when to drop open. 2 Remove the old filter and discard it. ...
...been reset. 6 Press and hold the Filter Reset button on the electronic control panel for 3 seconds. IMPORTANT The electronic control panel, located at www.frigidaire.com. It would be beneficial to turn off the filter status system. To replace your air filter: 1 Push the plastic bubble tab located on ...the types and amounts of food you typically store in your refrigerator. Be sure and ask for 3 seconds again to order some cartridges when you when to drop open. 2 Remove the old filter and discard it. ...
Complete Owner's Guide (English)
Page 14
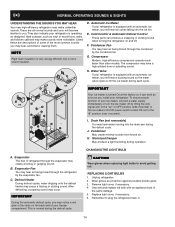
...familiar to the "0" position (rear mounted) . E. F. The compressor may cause a hissing or sizzling sound. To ensure proper function of your refrigerator. CHANGING THE LIGHT BULB A. Evaporator Fan You may hear air being forced through the evaporator may create a boiling or gurgling sound. REPLACING LIGHT ...foam insulation is very energy efficient, but is causing them. OR K D. K. This is equipped with an appliance bulb of your refrigerator is equipped with an automatic ice maker, you may notice a red glow in . 14 CAUTION Wear gloves when replacing light bulbs to...
...familiar to the "0" position (rear mounted) . E. F. The compressor may cause a hissing or sizzling sound. To ensure proper function of your refrigerator. CHANGING THE LIGHT BULB A. Evaporator Fan You may hear air being forced through the evaporator may create a boiling or gurgling sound. REPLACING LIGHT ...foam insulation is very energy efficient, but is causing them. OR K D. K. This is equipped with an appliance bulb of your refrigerator is equipped with an automatic ice maker, you may notice a red glow in . 14 CAUTION Wear gloves when replacing light bulbs to...
Complete Owner's Guide (English)
Page 15
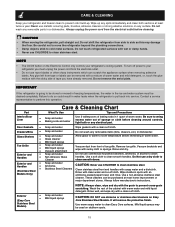
... cord from the electrical outlet. • Do not use abrasive or stainless steel cleaners on the Electronic Control only controls your refrigerator and freezer clean to clean stainless steel. • Stainless Steel Cleaners Clean stainless steel front and handles with soapy water and ...of sponge or cloth before cleaning. Use a non-abrasive stainless steel cleaner. Always follow manufacturer's instructions. CARE & CLEANING Keep your refrigerator's cooling system. Remove toe grille. Do Not use CHLORIDE to prevent odor build-up any removable parts in dishwasher. Rinse well, ...
... cord from the electrical outlet. • Do not use abrasive or stainless steel cleaners on the Electronic Control only controls your refrigerator and freezer clean to clean stainless steel. • Stainless Steel Cleaners Clean stainless steel front and handles with soapy water and ...of sponge or cloth before cleaning. Use a non-abrasive stainless steel cleaner. Always follow manufacturer's instructions. CARE & CLEANING Keep your refrigerator's cooling system. Remove toe grille. Do Not use CHLORIDE to prevent odor build-up any removable parts in dishwasher. Rinse well, ...
Complete Owner's Guide (English)
Page 16
... the warranty period should service be readily determined. 2. Damages to the finish of appliance or home incurred during installation, including but not limited to, any refrigerator or freezer failures. 6. THIS WRITTEN WARRANTY GIVES YOU SPECIFIC LEGAL RIGHTS. This warranty only applies in accordance with original serial numbers that has been transferred...
... the warranty period should service be readily determined. 2. Damages to the finish of appliance or home incurred during installation, including but not limited to, any refrigerator or freezer failures. 6. THIS WRITTEN WARRANTY GIVES YOU SPECIFIC LEGAL RIGHTS. This warranty only applies in accordance with original serial numbers that has been transferred...
Complete Owner's Guide (English)
Page 17
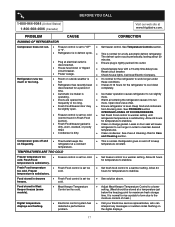
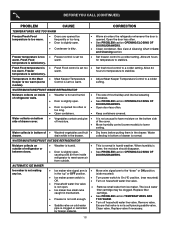
...food control to warmer setting until (control found in drawers freezes. • Fresh Food control is disconnected. Food stored in Fresh Food refrigerator temperature is satisfactory. Keep food and containers be stored at a constant temperature. • This is dirty. • Clean condenser.... Allow 24 hours cold. The defrost cycle occurs periodically, lasting about 30 • Plug at www.frigidaire.com. See PROBLEM section OPENING/CLOSING OF DOORS/DRAWERS. • Freezer control is set too cold • Set Fresh Food control to...
...food control to warmer setting until (control found in drawers freezes. • Fresh Food control is disconnected. Food stored in Fresh Food refrigerator temperature is satisfactory. Keep food and containers be stored at a constant temperature. • This is dirty. • Clean condenser.... Allow 24 hours cold. The defrost cycle occurs periodically, lasting about 30 • Plug at www.frigidaire.com. See PROBLEM section OPENING/CLOSING OF DOORS/DRAWERS. • Freezer control is set too cold • Set Fresh Food control to...
Complete Owner's Guide (English)
Page 18
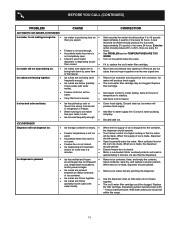
... cold enough. cartridge. • See PROBLEM section TEMPERATURES ARE • Freezer is satisfactory. by foreign material. 18 WATER/MOISTURE/FROST INSIDE REFRIGERATOR Moisture collects on inside DOORS/DRAWERS. When humidity is lower, the moisture should disappear. • Door is slightly open, • See ... are opened too frequently or too long. • Door is slightly open. • Condenser is dirty. • Warm air enters the refrigerator whenever the door is opened too often or too long. • Open containers. • The rate of drawer is normal. Temperature in ...
... cold enough. cartridge. • See PROBLEM section TEMPERATURES ARE • Freezer is satisfactory. by foreign material. 18 WATER/MOISTURE/FROST INSIDE REFRIGERATOR Moisture collects on inside DOORS/DRAWERS. When humidity is lower, the moisture should disappear. • Door is slightly open, • See ... are opened too frequently or too long. • Door is slightly open. • Condenser is dirty. • Warm air enters the refrigerator whenever the door is opened too often or too long. • Open containers. • The rate of drawer is normal. Temperature in ...
Complete Owner's Guide (English)
Page 19
... maker will produce fresh supply. Ice can then be clogged. The ice & water filter cartridge could be made . Ice cubes are not being held in refrigerator or freezer. Water running to colder setting. CORRECTION Side mounted ice maker should operate. Discard stale ice. Add filter to 4.5 pounds (approximately 4 quarts) of ice...
... maker will produce fresh supply. Ice can then be clogged. The ice & water filter cartridge could be made . Ice cubes are not being held in refrigerator or freezer. Water running to colder setting. CORRECTION Side mounted ice maker should operate. Discard stale ice. Add filter to 4.5 pounds (approximately 4 quarts) of ice...
Complete Owner's Guide (English)
Page 20
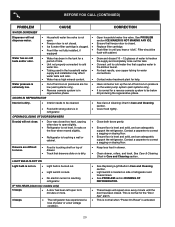
...• • Light switch is stuck. • • No electric current is reaching • refrigerator. This is level and solid, and can adequately support the refrigerator. ODORS IN REFRIGERATOR Interior is dirty. • Interior needs to be below 20 psi during the regenerative phase. drawer. •...(well systems only). Have someone turn up the cut-off and cut -on pressure on • the floor when moved slightly. • Refrigerator is touching a wall or • cabinet. Cover food tightly. Ensure floor is closed. Contact a carpenter to correct a sagging or sloping ...
...• • Light switch is stuck. • • No electric current is reaching • refrigerator. This is level and solid, and can adequately support the refrigerator. ODORS IN REFRIGERATOR Interior is dirty. • Interior needs to be below 20 psi during the regenerative phase. drawer. •...(well systems only). Have someone turn up the cut-off and cut -on pressure on • the floor when moved slightly. • Refrigerator is touching a wall or • cabinet. Cover food tightly. Ensure floor is closed. Contact a carpenter to correct a sagging or sloping ...


