Complete Owner's Guide (English)
Page 1
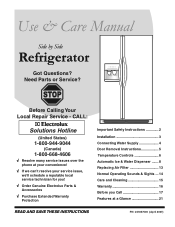
... local service technician for you! √ Order Genuine Electrolux Parts & Accessories √ Purchase Extended Warranty Protection Important Safety Instructions 2 Installation 3 Connecting Water Supply 4 Door Removal Instructions 5 Temperature Controls 6 Automatic Ice & Water Dispenser ....... 8 Replacing Air Filter 13 Normal Operating Sounds & Sights ... 14 Care and Cleaning 15 Warranty 16 Before you Call 17 Features at a Glance 21 READ AND SAVE THESE INSTRUCTIONS PN: 241857500 (April 2007) Need Parts or Service? Use & Care Manual Side by Side Refrigerator Got Questions...
... local service technician for you! √ Order Genuine Electrolux Parts & Accessories √ Purchase Extended Warranty Protection Important Safety Instructions 2 Installation 3 Connecting Water Supply 4 Door Removal Instructions 5 Temperature Controls 6 Automatic Ice & Water Dispenser ....... 8 Replacing Air Filter 13 Normal Operating Sounds & Sights ... 14 Care and Cleaning 15 Warranty 16 Before you Call 17 Features at a Glance 21 READ AND SAVE THESE INSTRUCTIONS PN: 241857500 (April 2007) Need Parts or Service? Use & Care Manual Side by Side Refrigerator Got Questions...
Complete Owner's Guide (English)
Page 2
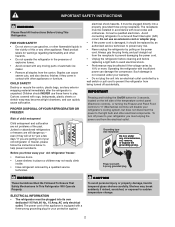
... your refrigerator's cooling system, but does not disconnect the power to sudden temperature change. 2 Cartons covered with rugs, bedspreads, plastic sheets or stretch wrap may break suddenly if nicked, scratched, or exposed to the light bulb and other flammable liquids in the presence of automatic ice maker. • Remove all staples from the electrical outlet. If you must be replaced by an authorized service technician...
... your refrigerator's cooling system, but does not disconnect the power to sudden temperature change. 2 Cartons covered with rugs, bedspreads, plastic sheets or stretch wrap may break suddenly if nicked, scratched, or exposed to the light bulb and other flammable liquids in the presence of automatic ice maker. • Remove all staples from the electrical outlet. If you must be replaced by an authorized service technician...
Complete Owner's Guide (English)
Page 3
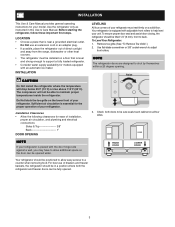
... proper temperatures inside the refrigerator. For best use an extension cord or an adapter plug. • If possible, place the refrigerator out of your refrigerator must be in this Use & Care Manual. INSTALLATION CAUTION Do Not install the refrigerator where the temperature will not be able to support a fully loaded refrigerator. • Consider water supply availability for ease of installation, proper air circulation, and plumbing and electrical connections: Sides & Top 3/8" Back 1" DOOR OPENING LEVELING All...
... proper temperatures inside the refrigerator. For best use an extension cord or an adapter plug. • If possible, place the refrigerator out of your refrigerator must be in this Use & Care Manual. INSTALLATION CAUTION Do Not install the refrigerator where the temperature will not be able to support a fully loaded refrigerator. • Consider water supply availability for ease of installation, proper air circulation, and plumbing and electrical connections: Sides & Top 3/8" Back 1" DOOR OPENING LEVELING All...

Complete Owner's Guide (English)
Page 4
... valve. Then add approximately 7 feet (2.1 meters), so the refrigerator can be completely filled with water pressure between 30 and 100 psi. • A water supply line made of water supply line into sink or bucket. Unscrew plastic cap from electric power source. 2. Coil excess water supply line (about priming an empty water supply system. Tighten another half turn ice maker on, lower wire signal arm (side mounted) or set the ice maker's On/Off power switch to electrical power...
... valve. Then add approximately 7 feet (2.1 meters), so the refrigerator can be completely filled with water pressure between 30 and 100 psi. • A water supply line made of water supply line into sink or bucket. Unscrew plastic cap from electric power source. 2. Coil excess water supply line (about priming an empty water supply system. Tighten another half turn ice maker on, lower wire signal arm (side mounted) or set the ice maker's On/Off power switch to electrical power...

Complete Owner's Guide (English)
Page 5
... door off of the bottom hinge and set it off of the bottom hinge. Lift the door off . Grasp both sides of the connector firmly and pull apart. 2 Remove top hinge cover screw on refrigerator door and remove cover. (some models) 2 Trace lightly around the door's top hinge with a pencil. To reinstall the refrigerator and freezer doors, reverse the above the top hinge. This makes reinstallation easier. 4 Detach the water tube from the top hinge...
... door off of the bottom hinge and set it off of the bottom hinge. Lift the door off . Grasp both sides of the connector firmly and pull apart. 2 Remove top hinge cover screw on refrigerator door and remove cover. (some models) 2 Trace lightly around the door's top hinge with a pencil. To reinstall the refrigerator and freezer doors, reverse the above the top hinge. This makes reinstallation easier. 4 Detach the water tube from the top hinge...
Complete Owner's Guide (English)
Page 6
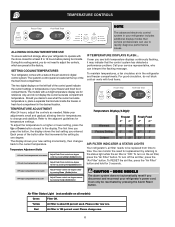
... controls as needed. Each press of your service representative, who can only be replaced from time to rapidly diagnose performance issues. Air Filter Status Light (not available on the air filter, press the "Air Filter" button. Please change and stabilize. To turn on all models) Green Filter OK. Adjust Freezer control one degree. If ever you desire to see both temperature displays continously flashing, it may indicate that increments the setting by pressing the Alarm Reset button...
... controls as needed. Each press of your service representative, who can only be replaced from time to rapidly diagnose performance issues. Air Filter Status Light (not available on the air filter, press the "Air Filter" button. Please change and stabilize. To turn on all models) Green Filter OK. Adjust Freezer control one degree. If ever you desire to see both temperature displays continously flashing, it may indicate that increments the setting by pressing the Alarm Reset button...

Complete Owner's Guide (English)
Page 7
... the freezer and fresh food compartments stops. Once you must unplug the power cord from normal operating conditions are reached, the On light displays green to indicate an active alarm system. number on the back page of this Use & Care Guide. turn the cooling system back on or higher) for over an hour. NOTE Pressing the On/Off button on the control panel disables your current current settings...
... the freezer and fresh food compartments stops. Once you must unplug the power cord from normal operating conditions are reached, the On light displays green to indicate an active alarm system. number on the back page of this Use & Care Guide. turn the cooling system back on or higher) for over an hour. NOTE Pressing the On/Off button on the control panel disables your current current settings...
Complete Owner's Guide (English)
Page 8
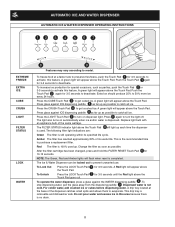
... same wattage. Extra Ice should produce 25% to evaporate. To stop dispensing water, pull the glass away from the dispensing paddle 9 . A Red light will appear above the Touch Pad 6 will light up each time the dispenser is no drain. 8 Do not pour water and excess ice in this feature. A green light will appear above the Touch Pad. This is removable and dishwasher safe. Dispensed water is completed. Change the filter...
... same wattage. Extra Ice should produce 25% to evaporate. To stop dispensing water, pull the glass away from the dispensing paddle 9 . A Red light will appear above the Touch Pad 6 will light up each time the dispenser is no drain. 8 Do not pour water and excess ice in this feature. A green light will appear above the Touch Pad. This is removable and dishwasher safe. Dispensed water is completed. Change the filter...
Complete Owner's Guide (English)
Page 9
... indicator will make a loud chattering noise. 9 IMPORTANT Your ice maker is shipped from the factory with the wire signal arm in device that shuts off the water flow after 3 minutes of the dispenser catches small spills and allows them to evaporate. To ensure that the softener is first connected to model. This may vary according to the household water supply line and whenever you replace the water filter...
... indicator will make a loud chattering noise. 9 IMPORTANT Your ice maker is shipped from the factory with the wire signal arm in device that shuts off the water flow after 3 minutes of the dispenser catches small spills and allows them to evaporate. To ensure that the softener is first connected to model. This may vary according to the household water supply line and whenever you replace the water filter...

Complete Owner's Guide (English)
Page 10
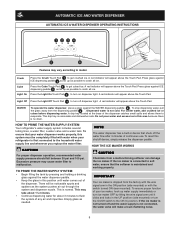
... the ice bin. Poor quality household water may overload and stop the ice maker, raise the wire signal arm until the ice bin fits into the freezer. Remember, if your water filter needs changing. IMPORTANT When removing or replacing the ice bin, DO NOT rotate the auger in wire signal arm, which automatically stops ice production when the ice bin is jamming with water inside. Press the switch to the "O" position to turn it in the ice maker mold...
... the ice bin. Poor quality household water may overload and stop the ice maker, raise the wire signal arm until the ice bin fits into the freezer. Remember, if your water filter needs changing. IMPORTANT When removing or replacing the ice bin, DO NOT rotate the auger in wire signal arm, which automatically stops ice production when the ice bin is jamming with water inside. Press the switch to the "O" position to turn it in the ice maker mold...
Complete Owner's Guide (English)
Page 11
... some models) After replacing the filter cartridge, it back in place. Please refer to the complete dispenser operating instructions attached to assure that the purest water possible is tightened. The Filter Status light will turn the water supply off , however, do not use for approximately 3 minutes to the inside of the freezer door. Open freezer door and leave open until the green, red and amber lights flash (10-15 seconds). Turn OFF side mounted ice maker...
... some models) After replacing the filter cartridge, it back in place. Please refer to the complete dispenser operating instructions attached to assure that the purest water possible is tightened. The Filter Status light will turn the water supply off , however, do not use for approximately 3 minutes to the inside of the freezer door. Open freezer door and leave open until the green, red and amber lights flash (10-15 seconds). Turn OFF side mounted ice maker...
Complete Owner's Guide (English)
Page 12
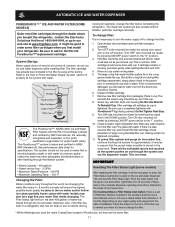
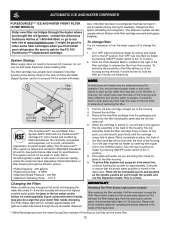
... of removing the filter. Changing the Filter: Water conditions vary throughout the world, but they are the same filter. 12 IMPORTANT Resetting The Filter Status Light (some filter cartridges when you first install your water filter needs changing. AUTOMATIC ICE AND WATER DISPENSER PURESOURCE2TM * ICE AND WATER FRONT FILTER (SOME MODELS) Order new filter cartridges through the dealer where you bought the refrigerator, contact the Electrolux Solutions Hotline at 1-800-944-9044, or go to press the Filter Reset button located...
... of removing the filter. Changing the Filter: Water conditions vary throughout the world, but they are the same filter. 12 IMPORTANT Resetting The Filter Status Light (some filter cartridges when you first install your water filter needs changing. AUTOMATIC ICE AND WATER DISPENSER PURESOURCE2TM * ICE AND WATER FRONT FILTER (SOME MODELS) Order new filter cartridges through the dealer where you bought the refrigerator, contact the Electrolux Solutions Hotline at 1-800-944-9044, or go to press the Filter Reset button located...

Complete Owner's Guide (English)
Page 13
... the Filter Reset button for 3 seconds again to turn off the filter status system. When the Filter OK light comes on, the status has been reset. 6 Press and hold the Filter Reset button on the electronic control panel for air filter replacement cartridge, part # 241504902. 13 IMPORTANT The electronic control panel, located at www.frigidaire.com. Be sure and ask for 3 seconds. To order new air filter cartridges, contact the dealer where you bought your air filter, including indicator lights...
... the Filter Reset button for 3 seconds again to turn off the filter status system. When the Filter OK light comes on, the status has been reset. 6 Press and hold the Filter Reset button on the electronic control panel for air filter replacement cartridge, part # 241504902. 13 IMPORTANT The electronic control panel, located at www.frigidaire.com. Be sure and ask for 3 seconds. To order new air filter cartridges, contact the dealer where you bought your air filter, including indicator lights...
Complete Owner's Guide (English)
Page 14
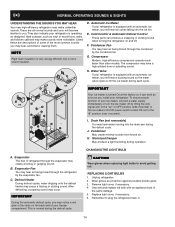
.... Cold Control & Automatic Defrost Control These parts can work as soon as protection against possible broken glass. 3. Compressor Modern, high-efficiency compressors operate much faster than older models. Evaporator Fan You may cause a hissing or sizzling sound. Defrost Heater During defrost cycles, water dripping onto the defrost heater may hear air being forced through the refrigerator by the evaporator fan. IMPORTANT During the automatic defrost cycle, you install your ice maker, connect a water supply immediately or turn the Ice maker off . Drain Pan (not...
.... Cold Control & Automatic Defrost Control These parts can work as soon as protection against possible broken glass. 3. Compressor Modern, high-efficiency compressors operate much faster than older models. Evaporator Fan You may cause a hissing or sizzling sound. Defrost Heater During defrost cycles, water dripping onto the defrost heater may hear air being forced through the refrigerator by the evaporator fan. IMPORTANT During the automatic defrost cycle, you install your ice maker, connect a water supply immediately or turn the Ice maker off . Drain Pan (not...
Complete Owner's Guide (English)
Page 15
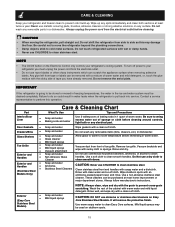
... labels can be used on the Electronic Control only controls your refrigerator you have already removed. Wash the rest of warm water and mild detergent, or, touch the glue residue with the grain to cold metal surfaces. CARE & CLEANING Keep your refrigerator and freezer clean to clean smooth handles. Failure to side as this operation. Contact a service representative to your refrigerator's cooling system. These cleaners can be drained completely. Mild...
... labels can be used on the Electronic Control only controls your refrigerator you have already removed. Wash the rest of warm water and mild detergent, or, touch the glue residue with the grain to cold metal surfaces. CARE & CLEANING Keep your refrigerator and freezer clean to clean smooth handles. Failure to side as this operation. Contact a service representative to your refrigerator's cooling system. These cleaners can be drained completely. Mild...
Complete Owner's Guide (English)
Page 16
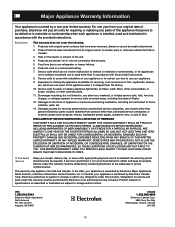
... in accordance with the provided instructions. 8. Rust on the interior or exterior of God. Products purchased "as removal of Alaska. 12. Food loss due to use your best interest to repair or replace appliance light bulbs, air filters, water filters, other consumables, or knobs, handles, or other appropriate payment record to remote areas, including the state of trim, cupboards, shelves, etc.,which do not...
... in accordance with the provided instructions. 8. Rust on the interior or exterior of God. Products purchased "as removal of Alaska. 12. Food loss due to use your best interest to repair or replace appliance light bulbs, air filters, water filters, other consumables, or knobs, handles, or other appropriate payment record to remote areas, including the state of trim, cupboards, shelves, etc.,which do not...
Complete Owner's Guide (English)
Page 17
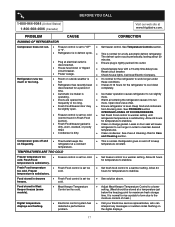
... temperature displays are opened too • Warm air entering the refrigerator causes it to a lower setting. (Meat should be slightly open. temperature is satisfactory. • Set fresh food control to warmer setting until (control found in Meat Keeper freezes (some models). • Meat Keeper Temperature Control set to stabilize. See PROBLEM section OPENING/CLOSING OF DOORS/DRAWERS. • Freezer control is normal for temperature to the moisture content of completely. It is set too cold. • Set freezer control to cool...
... temperature displays are opened too • Warm air entering the refrigerator causes it to a lower setting. (Meat should be slightly open. temperature is satisfactory. • Set fresh food control to warmer setting until (control found in Meat Keeper freezes (some models). • Meat Keeper Temperature Control set to stabilize. See PROBLEM section OPENING/CLOSING OF DOORS/DRAWERS. • Freezer control is normal for temperature to the moisture content of completely. It is set too cold. • Set freezer control to cool...
Complete Owner's Guide (English)
Page 18
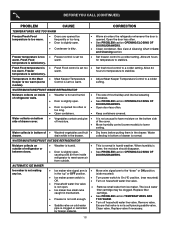
... PROBLEM section OPENING/CLOSING OF DOORS/DRAWERS. • Clean condenser. Fresh Food control is not a self-piercing saddle valve. of refrigerator walls. • Door is slightly open. • Door is not unusual to have moisture on inside DOORS/DRAWERS. Water collects in the drawer. Water drawer. AUTOMATIC ICE MAKER Ice maker is not making any ice. • Ice maker wire signal arm is not cold enough. cartridge. • See PROBLEM section TEMPERATURES ARE • Freezer is • Move wire signal arm to meet warm air...
... PROBLEM section OPENING/CLOSING OF DOORS/DRAWERS. • Clean condenser. Fresh Food control is not a self-piercing saddle valve. of refrigerator walls. • Door is slightly open. • Door is not unusual to have moisture on inside DOORS/DRAWERS. Water collects in the drawer. Water drawer. AUTOMATIC ICE MAKER Ice maker is not making any ice. • Ice maker wire signal arm is not cold enough. cartridge. • See PROBLEM section TEMPERATURES ARE • Freezer is • Move wire signal arm to meet warm air...
Complete Owner's Guide (English)
Page 19
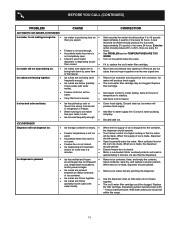
... set too • warm. Ice not used • frequently enough. Ice cubes are frozen together. • Ice cubes are hollow (partially frozen cubes with water inside ). Consult a water purifying company. Replace filter cartridge. The ice & water filter cartridge may be made , dispenser should fall within this range. 19 Discard stale ice. Freezer is overloaded. Ice cubes are not being held in proper position. Ice maker will produce fresh supply. Motor is not cold enough. Household water line valve...
... set too • warm. Ice not used • frequently enough. Ice cubes are frozen together. • Ice cubes are hollow (partially frozen cubes with water inside ). Consult a water purifying company. Replace filter cartridge. The ice & water filter cartridge may be made , dispenser should fall within this range. 19 Discard stale ice. Freezer is overloaded. Ice cubes are not being held in proper position. Ice maker will produce fresh supply. Motor is not cold enough. Household water line valve...
Complete Owner's Guide (English)
Page 20
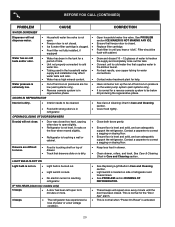
... NOT MAKING ANY ICE. Ensure that freezer door is not level. Draw and discard 10 - 12 glasses of water to correct a sagging or sloping floor. Cover food tightly. See Replacing Light Bulbs in Care and Cleaning section. This is normal when "Power-On-Reset" is normal for the "Door Ajar" alarm. drawer. • Track that supplies water to the kitchen faucet. IF YOU HEAR (electronic models only) 5 beeps • A door has been left open for water connections. Filter...
... NOT MAKING ANY ICE. Ensure that freezer door is not level. Draw and discard 10 - 12 glasses of water to correct a sagging or sloping floor. Cover food tightly. See Replacing Light Bulbs in Care and Cleaning section. This is normal when "Power-On-Reset" is normal for the "Door Ajar" alarm. drawer. • Track that supplies water to the kitchen faucet. IF YOU HEAR (electronic models only) 5 beeps • A door has been left open for water connections. Filter...


