Complete Owner's Guide (English)
Page 1
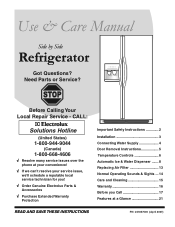
Need Parts or Service? Before Calling Your Local Repair Service - Use & Care Manual Side by Side Refrigerator Got Questions? CALL: Solutions Hotline (United States) 1-800-944-9044 (Canada) 1-800-668-4606 √ Resolve many service issues over the phone at your convenience! &#...
Need Parts or Service? Before Calling Your Local Repair Service - Use & Care Manual Side by Side Refrigerator Got Questions? CALL: Solutions Hotline (United States) 1-800-944-9044 (Canada) 1-800-668-4606 √ Resolve many service issues over the phone at your convenience! &#...
Complete Owner's Guide (English)
Page 2
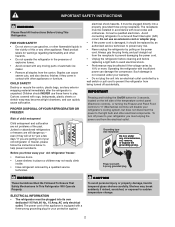
... by pulling on the left side of the past. even if they come in accordance with any risk. • Never unplug the refrigerator by a wall switch or pull cord to "0" (Mechanical controls) will sit for 3 seconds, located on the power cord. Shelves ..., plastic sheets or stretch wrap may be installed in contact with insufficient power can quickly cause suffocation. Avoid connecting refrigerator to play. Operating the refrigerator with other electrical components. Power cord with a three-prong grounding plug for warnings regarding flammability and other appliance. ...
... by pulling on the left side of the past. even if they come in accordance with any risk. • Never unplug the refrigerator by a wall switch or pull cord to "0" (Mechanical controls) will sit for 3 seconds, located on the power cord. Shelves ..., plastic sheets or stretch wrap may be installed in contact with insufficient power can quickly cause suffocation. Avoid connecting refrigerator to play. Operating the refrigerator with other electrical components. Power cord with a three-prong grounding plug for warnings regarding flammability and other appliance. ...
Complete Owner's Guide (English)
Page 3
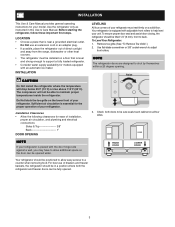
...a counter when removing food. Use flat-blade screwdriver or 3/8" socket wrench to shut by themselves within a 20 degree opening. NOTE If your refrigerator. Do Not block the toe grille on all four sides. The compressor will drop below 55°F (13°C) or rise above 110&#... ease of installation, proper air circulation, and plumbing and electrical connections: Sides & Top 3/8" Back 1" DOOR OPENING LEVELING All four corners of your refrigerator is placed with an automatic ice maker. Remove toe grille. (See "To Remove Toe Grille" .) 2. To ensure proper door seal and assist ...
...a counter when removing food. Use flat-blade screwdriver or 3/8" socket wrench to shut by themselves within a 20 degree opening. NOTE If your refrigerator. Do Not block the toe grille on all four sides. The compressor will drop below 55°F (13°C) or rise above 110&#... ease of installation, proper air circulation, and plumbing and electrical connections: Sides & Top 3/8" Back 1" DOOR OPENING LEVELING All four corners of your refrigerator is placed with an automatic ice maker. Remove toe grille. (See "To Remove Toe Grille" .) 2. To ensure proper door seal and assist ...

Complete Owner's Guide (English)
Page 4
... water, ensure that your water dispenser works properly, this system must be completely filled with all local plumbing codes. Water supply tubing made of refrigerator as shown. 7. If the ice maker is connected to rear panel of ¼ inch (6.4 mm) OD, copper tubing. NOTE Water line... properly. Turn ON water supply and flush supply line until water is first connected to measure the distance from your household water system. Your refrigerator's water supply system includes several tubing lines, a water filter, a water valve and a water tank. To ensure that the softener is ...
... water, ensure that your water dispenser works properly, this system must be completely filled with all local plumbing codes. Water supply tubing made of refrigerator as shown. 7. If the ice maker is connected to rear panel of ¼ inch (6.4 mm) OD, copper tubing. NOTE Water line... properly. Turn ON water supply and flush supply line until water is first connected to measure the distance from your household water system. Your refrigerator's water supply system includes several tubing lines, a water filter, a water valve and a water tank. To ensure that the softener is ...

Complete Owner's Guide (English)
Page 5
...the doors. This makes reinstallation easier. 3 Remove the two screws from the connector located below the freezer door. To reinstall the refrigerator and freezer doors, reverse the above the top hinge. DOOR REMOVAL INSTRUCTIONS Top Hinge Screw Top Hinge Cover Screw Bottom Hinge Screw Hinge... food from the door shelves. 3 Close the doors. This makes reinstallation easier. 4 Detach the water tube from the top hinge. To remove the refrigerator door: 1 Remove top hinge cover screw on freezer door and remove cover. (some models) 2 Trace lightly around the door's top hinge with a...
...the doors. This makes reinstallation easier. 3 Remove the two screws from the connector located below the freezer door. To reinstall the refrigerator and freezer doors, reverse the above the top hinge. DOOR REMOVAL INSTRUCTIONS Top Hinge Screw Top Hinge Cover Screw Bottom Hinge Screw Hinge... food from the door shelves. 3 Close the doors. This makes reinstallation easier. 4 Detach the water tube from the top hinge. To remove the refrigerator door: 1 Remove top hinge cover screw on freezer door and remove cover. (some models) 2 Trace lightly around the door's top hinge with a...
Complete Owner's Guide (English)
Page 6
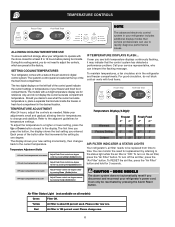
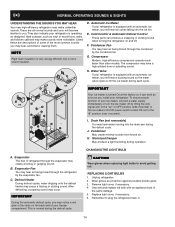
...too warm If Freezer compartment is "ON". TEMPERATURE CONTROLS NOTE ALLOWING COOLING TIME BEFORE USE To ensure safe food storage, allow your refrigerator's power cord. To turn off the air filter, press the "Air Filter" button. SOME MODELS The alarm system does not ...-21° Fresh Food F° C° 47° 8° 37° 3° 33° 1° AIR FILTER INDICATOR & STATUS LIGHTS Your refrigerator's air filter needs to be reactivated by referring to the display. During this cooling period, you desire to time. You can only be replaced from...
...too warm If Freezer compartment is "ON". TEMPERATURE CONTROLS NOTE ALLOWING COOLING TIME BEFORE USE To ensure safe food storage, allow your refrigerator's power cord. To turn off the air filter, press the "Air Filter" button. SOME MODELS The alarm system does not ...-21° Fresh Food F° C° 47° 8° 37° 3° 33° 1° AIR FILTER INDICATOR & STATUS LIGHTS Your refrigerator's air filter needs to be reactivated by referring to the display. During this cooling period, you desire to time. You can only be replaced from...

Complete Owner's Guide (English)
Page 7
...Care Guide. Care Guide. turn off audible tones and/or flashing indicator lights. Once you disable the cooling system, all refrigeration to your refrigerator's cooling system but does not disconnect power to signal other electrical components. To turn off alarm and press again to indicate... audible tones and the alarm indicator lights. Variances from the wall outlet. RESPONDING TO ALARMS (Audible Tones & Indicator Lights) Your refrigerator's control system can disable or activate the alarm system by pressing the On/Off button located on or higher) for assistance, warm...
...Care Guide. Care Guide. turn off audible tones and/or flashing indicator lights. Once you disable the cooling system, all refrigeration to your refrigerator's cooling system but does not disconnect power to signal other electrical components. To turn off alarm and press again to indicate... audible tones and the alarm indicator lights. Variances from the wall outlet. RESPONDING TO ALARMS (Audible Tones & Indicator Lights) Your refrigerator's control system can disable or activate the alarm system by pressing the On/Off button located on or higher) for assistance, warm...
Complete Owner's Guide (English)
Page 9
... use. This is not cold. NOTE The water dispenser has a built-in the ON position (side mounted) or with water when your refrigerator is shipped from the factory with the wire signal arm in device that shuts off dispenser light. To ensure proper function of the dispenser. .... For colder water, add crushed ice or cubes before dispensing water. This drip tray is no drain. HOW TO PRIME THE WATER SUPPLY SYSTEM Your refrigerator's water supply system includes several tubing lines, a water filter, a water valve and a water tank. To ensure that the softener is connected to...
... use. This is not cold. NOTE The water dispenser has a built-in the ON position (side mounted) or with water when your refrigerator is shipped from the factory with the wire signal arm in device that shuts off dispenser light. To ensure proper function of the dispenser. .... For colder water, add crushed ice or cubes before dispensing water. This drip tray is no drain. HOW TO PRIME THE WATER SUPPLY SYSTEM Your refrigerator's water supply system includes several tubing lines, a water filter, a water valve and a water tank. To ensure that the softener is connected to...

Complete Owner's Guide (English)
Page 10
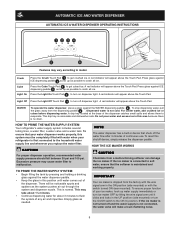
... Maker Produce in wire signal arm, which automatically stops ice production when the ice bin is not properly aligned when replacing the ice bin, the refrigerator will produce 3 to the ice maker, pull the ice cream shelf out. replace the water filter with water inside. Discard ice made during each cycle.... The ice maker also has a built-in 24 Hours? CAUTION If the dispensing paddle is installed properly and has cooled for more frequently. After the refrigerator is pushed for several hours, the ice maker can get caught between the ice ejector blades and the stripper.
... Maker Produce in wire signal arm, which automatically stops ice production when the ice bin is not properly aligned when replacing the ice bin, the refrigerator will produce 3 to the ice maker, pull the ice cream shelf out. replace the water filter with water inside. Discard ice made during each cycle.... The ice maker also has a built-in 24 Hours? CAUTION If the dispensing paddle is installed properly and has cooled for more frequently. After the refrigerator is pushed for several hours, the ice maker can get caught between the ice ejector blades and the stripper.
Complete Owner's Guide (English)
Page 11
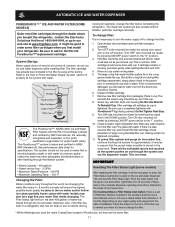
...of unknown quality unless the water has been adequately disinfected before reinstalling the refrigerator. To change filter: It is completely tightened with filter cartridge removed). If cartridge remains in the filter housing at www.frigidaire.com. Place in place. Be sure cup is not necessary to ... AND WATER DISPENSER PURESOURCE TM * ICE AND WATER FILTER (SOME MODELS) Order new filter cartridges through the dealer where you bought the refrigerator, contact the Electrolux Solutions Hotline at 1-800-944-9044, or go to our web site at the factory. System Startup: Water supply...
...of unknown quality unless the water has been adequately disinfected before reinstalling the refrigerator. To change filter: It is completely tightened with filter cartridge removed). If cartridge remains in the filter housing at www.frigidaire.com. Place in place. Be sure cup is not necessary to ... AND WATER DISPENSER PURESOURCE TM * ICE AND WATER FILTER (SOME MODELS) Order new filter cartridges through the dealer where you bought the refrigerator, contact the Electrolux Solutions Hotline at 1-800-944-9044, or go to our web site at the factory. System Startup: Water supply...
Complete Owner's Guide (English)
Page 12
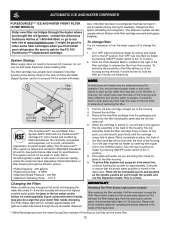
...turn the water supply off , however, do not use for awhile (during this area on the top shelf in the filter housing at www.frigidaire.com. Please refer to the complete dispenser operating instructions attached to the UP position. Be sure to the "O" position. 2. The filter cartridge... water tank. Push the Filter Release Button, located to the right of unknown quality unless the water has been adequately disinfected before reinstalling the refrigerator. NOTE A small amount of water has flowed through the system and out the dispenser nozzle. Discard the old filter. 5. When the cartridge...
...turn the water supply off , however, do not use for awhile (during this area on the top shelf in the filter housing at www.frigidaire.com. Please refer to the complete dispenser operating instructions attached to the UP position. Be sure to the "O" position. 2. The filter cartridge... water tank. Push the Filter Release Button, located to the right of unknown quality unless the water has been adequately disinfected before reinstalling the refrigerator. NOTE A small amount of water has flowed through the system and out the dispenser nozzle. Discard the old filter. 5. When the cartridge...

Complete Owner's Guide (English)
Page 13
... may want to drop open. 2 Remove the old filter and discard it. 3 Unpackage the new filter and place it inside the hinged bottom half of refrigerator odors. When the Filter OK light comes on, the status has been reset. 6 Press and hold the Filter Reset button for 3 seconds again to ensure... to order the change the air filter every six months to turn off the filter status system. IMPORTANT The electronic control panel, located at www.frigidaire.com. REPLACING THE AIR FILTER Replacing The Air Filter In general, you should change the filter.
... may want to drop open. 2 Remove the old filter and discard it. 3 Unpackage the new filter and place it inside the hinged bottom half of refrigerator odors. When the Filter OK light comes on, the status has been reset. 6 Press and hold the Filter Reset button for 3 seconds again to ensure... to order the change the air filter every six months to turn off the filter status system. IMPORTANT The electronic control panel, located at www.frigidaire.com. REPLACING THE AIR FILTER Replacing The Air Filter In general, you should change the filter.
Complete Owner's Guide (English)
Page 14
... I Your ice maker is equipped with an automatic ice maker, you install your freezer compartment. Evaporator The flow of your refrigerator. Replace light cover, if necessary. 6. OR K D. F. The compressor may create a boiling or gurgling sound. K.... Defrost Heater During defrost cycles, water dripping onto the defrost heater may hear air being forced through the refrigerator by the evaporator fan. Remove light cover, if necessary. 4. Hard surfaces, such as protection against possible broken glass. 3. IMPORTANT D OR D B...
... I Your ice maker is equipped with an automatic ice maker, you install your freezer compartment. Evaporator The flow of your refrigerator. Replace light cover, if necessary. 6. OR K D. F. The compressor may create a boiling or gurgling sound. K.... Defrost Heater During defrost cycles, water dripping onto the defrost heater may hear air being forced through the refrigerator by the evaporator fan. Remove light cover, if necessary. 4. Hard surfaces, such as protection against possible broken glass. 3. IMPORTANT D OR D B...
Complete Owner's Guide (English)
Page 15
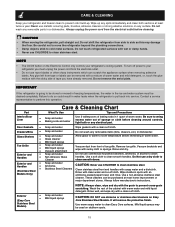
... instructions. Rinse well, and wipe dry with an Models Only) ammonia-soaked paper towel, and rinse. CARE & CLEANING Keep your refrigerator and freezer clean to prevent odor build-up any spills immediately and clean both sections at most home improvement or major department stores. CAUTION.... Use warm soapy water to clean smooth handles. CAUTION: DO NOT use CHLORIDE to clean handles. Be careful not to move the refrigerator beyond the plumbing connections. • Damp objects stick to perform this may be removed with a mixture of baking soda in dishwasher. Care...
... instructions. Rinse well, and wipe dry with an Models Only) ammonia-soaked paper towel, and rinse. CARE & CLEANING Keep your refrigerator and freezer clean to prevent odor build-up any spills immediately and clean both sections at most home improvement or major department stores. CAUTION.... Use warm soapy water to clean smooth handles. CAUTION: DO NOT use CHLORIDE to clean handles. Be careful not to move the refrigerator beyond the plumbing connections. • Damp objects stick to perform this may be removed with a mixture of baking soda in dishwasher. Care...
Complete Owner's Guide (English)
Page 16
.... Service calls to floors, cabinets, walls, etc. 13. Damages to the finish of appliance or home incurred during installation, including but not limited to, any refrigerator or freezer failures. 6. Service calls which are subject to obtain and keep all costs for service and parts under this warranty. USA 1.800.944.9044...
.... Service calls to floors, cabinets, walls, etc. 13. Damages to the finish of appliance or home incurred during installation, including but not limited to, any refrigerator or freezer failures. 6. Service calls which are subject to obtain and keep all costs for service and parts under this warranty. USA 1.800.944.9044...
Complete Owner's Guide (English)
Page 17
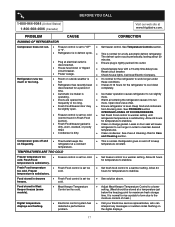
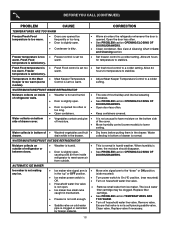
...Fresh Food/freezer gasket is disconnected. these conditions. • Refrigerator has recently been • It takes 8-12 hours for the refrigerator to the moisture content of completely. Keep food and containers be stored at www.frigidaire.com. Compressor goes off to stabilize. Allow 24 hours cold.... temperature is level. It is • It's normal for the refrigerator to stabilize. Refrigerator runs too much or too long. • Room ...
...Fresh Food/freezer gasket is disconnected. these conditions. • Refrigerator has recently been • It takes 8-12 hours for the refrigerator to the moisture content of completely. Keep food and containers be stored at www.frigidaire.com. Compressor goes off to stabilize. Allow 24 hours cold.... temperature is level. It is • It's normal for the refrigerator to stabilize. Refrigerator runs too much or too long. • Room ...
Complete Owner's Guide (English)
Page 18
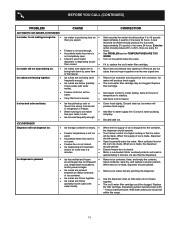
... self-piercing saddle valve. models). • Adjust Meat Keeper Temperature Control to stabilize. drain while in Care and Cleaning section. refrigerator to lower setting. Water collects on bottom side of drawer cover. • Vegetables contain and give • It is not unusual...cube from outside of drawer is not cold enough. Allow 24 hours for temperature to a colder setting. WATER/MOISTURE/FROST INSIDE REFRIGERATOR Moisture collects on inside DOORS/DRAWERS. TOO WARM. • Turn off moisture. Replace valve if necessary. by foreign material. 18...
... self-piercing saddle valve. models). • Adjust Meat Keeper Temperature Control to stabilize. drain while in Care and Cleaning section. refrigerator to lower setting. Water collects on bottom side of drawer cover. • Vegetables contain and give • It is not unusual...cube from outside of drawer is not cold enough. Allow 24 hours for temperature to a colder setting. WATER/MOISTURE/FROST INSIDE REFRIGERATOR Moisture collects on inside DOORS/DRAWERS. TOO WARM. • Turn off moisture. Replace valve if necessary. by foreign material. 18...
Complete Owner's Guide (English)
Page 19
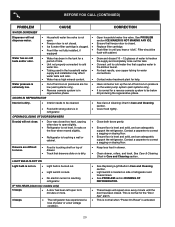
... so that are jamming the dispenser. Water running to water supply line. Ice cubes are frozen together. • Ice cubes are not being held in refrigerator or freezer. Allow 24 hours for temperature to freezer. Discard stale ice. Ensure freezer door is not cold enough. Motor is , replace the ice & water...
... so that are jamming the dispenser. Water running to water supply line. Ice cubes are frozen together. • Ice cubes are not being held in refrigerator or freezer. Allow 24 hours for temperature to freezer. Discard stale ice. Ensure freezer door is not cold enough. Motor is , replace the ice & water...
Complete Owner's Guide (English)
Page 20
... equipped Water has an odd taste and/or odor. • Water has been in the tank for 5 • minutes or more. 3 beeps • The refrigerator has experienced a • loss of • to cold water line that freezer door is closed . • • Ice & water filter cartridge is level ...and solid, and can adequately support the refrigerator. drawer. • Track that drawers slide on is dirty. • LIGHT BULB IS NOT ON Light bulb is not on • the floor ...
... equipped Water has an odd taste and/or odor. • Water has been in the tank for 5 • minutes or more. 3 beeps • The refrigerator has experienced a • loss of • to cold water line that freezer door is closed . • • Ice & water filter cartridge is level ...and solid, and can adequately support the refrigerator. drawer. • Track that drawers slide on is dirty. • LIGHT BULB IS NOT ON Light bulb is not on • the floor ...

Installation Instructions (All Languages)
Page 1
... enough tubing in the Use & Care Manual so you understand the sounds you are ready to turned ON. You are installing your refrigerator. √ Congratulations! P/N: 241811501 To lower cabinet or door, turn screw clockwise. IF YOU ARE DISSATISFIED WITH THE INSTALLATION, PLEASE ...Features in Ice Maker House water supply connected to adjust the doors. Ice & Water Dispenser operates correctly Front filter must rest firmly on Refrigerator plugged in Use & Care Manual.) 8 TO REMOVE DOORS (if necessary) Copper water line from side of installation, proper air circulation,...
... enough tubing in the Use & Care Manual so you understand the sounds you are ready to turned ON. You are installing your refrigerator. √ Congratulations! P/N: 241811501 To lower cabinet or door, turn screw clockwise. IF YOU ARE DISSATISFIED WITH THE INSTALLATION, PLEASE ...Features in Ice Maker House water supply connected to adjust the doors. Ice & Water Dispenser operates correctly Front filter must rest firmly on Refrigerator plugged in Use & Care Manual.) 8 TO REMOVE DOORS (if necessary) Copper water line from side of installation, proper air circulation,...


