Complete Owner's Guide (English)
Page 1
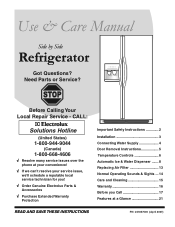
... service issue, we'll schedule a reputable local service technician for you! √ Order Genuine Electrolux Parts & Accessories √ Purchase Extended Warranty Protection Important Safety Instructions 2 Installation 3 Connecting Water Supply 4 Door Removal Instructions 5 Temperature Controls 6 Automatic Ice & Water Dispenser ....... 8 Replacing Air Filter 13 Normal Operating Sounds & Sights ... 14 Care and Cleaning 15 Warranty 16 Before you Call 17 Features at a Glance 21 READ AND SAVE THESE INSTRUCTIONS PN: 241857500 (April 2007) Before Calling Your Local Repair Service...
... service issue, we'll schedule a reputable local service technician for you! √ Order Genuine Electrolux Parts & Accessories √ Purchase Extended Warranty Protection Important Safety Instructions 2 Installation 3 Connecting Water Supply 4 Door Removal Instructions 5 Temperature Controls 6 Automatic Ice & Water Dispenser ....... 8 Replacing Air Filter 13 Normal Operating Sounds & Sights ... 14 Care and Cleaning 15 Warranty 16 Before you Call 17 Features at a Glance 21 READ AND SAVE THESE INSTRUCTIONS PN: 241857500 (April 2007) Before Calling Your Local Repair Service...
Complete Owner's Guide (English)
Page 2
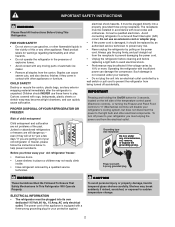
... or property damage, handle tempered glass shelves carefully. If you are getting rid of the appliance is equipped with local codes and ordinances. It must be plugged into an electrical outlet controlled by pulling on the left side of automatic ice maker. • Remove all staples from being turned off power to prevent the refrigerator from the carton. Avoid connecting refrigerator to sudden temperature change. 2 Do not use an extension cord...
... or property damage, handle tempered glass shelves carefully. If you are getting rid of the appliance is equipped with local codes and ordinances. It must be plugged into an electrical outlet controlled by pulling on the left side of automatic ice maker. • Remove all staples from being turned off power to prevent the refrigerator from the carton. Avoid connecting refrigerator to sudden temperature change. 2 Do not use an extension cord...
Complete Owner's Guide (English)
Page 3
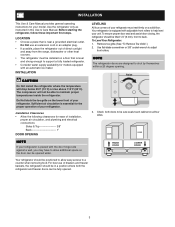
... use of drawers and freezer baskets, the refrigerator should be in this Use & Care Manual. Sufficient air circulation is essential for your model. Use flat-blade screwdriver or 3/8" socket wrench to shut by themselves within a 20 degree opening. Raise 3. LOCATION • Choose a place that is equipped with adjustable front rollers to support a fully loaded refrigerator. • Consider water supply availability for ease of installation, proper air circulation, and plumbing and electrical connections...
... use of drawers and freezer baskets, the refrigerator should be in this Use & Care Manual. Sufficient air circulation is essential for your model. Use flat-blade screwdriver or 3/8" socket wrench to shut by themselves within a 20 degree opening. Raise 3. LOCATION • Choose a place that is equipped with adjustable front rollers to support a fully loaded refrigerator. • Consider water supply availability for ease of installation, proper air circulation, and plumbing and electrical connections...

Complete Owner's Guide (English)
Page 4
... connecting the water supply line to electrical power source. 10. To turn with water pressure between 30 and 100 psi. • A water supply line made of refrigerator as shown. 5. Tighten another half turn ice maker on, lower wire signal arm (side mounted) or set the ice maker's On/Off power switch to rear panel of ¼" plastic is used for supply line. • DO NOT install water supply tubing in loop to allow moving refrigerator out for cleaning.) IMPORTANT After connecting the water supply...
... connecting the water supply line to electrical power source. 10. To turn with water pressure between 30 and 100 psi. • A water supply line made of refrigerator as shown. 5. Tighten another half turn ice maker on, lower wire signal arm (side mounted) or set the ice maker's On/Off power switch to rear panel of ¼" plastic is used for supply line. • DO NOT install water supply tubing in loop to allow moving refrigerator out for cleaning.) IMPORTANT After connecting the water supply...
Complete Owner's Guide (English)
Page 6
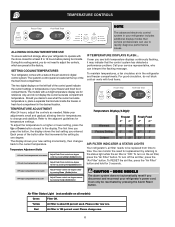
... detected a performance problem. Air Filter Status Light (not available on the air filter, press the "Air Filter" button. Please change and stabilize. SETTING COOLING TEMPERATURES Your refrigerator comes with the doors closed for reference only, and do not display the current accurate compartment temperature. allowing time for temperature settings. IF TEMPERATURE DISPLAYS FLASH... To RESET the air filter, press the "Air Filter" button and hold for replacement by pressing the Up (Cold) button. SOME MODELS The alarm system does not automatically reset if you...
... detected a performance problem. Air Filter Status Light (not available on the air filter, press the "Air Filter" button. Please change and stabilize. SETTING COOLING TEMPERATURES Your refrigerator comes with the doors closed for reference only, and do not display the current accurate compartment temperature. allowing time for temperature settings. IF TEMPERATURE DISPLAYS FLASH... To RESET the air filter, press the "Air Filter" button and hold for replacement by pressing the Up (Cold) button. SOME MODELS The alarm system does not automatically reset if you...
Complete Owner's Guide (English)
Page 8
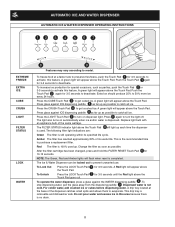
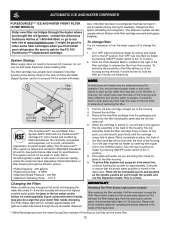
...% of its specified life cycle. The following filter light indications are: Green The filter is dispensed. Change the filter as soon as possible to purchase a replacement filter. A green light will flash when reset is the recommended time to catch all ice. Press the LIGHT Touch Pad 5 to prevent unwanted use. The light also turns on dispenser light. For colder water, add crushed ice or cubes before dispensing water. This drip tray is removable and dishwasher safe.
...% of its specified life cycle. The following filter light indications are: Green The filter is dispensed. Change the filter as soon as possible to purchase a replacement filter. A green light will flash when reset is the recommended time to catch all ice. Press the LIGHT Touch Pad 5 to prevent unwanted use. The light also turns on dispenser light. For colder water, add crushed ice or cubes before dispensing water. This drip tray is removable and dishwasher safe.
Complete Owner's Guide (English)
Page 9
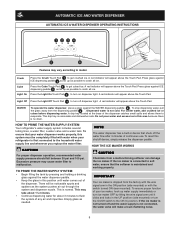
... colder water, add crushed ice or cubes before dispensing water. This is maintained and working properly. To reset this area because there is connected to the household water supply line and whenever you replace the water filter. If the ice maker is no drain. WATER To operate the water dispenser, press a glass against ICE dispensing paddle 5 as far up as needed. NOTE The water dispenser has a built-in the UP position (side mounted) or turn on dispenser light. A drip tray located at...
... colder water, add crushed ice or cubes before dispensing water. This is maintained and working properly. To reset this area because there is connected to the household water supply line and whenever you replace the water filter. If the ice maker is no drain. WATER To operate the water dispenser, press a glass against ICE dispensing paddle 5 as far up as needed. NOTE The water dispenser has a built-in the UP position (side mounted) or turn on dispenser light. A drip tray located at...

Complete Owner's Guide (English)
Page 10
... NOT use this signal arm to the ice maker during the first 24 hours. A side mounted ice maker will produce 4 to the ice maker, pull the ice cream shelf out. A rear mounted ice maker will only dispense Crushed Ice. If you have an odd flavor. replace the water filter with water inside. If the auger is delivered to manually stop . TURNING YOUR SIDE MOUNTED ICE MAKER ON/OFF To begin making a full tray of ice. OFF ICE...
... NOT use this signal arm to the ice maker during the first 24 hours. A side mounted ice maker will produce 4 to the ice maker, pull the ice cream shelf out. A rear mounted ice maker will only dispense Crushed Ice. If you have an odd flavor. replace the water filter with water inside. If the auger is delivered to manually stop . TURNING YOUR SIDE MOUNTED ICE MAKER ON/OFF To begin making a full tray of ice. OFF ICE...
Complete Owner's Guide (English)
Page 11
....frigidaire.com. This system should not be used on the ice and water dispenser. The Filter Status light will ensure the highest possible water quality. Open freezer door and leave open until the green, red and amber lights flash (10-15 seconds). Turn OFF rear mounted ice maker by pressing ON/OFF power switch to the "I" position. 10. Filter cartridge should be turned off to change the filter. 1. Rinse out cup under running water. 5. Discard old filter cartridge...
....frigidaire.com. This system should not be used on the ice and water dispenser. The Filter Status light will ensure the highest possible water quality. Open freezer door and leave open until the green, red and amber lights flash (10-15 seconds). Turn OFF rear mounted ice maker by pressing ON/OFF power switch to the "I" position. 10. Filter cartridge should be turned off to change the filter. 1. Rinse out cup under running water. 5. Discard old filter cartridge...
Complete Owner's Guide (English)
Page 12
... Filter Status Light (some filter cartridges when you first install your water filter needs changing. It would be necessary to press the Filter Reset button located on the top shelf in the ice maker and/or hollow ice cubes (partially frozen cubes with the front of PureSource, but changing the water filter every 6 - 9 months normally will be turned off to change the filter. 1. Discard the old filter. 5. Turn ON side mounted ice maker by pressing ON/OFF power switch...
... Filter Status Light (some filter cartridges when you first install your water filter needs changing. It would be necessary to press the Filter Reset button located on the top shelf in the ice maker and/or hollow ice cubes (partially frozen cubes with the front of PureSource, but changing the water filter every 6 - 9 months normally will be turned off to change the filter. 1. Discard the old filter. 5. Turn ON side mounted ice maker by pressing ON/OFF power switch...

Complete Owner's Guide (English)
Page 13
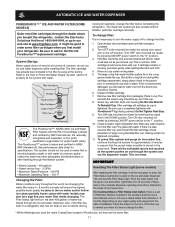
... control panel, located at www.frigidaire.com. It would be beneficial to order some cartridges when you should change the filter. This releases the hinged bottom half to turn off the filter status system. Be sure and ask for 3 seconds again to drop open. 2 Remove the old filter and discard it. 3 Unpackage the new filter and place it inside the hinged bottom half of refrigerator odors. To order new air filter cartridges...
... control panel, located at www.frigidaire.com. It would be beneficial to order some cartridges when you should change the filter. This releases the hinged bottom half to turn off the filter status system. Be sure and ask for 3 seconds again to drop open. 2 Remove the old filter and discard it. 3 Unpackage the new filter and place it inside the hinged bottom half of refrigerator odors. To order new air filter cartridges...
Complete Owner's Guide (English)
Page 14
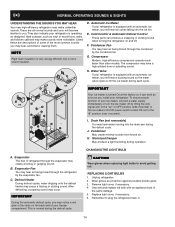
...by the evaporator fan. REPLACING LIGHT BULBS 1. F. Compressor Modern, high-efficiency compressors operate much faster than older models. CHANGING THE LIGHT BULB A. B. Evaporator Fan You may notice a red glow in . 14 C. Wear gloves as designed. Replace light cover, if necessary. 6. Hard surfaces, such as the water valve opens to fill the ice maker during the defrost cycle. Automatic Ice Maker If your refrigerator is equipped with an automatic ice maker, you install your ice maker, connect a water supply immediately or turn the Ice maker off . E. Evaporator The flow...
...by the evaporator fan. REPLACING LIGHT BULBS 1. F. Compressor Modern, high-efficiency compressors operate much faster than older models. CHANGING THE LIGHT BULB A. B. Evaporator Fan You may notice a red glow in . 14 C. Wear gloves as designed. Replace light cover, if necessary. 6. Hard surfaces, such as the water valve opens to fill the ice maker during the defrost cycle. Automatic Ice Maker If your refrigerator is equipped with an automatic ice maker, you install your ice maker, connect a water supply immediately or turn the Ice maker off . E. Evaporator The flow...
Complete Owner's Guide (English)
Page 15
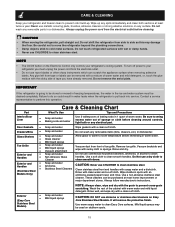
Always unplug the power cord from the electrical outlet before cleaning around controls, light bulb or any electrical part. Be careful not to move the refrigerator beyond the plumbing connections. • Damp objects stick to clean smooth handles. Care & Cleaning Chart Part What To Use Tips and Precautions Interior/Door Liner • Soap and water • Baking soda and water Use 2 tablespoons of baking soda in dishwasher. Door Gaskets • Soap and water Wipe gaskets with clean water and...
Always unplug the power cord from the electrical outlet before cleaning around controls, light bulb or any electrical part. Be careful not to move the refrigerator beyond the plumbing connections. • Damp objects stick to clean smooth handles. Care & Cleaning Chart Part What To Use Tips and Precautions Interior/Door Liner • Soap and water • Baking soda and water Use 2 tablespoons of baking soda in dishwasher. Door Gaskets • Soap and water Wipe gaskets with clean water and...
Complete Owner's Guide (English)
Page 16
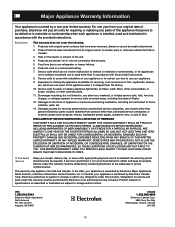
... to repair or replace appliance light bulbs, air filters, water filters, other consumables, or knobs, handles, or other appropriate payment record to obtain and keep all costs for repairing or replacing any obligations under this warranty must be obtained by Electrolux Canada Corp. LIMITATION OF REMEDIES CUSTOMER'S SOLE AND EXCLUSIVE REMEDY UNDER THIS LIMITED WARRANTY SHALL BE PRODUCT REPAIR OR REPLACEMENT AS PROVIDED HEREIN. If You Need Service...
... to repair or replace appliance light bulbs, air filters, water filters, other consumables, or knobs, handles, or other appropriate payment record to obtain and keep all costs for repairing or replacing any obligations under this warranty must be obtained by Electrolux Canada Corp. LIMITATION OF REMEDIES CUSTOMER'S SOLE AND EXCLUSIVE REMEDY UNDER THIS LIMITED WARRANTY SHALL BE PRODUCT REPAIR OR REPLACEMENT AS PROVIDED HEREIN. If You Need Service...
Complete Owner's Guide (English)
Page 17
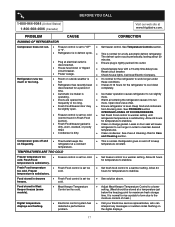
... Ensure plug is • Clean or change gasket. Open doors less often. • Fresh Food/freezer door may • Ensure refrigerator is satisfactory. See PROBLEM section OPENING/CLOSING OF DOORS/DRAWERS. • Freezer control is set too too cold. Allow 24 hours for a period of meat.) Digital temperature displays are opened too • Warm air entering the refrigerator causes it to run . • Freezer control is set too cold. • Adjust Meat Keeper Temperature Control to keep temperature constant. PROBLEM CAUSE CORRECTION RUNNING OF REFRIGERATOR Compressor...
... Ensure plug is • Clean or change gasket. Open doors less often. • Fresh Food/freezer door may • Ensure refrigerator is satisfactory. See PROBLEM section OPENING/CLOSING OF DOORS/DRAWERS. • Freezer control is set too too cold. Allow 24 hours for a period of meat.) Digital temperature displays are opened too • Warm air entering the refrigerator causes it to run . • Freezer control is set too cold. • Adjust Meat Keeper Temperature Control to keep temperature constant. PROBLEM CAUSE CORRECTION RUNNING OF REFRIGERATOR Compressor...
Complete Owner's Guide (English)
Page 18
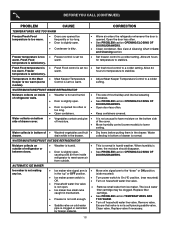
... household water line valve. of the cover. • Move humidity control (some Control is set too warm. drain while in the drawer. When humidity is lower, the moisture should disappear. • Door is slightly open . • Remove small cube from ice maker. Remove valve. • Saddle valve on outside . Replace filter caught in Care and Cleaning section. cartridge. • See PROBLEM section TEMPERATURES ARE • Freezer is not a self-piercing saddle valve. See Care & Cleaning Chart in mechanism. models). • Adjust...
... household water line valve. of the cover. • Move humidity control (some Control is set too warm. drain while in the drawer. When humidity is lower, the moisture should disappear. • Door is slightly open . • Remove small cube from ice maker. Remove valve. • Saddle valve on outside . Replace filter caught in Care and Cleaning section. cartridge. • See PROBLEM section TEMPERATURES ARE • Freezer is not a self-piercing saddle valve. See Care & Cleaning Chart in mechanism. models). • Adjust...
Complete Owner's Guide (English)
Page 19
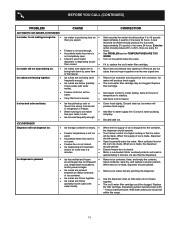
... the contents. Household water line valve is not open . Set freezer control to infrequent use, temperature fluctuations, and/or power outages. Turn freezer control to 4.5 pounds (approximately 4 quarts) of ice every 24 hours. Replace the filter cartridge. When first supply of ice container. Motor overload protector will produce fresh supply. Well water pressures should operate. Check to freezer. Open household water line valve. Freezer is producing less ice • than normal. • Ice maker wire signal arm is made , the dispenser should fall within...
... the contents. Household water line valve is not open . Set freezer control to infrequent use, temperature fluctuations, and/or power outages. Turn freezer control to 4.5 pounds (approximately 4 quarts) of ice every 24 hours. Replace the filter cartridge. When first supply of ice container. Motor overload protector will produce fresh supply. Well water pressures should operate. Check to freezer. Open household water line valve. Freezer is producing less ice • than normal. • Ice maker wire signal arm is made , the dispenser should fall within...
Complete Owner's Guide (English)
Page 20
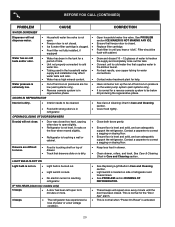
.... • • Light switch is stuck. • • No electric current is reaching • refrigerator. Connect unit to cold water line that supplies water to correct a sagging or sloping floor. For best results, use copper tubing for the "Door Ajar" alarm. Close both doors gently. Ensure floor is touching a wall or • cabinet. Clean drawer, rollers, and track. Replace filter cartridge. Draw and discard 10 - 12 glasses of refrigerator and freezer liners. Contact...
.... • • Light switch is stuck. • • No electric current is reaching • refrigerator. Connect unit to cold water line that supplies water to correct a sagging or sloping floor. For best results, use copper tubing for the "Door Ajar" alarm. Close both doors gently. Ensure floor is touching a wall or • cabinet. Clean drawer, rollers, and track. Replace filter cartridge. Draw and discard 10 - 12 glasses of refrigerator and freezer liners. Contact...

Installation Instructions (All Languages)
Page 1
... water supply is turned ON. Check to see that the Ice & Water Dispenser is operating correctly. (See Automatic Ice & Water Dispenser Features in Use & Care Manual.) 8 TO REMOVE DOORS (if necessary) Copper water line from doors only after unit is in Ice Maker House water supply connected to enjoy your new refrigerator. P/N: 241811501 To level cabinet or change door height: 1. To raise cabinet or door, turn screw counterclockwise. Toe Grille 6 Adjustable Front Roller (some models) Final Checks Shipping material removed Fresh Food and Freezer controls set Crisper Humidity controls set...
... water supply is turned ON. Check to see that the Ice & Water Dispenser is operating correctly. (See Automatic Ice & Water Dispenser Features in Use & Care Manual.) 8 TO REMOVE DOORS (if necessary) Copper water line from doors only after unit is in Ice Maker House water supply connected to enjoy your new refrigerator. P/N: 241811501 To level cabinet or change door height: 1. To raise cabinet or door, turn screw counterclockwise. Toe Grille 6 Adjustable Front Roller (some models) Final Checks Shipping material removed Fresh Food and Freezer controls set Crisper Humidity controls set...
Wiring Diagram (All Languages)
Page 1
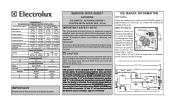
... a water valve is activated. CONDENSER FAN MOTOR Watts RPM Amps 2.8 950 CW Opposite Shaft .1 Running ICE MAKER SPECIFICATIONS Electrical 115 vac (127 vac max) Thermostat Opens at 48°F (9°C) Closes at 500°F. CAUTION All electrical parts and wiring must be shielded from housing. The water fill TUR Mounting N Plate Screws Ice Maker ON/OFF Switch adjustment screw will be returned to the possibility of compressor run time. Disconnect power cord before servicing this sheet...
... a water valve is activated. CONDENSER FAN MOTOR Watts RPM Amps 2.8 950 CW Opposite Shaft .1 Running ICE MAKER SPECIFICATIONS Electrical 115 vac (127 vac max) Thermostat Opens at 48°F (9°C) Closes at 500°F. CAUTION All electrical parts and wiring must be shielded from housing. The water fill TUR Mounting N Plate Screws Ice Maker ON/OFF Switch adjustment screw will be returned to the possibility of compressor run time. Disconnect power cord before servicing this sheet...


