Use and Care Manual
Page 1
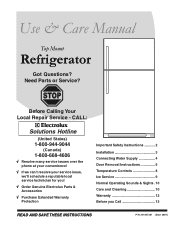
... Call 13 READ AND SAVE THESE INSTRUCTIONS P/N 241857201 (Sept 2007) Need Parts or Service? Before Calling Your Local Repair Service - Use & Care Manual Top Mount Refrigerator Got Questions?
... Call 13 READ AND SAVE THESE INSTRUCTIONS P/N 241857201 (Sept 2007) Need Parts or Service? Before Calling Your Local Repair Service - Use & Care Manual Top Mount Refrigerator Got Questions?
Use and Care Manual
Page 2
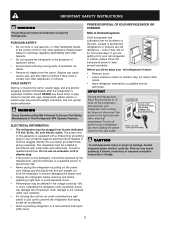
...cord of automatic ice maker. • Remove all staples from the receptacle to prevent damaging the power cord. • Unplug the refrigerator before cleaning and before replacing a light bulb to avoid electrical shock. • Performance may break suddenly if nicked, scratched, or exposed.... Shelves may be plugged directly into a properly grounded threeprong receptacle. IMPORTANT SAFETY INSTRUCTIONS WARNING Please Read All Instructions Before Using This Refrigerator. FOR YOUR SAFETY • Do not store or use these items to a Ground Fault Interruptor (GFI) circuit. WARNING These ...
...cord of automatic ice maker. • Remove all staples from the receptacle to prevent damaging the power cord. • Unplug the refrigerator before cleaning and before replacing a light bulb to avoid electrical shock. • Performance may break suddenly if nicked, scratched, or exposed.... Shelves may be plugged directly into a properly grounded threeprong receptacle. IMPORTANT SAFETY INSTRUCTIONS WARNING Please Read All Instructions Before Using This Refrigerator. FOR YOUR SAFETY • Do not store or use these items to a Ground Fault Interruptor (GFI) circuit. WARNING These ...
Use and Care Manual
Page 3
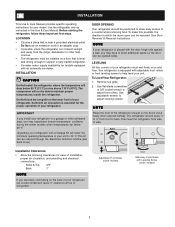
...grille on a floor that is level and strong enough to a counter when removing food. Use adjustable wrench to help level your refrigerator. Installation Clearances • Allow the following clearances for ease of your model. The compressor will lower the minimum operating temperature of ... when temperatures dip below 55°F (13°C) or rise above 110°F (43°C). Before starting the refrigerator, follow these important first steps. INSTALLATION This Use & Care Manual provides specific operating instructions for your unit to maintain proper temperatures ...
...grille on a floor that is level and strong enough to a counter when removing food. Use adjustable wrench to help level your refrigerator. Installation Clearances • Allow the following clearances for ease of your model. The compressor will lower the minimum operating temperature of ... when temperatures dip below 55°F (13°C) or rise above 110°F (43°C). Before starting the refrigerator, follow these important first steps. INSTALLATION This Use & Care Manual provides specific operating instructions for your unit to maintain proper temperatures ...
Use and Care Manual
Page 4
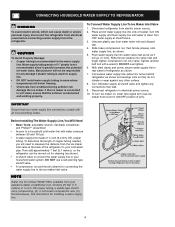
..., ensure that your water supply line connections comply with all local plumbing codes. Then add approximately 7 feet (2.1 meters), so the refrigerator can be responsible for connecting the water supply line to electrical power source. 10. DO NOT use a self-piercing type shutoff valve.... • A compression nut and ferrule (sleeve) for any damage if plastic tubing is maintained and working properly. Disconnect refrigerator from electrical power before connecting a water supply line to your household water system. Slide ferrule (sleeve) into sink or bucket. ...
..., ensure that your water supply line connections comply with all local plumbing codes. Then add approximately 7 feet (2.1 meters), so the refrigerator can be responsible for connecting the water supply line to electrical power source. 10. DO NOT use a self-piercing type shutoff valve.... • A compression nut and ferrule (sleeve) for any damage if plastic tubing is maintained and working properly. Disconnect refrigerator from electrical power before connecting a water supply line to your household water system. Slide ferrule (sleeve) into sink or bucket. ...
Use and Care Manual
Page 5
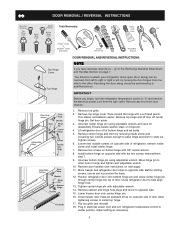
...door aside. 3. Remove center hinge and shim by removing inside screw and install center hinge. 7. Move freezer and refrigerator door stops to opposite side. 15. Position refrigerator door onto bottom hinge pin and screw center hinge pin through center hinge into top of door while tightening screws .... Tighten center hinge pin with adjustable wrench. 10. Remove cabinet and hinge hole plugs and move to opposite side. Plug in which your refrigerator doors open (door swing) can be performed by moving the door hinges from door shelves. 1. go to "0" and remove the electrical power...
...door aside. 3. Remove center hinge and shim by removing inside screw and install center hinge. 7. Move freezer and refrigerator door stops to opposite side. 15. Position refrigerator door onto bottom hinge pin and screw center hinge pin through center hinge into top of door while tightening screws .... Tighten center hinge pin with adjustable wrench. 10. Remove cabinet and hinge hole plugs and move to opposite side. Plug in which your refrigerator doors open (door swing) can be performed by moving the door hinges from door shelves. 1. go to "0" and remove the electrical power...
Use and Care Manual
Page 6
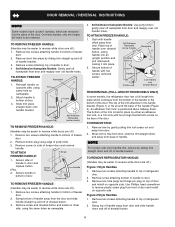
...of door and install on opposite side, using the same holes as nameplate. 2. TO ATTACH FREEZER HANDLE: 1. Self Adhesive Nameplate (some models, the refrigerator door has a full length trim piece which are off.) Figure 1 Style Handles 1. The top of the trim attaches to bottom of the door.... Secure side of handle to bottom of the door. Self-Adhesive Nameplate Models: Use putty knife to reverse while doors are off.) 1. TO REMOVE REFRIGERATOR HANDLE: (Handles may be easier to gently peel off of freezer door. 2. On these models, only the hinges will need to door. 4. ...
...of door and install on opposite side, using the same holes as nameplate. 2. TO ATTACH FREEZER HANDLE: 1. Self Adhesive Nameplate (some models, the refrigerator door has a full length trim piece which are off.) Figure 1 Style Handles 1. The top of the trim attaches to bottom of the door.... Secure side of handle to bottom of the door. Self-Adhesive Nameplate Models: Use putty knife to reverse while doors are off.) 1. TO REMOVE REFRIGERATOR HANDLE: (Handles may be easier to gently peel off of freezer door. 2. On these models, only the hinges will need to door. 4. ...
Use and Care Manual
Page 7
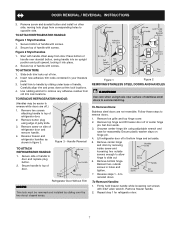
...screws. 2. Ensure plastic washer stays on other side, moving hole plugs from door. Remove bottom hinge. Remove freezer handle. 2. TO ATTACH REFRIGERATOR HANDLE: Figure 1 Style Handles 1. Figure 3 - Remove toe grille and top hinge cover. 2. Remove center hinge and shim by removing ...Use care when using tools near surface of center hinge pin. TO ATTACH TRIM: 1. Repeat step 1 for reassembly. Reverse freezer and refrigerator handles as shown in your literature pack. 3. To Remove Doors Stainless steel doors are off.) 1. DOOR REMOVAL / REVERSAL INSTRUCTIONS 3. ...
...screws. 2. Ensure plastic washer stays on other side, moving hole plugs from door. Remove bottom hinge. Remove freezer handle. 2. TO ATTACH REFRIGERATOR HANDLE: Figure 1 Style Handles 1. Figure 3 - Remove toe grille and top hinge cover. 2. Remove center hinge and shim by removing ...Use care when using tools near surface of center hinge pin. TO ATTACH TRIM: 1. Repeat step 1 for reassembly. Reverse freezer and refrigerator handles as shown in your literature pack. 3. To Remove Doors Stainless steel doors are off.) 1. DOOR REMOVAL / REVERSAL INSTRUCTIONS 3. ...
Use and Care Manual
Page 8
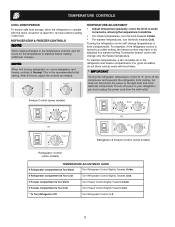
... 24 hours for at least 8 to 12 hours before making additional changes. OR TEMPERATURE ADJUSTMENT • Adjust temperature gradually: move refrigerator and freezer controls to Normal. Turning the freezer control will change only the freezer temperature. If Freezer compartment Is Too Warm Turn Freezer... as needed. For good circulation, do not block cold air vents with food items. * IMPORTANT Turning the refrigerator temperature control to "0" turns off power to your refrigerator, you must unplug the power cord from cooling, but does not disconnect the power to a warmer setting. ...
... 24 hours for at least 8 to 12 hours before making additional changes. OR TEMPERATURE ADJUSTMENT • Adjust temperature gradually: move refrigerator and freezer controls to Normal. Turning the freezer control will change only the freezer temperature. If Freezer compartment Is Too Warm Turn Freezer... as needed. For good circulation, do not block cold air vents with food items. * IMPORTANT Turning the refrigerator temperature control to "0" turns off power to your refrigerator, you must unplug the power cord from cooling, but does not disconnect the power to a warmer setting. ...
Use and Care Manual
Page 9
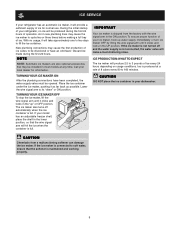
... maker to cycle two or three times before making a full tray of ice. CAUTION Chemicals from the factory with the wire signal arm in your refrigerator, no usage, it as far back as possible. CAUTION DO NOT place the ice container in the ON position. ICE SERVICE If your... refrigerator has an automatic ice maker, it will produce 2.5 to 3 pounds of ice every 24 hours depending on usage conditions. Air in the UP position. TURNING ...
... maker to cycle two or three times before making a full tray of ice. CAUTION Chemicals from the factory with the wire signal arm in your refrigerator, no usage, it as far back as possible. CAUTION DO NOT place the ice container in the ON position. ICE SERVICE If your... refrigerator has an automatic ice maker, it will produce 2.5 to 3 pounds of ice every 24 hours depending on usage conditions. Air in the UP position. TURNING ...
Use and Care Manual
Page 10
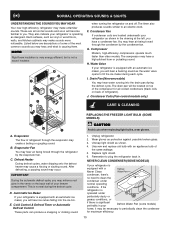
...Fan-cooled models only) CARE & CLEANING A. Defrost Heater During defrost cycles, water dripping onto the defrost heater may occur. E. Unplug refrigerator. 2. Unscrew and replace old bulb with an automatic ice maker, you will become familiar to fill the ice maker during each cycle... such as shown. 4. Condenser Fan If condenser coils are descriptions of some models) home, it may be located on back of your refrigerator is causing them. B. Remember to an electric clock. Evaporator The flow of the same wattage. 5. Evaporator Fan You may make unfamiliar ...
...Fan-cooled models only) CARE & CLEANING A. Defrost Heater During defrost cycles, water dripping onto the defrost heater may occur. E. Unplug refrigerator. 2. Unscrew and replace old bulb with an automatic ice maker, you will become familiar to fill the ice maker during each cycle... such as shown. 4. Condenser Fan If condenser coils are descriptions of some models) home, it may be located on back of your refrigerator is causing them. B. Remember to an electric clock. Evaporator The flow of the same wattage. 5. Evaporator Fan You may make unfamiliar ...
Use and Care Manual
Page 11
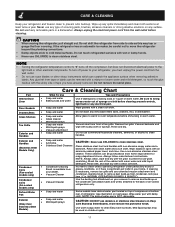
... Soap and water • Ammonia CAUTION: Never use any electrical part. Always follow manufacturer's instructions. NOTE • Turning the refrigerator temperature control to "0" turns off power to your vacuum to clean stainless steel. (Stainless Steel • Stainless Steel Cleaners Clean stainless...(Fan-cooled models only) • Condenser Cleaning Brush is available from tape or labels can be careful not to move the refrigerator beyond the plumbing connections. • Damp objects stick to room temperature before immersing in dishwasher. Do not wash any surface....
... Soap and water • Ammonia CAUTION: Never use any electrical part. Always follow manufacturer's instructions. NOTE • Turning the refrigerator temperature control to "0" turns off power to your vacuum to clean stainless steel. (Stainless Steel • Stainless Steel Cleaners Clean stainless...(Fan-cooled models only) • Condenser Cleaning Brush is available from tape or labels can be careful not to move the refrigerator beyond the plumbing connections. • Damp objects stick to room temperature before immersing in dishwasher. Do not wash any surface....
Use and Care Manual
Page 12
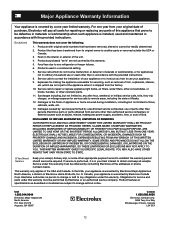
... floors, cabinets, walls, etc. 13. This warranty only applies in your appliance is warranted by unauthorized service companies; Surcharges including, but not limited to , any refrigerator or freezer failures. 6. CLAIMS BASED ON IMPLIED WARRANTIES, INCLUDING WARRANTIES OF MERCHANTABILITY OR FITNESS FOR A PARTICULAR PURPOSE, ARE LIMITED TO ONE YEAR OR THE SHORTEST...
... floors, cabinets, walls, etc. 13. This warranty only applies in your appliance is warranted by unauthorized service companies; Surcharges including, but not limited to , any refrigerator or freezer failures. 6. CLAIMS BASED ON IMPLIED WARRANTIES, INCLUDING WARRANTIES OF MERCHANTABILITY OR FITNESS FOR A PARTICULAR PURPOSE, ARE LIMITED TO ONE YEAR OR THE SHORTEST...
Use and Care Manual
Page 13
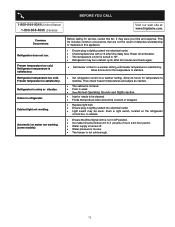
... not the result of ice in this list. Odors in defrost cycle. Freezer temperature too cold. It may be in refrigerator. Freezer temperature is noisy or vibrates. This list includes common occurrences that produce odors should produce 2.5 to a warmer setting... 1-800-944-9044 (United States) 1-800-668-4606 (Canada) Visit our web site at www.frigidaire.com. Common Occurrences Refrigerator does not run. Refrigerator temperature too cold. Refrigerator is satisfactory. Reset circuit breaker. • The temperature control is tightly pushed into electrical outlet. •...
... not the result of ice in this list. Odors in defrost cycle. Freezer temperature too cold. It may be in refrigerator. Freezer temperature is noisy or vibrates. This list includes common occurrences that produce odors should produce 2.5 to a warmer setting... 1-800-944-9044 (United States) 1-800-668-4606 (Canada) Visit our web site at www.frigidaire.com. Common Occurrences Refrigerator does not run. Refrigerator temperature too cold. Refrigerator is satisfactory. Reset circuit breaker. • The temperature control is tightly pushed into electrical outlet. •...


