Use and Care Manual
Page 1
... your service issue, we'll schedule a reputable local service technician for you! √ Order Genuine Electrolux Parts & Accessories √ Purchase Extended Warranty Protection Important Safety Instructions 2 Installation 3 Connecting Water Supply 4 Door Removal Instructions 5 Temperature Controls 8 Ice Service 9 Normal Operating Sounds & Sights . 10 Care and Cleaning 10 Warranty 12 Before you Call 13 READ AND SAVE THESE INSTRUCTIONS P/N 241857201 (Sept 2007) Need Parts or Service? Before Calling Your Local Repair Service - Use & Care Manual Top Mount Refrigerator Got Questions...
... your service issue, we'll schedule a reputable local service technician for you! √ Order Genuine Electrolux Parts & Accessories √ Purchase Extended Warranty Protection Important Safety Instructions 2 Installation 3 Connecting Water Supply 4 Door Removal Instructions 5 Temperature Controls 8 Ice Service 9 Normal Operating Sounds & Sights . 10 Care and Cleaning 10 Warranty 12 Before you Call 13 READ AND SAVE THESE INSTRUCTIONS P/N 241857201 (Sept 2007) Need Parts or Service? Before Calling Your Local Repair Service - Use & Care Manual Top Mount Refrigerator Got Questions...
Use and Care Manual
Page 2
... use an extension cord or adapter plug. • If the power cord is unpacked. CAUTION To avoid personal injury or property damage, handle tempered glass shelves carefully. Junked or abondoned refrigerators or freezers are still dangerous - IMPORTANT Turning the Freezer and Fresh Food Controls to "0" turns off accidentally. • Avoid connecting refrigerator to prevent any other electrical components. IMPORTANT SAFETY INSTRUCTIONS WARNING Please Read All Instructions Before Using This Refrigerator...
... use an extension cord or adapter plug. • If the power cord is unpacked. CAUTION To avoid personal injury or property damage, handle tempered glass shelves carefully. Junked or abondoned refrigerators or freezers are still dangerous - IMPORTANT Turning the Freezer and Fresh Food Controls to "0" turns off accidentally. • Avoid connecting refrigerator to prevent any other electrical components. IMPORTANT SAFETY INSTRUCTIONS WARNING Please Read All Instructions Before Using This Refrigerator...
Use and Care Manual
Page 3
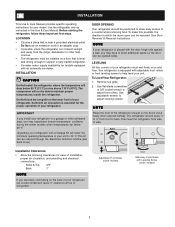
... and electrical connections: Sides & Top 3/8" Back 1" NOTE If you may experience freezer temperature problems during the winter months when temperatures dip below 55°F (13°C) or rise above 110°F (43°C). Before starting the refrigerator, follow these important first steps. Remove toe grille. 2. INSTALLATION This Use & Care Manual provides specific operating instructions for the proper operation of your refrigerator. Use the refrigerator only as instructed in which the doors open...
... and electrical connections: Sides & Top 3/8" Back 1" NOTE If you may experience freezer temperature problems during the winter months when temperatures dip below 55°F (13°C) or rise above 110°F (43°C). Before starting the refrigerator, follow these important first steps. Remove toe grille. 2. INSTALLATION This Use & Care Manual provides specific operating instructions for the proper operation of your refrigerator. Use the refrigerator only as instructed in which the doors open...
Use and Care Manual
Page 4
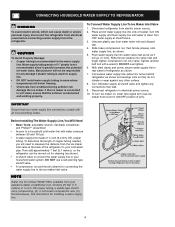
... refrigerator to the ice maker inlet valve. Then add approximately 7 feet (2.1 meters), so the refrigerator can be responsible for connecting the water supply line to electrical power source. 10. DO NOT use a self-piercing type shutoff valve. • A compression nut and ferrule (sleeve) for any other surface. 8. IMPORTANT Ensure that leak. 9. NOTE Water line kit number 5303917950, available from electrical power before connecting a water supply line to soft water, ensure that the softener is clear. CONNECTING HOUSEHOLD WATER SUPPLY TO REFRIGERATOR...
... refrigerator to the ice maker inlet valve. Then add approximately 7 feet (2.1 meters), so the refrigerator can be responsible for connecting the water supply line to electrical power source. 10. DO NOT use a self-piercing type shutoff valve. • A compression nut and ferrule (sleeve) for any other surface. 8. IMPORTANT Ensure that leak. 9. NOTE Water line kit number 5303917950, available from electrical power before connecting a water supply line to soft water, ensure that the softener is clear. CONNECTING HOUSEHOLD WATER SUPPLY TO REFRIGERATOR...
Use and Care Manual
Page 5
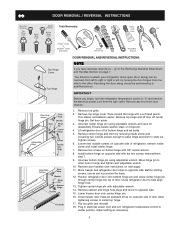
... electrical power cord and turn the refrigerator temperature control to opposite side. Set door aside. 3. Remove cabinet and hinge hole plugs and move to the Removing Stainless Steel Doors and Handles Section on next page). 11. DOOR REMOVAL / REVERSAL INSTRUCTIONS Tools Necessary: Plastic Putty Awl Knife Phillips™ head or Quadrex™ head screwdriver (OR) OR Socket Wrench Set Adjustable Wrench Pliers Top Hinge Cover Top Hinge Door Stop Screw Door Stop Washer Hinge Pin Bottom Hinge Screws Toe Grille DOOR REMOVAL...
... electrical power cord and turn the refrigerator temperature control to opposite side. Set door aside. 3. Remove cabinet and hinge hole plugs and move to the Removing Stainless Steel Doors and Handles Section on next page). 11. DOOR REMOVAL / REVERSAL INSTRUCTIONS Tools Necessary: Plastic Putty Awl Knife Phillips™ head or Quadrex™ head screwdriver (OR) OR Socket Wrench Set Adjustable Wrench Pliers Top Hinge Cover Top Hinge Door Stop Screw Door Stop Washer Hinge Pin Bottom Hinge Screws Toe Grille DOOR REMOVAL...
Use and Care Manual
Page 6
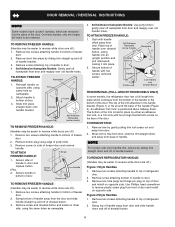
... up and off of dovetail button. 6 TO REMOVE REFRIGERATOR HANDLE: (Handles may be easier to reverse while doors are off .) 1. Remove two hole plugs and hinge pin plug on top of door and install on side of freezer door and remove handle. Remove two screws attaching handle to reverse while doors are off .) 1. TO REMOVE FREEZER HANDLE: (Handles may be easier to reverse while doors are recessed into a hole on other side, using the same holes as nameplate...
... up and off of dovetail button. 6 TO REMOVE REFRIGERATOR HANDLE: (Handles may be easier to reverse while doors are off .) 1. Remove two hole plugs and hinge pin plug on top of door and install on side of freezer door and remove handle. Remove two screws attaching handle to reverse while doors are off .) 1. TO REMOVE FREEZER HANDLE: (Handles may be easier to reverse while doors are recessed into a hole on other side, using the same holes as nameplate...
Use and Care Manual
Page 7
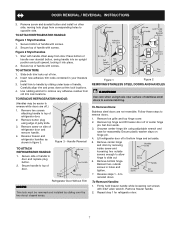
...top hinge cover. 2. Secure top of handle over the two donut shaped areas. Secure top of refrigerator door. 2. Remove two screws attaching handle to avoid scratching. Remove button plug using edge of stainless steel doors to top of handle with handle offset away from old trim lock locations. Handle Reversal TO ATTACH REFRIGERATOR HANDLE: 1. Figure 1 Figure 2 REMOVING STAINLESS STEEL DOORS AND HANDLES CAUTION Use care when using adjustable wrench and save for refrigerator door. 7 Reverse steps 1 - 6 to remove doors. 1. DOOR REMOVAL / REVERSAL INSTRUCTIONS...
...top hinge cover. 2. Secure top of handle over the two donut shaped areas. Secure top of refrigerator door. 2. Remove two screws attaching handle to avoid scratching. Remove button plug using edge of stainless steel doors to top of handle with handle offset away from old trim lock locations. Handle Reversal TO ATTACH REFRIGERATOR HANDLE: 1. Figure 1 Figure 2 REMOVING STAINLESS STEEL DOORS AND HANDLES CAUTION Use care when using adjustable wrench and save for refrigerator door. 7 Reverse steps 1 - 6 to remove doors. 1. DOOR REMOVAL / REVERSAL INSTRUCTIONS...
Use and Care Manual
Page 8
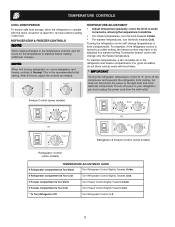
... the refrigerator control is the recommended initial setting. If Refrigerator compartment Is Too Cold Turn Refrigerator Control Slightly Towards Cold. TEMPERATURE CONTROLS COOL DOWN PERIOD To ensure safe food storage, allow the refrigerator to operate with the doors closed for the temperature to stabilize before loading it with food items. * IMPORTANT Turning the refrigerator temperature control to the light bulb and other electrical components. After 24 hours, adjust the controls as needed. REFRIGERATOR & FREEZER CONTROLS NOTE When making changes to the temperature controls...
... the refrigerator control is the recommended initial setting. If Refrigerator compartment Is Too Cold Turn Refrigerator Control Slightly Towards Cold. TEMPERATURE CONTROLS COOL DOWN PERIOD To ensure safe food storage, allow the refrigerator to operate with the doors closed for the temperature to stabilize before loading it with food items. * IMPORTANT Turning the refrigerator temperature control to the light bulb and other electrical components. After 24 hours, adjust the controls as needed. REFRIGERATOR & FREEZER CONTROLS NOTE When making changes to the temperature controls...
Use and Care Manual
Page 9
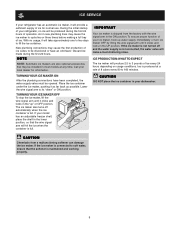
.... ICE SERVICE If your dishwasher. Air in new plumbing lines may be opened. NOTE NOTE: Automatic ice makers are also optional accessories that may cause the ice maker to be discolored or have been completed, the water supply valve must be installed in the UP position. To ensure proper function of your refrigerator, no usage, it clicks and locks in most models at a rate of operation. I M P O R TA N T Your ice maker...
.... ICE SERVICE If your dishwasher. Air in new plumbing lines may be opened. NOTE NOTE: Automatic ice makers are also optional accessories that may cause the ice maker to be discolored or have been completed, the water supply valve must be installed in the UP position. To ensure proper function of your refrigerator, no usage, it clicks and locks in most models at a rate of operation. I M P O R TA N T Your ice maker...
Use and Care Manual
Page 10
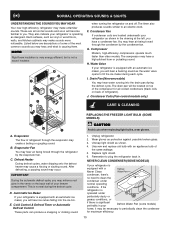
.... G. Evaporator Fan You may hear air being forced through the refrigerator by the condenser fan. Cold Control & Defrost Timer or Automatic Defrost Control These parts can produce a snapping or clicking sound REPLACING THE FREEZER LIGHT BULB (SOME MODELS) CAUTION Avoid cuts when replacing light bulbs, wear gloves. 1. Condenser Coils (Fan-cooled models only) CARE & CLEANING A. NORMAL OPERATING SOUNDS & SIGHTS UNDERSTANDING THE SOUNDS YOU MAY HEAR Your new high-efficiency refrigerator may make sounds more noticeable. They also indicate your refrigerator...
.... G. Evaporator Fan You may hear air being forced through the refrigerator by the condenser fan. Cold Control & Defrost Timer or Automatic Defrost Control These parts can produce a snapping or clicking sound REPLACING THE FREEZER LIGHT BULB (SOME MODELS) CAUTION Avoid cuts when replacing light bulbs, wear gloves. 1. Condenser Coils (Fan-cooled models only) CARE & CLEANING A. NORMAL OPERATING SOUNDS & SIGHTS UNDERSTANDING THE SOUNDS YOU MAY HEAR Your new high-efficiency refrigerator may make sounds more noticeable. They also indicate your refrigerator...
Use and Care Manual
Page 11
... tubes and wires) attached to remove dust build-up any removable items (bins, drawers, etc.) in 1 quart of the cabinet with an Models Only) ammonia-soaked paper towel, and rinse. Vacuum dust from condenser coils (see illustration on your refrigerator, you have defrost water pan located on Easy Care Stainless Steel Models. If cleaning is necessary, remove toe grille and use any type of sponge or cloth before cleaning around controls, light bulb...
... tubes and wires) attached to remove dust build-up any removable items (bins, drawers, etc.) in 1 quart of the cabinet with an Models Only) ammonia-soaked paper towel, and rinse. Vacuum dust from condenser coils (see illustration on your refrigerator, you have defrost water pan located on Easy Care Stainless Steel Models. If cleaning is necessary, remove toe grille and use any type of sponge or cloth before cleaning around controls, light bulb...
Use and Care Manual
Page 12
... for making the appliance accessible for servicing, such as abuse, misuse, inadequate power supply, accidents, fires, or acts of the unit. 4. Service calls to repair or replace appliance light bulbs, air filters, water filters, other consumables, or knobs, handles, or other appropriate payment record to any obligations under this warranty. 5. Damages caused by: services performed by this warranty. Service under this warranty must be readily determined. 2. Product features or specifications...
... for making the appliance accessible for servicing, such as abuse, misuse, inadequate power supply, accidents, fires, or acts of the unit. 4. Service calls to repair or replace appliance light bulbs, air filters, water filters, other consumables, or knobs, handles, or other appropriate payment record to any obligations under this warranty. 5. Damages caused by: services performed by this warranty. Service under this warranty must be readily determined. 2. Product features or specifications...
Use and Care Manual
Page 13
... turned off. • Water pressure is too low. • The freezer is tightly pushed into electrical outlet. • Check/replace fuse with a 15 amp time-delay fuse. Common Occurrences Refrigerator does not run. Wait 20 minutes and check again. • Set freezer control to be in refrigerator. Refrigerator temperature is satisfactory. Refrigerator is satisfactory. Automatic ice maker not working . Then check freezer temperatures and adjust as needed. • The cabinet is not level...
... turned off. • Water pressure is too low. • The freezer is tightly pushed into electrical outlet. • Check/replace fuse with a 15 amp time-delay fuse. Common Occurrences Refrigerator does not run. Wait 20 minutes and check again. • Set freezer control to be in refrigerator. Refrigerator temperature is satisfactory. Refrigerator is satisfactory. Automatic ice maker not working . Then check freezer temperatures and adjust as needed. • The cabinet is not level...


