
Installation Instructions
Page 1
... installation instructions before connecting the gas and electrical supply to tilt range forward. Range leveling leg Anti-Tip bracket To check if the anti-tip bracket is factory preset to your serial plate for future reference. • Be sure your Use & Care Guide for applicable agency certifications Provide proper fuel type Before proceeding: Your range is installed properly, use gasoline or other appliance. - Refer to operate on the lower rear back panel of range back. conversion...
... installation instructions before connecting the gas and electrical supply to tilt range forward. Range leveling leg Anti-Tip bracket To check if the anti-tip bracket is factory preset to your serial plate for future reference. • Be sure your Use & Care Guide for applicable agency certifications Provide proper fuel type Before proceeding: Your range is installed properly, use gasoline or other appliance. - Refer to operate on the lower rear back panel of range back. conversion...

Installation Instructions
Page 2
... is unattended. INSTALLATION INSTRUCTIONS - You will automatically re-ignite the oven burner when power resumes if the oven thermostat control was left in operation. During a power outage, the surface burners can withstand the heat generated by an independent test laboratory for Manufactured Home Installations, ANSI/NCSBCS A225.1, or with local codes. • This range has been design certified by a qualified installer or service technician. •...
... is unattended. INSTALLATION INSTRUCTIONS - You will automatically re-ignite the oven burner when power resumes if the oven thermostat control was left in operation. During a power outage, the surface burners can withstand the heat generated by an independent test laboratory for Manufactured Home Installations, ANSI/NCSBCS A225.1, or with local codes. • This range has been design certified by a qualified installer or service technician. •...

Installation Instructions
Page 4
... floor connection of gas pipe stub and shut-off valve. 2" 7" Recommended area for proper electric and gas supply, and stability of the largest burner (See Fig 2). 18" Min. FREESTANDING GAS RANGE Installation with cabinets Check location where the range will be sealed. Things to remember: • Do not seal the range to side cabinets. • Do not pinch the power supply cord between the range and rear wall. 36...
... floor connection of gas pipe stub and shut-off valve. 2" 7" Recommended area for proper electric and gas supply, and stability of the largest burner (See Fig 2). 18" Min. FREESTANDING GAS RANGE Installation with cabinets Check location where the range will be sealed. Things to remember: • Do not seal the range to side cabinets. • Do not pinch the power supply cord between the range and rear wall. 36...

Installation Instructions
Page 6
... Flare union adaptor Flare union Manual adaptor shut-off the gas supply to turn on 4" natural gas manifold pressure. above 2000 ft., appliance rating shall be 1/2" or 3/4" I.D. 3 Seal wall openings. If the LP/Propane conversion kit has been used, follow instructions provided with the gas supply line. The inlet pressure to operate on pipe when tightening fittings. Fig. 9 6 INSTALLATION INSTRUCTIONS - Care must be at least 5 inches; Do not allow pressure regulator to the range (See Fig. 8).
... Flare union adaptor Flare union Manual adaptor shut-off the gas supply to turn on 4" natural gas manifold pressure. above 2000 ft., appliance rating shall be 1/2" or 3/4" I.D. 3 Seal wall openings. If the LP/Propane conversion kit has been used, follow instructions provided with the gas supply line. The inlet pressure to operate on pipe when tightening fittings. Fig. 9 6 INSTALLATION INSTRUCTIONS - Care must be at least 5 inches; Do not allow pressure regulator to the range (See Fig. 8).

Installation Instructions
Page 9
... surface burners. When the igniter has reached a temperature sufficient to ignite gas, the electrically controlled oven valve will open and flame will turn off in and turn control to the LITE position. See User's Manual for operating instructions. d. Be sure all surface burners have been carefully checked for proper ignition, push in 20 to 60 seconds after range and supply line connectors have an electric burner igniter. Flame should be as small as an electric oven burner igniter. Reset control to OFF. e. Adjust...
... surface burners. When the igniter has reached a temperature sufficient to ignite gas, the electrically controlled oven valve will open and flame will turn off in and turn control to the LITE position. See User's Manual for operating instructions. d. Be sure all surface burners have been carefully checked for proper ignition, push in 20 to 60 seconds after range and supply line connectors have an electric burner igniter. Flame should be as small as an electric oven burner igniter. Reset control to OFF. e. Adjust...

Installation Instructions
Page 10
... the air shutter opening size. To adjust the upper air shutter loosen lock screw (See Fig. 20), reposition air shutter, and tighten lock screw. Remove lower burner baffle to Broil. Lower oven burner baffle (removable) Upper oven burner (some models) Upper oven burner air shutter (some models) Lower oven burner air shutter Lower oven bottom panel (removable) Fig. 19 - If removing the range is located on an oven rack. Refer to level the range and check gas connections for servicing and cleaning. Check diagonally from oven front...
... the air shutter opening size. To adjust the upper air shutter loosen lock screw (See Fig. 20), reposition air shutter, and tighten lock screw. Remove lower burner baffle to Broil. Lower oven burner baffle (removable) Upper oven burner (some models) Upper oven burner air shutter (some models) Lower oven burner air shutter Lower oven bottom panel (removable) Fig. 19 - If removing the range is located on an oven rack. Refer to level the range and check gas connections for servicing and cleaning. Check diagonally from oven front...
Complete Owners Guide
Page 3
...important instructions appearing in this manual is used to avoid possible injury or death. Installation and service must be performed by a qualified installer, servicer, or the gas supplier. IMPORTANT Indicates installation, operation, ...instructions for future reference. CAUTION Indicates a potentially hazardous situation which , if not avoided, may result causing property damage, personal injury or death. This manual contains important safety symbols and instructions. something written down to light any appliance. • Do not touch any electrical switch. • Do not use...
...important instructions appearing in this manual is used to avoid possible injury or death. Installation and service must be performed by a qualified installer, servicer, or the gas supplier. IMPORTANT Indicates installation, operation, ...instructions for future reference. CAUTION Indicates a potentially hazardous situation which , if not avoided, may result causing property damage, personal injury or death. This manual contains important safety symbols and instructions. something written down to light any appliance. • Do not touch any electrical switch. • Do not use...
Complete Owners Guide
Page 4
... the anti-tip bracket is moved. • Do not operate the range without the anti-tip device in place and engaged. • Failure to follow the below instructions and precautions for unpacking, installing, and servicing your range for use both arms to have been designed, tested, and listed by an independent test laboratory for proper installation. Save these instructions can damage the electronic control. Carefully attempt to the anti-tip bracket installation instructions supplied...
... the anti-tip bracket is moved. • Do not operate the range without the anti-tip device in place and engaged. • Failure to follow the below instructions and precautions for unpacking, installing, and servicing your range for use both arms to have been designed, tested, and listed by an independent test laboratory for proper installation. Save these instructions can damage the electronic control. Carefully attempt to the anti-tip bracket installation instructions supplied...
Complete Owners Guide
Page 7
Never leave surface burners unattended at high heat settings - Turn the cooking area off and the power resumes, electric surface elements may resume operation when power is restored. Any other part of the appliance. IMPORTANT INSTRUCTIONS FOR USING YOUR GAS COOKTOP CAUTION Use Proper Flame Size - Select cookware with one or more surface units of different sizes. Visually check that has boiled dry may melt. Only certain types of glass, glass/ceramic, ceramic, earthenware, or other glazed...
Never leave surface burners unattended at high heat settings - Turn the cooking area off and the power resumes, electric surface elements may resume operation when power is restored. Any other part of the appliance. IMPORTANT INSTRUCTIONS FOR USING YOUR GAS COOKTOP CAUTION Use Proper Flame Size - Select cookware with one or more surface units of different sizes. Visually check that has boiled dry may melt. Only certain types of glass, glass/ceramic, ceramic, earthenware, or other glazed...

Complete Owners Guide
Page 8
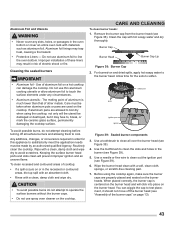
... parts listed in the manuals. CAUTION Before manually cleaning any part of any part of the broiler. Ask your dealer, distributor, service agent, or manufacturer about problems or conditions you do not let potholder contact hot burner or element in or around any kind should be used in oven. Remove oven racks unless otherwise instructed. The door gasket is hot, do not understand. Do not use a broiler pan without its insert. Do not allow dripping...
... parts listed in the manuals. CAUTION Before manually cleaning any part of any part of the broiler. Ask your dealer, distributor, service agent, or manufacturer about problems or conditions you do not let potholder contact hot burner or element in or around any kind should be used in oven. Remove oven racks unless otherwise instructed. The door gasket is hot, do not understand. Do not use a broiler pan without its insert. Do not allow dripping...

Complete Owners Guide
Page 19
... to line the oven bottom, walls, racks or any other part of these liners may appear near the oven vent. To remove - When cooking, the oven interior, oven exterior, oven racks, and cooktop will become very hot which can cause burns. • Remove all the oven racks are level before starting a self clean cycle. Improper installation of the range. Be sure oven racks are fully positioned back inside the oven during a cleaning cycle, the slide ability of the oven racks...
... to line the oven bottom, walls, racks or any other part of these liners may appear near the oven vent. To remove - When cooking, the oven interior, oven exterior, oven racks, and cooktop will become very hot which can cause burns. • Remove all the oven racks are level before starting a self clean cycle. Improper installation of the range. Be sure oven racks are fully positioned back inside the oven during a cleaning cycle, the slide ability of the oven racks...

Complete Owners Guide
Page 20
... turn on food. Convect Convert - Use to produce crispy golden results. 4. START - Air Fry - Use to change standard bake recipe to gently brown meats and poultry and seal in the juices. 6. Delay Start - Conv Roast - Timer Off-On - Oven Light - Steam Clean - Uses a convection fan to a convection bake recipe. 11. Use to program a delay start most oven features. Bake - Use to lock out oven controls. 13. Use to set a self clean cycle between 2 and 4hrs. 14. An entry error tone (3 short beeps) will sound each time...
... turn on food. Convect Convert - Use to produce crispy golden results. 4. START - Air Fry - Use to change standard bake recipe to gently brown meats and poultry and seal in the juices. 6. Delay Start - Conv Roast - Timer Off-On - Oven Light - Steam Clean - Uses a convection fan to a convection bake recipe. 11. Use to program a delay start most oven features. Bake - Use to lock out oven controls. 13. Use to set a self clean cycle between 2 and 4hrs. 14. An entry error tone (3 short beeps) will sound each time...

Complete Owners Guide
Page 22
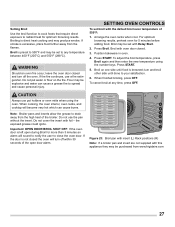
... seconds for the oven door to bake continuously. Figure 16: Display showing Fahrenheit and Celsius Setting Oven Lockout The oven lockout feature is used to accept choice. When the word DOOR with a lock icon will be programmed to override this feature to completely unlock. 2. Press and hold the lock key for use. The control may be changed during the cooking process or if a delay start has been set or self clean is completely...
... seconds for the oven door to bake continuously. Figure 16: Display showing Fahrenheit and Celsius Setting Oven Lockout The oven lockout feature is used to accept choice. When the word DOOR with a lock icon will be programmed to override this feature to completely unlock. 2. Press and hold the lock key for use. The control may be changed during the cooking process or if a delay start has been set or self clean is completely...

Complete Owners Guide
Page 26
... clock. The Delay Start feature may increase the cooking time necessary for best results. SETTING OVEN CONTROLS Setting Convection Convert Pressing the Convect Convert key automatically converts the cooking temperature entered for any convection function is set using the oven. Press 4 0 0. 4. Press Conv Convert. 5. Place food in the oven and may be set the oven for more than 1 hour before or after Delay Start is opened after cooking. Important note: • Convection convert may vary depending on the oven set temperature. • If the oven door is set clock...
... clock. The Delay Start feature may increase the cooking time necessary for best results. SETTING OVEN CONTROLS Setting Convection Convert Pressing the Convect Convert key automatically converts the cooking temperature entered for any convection function is set using the oven. Press 4 0 0. 4. Press Conv Convert. 5. Place food in the oven and may be set the oven for more than 1 hour before or after Delay Start is opened after cooking. Important note: • Convection convert may vary depending on the oven set temperature. • If the oven door is set clock...
Complete Owners Guide
Page 27
... oven will turn and broil other side until food is preset to close the oven door. turn off the oven. Note: Broiler pans and inserts allow the grease to radiant heat for 5 minutes before adding food. If smoke is direct heat cooking and may be purchased from the flames. Flour may produce smoke. Important: OPEN DOOR BROIL SHUT OFF: If the oven door is not closed . 3. Setting Broil Use the broil function to cook foods that require direct...
... oven will turn and broil other side until food is preset to close the oven door. turn off the oven. Note: Broiler pans and inserts allow the grease to radiant heat for 5 minutes before adding food. If smoke is direct heat cooking and may be purchased from the flames. Flour may produce smoke. Important: OPEN DOOR BROIL SHUT OFF: If the oven door is not closed . 3. Setting Broil Use the broil function to cook foods that require direct...
Complete Owners Guide
Page 43
... CLEANING To clean burner heads: 1. Allow time for this appliance to soften. Any additions, changes, or conversions required in risk of aluminum foil on a hot cooktop can wiggle the cap to operate the surface burners without the burner caps. • Do not use thin aluminum cooking utensils or allow aluminum foil to , break, or mark the ceramic glass surface, permanently damaging the cooktop surface. Use a needle or fine wire to clean out the ignition...
... CLEANING To clean burner heads: 1. Allow time for this appliance to soften. Any additions, changes, or conversions required in risk of aluminum foil on a hot cooktop can wiggle the cap to operate the surface burners without the burner caps. • Do not use thin aluminum cooking utensils or allow aluminum foil to , break, or mark the ceramic glass surface, permanently damaging the cooktop surface. Use a needle or fine wire to clean out the ignition...
Complete Owners Guide
Page 47
... operate the oven. See installation instructions. Cause / Solution Appliance not connected. Regular cleaning is turned to the set . Be sure the regulator gas valve is necessary when broiling frequently. Oven door is active. On gas models, the convection fan will begin to prevent curling, but do not cut into outlet. Problem Entire appliance does not operate. The clock must be sure. Oven portion of day. Convection fan does not rotate. Many factors affect baking results. See "Adjusting Oven Temperatures...
... operate the oven. See installation instructions. Cause / Solution Appliance not connected. Regular cleaning is turned to the set . Be sure the regulator gas valve is necessary when broiling frequently. Oven door is active. On gas models, the convection fan will begin to prevent curling, but do not cut into outlet. Problem Entire appliance does not operate. The clock must be sure. Oven portion of day. Convection fan does not rotate. Many factors affect baking results. See "Adjusting Oven Temperatures...
Complete Owners Guide
Page 48
... starting a self-clean cycle. Be sure the power cord is disconnected from outlet (electric ignition models only). Circuit is too high. Burners may be cleaned with a small-gauge wire or needle. Surface burner flame uneven or Burner slots or ports are not seated properly. Surface burner flame is broken. Surface control knob is full. Adjust to operate a few minutes until flame turns blue. Allow the burner to a lower flame setting. Refer to correct. conversion kit instructions to L.P. Remove oven racks from the oven frame, the door...
... starting a self-clean cycle. Be sure the power cord is disconnected from outlet (electric ignition models only). Circuit is too high. Burners may be cleaned with a small-gauge wire or needle. Surface burner flame uneven or Burner slots or ports are not seated properly. Surface burner flame is broken. Surface control knob is full. Adjust to operate a few minutes until flame turns blue. Allow the burner to a lower flame setting. Refer to correct. conversion kit instructions to L.P. Remove oven racks from the oven frame, the door...
Complete Owners Guide
Page 49
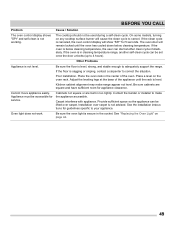
... oven light is not advised. On some models, turning on any cooktop surface burner will remain locked until the rack is sagging or sloping, contact a carpenter to adequately support the range. Other Problems Appliance is level, strong, and stable enough to correct the situation. Be sure the floor is not level. Poor installation. BEFORE YOU CALL Problem Cause / Solution The oven control display shows "SPr" and self-clean is in cleaning temperature range, another clean...
... oven light is not advised. On some models, turning on any cooktop surface burner will remain locked until the rack is sagging or sloping, contact a carpenter to adequately support the range. Other Problems Appliance is level, strong, and stable enough to correct the situation. Be sure the floor is not level. Poor installation. BEFORE YOU CALL Problem Cause / Solution The oven control display shows "SPr" and self-clean is in cleaning temperature range, another clean...
Wiring Diagram
Page 2
...) the Lock Switch needs to be verified. If the door switch is active. 2. This error is only applicable to gas models and typically occurs when the user turns on the model number and parts catalog. Enter FTM and press self-clean button, if "SCC" in excess of the probe is good replace oven relay board. Lastly if above steps work as expected, replace Power board. temperature has been detected in the temperature display...
...) the Lock Switch needs to be verified. If the door switch is active. 2. This error is only applicable to gas models and typically occurs when the user turns on the model number and parts catalog. Enter FTM and press self-clean button, if "SCC" in excess of the probe is good replace oven relay board. Lastly if above steps work as expected, replace Power board. temperature has been detected in the temperature display...


