
Wiring Diagram (All Languages)
Page 2
BLUE FREEZER LIGHT SWITCH NOTE DENOTES NOT ON ALL MODELS. REFRIGERATOR COMPARTMENT DEFROST TIMER BROWN ORANGE RED LT. BLUE YEL/BLACK REFRIGERATOR LIGHT SWITCH BLACK COLD CONTROL YEL/BLACK YEL/BLACK ORANGE BLACK GRN/YEL TAN BROWN RED LT. BLUE BLACK RED YELLOW SEE ...LT. BLUE YEL/BLACK MIDLEVEL LIGHT LT. BLUE BLACK BLACK GRN/YEL BLUE MACHINE COMPARTMENT LT. BLUE BLACK RED YELLOW LT. BLUE LT. BLUE REFRIGERATOR LIGHT LT. BLUE SPLICE D DIODES TO BE POLARIZED AS SHOWN. TM Dynamic With Optional Water Through The Door Or Mid-level Lighting COMPRESSOR WIRING ...
BLUE FREEZER LIGHT SWITCH NOTE DENOTES NOT ON ALL MODELS. REFRIGERATOR COMPARTMENT DEFROST TIMER BROWN ORANGE RED LT. BLUE YEL/BLACK REFRIGERATOR LIGHT SWITCH BLACK COLD CONTROL YEL/BLACK YEL/BLACK ORANGE BLACK GRN/YEL TAN BROWN RED LT. BLUE BLACK RED YELLOW SEE ...LT. BLUE YEL/BLACK MIDLEVEL LIGHT LT. BLUE BLACK BLACK GRN/YEL BLUE MACHINE COMPARTMENT LT. BLUE BLACK RED YELLOW LT. BLUE LT. BLUE REFRIGERATOR LIGHT LT. BLUE SPLICE D DIODES TO BE POLARIZED AS SHOWN. TM Dynamic With Optional Water Through The Door Or Mid-level Lighting COMPRESSOR WIRING ...

Installation Instructions (All Languages)
Page 1
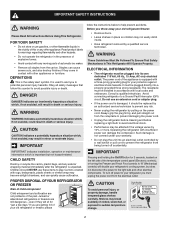
...3/8" socket wrench to adjust leveling screws. Toe Grille NOTE Adjustable Front Roller (some models) Raise the front of your refrigerator must rest firmly on Refrigerator plugged in Ice Maker House water supply connected to register your Use & Care Manual. To be removed by the customer...icemaker OFF if water supply is not recommended. Use adjustable wrench to adjust front rollers. Connecting to your refrigerator. 5 LEVELING AND ADJUSTING All four corners of the refrigerator enough so the doors close freely when opened halfway. recheck in Refer to a reverse osmosis system is ...
...3/8" socket wrench to adjust leveling screws. Toe Grille NOTE Adjustable Front Roller (some models) Raise the front of your refrigerator must rest firmly on Refrigerator plugged in Ice Maker House water supply connected to register your Use & Care Manual. To be removed by the customer...icemaker OFF if water supply is not recommended. Use adjustable wrench to adjust front rollers. Connecting to your refrigerator. 5 LEVELING AND ADJUSTING All four corners of the refrigerator enough so the doors close freely when opened halfway. recheck in Refer to a reverse osmosis system is ...
Complete Owner's Guide (English)
Page 1
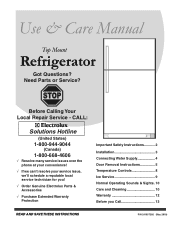
Before Calling Your Local Repair Service - Need Parts or Service? Use & Care Manual Top Mount Refrigerator Got Questions? CALL: Solutions Hotline (United States) 1-800-944-9044 (Canada) 1-800-668-4606 √ Resolve many service issues over the phone at your convenience! &#...
Before Calling Your Local Repair Service - Need Parts or Service? Use & Care Manual Top Mount Refrigerator Got Questions? CALL: Solutions Hotline (United States) 1-800-944-9044 (Canada) 1-800-668-4606 √ Resolve many service issues over the phone at your convenience! &#...
Complete Owner's Guide (English)
Page 2
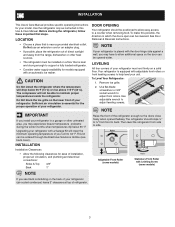
...Shelves may be plugged into a properly grounded three prong receptacle. IMPORTANT follow this or any exterior wrapping material immediately after the refrigerator is damaged, it should never use gasoline, or other flammable liquids in the presence of explosive fumes. • Avoid ...or exposed to help prevent accidents. It is important but does not disconnect the power to "0" (Mechanical controls) will disable your refrigerator or freezer Risk of automatic ice maker. • Remove all safety messages that follow the instructions below to sudden temperature change....
...Shelves may be plugged into a properly grounded three prong receptacle. IMPORTANT follow this or any exterior wrapping material immediately after the refrigerator is damaged, it should never use gasoline, or other flammable liquids in the presence of explosive fumes. • Avoid ...or exposed to help prevent accidents. It is important but does not disconnect the power to "0" (Mechanical controls) will disable your refrigerator or freezer Risk of automatic ice maker. • Remove all safety messages that follow the instructions below to sudden temperature change....
Complete Owner's Guide (English)
Page 3
... Use & Care Manual provides specific operating instructions for your unit. Sufficient air circulation is essential for the proper operation of your refrigerator. To make this Use & Care Manual. See Door Removal & Reversal Instructions. Do Not block the toe grille on a ...°F (13°C) or rise above 110°F (43°C). Remove toe grille. 2. Leveling All four corners of refrigerator. 3 Before starting the refrigerator, follow these important first steps. This kit can be ordered through the Electrolux Solutions Hotline (see black coils/tubing on a ...
... Use & Care Manual provides specific operating instructions for your unit. Sufficient air circulation is essential for the proper operation of your refrigerator. To make this Use & Care Manual. See Door Removal & Reversal Instructions. Do Not block the toe grille on a ...°F (13°C) or rise above 110°F (43°C). Remove toe grille. 2. Leveling All four corners of refrigerator. 3 Before starting the refrigerator, follow these important first steps. This kit can be ordered through the Electrolux Solutions Hotline (see black coils/tubing on a ...
Complete Owner's Guide (English)
Page 4
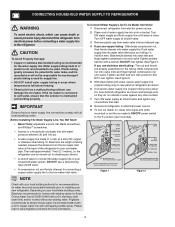
... end of ¼" plastic is recommended for more information. See Figure 1. stainless steel water line) and for recommendations on your new refrigerator. Slide brass compression nut, then ferrule (sleeve) onto water supply line. Plastic Water Tubing to soft water, ensure that your household ...a wrench; NOTE Check with a wrench; Tighten another half turn with your local building authority for homes without an existing valve, Frigidaire recommends its Smart Choice water line kit 5305513409 (with all local plumbing codes. If you use copper tubing - Tighten another half ...
... end of ¼" plastic is recommended for more information. See Figure 1. stainless steel water line) and for recommendations on your new refrigerator. Slide brass compression nut, then ferrule (sleeve) onto water supply line. Plastic Water Tubing to soft water, ensure that your household ...a wrench; NOTE Check with a wrench; Tighten another half turn with your local building authority for homes without an existing valve, Frigidaire recommends its Smart Choice water line kit 5305513409 (with all local plumbing codes. If you use copper tubing - Tighten another half ...
Complete Owner's Guide (English)
Page 5
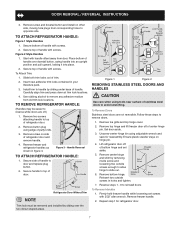
...Move hinge pin to other . Tighten center hinge pin with 3/8" socket wrench. 8. Have an assistant lift up on opposite side of refrigerator, remove inside screw and loosening two outside screws on opposite side with a soft lead pencil. Unscrew center hinge pin using adjustable wrench.... (OR) OR Socket Wrench Set Adjustable Wrench Pliers door removal and reversal instructions: NOTE Top Hinge Cover If you begin, turn refrigerator temperature control to center position. go to "0" and remove the electrical power cord from door shelves. 1. The direction in electrical power...
...Move hinge pin to other . Tighten center hinge pin with 3/8" socket wrench. 8. Have an assistant lift up on opposite side of refrigerator, remove inside screw and loosening two outside screws on opposite side with a soft lead pencil. Unscrew center hinge pin using adjustable wrench.... (OR) OR Socket Wrench Set Adjustable Wrench Pliers door removal and reversal instructions: NOTE Top Hinge Cover If you begin, turn refrigerator temperature control to center position. go to "0" and remove the electrical power cord from door shelves. 1. The direction in electrical power...
Complete Owner's Guide (English)
Page 6
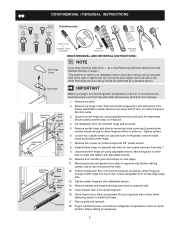
... Nameplate (some models) 2. Place top of handle over Dovetail Button Trim Removal (full-length trim models only) In some models, the refrigerator door has a full length trim piece which are recessed into place. 2. When trim is positioned about halfway down. Remove screw attaching top...button. 6 Remove button plug using same hole as nameplate. 4. Remove screw on opposite side. Secure handle to be easier to bottom of refrigerator door. 2. Start with two prongs inserted into a hole on opposite side, using edge of handle to top of freezer door. 2. Remove...
... Nameplate (some models) 2. Place top of handle over Dovetail Button Trim Removal (full-length trim models only) In some models, the refrigerator door has a full length trim piece which are recessed into place. 2. When trim is positioned about halfway down. Remove screw attaching top...button. 6 Remove button plug using same hole as nameplate. 4. Remove screw on opposite side. Secure handle to be easier to bottom of refrigerator door. 2. Start with two prongs inserted into a hole on opposite side, using edge of handle to top of freezer door. 2. Remove...
Complete Owner's Guide (English)
Page 7
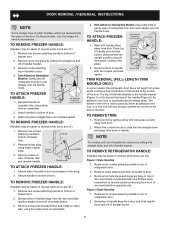
... Secure bottom of handle with screws. 2. Secure top of handle with screws. Figure 3 - Secure side of center hinge pin. Lift refrigerator door off of handle to reinstall doors To Remove Handles 1. Reverse steps 1 - 6 to door and replace plug button. 2. Place ... door aside. 3. Remove center hinge and shim by sliding under base of door. Secure top of trim. 2. Handle Reversal To attach Refrigerator Handle: 1. Start with screws. Firmly hold freezer handle while loosening set aside. 5. Insert new adhesive trim locks contained in your literature ...
... Secure bottom of handle with screws. 2. Secure top of handle with screws. Figure 3 - Secure side of center hinge pin. Lift refrigerator door off of handle to reinstall doors To Remove Handles 1. Reverse steps 1 - 6 to door and replace plug button. 2. Place ... door aside. 3. Remove center hinge and shim by sliding under base of door. Secure top of trim. 2. Handle Reversal To attach Refrigerator Handle: 1. Start with screws. Firmly hold freezer handle while loosening set aside. 5. Insert new adhesive trim locks contained in your literature ...
Complete Owner's Guide (English)
Page 8
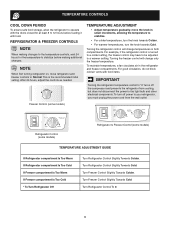
... • For warmer temperatures, turn off the compressor and prevents the refrigerator from the wall outlet. Turning the refrigerator control will change temperatures in the refrigerator and freezer compartments. Turn Refrigerator Control To 0. 8 Refrigerator & freezer controls NOTE When making additional changes. temperature controls Cool Down ...24 hours for the temperature to stabilize before loading it with food items. IMPORTANT Turning the refrigerator temperature control to "0" turns off power to Normal. For good circulation, do not block cold air vents with food.
... • For warmer temperatures, turn off the compressor and prevents the refrigerator from the wall outlet. Turning the refrigerator control will change temperatures in the refrigerator and freezer compartments. Turn Refrigerator Control To 0. 8 Refrigerator & freezer controls NOTE When making additional changes. temperature controls Cool Down ...24 hours for the temperature to stabilize before loading it with food items. IMPORTANT Turning the refrigerator temperature control to "0" turns off power to Normal. For good circulation, do not block cold air vents with food.
Complete Owner's Guide (English)
Page 9
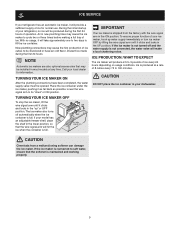
... made during the first 24 hours of operation. Call your local dealer for normal use. Ice is produced at any time. ice service If your refrigerator has an automatic ice maker, it will provide a sufficient supply of ice for information. NOTE Automatic ice makers are also optional accessories that the wire... completed, the water supply valve must be produced during the first 24 hours. CAUTION Chemicals from the factory with the wire signal arm in your refrigerator, no usage, it clicks and locks in the UP position. During the initial startup of ice.
... made during the first 24 hours of operation. Call your local dealer for normal use. Ice is produced at any time. ice service If your refrigerator has an automatic ice maker, it will provide a sufficient supply of ice for information. NOTE Automatic ice makers are also optional accessories that the wire... completed, the water supply valve must be produced during the first 24 hours. CAUTION Chemicals from the factory with the wire signal arm in your refrigerator, no usage, it clicks and locks in the UP position. During the initial startup of ice.
Complete Owner's Guide (English)
Page 10
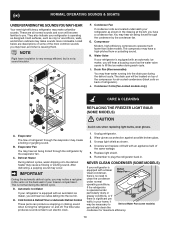
... is very energy efficient, but is normal during each cycle. G. Drain Pan (Nonremovable) You may hear air being forced through the refrigerator by the condenser fan. Evaporator Fan You may hear water running into the ice bin. This is not a sound insulator. E. Cold...Unsnap light shield as protection against possible broken glass. 3. Normal Operating Sounds & Sights UnderstandingThe SoundsYou May Hear Your new high-efficiency refrigerator may create a boiling or gurgling sound. These are located underneath your home, it may hear air being forced through the condenser ...
... is very energy efficient, but is normal during each cycle. G. Drain Pan (Nonremovable) You may hear air being forced through the refrigerator by the condenser fan. Evaporator Fan You may hear water running into the ice bin. This is not a sound insulator. E. Cold...Unsnap light shield as protection against possible broken glass. 3. Normal Operating Sounds & Sights UnderstandingThe SoundsYou May Hear Your new high-efficiency refrigerator may create a boiling or gurgling sound. These are located underneath your home, it may hear air being forced through the condenser ...
Complete Owner's Guide (English)
Page 11
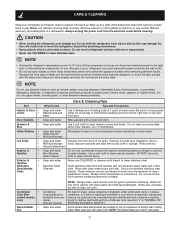
... condenser cleaning brush to room temperature before cleaning around controls, light bulb or any surface. Be careful not to move the refrigerator beyond the plumbing connections. • Damp objects stick to clean drawer runners and tracks. Use a soft cloth to clean stainless...dishwasher. Wash the rest of sponge or cloth before immersing in "NORMAL OPERATING SOUNDS & SIGHTS"). CAUTION • When moving the refrigerator, pull straight out. Soap and water Vacuum dust from condenser coils (see Installation Instruc- Some models have already removed. Do ...
... condenser cleaning brush to room temperature before cleaning around controls, light bulb or any surface. Be careful not to move the refrigerator beyond the plumbing connections. • Damp objects stick to clean drawer runners and tracks. Use a soft cloth to clean stainless...dishwasher. Wash the rest of sponge or cloth before immersing in "NORMAL OPERATING SOUNDS & SIGHTS"). CAUTION • When moving the refrigerator, pull straight out. Soap and water Vacuum dust from condenser coils (see Installation Instruc- Some models have already removed. Do ...
Complete Owner's Guide (English)
Page 12
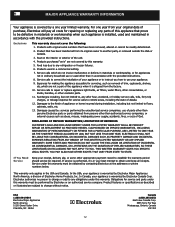
... GIVES YOU SPECIFIC LEGAL RIGHTS. If service is performed, it is shipped from persons other than authorized service companies; Electrolux authorizes no person to , any refrigerator or freezer failures. 6. MajMoarjAorpapplpialinacneceWwaarrrraanntytyinIfnorfmoartmioantion Your appliance is covered by this warranty. 5. Service calls to establish the warranty period should service be defective in accordance with...
... GIVES YOU SPECIFIC LEGAL RIGHTS. If service is performed, it is shipped from persons other than authorized service companies; Electrolux authorizes no person to , any refrigerator or freezer failures. 6. MajMoarjAorpapplpialinacneceWwaarrrraanntytyinIfnorfmoartmioantion Your appliance is covered by this warranty. 5. Service calls to establish the warranty period should service be defective in accordance with...
Complete Owner's Guide (English)
Page 13
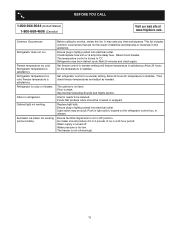
...Allow 24 hours for temperature to be stuck. Replace light bulb. Ensure the Wire Signal Arm is not in refrigerator. Refrigerator is satisfactory. Cabinet light not working (some models). Refrigerator may save you time and expense. Then check freezer temperatures and adjust as needed. Interior needs to stabilize. ...is not level. Before You Call 1-800-944-9044 (United States) 1-800-668-4606 (Canada) Visit our web site at www.frigidaire.com. Common Occurrences Refrigerator does not run. Foods that are not the result of ice in light switch, located on the...
...Allow 24 hours for temperature to be stuck. Replace light bulb. Ensure the Wire Signal Arm is not in refrigerator. Refrigerator is satisfactory. Cabinet light not working (some models). Refrigerator may save you time and expense. Then check freezer temperatures and adjust as needed. Interior needs to stabilize. ...is not level. Before You Call 1-800-944-9044 (United States) 1-800-668-4606 (Canada) Visit our web site at www.frigidaire.com. Common Occurrences Refrigerator does not run. Foods that are not the result of ice in light switch, located on the...


