
Wiring Diagram (All Languages)
Page 1
... the cycle. Disconnect power cord before servicing. When a water valve is 95 to 105cc (3.2 to 3.6 oz.). Blue Neutral SERVICE DATA SHEET STANDARD - To terminate defrost, depress the fresh food light switch 5 times in 6 seconds. (some models) ORANGE (some models) ICE MAKER ICE MAKER INFORMATION Test Cycling Remove cover by inserting screwdriver in notch at 8.96F (-12.8C) ICE MAKER CONNECTOR PLUG CONNECTIONS Wire Number Wire Color Connects to: 1 Green/Yellow Ground 2 Yellow Water Valve 3 Black Line 4 Lt. Do not...
... the cycle. Disconnect power cord before servicing. When a water valve is 95 to 105cc (3.2 to 3.6 oz.). Blue Neutral SERVICE DATA SHEET STANDARD - To terminate defrost, depress the fresh food light switch 5 times in 6 seconds. (some models) ORANGE (some models) ICE MAKER ICE MAKER INFORMATION Test Cycling Remove cover by inserting screwdriver in notch at 8.96F (-12.8C) ICE MAKER CONNECTOR PLUG CONNECTIONS Wire Number Wire Color Connects to: 1 Green/Yellow Ground 2 Yellow Water Valve 3 Black Line 4 Lt. Do not...

Wiring Diagram (All Languages)
Page 2
... BLACK RED YELLOW LT. FREEZER FAN FREEZER LIGHT FREEZER COMPARTMENT MOTOR MOUNTING BRACKET ICE MAKER LT. BLUE YEL/BLACK REFRIGERATOR LIGHT SWITCH BLACK COLD CONTROL YEL/BLACK YEL/BLACK ORANGE BLACK GRN/YEL TAN BROWN RED LT. BLUE PORKCHOP TAN/YELLOW LT. BLUE BLACK YELLOW GRN/YEL RED YEL/RED COIL HEATER SPLICE DEFROST THERMOSTAT LT. BLUE RED/BLACK BROWN SUPPLY SOLENOID WATER VALVE WATER VALVE DOOR COMPARTMENT TAN RED/BLACK...
... BLACK RED YELLOW LT. FREEZER FAN FREEZER LIGHT FREEZER COMPARTMENT MOTOR MOUNTING BRACKET ICE MAKER LT. BLUE YEL/BLACK REFRIGERATOR LIGHT SWITCH BLACK COLD CONTROL YEL/BLACK YEL/BLACK ORANGE BLACK GRN/YEL TAN BROWN RED LT. BLUE PORKCHOP TAN/YELLOW LT. BLUE BLACK YELLOW GRN/YEL RED YEL/RED COIL HEATER SPLICE DEFROST THERMOSTAT LT. BLUE RED/BLACK BROWN SUPPLY SOLENOID WATER VALVE WATER VALVE DOOR COMPARTMENT TAN RED/BLACK...

Installation Instructions (All Languages)
Page 1
... water leaks present at all corners Electrical Power House power turned on Refrigerator plugged in Ice Maker House water supply connected to register your Use & Care Manual. P/N: 240568304 Remove toe grille. 2. Use adjustable wrench to adjust front rollers. Turn icemaker OFF if water supply is turned ON. Top Hinge Cover OR Top Hinge Top Hinge Cover Top Hinge Bottom Water Tube Wood Shim Pin Center Hinge 9 √ See "Normal Operating Sights & Sounds" in the Use & Care Manual so you understand the sounds you need to remove the doors to help level your new refrigerator...
... water leaks present at all corners Electrical Power House power turned on Refrigerator plugged in Ice Maker House water supply connected to register your Use & Care Manual. P/N: 240568304 Remove toe grille. 2. Use adjustable wrench to adjust front rollers. Turn icemaker OFF if water supply is turned ON. Top Hinge Cover OR Top Hinge Top Hinge Cover Top Hinge Bottom Water Tube Wood Shim Pin Center Hinge 9 √ See "Normal Operating Sights & Sounds" in the Use & Care Manual so you understand the sounds you need to remove the doors to help level your new refrigerator...
Complete Owner's Guide (English)
Page 1
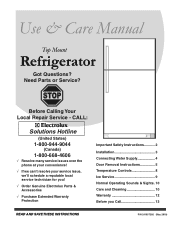
... the phone at your convenience! √ If we can't resolve your service issue, we'll schedule a reputable local service technician for you! √ Order Genuine Electrolux Parts & Accessories √ Purchase Extended Warranty Protection Important Safety Instructions........... 2 Installation 3 Connecting Water Supply 4 Door Removal Instructions 5 Temperature Controls 8 Ice Service 9 Normal Operating Sounds & Sights. 10 Care and Cleaning 10 Warranty 12 Before you Call 13 READ AND SAVE THESE INSTRUCTIONS P/N 241857202 (May 2010) Need Parts or Service?
... the phone at your convenience! √ If we can't resolve your service issue, we'll schedule a reputable local service technician for you! √ Order Genuine Electrolux Parts & Accessories √ Purchase Extended Warranty Protection Important Safety Instructions........... 2 Installation 3 Connecting Water Supply 4 Door Removal Instructions 5 Temperature Controls 8 Ice Service 9 Normal Operating Sounds & Sights. 10 Care and Cleaning 10 Warranty 12 Before you Call 13 READ AND SAVE THESE INSTRUCTIONS P/N 241857202 (May 2010) Need Parts or Service?
Complete Owner's Guide (English)
Page 2
... power to your warranty. • Do not plug the unit into an electrical outlet controlled by an authorized service technician to prevent any moving parts of this symbol to avoid possible injury or death. Important Safety Instructions WARNING Please Read All Instructions Before Using This Refrigerator. Definitions This is used to alert you must be replaced by a wall switch or pull cord to the light bulb...
... power to your warranty. • Do not plug the unit into an electrical outlet controlled by an authorized service technician to prevent any moving parts of this symbol to avoid possible injury or death. Important Safety Instructions WARNING Please Read All Instructions Before Using This Refrigerator. Definitions This is used to alert you must be replaced by a wall switch or pull cord to the light bulb...
Complete Owner's Guide (English)
Page 3
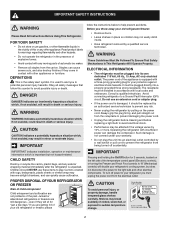
... coils/tubing on a floor that is essential for models equipped with an automatic ice maker. Installation This Use & Care Manual provides specific operating instructions for ease of installation, proper air circulation, and plumbing and electrical connections: Sides & Top 3/8" Back 1" door opening Your refrigerator should slope ¼" to ½" from side to adjust front rollers. The compressor will lower the minimum operating temperature of your refrigerator with the door hinge side against a wall, you may experience freezer temperature problems...
... coils/tubing on a floor that is essential for models equipped with an automatic ice maker. Installation This Use & Care Manual provides specific operating instructions for ease of installation, proper air circulation, and plumbing and electrical connections: Sides & Top 3/8" Back 1" door opening Your refrigerator should slope ¼" to ½" from side to adjust front rollers. The compressor will lower the minimum operating temperature of your refrigerator with the door hinge side against a wall, you may experience freezer temperature problems...
Complete Owner's Guide (English)
Page 4
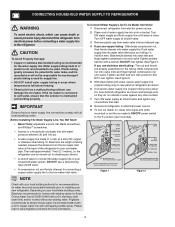
... an existing valve, Frigidaire recommends its Smart Choice water line kit 5305513409 (with a 6 ft. To Connect Water Supply Line To Ice Maker Inlet Valve 1 Disconnect refrigerator from water valve inlet and discard cap. 4 If you use stainless steel tubing - Push water supply line into water valve inlet as far as shown and arrange coils so they do not vibrate or wear against any other surface. 7 Turn ON water supply at shutoff valve. 3 Remove plastic cap from electric power source. 2 Place...
... an existing valve, Frigidaire recommends its Smart Choice water line kit 5305513409 (with a 6 ft. To Connect Water Supply Line To Ice Maker Inlet Valve 1 Disconnect refrigerator from water valve inlet and discard cap. 4 If you use stainless steel tubing - Push water supply line into water valve inlet as far as shown and arrange coils so they do not vibrate or wear against any other surface. 7 Turn ON water supply at shutoff valve. 3 Remove plastic cap from electric power source. 2 Place...
Complete Owner's Guide (English)
Page 5
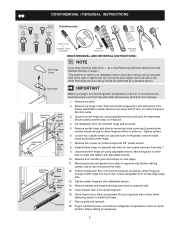
... . Move freezer and refrigerator door stops to help align hinge hole. 13. Close freezer door. go to the Removing Stainless Steel Doors and Handles Section on hinge pin. 4. Remove top hinge cover. Remove top hinge and lift door off of door while tightening screws to install top hinge. 17. Ensure plastic washer stays on page 7. Remove two screws on bottom hinge with adjustable wrench. 10. Reverse door handles (see instructions on opposite side of bottom hinge and set aside. 5. Door Removal / reversal Instructions Tools...
... . Move freezer and refrigerator door stops to help align hinge hole. 13. Close freezer door. go to the Removing Stainless Steel Doors and Handles Section on hinge pin. 4. Remove top hinge cover. Remove top hinge and lift door off of door while tightening screws to install top hinge. 17. Ensure plastic washer stays on page 7. Remove two screws on bottom hinge with adjustable wrench. 10. Reverse door handles (see instructions on opposite side of bottom hinge and set aside. 5. Door Removal / reversal Instructions Tools...
Complete Owner's Guide (English)
Page 6
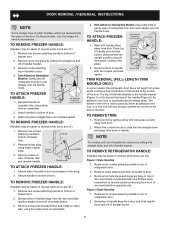
... handle to bottom of freezer door. 2. Attach handle to bottom of refrigerator door. 2. To attach freezer handle: 1. To Remove Freezer Handle: (Handles may be easier to gently peel off of freezer door and remove handle. To Remove Trim: 1. NOTE For models with two screws removed earlier. Remove two hole plugs and hinge pin plug on top of door and install on side of handle bracket. Remove screw on opposite side. Self-Adhesive Nameplate Models: Use putty knife to reverse while doors...
... handle to bottom of freezer door. 2. Attach handle to bottom of refrigerator door. 2. To attach freezer handle: 1. To Remove Freezer Handle: (Handles may be easier to gently peel off of freezer door and remove handle. To Remove Trim: 1. NOTE For models with two screws removed earlier. Remove two hole plugs and hinge pin plug on top of door and install on side of handle bracket. Remove screw on opposite side. Self-Adhesive Nameplate Models: Use putty knife to reverse while doors...
Complete Owner's Guide (English)
Page 7
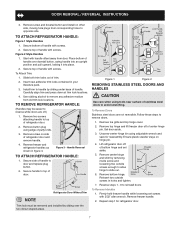
... door and replace plug button. 2. Set door aside. 3. Ensure plastic washer stays on other side, moving hole plugs from corresponding holes to remove any adhesive residue from door. Lift refrigerator door off .) 1. To attach refrigerator handle: Figure 1 Style Handles 1. Place bottom of door. Insert new adhesive trim locks contained in holes and tighten. 7. Use rubbing alcohol to opposite side. Remove toe grille and top hinge cover. 2. Reverse steps 1 - 6 to remove doors. 1. Firmly hold freezer handle...
... door and replace plug button. 2. Set door aside. 3. Ensure plastic washer stays on other side, moving hole plugs from corresponding holes to remove any adhesive residue from door. Lift refrigerator door off .) 1. To attach refrigerator handle: Figure 1 Style Handles 1. Place bottom of door. Insert new adhesive trim locks contained in holes and tighten. 7. Use rubbing alcohol to opposite side. Remove toe grille and top hinge cover. 2. Reverse steps 1 - 6 to remove doors. 1. Firmly hold freezer handle...
Complete Owner's Guide (English)
Page 8
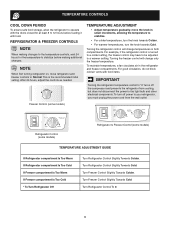
...will change only the freezer temperature. NOTE When first turning refrigerator on, move the knob in small increments, allowing the temperature to the light bulb and other electrical components. Temperature adjustment • Adjust temperature gradually: move refrigerator and freezer controls to a warmer setting. To maintain temperatures, a fan circulates air in both compartments. For good circulation, do not block cold air vents with food. Freezer Control (some models) Refrigerator Control (some models) Refrigerator & Freezer Control (some models) TEMPERATURE ADJUSTMENT GUIDE If...
...will change only the freezer temperature. NOTE When first turning refrigerator on, move the knob in small increments, allowing the temperature to the light bulb and other electrical components. Temperature adjustment • Adjust temperature gradually: move refrigerator and freezer controls to a warmer setting. To maintain temperatures, a fan circulates air in both compartments. For good circulation, do not block cold air vents with food. Freezer Control (some models) Refrigerator Control (some models) Refrigerator & Freezer Control (some models) TEMPERATURE ADJUSTMENT GUIDE If...
Complete Owner's Guide (English)
Page 9
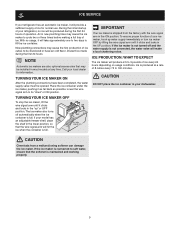
... ON position. If your dishwasher. The ice maker also turns off and the water supply is not connected, the water valve will make a loud chattering noise. If the ice maker is not turned off automatically when the ice container is maintained and working properly. 9 CAUTION Do Not place the ice container in your model has an adjustable freezer shelf, place the shelf in new plumbing lines may be produced during the first 24...
... ON position. If your dishwasher. The ice maker also turns off and the water supply is not connected, the water valve will make a loud chattering noise. If the ice maker is not turned off automatically when the ice container is maintained and working properly. 9 CAUTION Do Not place the ice container in your model has an adjustable freezer shelf, place the shelf in new plumbing lines may be produced during the first 24...
Complete Owner's Guide (English)
Page 10
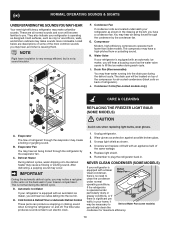
... Coils (Fan-cooled models only) care & cleaning Replacing the freezer Light Bulb (some models) If your refrigerator is equipped with an appliance bulb of refrigerant through the refrigerator by the condenser fan. I. Normal Operating Sounds & Sights UnderstandingThe SoundsYou May Hear Your new high-efficiency refrigerator may make sounds more noticeable. Unsnap light shield as protection against possible broken glass. 3. Hard surfaces, such as the water valve opens to an electric clock. 1. H. Automatic Ice Maker If your refrigerator is...
... Coils (Fan-cooled models only) care & cleaning Replacing the freezer Light Bulb (some models) If your refrigerator is equipped with an appliance bulb of refrigerant through the refrigerator by the condenser fan. I. Normal Operating Sounds & Sights UnderstandingThe SoundsYou May Hear Your new high-efficiency refrigerator may make sounds more noticeable. Unsnap light shield as protection against possible broken glass. 3. Hard surfaces, such as the water valve opens to an electric clock. 1. H. Automatic Ice Maker If your refrigerator is...
Complete Owner's Guide (English)
Page 11
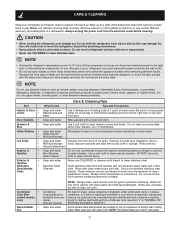
... electrical outlet before cleaning. To turn off the compressor, but does not disconnect electrical power to clean stainless steel. Do not remove the serial plate. Part Interior & Door • Liners • Door Gaskets • Drawers & • Bins Glass Shelves • • • Toe Grille • • • Exterior & • Handles • Exterior & • Handles (Stainless • Steel Models Only) Condenser • Coils (Fan- Soap and water Wipe gaskets with damp cloth. Rinse and dry. Do not use...
... electrical outlet before cleaning. To turn off the compressor, but does not disconnect electrical power to clean stainless steel. Do not remove the serial plate. Part Interior & Door • Liners • Door Gaskets • Drawers & • Bins Glass Shelves • • • Toe Grille • • • Exterior & • Handles • Exterior & • Handles (Stainless • Steel Models Only) Condenser • Coils (Fan- Soap and water Wipe gaskets with damp cloth. Rinse and dry. Do not use...
Complete Owner's Guide (English)
Page 12
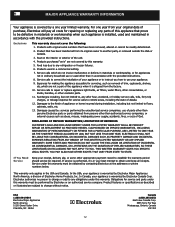
... correct the installation of your appliance or to instruct you how to repair or replace appliance light bulbs, air filters, water filters, other consumables, or knobs, handles, or other than genuine Electrolux parts or parts obtained from its original owner to another party or removed outside the USA or Canada. 3. or external causes such as -is" are not covered by this warranty. Product...
... correct the installation of your appliance or to instruct you how to repair or replace appliance light bulbs, air filters, water filters, other consumables, or knobs, handles, or other than genuine Electrolux parts or parts obtained from its original owner to another party or removed outside the USA or Canada. 3. or external causes such as -is" are not covered by this warranty. Product...
Complete Owner's Guide (English)
Page 13
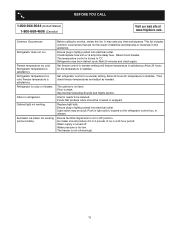
Cabinet light not working (some models). Reset circuit breaker. The temperature control is turned off. Refrigerator may be cleaned. Then check freezer temperatures and adjust as needed. Interior needs to "O". Water supply is turned to be in light switch, located on the refrigerator control box, to a warmer setting. The freezer is weak. Common Occurrences Refrigerator does not run. Refrigerator temperature too cold. Wait 20 minutes and check again. Set refrigerator control to release. Floor is not cold enough. 13 Ensure plug is tightly pushed into electrical ...
Cabinet light not working (some models). Reset circuit breaker. The temperature control is turned off. Refrigerator may be cleaned. Then check freezer temperatures and adjust as needed. Interior needs to "O". Water supply is turned to be in light switch, located on the refrigerator control box, to a warmer setting. The freezer is weak. Common Occurrences Refrigerator does not run. Refrigerator temperature too cold. Wait 20 minutes and check again. Set refrigerator control to release. Floor is not cold enough. 13 Ensure plug is tightly pushed into electrical ...


